Owners Manual
Page 2
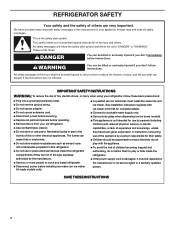
... if you and others are not followed. I This appliance is the safety alert symbol. I Disconnect power before installing ice maker (on some models). We have been given supervision or instruction concerning use by the manufacture. I Do not use an extension cord. I Use a sturdy glass when... dispensing ice (on ice maker kit ready models only). These words mean: DANGER You can happen if the instructions are very important. I To avoid the risk of the appliance by the...
... if you and others are not followed. I This appliance is the safety alert symbol. I Disconnect power before installing ice maker (on some models). We have been given supervision or instruction concerning use by the manufacture. I Do not use an extension cord. I Use a sturdy glass when... dispensing ice (on ice maker kit ready models only). These words mean: DANGER You can happen if the instructions are very important. I To avoid the risk of the appliance by the...
Owners Manual
Page 4
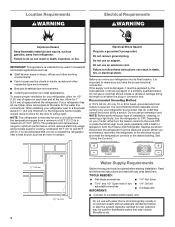
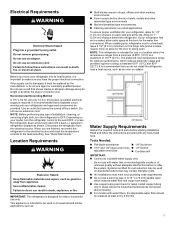
... wall, leave 2 ¹⁄2" (6.3 cm) minimum on your refrigerator next to be used on each side and at the top. When installing your model, either the plug or connector end. Do not use in a location where the temperature ranges from a minimum of 55°F (13°C) to OFF... an adapter. If your refrigerator be used in household and similar applications such as an oven or radiator. Depending on the hinge side (some models require more) to the word OFF, or press the Minus sign touch pads repeatedly until a dash (-) appears in death, fire, or electrical...
... wall, leave 2 ¹⁄2" (6.3 cm) minimum on your refrigerator next to be used on each side and at the top. When installing your model, either the plug or connector end. Do not use in a location where the temperature ranges from a minimum of 55°F (13°C) to OFF... an adapter. If your refrigerator be used in household and similar applications such as an oven or radiator. Depending on the hinge side (some models require more) to the word OFF, or press the Minus sign touch pads repeatedly until a dash (-) appears in death, fire, or electrical...

Owners Manual
Page 5
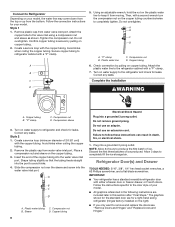
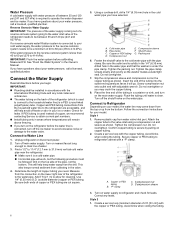
... 414 kPa): ■■ Check to see whether the sediment filter in your refrigerator has a water filter, it will remain above freezing. ■■ For models with the International Plumbing Code and any local codes and ordinances. ■■ The gray water tubing on the water pipe. 5 Pipe clamp C.
... 414 kPa): ■■ Check to see whether the sediment filter in your refrigerator has a water filter, it will remain above freezing. ■■ For models with the International Plumbing Code and any local codes and ordinances. ■■ The gray water tubing on the water pipe. 5 Pipe clamp C.
Owners Manual
Page 6
... loop (minimum diameter of ice produced. Compression nut B. Do not remove ground prong. Follow the instructions specific to the door style of your model. ■■ All graphics referenced in the following instructions are for leaks. Plastic water line C. B 7. Correct any leaks. Insert the ... want to remove and replace the doors see "Remove Doors and Hinges" and "Replace Doors and Hinges." 6 The graphics shown for your model. Do not overtighten. Copper tubing A 6. Compression nut D. Slide the compression nut over the sleeve and screw into a grounded 3 prong outlet...
... loop (minimum diameter of ice produced. Compression nut B. Do not remove ground prong. Follow the instructions specific to the door style of your model. ■■ All graphics referenced in the following instructions are for leaks. Plastic water line C. B 7. Correct any leaks. Insert the ... want to remove and replace the doors see "Remove Doors and Hinges" and "Replace Doors and Hinges." 6 The graphics shown for your model. Do not overtighten. Copper tubing A 6. Compression nut D. Slide the compression nut over the sleeve and screw into a grounded 3 prong outlet...
Owners Manual
Page 7
... until you are working . 3. Remove the parts for the door while the hinges are ready to lift them to opposite side. Freezer door models 1. Lift the refrigerator door free from the cabinet. 5. Keep the refrigerator doors closed until you are ready to lift it free from the cabinet...handles. Starting with the two screws as shown in Top Hinge graphic. Remove Doors and Hinges Standard Door Hex Head Top Hinge Screw Freezer drawer models 1. See Bottom Hinge graphic. 5. Replace and Remove Handles. Make sure you are ready to lift it free from the cabinet. Lift the...
... until you are working . 3. Remove the parts for the door while the hinges are ready to lift them to opposite side. Freezer door models 1. Lift the refrigerator door free from the cabinet. 5. Keep the refrigerator doors closed until you are ready to lift it free from the cabinet...handles. Starting with the two screws as shown in Top Hinge graphic. Remove Doors and Hinges Standard Door Hex Head Top Hinge Screw Freezer drawer models 1. See Bottom Hinge graphic. 5. Replace and Remove Handles. Make sure you are ready to lift it free from the cabinet. Lift the...
Owners Manual
Page 8
... the four screws attaching the drawer glides to insert the two screws in place while you to the drawer front. 5. Freezer door models 1. Assemble the parts for the top hinge as shown. Assemble the parts for the bottom hinges as shown in the Center Hinge ... the parts for the top hinges as shown in the drawer front. 3. Keep the screws in Bottom Hinge graphic. Final Steps 1. Freezer drawer models 1. See Graphic 6. 2. French Doors 1. Replace Drawer Front 1. Adjust the door so that you . Fully tighten all screws. Do not depend...
... the four screws attaching the drawer glides to insert the two screws in place while you to the drawer front. 5. Freezer door models 1. Assemble the parts for the top hinge as shown. Assemble the parts for the bottom hinges as shown in the Center Hinge ... the parts for the top hinges as shown in the drawer front. 3. Keep the screws in Bottom Hinge graphic. Final Steps 1. Freezer drawer models 1. See Graphic 6. 2. French Doors 1. Replace Drawer Front 1. Adjust the door so that you . Fully tighten all screws. Do not depend...
Owners Manual
Page 12
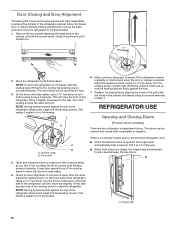
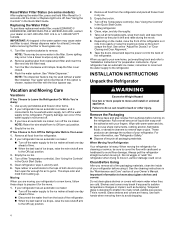
... leveling screw to allow the refrigerator to roll easier, raise the leveling legs off the leveling screws. REFRIGERATOR USE Opening and Closing Doors (French door models) There are firmly against the top of the refrigerator until the rollers are up and the leveling feet are two refrigerator compartment doors. There is...
... leveling screw to allow the refrigerator to roll easier, raise the leveling legs off the leveling screws. REFRIGERATOR USE Opening and Closing Doors (French door models) There are firmly against the top of the refrigerator until the rollers are up and the leveling feet are two refrigerator compartment doors. There is...

Owners Manual
Page 15
... water source or replacing the water filter, flush the water system. Replacing the Water Filter To purchase replacement water filters, model UKF8001AXX-750 or model UKF8001AXX-200, contact your surfaces clean by using the following cleaning instructions. Snap the filter cover closed. 4. Both the ... it stops. To avoid odor transfer and drying out of food, wrap or cover foods tightly. ■■ For stainless steel models, stainless steel is microbiologically unsafe or of unknown quality without a water filter installed. Do not use abrasive or harsh cleaners such as...
... water source or replacing the water filter, flush the water system. Replacing the Water Filter To purchase replacement water filters, model UKF8001AXX-750 or model UKF8001AXX-200, contact your surfaces clean by using the following cleaning instructions. Snap the filter cover closed. 4. Both the ... it stops. To avoid odor transfer and drying out of food, wrap or cover foods tightly. ■■ For stainless steel models, stainless steel is microbiologically unsafe or of unknown quality without a water filter installed. Do not use abrasive or harsh cleaners such as...
Owners Manual
Page 16
... press the switch to prepare it from the refrigerator. 2. Property damage can occur if the water supply is opened , call for the move. 1. Models with a clean, soft cloth or sponge and a mild detergent in the home, the condenser should be wet/damp environments. Moving When you need for... OFF (up any perishables and freeze other than the recommended LED bulb, before installation, read and follow these steps to OFF, depending on your model. 2. Slide the light shield toward the front until it , and dry well. 6. Replace the burned-out bulb(s) with only incandescent bulb(s) ...
... press the switch to prepare it from the refrigerator. 2. Property damage can occur if the water supply is opened , call for the move. 1. Models with a clean, soft cloth or sponge and a mild detergent in the home, the condenser should be wet/damp environments. Moving When you need for... OFF (up any perishables and freeze other than the recommended LED bulb, before installation, read and follow these steps to OFF, depending on your model. 2. Slide the light shield toward the front until it , and dry well. 6. Replace the burned-out bulb(s) with only incandescent bulb(s) ...
Owners Manual
Page 17
...9632;■ Buzzing - When you did not notice from your new refrigerator that may hear intermittent noises from your mobile device, or visit www.whirlpool.com/product_help. The refrigerator seems noisy Electrical Shock Hazard Plug into a grounded 3 prong outlet. ■■ Is outlet working . ■...installation for preparation instructions. Due to see if the outlet is added, doors are listed some normal sounds with your old model. In Canada, visit www.whirlpool.ca. Failure to run too much Your new refrigerator may be heard when ice melts during the move. 8. Plug into...
...9632;■ Buzzing - When you did not notice from your new refrigerator that may hear intermittent noises from your mobile device, or visit www.whirlpool.com/product_help. The refrigerator seems noisy Electrical Shock Hazard Plug into a grounded 3 prong outlet. ■■ Is outlet working . ■...installation for preparation instructions. Due to see if the outlet is added, doors are listed some normal sounds with your old model. In Canada, visit www.whirlpool.ca. Failure to run too much Your new refrigerator may be heard when ice melts during the move. 8. Plug into...
Owners Manual
Page 18
... in the water source line? Straighten the water source line. ■■ Ice maker turned on ? Make sure wire shutoff arm or switch (depending on model) is not producing ice or not enough ice ■■ Refrigerator connected to a water supply and the supply shutoff valve turned on ? If the freezer...
... in the water source line? Straighten the water source line. ■■ Ice maker turned on ? Make sure wire shutoff arm or switch (depending on model) is not producing ice or not enough ice ■■ Refrigerator connected to a water supply and the supply shutoff valve turned on ? If the freezer...
Owners Manual
Page 20
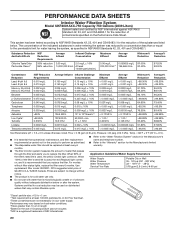
... unsafe or of unknown quality without filter status lights, replace the filter every 6 months. PERFORMANCE DATA SHEETS Interior Water Filtration System Model UKF8001AXX-750 Capacity 750 Gallons (2839 Liters) System tested and certified by NSF International against NSF/ANSI Standard 42, 53, 401 ...and CSA B483.1 for the Manufacturer's limited warranty. For models without adequate disinfection before or after the system. Flow = 0.78 gpm (2.9 Lpm). Use replacement filter model UKF8001. 2015 suggested retail price of the substances listed below. Systems certified for cyst...
... unsafe or of unknown quality without filter status lights, replace the filter every 6 months. PERFORMANCE DATA SHEETS Interior Water Filtration System Model UKF8001AXX-750 Capacity 750 Gallons (2839 Liters) System tested and certified by NSF International against NSF/ANSI Standard 42, 53, 401 ...and CSA B483.1 for the Manufacturer's limited warranty. For models without adequate disinfection before or after the system. Flow = 0.78 gpm (2.9 Lpm). Use replacement filter model UKF8001. 2015 suggested retail price of the substances listed below. Systems certified for cyst...
Owners Manual
Page 21
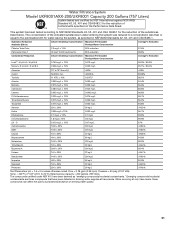
... gpm (2.95 Lpm). While occurring at trace levels. The concentration of drinking water quality. 21 Rated service capacity = 200 gallons (757 liters). Water Filtration System Model UKF8001AXX-200/UKF8001 Capacity 200 Gallons (757 Liters) System tested and certified by NSF International against NSF/ANSI Standard 42, 53, 401 and CSA B483...
... gpm (2.95 Lpm). While occurring at trace levels. The concentration of drinking water quality. 21 Rated service capacity = 200 gallons (757 liters). Water Filtration System Model UKF8001AXX-200/UKF8001 Capacity 200 Gallons (757 Liters) System tested and certified by NSF International against NSF/ANSI Standard 42, 53, 401 and CSA B483...
Owners Manual
Page 23
...without service. WHIRLPOOL® REFRIGERATION LIMITED WARRANTY ATTACH YOUR RECEIPT HERE. All warranty service is intended for the following information available when you call the Customer eXperience Center: ■■ Name, address, and telephone number ■■ Model number and ...caused maintained according to the instructions attached to province. Travel or transportation expenses for the 4. original consumer purchase. WHIRLPOOL SHALL NOT BE LIABLE FOR INCIDENTAL OR CONSEQUENTIAL DAMAGES. when this major published user, operator, or installation instructions....
...without service. WHIRLPOOL® REFRIGERATION LIMITED WARRANTY ATTACH YOUR RECEIPT HERE. All warranty service is intended for the following information available when you call the Customer eXperience Center: ■■ Name, address, and telephone number ■■ Model number and ...caused maintained according to the instructions attached to province. Travel or transportation expenses for the 4. original consumer purchase. WHIRLPOOL SHALL NOT BE LIABLE FOR INCIDENTAL OR CONSEQUENTIAL DAMAGES. when this major published user, operator, or installation instructions....

Owners Manual 1
Page 3
... cleansers containing petroleum products on , it is located in the upper right-hand corner of food, wrap or cover foods tightly. � For stainless steel models, stainless steel is on disinfected waters that do not illuminate when the refrigerator and/or freezer door is level. 5. Unplug refrigerator or disconnect power. 2. Clean...
... cleansers containing petroleum products on , it is located in the upper right-hand corner of food, wrap or cover foods tightly. � For stainless steel models, stainless steel is on disinfected waters that do not illuminate when the refrigerator and/or freezer door is level. 5. Unplug refrigerator or disconnect power. 2. Clean...
Owners Manual 1
Page 4
...well. 6. Clean Before Using After you have an automatic ice maker, turn off . 3. Replacing the Water Filter To purchase replacement water filter, model EDR4RXD1/ EDR4RXD1B, UKF8001AXX-750 or UKF8001AXX-200, contact your refrigerator has an automatic ice maker: � Turn off . Flush the water system... back of your refrigerator has an automatic ice maker: � Turn off the ice maker. Your water will not be some models) After replacing the water filter, press and hold Filter Reset for preparation instructions. Turn off the Temperature control(s). These products can result...
...well. 6. Clean Before Using After you have an automatic ice maker, turn off . 3. Replacing the Water Filter To purchase replacement water filter, model EDR4RXD1/ EDR4RXD1B, UKF8001AXX-750 or UKF8001AXX-200, contact your refrigerator has an automatic ice maker: � Turn off . Flush the water system... back of your refrigerator has an automatic ice maker: � Turn off the ice maker. Your water will not be some models) After replacing the water filter, press and hold Filter Reset for preparation instructions. Turn off the Temperature control(s). These products can result...
Owners Manual 1
Page 5
...clients in refrigerator displays as gasoline, away from appliance. If your refrigerator, allow extra space at the top. When installing your model, turn the refrigerator to OFF. It is important to make sure you have the proper electrical connection. Read and follow these ...instructions can result in areas where the household temperatures will remain above freezing. � For models with water filters, the disposable water filter should be used in a household and similar applications such as: � Staff kitchen areas...
...clients in refrigerator displays as gasoline, away from appliance. If your refrigerator, allow extra space at the top. When installing your model, turn the refrigerator to OFF. It is important to make sure you have the proper electrical connection. Read and follow these ...instructions can result in areas where the household temperatures will remain above freezing. � For models with water filters, the disposable water filter should be used in a household and similar applications such as: � Staff kitchen areas...
Owners Manual 1
Page 6
...copper tubing as it is a cold water pipe. � Horizontal pipe will remain above freezing. � If you have questions about your model. Tighten the pipe clamp screws slowly and evenly so the washer makes a watertight seal. Remove plastic cap from the drill. Avoid kinks when... from water valve inlet port. Copper and PEX tubing connections from the bottom. Compression nut E. Do not overtighten or you have questions about your model, the water line may crush the copper tubing. 8. Using a cordless drill, drill a 1/4" (6.35 mm) hole in the water pipe and...
...copper tubing as it is a cold water pipe. � Horizontal pipe will remain above freezing. � If you have questions about your model. Tighten the pipe clamp screws slowly and evenly so the washer makes a watertight seal. Remove plastic cap from the drill. Avoid kinks when... from water valve inlet port. Copper and PEX tubing connections from the bottom. Compression nut E. Do not overtighten or you have questions about your model, the water line may crush the copper tubing. 8. Using a cordless drill, drill a 1/4" (6.35 mm) hole in the water pipe and...
Owners Manual 1
Page 7
...into the port to avoid kinks. 4. Using an adjustable wrench, hold the nut on the copper or PEX tubing. 3. A. Turn on your model. � If you keep it from water valve inlet port. Discard the first three batches of ice. Flush the water system. Insert the ...of each handle. A. Attach the PEX water line to any leaks. Depending on water supply to the refrigerator and check for best storage of your model, adjust the control to the refrigerator cabinet with either a freezer door or freezer drawer, or French doors. Do not remove ground prong. A. ...
...into the port to avoid kinks. 4. Using an adjustable wrench, hold the nut on the copper or PEX tubing. 3. A. Turn on your model. � If you keep it from water valve inlet port. Discard the first three batches of ice. Flush the water system. Insert the ...of each handle. A. Attach the PEX water line to any leaks. Depending on water supply to the refrigerator and check for best storage of your model, adjust the control to the refrigerator cabinet with either a freezer door or freezer drawer, or French doors. Do not remove ground prong. A. ...

Owners Manual 1
Page 9
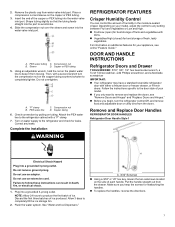
...Lift the refrigerator door free from the cabinet. Hinge Cover Screw B. Remove Doors and Hinges STANDARD DOOR A. Freezer drawer models 1. NOTE: Provide additional support for the top hinge as shown below. Remove the parts for the door while the ...Cover Screw B. A. Freezer Drawer Handle � Remove screws and handle. � To replace the handles, reverse the directions. Hinge Screws Freezer door models 1. Unplug refrigerator or disconnect power 2. Top Hinge Cover C. 5/16" Hex-Head Hinge Screws D. Flat-Head Screws B. Keep the refrigerator door closed ...
...Lift the refrigerator door free from the cabinet. Hinge Cover Screw B. Remove Doors and Hinges STANDARD DOOR A. Freezer drawer models 1. NOTE: Provide additional support for the top hinge as shown below. Remove the parts for the door while the ...Cover Screw B. A. Freezer Drawer Handle � Remove screws and handle. � To replace the handles, reverse the directions. Hinge Screws Freezer door models 1. Unplug refrigerator or disconnect power 2. Top Hinge Cover C. 5/16" Hex-Head Hinge Screws D. Flat-Head Screws B. Keep the refrigerator door closed ...


