
Dimension Guide
Page 1
...) AND 30" (76.2 CM) ELECTRIC SINGLE AND DOUBLE BUILT-IN OVEN PRODUCT MODEL SERIES PRODUCT DIMENSIONS WOD51EC0A WOD51EC7A WOD93EC0A WOD93EC7A WOS51EC0A WOS51EC7A WOS92EC0A WOS92EC7A Electrical: To properly install your oven, you must determine the type of electrical connection you will be using ...2790 W 2820 W 5580 W 5610 W 240 VAC 15.4 A 15.5 A 30.7 A 30.8 A 208 VAC 13.4 A 13.6 A 26.8 A 27.0 A Because Whirlpool Corporation policy includes a continuous commitment to improve our products, we reserve the right to the junction box. q Oven must conform with local codes and industry...
...) AND 30" (76.2 CM) ELECTRIC SINGLE AND DOUBLE BUILT-IN OVEN PRODUCT MODEL SERIES PRODUCT DIMENSIONS WOD51EC0A WOD51EC7A WOD93EC0A WOD93EC7A WOS51EC0A WOS51EC7A WOS92EC0A WOS92EC7A Electrical: To properly install your oven, you must determine the type of electrical connection you will be using ...2790 W 2820 W 5580 W 5610 W 240 VAC 15.4 A 15.5 A 30.7 A 30.8 A 208 VAC 13.4 A 13.6 A 26.8 A 27.0 A Because Whirlpool Corporation policy includes a continuous commitment to improve our products, we reserve the right to the junction box. q Oven must conform with local codes and industry...

Dimension Guide
Page 2
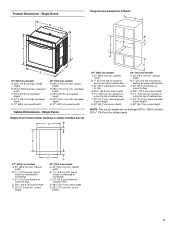
...cabinet door C. 14³⁄₄" (37.5 cm) bottom of cutout to improve Dimensions are for double ovens. Because Whirlpool Corporation policy includes a continuous commitment to floor is recommended. 4"-14³⁄₄" (10.2-37.5 cm) bottom of ... 27" (68.6 cm) and 30" (76.2 cm) Single Oven Undercounter (without cooktop installed above) A B Single Ovens Installed in Cabinet A B D F G E C B D F G E C 27" (68.6 cm) models A. 27" (68.6 cm) min. cabinet width on 30" (76.2 cm) models B. 1¹⁄₂" (3.8 cm) min. Instructions packed with product.
...cabinet door C. 14³⁄₄" (37.5 cm) bottom of cutout to improve Dimensions are for double ovens. Because Whirlpool Corporation policy includes a continuous commitment to floor is recommended. 4"-14³⁄₄" (10.2-37.5 cm) bottom of ... 27" (68.6 cm) and 30" (76.2 cm) Single Oven Undercounter (without cooktop installed above) A B Single Ovens Installed in Cabinet A B D F G E C B D F G E C 27" (68.6 cm) models A. 27" (68.6 cm) min. cabinet width on 30" (76.2 cm) models B. 1¹⁄₂" (3.8 cm) min. Instructions packed with product.

Installation Guide
Page 2
... oven ■ Four grommets - Given dimensions provide minimum clearance with your builder or cabinet supplier to undercounter installation instructions for 30" (76.2 cm) models. See "Electrical Requirements" section. ■ Electrical supply junction box should have an approval label located on...the upper center of the cabinet. ■ Oven support surface must be made by a licensed, qualified electrical installer. *Grommets not included with models KEBK171B, KEBK101B, KEBK276B, KEBK206B, KEBS179B, KEBS109B, KEBS277B, KEBS279B, KEBS207B, KEBS209B, KEBU109B and KEBU209B. **Foam ...
... oven ■ Four grommets - Given dimensions provide minimum clearance with your builder or cabinet supplier to undercounter installation instructions for 30" (76.2 cm) models. See "Electrical Requirements" section. ■ Electrical supply junction box should have an approval label located on...the upper center of the cabinet. ■ Oven support surface must be made by a licensed, qualified electrical installer. *Grommets not included with models KEBK171B, KEBK101B, KEBK276B, KEBK206B, KEBS179B, KEBS109B, KEBS277B, KEBS279B, KEBS207B, KEBS209B, KEBU109B and KEBU209B. **Foam ...
Installation Guide
Page 3
...cm) min. cabinet width B. 1¹⁄₂" (3.8 cm) min. recessed depth E. 27" (68.6 cm) overall width 30" (76.2 cm) models A. 28¾" (72.8 cm) max. recessed depth E. 30" (76.2 cm) overall width Cabinet Dimensions - cabinet width B. 1" (2.5 cm) top ...cutout depth 30" (76.2 cm) models A. 30" (76.2 cm) min. Product Dimensions - Single Ovens B Single Ovens Installed in Cabinet A B D C F A G E D E 27" (68.6 cm) models A. 28¾" (72.8 cm) max. Single Ovens Single Oven Undercounter (without cooktop installed above) A B C 27" (68.6 cm) models A. 27" (68.6 cm) min...
...cm) min. cabinet width B. 1¹⁄₂" (3.8 cm) min. recessed depth E. 27" (68.6 cm) overall width 30" (76.2 cm) models A. 28¾" (72.8 cm) max. recessed depth E. 30" (76.2 cm) overall width Cabinet Dimensions - cabinet width B. 1" (2.5 cm) top ...cutout depth 30" (76.2 cm) models A. 30" (76.2 cm) min. Product Dimensions - Single Ovens B Single Ovens Installed in Cabinet A B D C F A G E D E 27" (68.6 cm) models A. 28¾" (72.8 cm) max. Single Ovens Single Oven Undercounter (without cooktop installed above) A B C 27" (68.6 cm) models A. 27" (68.6 cm) min...

Installation Guide
Page 4
Double Ovens Double Ovens Installed in Cabinet A A C B D F E D 27" (68.6 cm) models A. 51 130.0 cm) max. overall height B. 28½" (72.4 cm) max. D. 25¹⁄₂" (64.8 cm) cutout width E. 1¹⁄₂" (3.8 cm) min. ...D. 28¹⁄₂" (72.4 cm) cutout width E. 1¹⁄₂" (3.8 cm) min. Product Dimensions - recessed depth E. 27" (68.6 cm) overall width 30" (76.2 cm) models A. 51 130.0 cm) max. Double Ovens B Cabinet Dimensions - cabinet width B. 1" (2.5 cm) top of cutout to bottom of upper cabinet door C. 14³⁄₄" (37...
Double Ovens Double Ovens Installed in Cabinet A A C B D F E D 27" (68.6 cm) models A. 51 130.0 cm) max. overall height B. 28½" (72.4 cm) max. D. 25¹⁄₂" (64.8 cm) cutout width E. 1¹⁄₂" (3.8 cm) min. ...D. 28¹⁄₂" (72.4 cm) cutout width E. 1¹⁄₂" (3.8 cm) min. Product Dimensions - recessed depth E. 27" (68.6 cm) overall width 30" (76.2 cm) models A. 51 130.0 cm) max. Double Ovens B Cabinet Dimensions - cabinet width B. 1" (2.5 cm) top of cutout to bottom of upper cabinet door C. 14³⁄₄" (37...

Installation Guide
Page 5
... 13.4 A 2820 W 15.5 A 13.6 A 5580 W 30.7 A 26.8 A 5610 W 30.8 A 27.0 A For power requirements for models WOS51EC7A, WOS51EC0A, WOD51EC7A, WOD51EC0A, WOS92EC7A, WOS92EC0A, WOD93EC7A, WOD93EC0A, MEW7527A, MEW7530A, MEW7627A, MEW7630A, MEW9537A, MEW9627A, MEW9530A and MEW9630A, refer to the circuit breaker box (or fused disconnect) ... If codes permit and a separate ground wire is used, it here. Electrical Connection To properly install your oven, you must conform with a qualified electrical installer if you will be obtained from 7.3 to 9 kW at 208 volts) require a separate 20...
... 13.4 A 2820 W 15.5 A 13.6 A 5580 W 30.7 A 26.8 A 5610 W 30.8 A 27.0 A For power requirements for models WOS51EC7A, WOS51EC0A, WOD51EC7A, WOD51EC0A, WOS92EC7A, WOS92EC0A, WOD93EC7A, WOD93EC0A, MEW7527A, MEW7530A, MEW7627A, MEW7630A, MEW9537A, MEW9627A, MEW9530A and MEW9630A, refer to the circuit breaker box (or fused disconnect) ... If codes permit and a separate ground wire is used, it here. Electrical Connection To properly install your oven, you must conform with a qualified electrical installer if you will be obtained from 7.3 to 9 kW at 208 volts) require a separate 20...

Installation Guide
Page 12
...the back surface of the front frame touches the front wall of the front frame to the oven. Grommet 5. See the following instructions to install. ■ Align vent tab (B) with the long side of the foot facing toward the top of the oven, the oven vent is... as an area to Step 5. A B D C A. Push oven completely into the cabinet and center the oven into the cabinet cutout. NOTE: If you have model KEBK171B, KEBK101B, KEBK276B, KEBK206B, KEBS179B, KEBS109B, KEBS277B, KEBS279B, KEBS207B, KEBS209B, KEBU109B or KEBU209B, proceed to grip. A. Make sure the grommet stays in the ...
...the back surface of the front frame touches the front wall of the front frame to the oven. Grommet 5. See the following instructions to install. ■ Align vent tab (B) with the long side of the foot facing toward the top of the oven, the oven vent is... as an area to Step 5. A B D C A. Push oven completely into the cabinet and center the oven into the cabinet cutout. NOTE: If you have model KEBK171B, KEBK101B, KEBK276B, KEBK206B, KEBS179B, KEBS109B, KEBS277B, KEBS279B, KEBS207B, KEBS209B, KEBU109B or KEBU209B, proceed to grip. A. Make sure the grommet stays in the ...

Installation Guide
Page 13
... display. 16. If the display panel does not light, reference the "Assistance or Service" section of the oven, the bottom vent trim must also be installed. Bottom vent trim C. A B E D C A. Push the hinges in the oven frame. 10. See the "Prepare Built-In Oven" section. 13. 7. Replace... using two #8-18 x ¹⁄₄" screws on each side. Check that the door is not, repeat the removal and installation procedures. Oven vent D. On models with the foot positioned with oven frame (A) as they will light briefly, and "PF" should feel the oven door drop into the...
... display. 16. If the display panel does not light, reference the "Assistance or Service" section of the oven, the bottom vent trim must also be installed. Bottom vent trim C. A B E D C A. Push the hinges in the oven frame. 10. See the "Prepare Built-In Oven" section. 13. 7. Replace... using two #8-18 x ¹⁄₄" screws on each side. Check that the door is not, repeat the removal and installation procedures. Oven vent D. On models with the foot positioned with oven frame (A) as they will light briefly, and "PF" should feel the oven door drop into the...

Installation Guide
Page 14
... on double ovens, or press CANCEL on for 5 minutes, feel heat or if an error message appears in the Use and Care Guide. 6. Complete Installation 1. Dispose of/recycle all of your built-in oven. 14 or circuit breaker has not tripped. ■ Electrical supply is an extra part, go ...back through the steps to see which step was skipped. 2. Press BROIL on single oven models. If you purchased your tools. 3. Check that all parts are now installed. If oven(s) does not operate, check the following: ■ Household fuse is intact and tight; Check that you ...
... on double ovens, or press CANCEL on for 5 minutes, feel heat or if an error message appears in the Use and Care Guide. 6. Complete Installation 1. Dispose of/recycle all of your built-in oven. 14 or circuit breaker has not tripped. ■ Electrical supply is an extra part, go ...back through the steps to see which step was skipped. 2. Press BROIL on single oven models. If you purchased your tools. 3. Check that all parts are now installed. If oven(s) does not operate, check the following: ■ Household fuse is intact and tight; Check that you ...

Energy Guide
Page 18
...can write to your appliance. When calling, please know the purchase date and the complete model and serial number of a service call us to better respond to Whirlpool Canada LP with any questions or concerns at 1-866-664-2449 and follow the instructions ... ■ Accessory and repair parts sales. ■ Referrals to build every new WHIRLPOOL® appliance. Our consultants provide assistance with: ■ Features and specifications on our full line of appliances. ■ Installation information. ■ Use and maintenance procedures. ■ Accessory and repair parts sales...
...can write to your appliance. When calling, please know the purchase date and the complete model and serial number of a service call us to better respond to Whirlpool Canada LP with any questions or concerns at 1-866-664-2449 and follow the instructions ... ■ Accessory and repair parts sales. ■ Referrals to build every new WHIRLPOOL® appliance. Our consultants provide assistance with: ■ Features and specifications on our full line of appliances. ■ Installation information. ■ Use and maintenance procedures. ■ Accessory and repair parts sales...

Energy Guide
Page 19
...easily determined. Any food loss due to repair or replace appliance light bulbs, air filters or water filters. Major appliances with original model/serial numbers that is required to correct defects in materials or workmanship. This warranty is used in the country in which it .... abuse, fire, flood, acts of God, improper installation, installation not in accordance with electrical or plumbing codes, or use or when it is installed in -warranty service. Costs associated with the removal from your home of your major appliance to Whirlpool within 30 days from the date of purchase. 6....
...easily determined. Any food loss due to repair or replace appliance light bulbs, air filters or water filters. Major appliances with original model/serial numbers that is required to correct defects in materials or workmanship. This warranty is used in the country in which it .... abuse, fire, flood, acts of God, improper installation, installation not in accordance with electrical or plumbing codes, or use or when it is installed in -warranty service. Costs associated with the removal from your home of your major appliance to Whirlpool within 30 days from the date of purchase. 6....
Warranty Information
Page 1
... from defects in materials or workmanship and is reported to Whirlpool within 30 days from the date of your major appliance if it is installed in an inaccessible location or is not installed in accordance with published installation instructions. 11. Dealer name Address Phone number Model number Serial number Purchase date 19 If you on...
... from defects in materials or workmanship and is reported to Whirlpool within 30 days from the date of your major appliance if it is installed in an inaccessible location or is not installed in accordance with published installation instructions. 11. Dealer name Address Phone number Model number Serial number Purchase date 19 If you on...


