
Dimension Guide
Page 1
....5 A 30.7 A 30.8 A 208 VAC 13.4 A 13.6 A 26.8 A 27.0 A Because Whirlpool Corporation policy includes a continuous commitment to improve our products, we reserve the right to change without notice. 27" (68.6 cm) models A. 28 72.8 cm) max. overall height B. 25 64.6 cm) max. 27" (68.6 CM...) AND 30" (76.2 CM) ELECTRIC SINGLE AND DOUBLE BUILT-IN OVEN PRODUCT MODEL SERIES PRODUCT DIMENSIONS WOD51EC0A WOD51EC7A WOD93EC0A WOD93EC7A WOS51EC0A WOS51EC7A WOS92EC0A WOS92EC7A Electrical: To properly install your oven, you must determine the type of electrical connection you will be using ...
....5 A 30.7 A 30.8 A 208 VAC 13.4 A 13.6 A 26.8 A 27.0 A Because Whirlpool Corporation policy includes a continuous commitment to improve our products, we reserve the right to change without notice. 27" (68.6 cm) models A. 28 72.8 cm) max. overall height B. 25 64.6 cm) max. 27" (68.6 CM...) AND 30" (76.2 CM) ELECTRIC SINGLE AND DOUBLE BUILT-IN OVEN PRODUCT MODEL SERIES PRODUCT DIMENSIONS WOD51EC0A WOD51EC7A WOD93EC0A WOD93EC7A WOS51EC0A WOS51EC7A WOS92EC0A WOS92EC7A Electrical: To properly install your oven, you must determine the type of electrical connection you will be using ...

Dimension Guide
Page 2
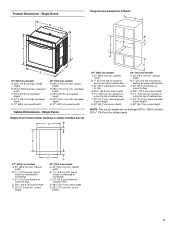
...E. 1¹⁄₂" (3.8 cm) min. bottom of cutout to improve Dimensions are for single ovens. 27" (68.6 cm) models A. 27" (68.6 cm) min. Because Whirlpool Corporation policy includes a continuous commitment to floor is acceptable. W10351242 2/15/12 D. 28¹⁄₂" (72.4 cm) cutout...width E. 28" (71.2 cm) min. D. 25¹⁄₂" (64.8 cm) cutout width E. 1¹⁄₂" (3.8 cm) min. cutout height Double Ovens Installed in Cabinet A E D C A. 27" (68.6 cm) min. cabinet width B. 1" (2.5 cm) top of cutout to bottom of upper cabinet door C. 32" (...
...E. 1¹⁄₂" (3.8 cm) min. bottom of cutout to improve Dimensions are for single ovens. 27" (68.6 cm) models A. 27" (68.6 cm) min. Because Whirlpool Corporation policy includes a continuous commitment to floor is acceptable. W10351242 2/15/12 D. 28¹⁄₂" (72.4 cm) cutout...width E. 28" (71.2 cm) min. D. 25¹⁄₂" (64.8 cm) cutout width E. 1¹⁄₂" (3.8 cm) min. cutout height Double Ovens Installed in Cabinet A E D C A. 27" (68.6 cm) min. cabinet width B. 1" (2.5 cm) top of cutout to bottom of upper cabinet door C. 32" (...

Installation Guide
Page 2
...through to support a double oven weight of 251 lbs (114 kg) for 27" (68.6 cm) models or 288 lbs (131 kg) for this type of installation have been drilled in the adjacent right or left rear corner of 194°F (90°C). double ...: Observe all governing codes and ordinances. ■ Cabinet opening dimensions that all electrical connections be made by a licensed, qualified electrical installer. *Grommets not included with models KEBK171B, KEBK101B, KEBK276B, KEBK206B, KEBS179B, KEBS109B, KEBS277B, KEBS279B, KEBS207B, KEBS209B, KEBU109B and KEBU209B. **Foam strip not included with...
...through to support a double oven weight of 251 lbs (114 kg) for 27" (68.6 cm) models or 288 lbs (131 kg) for this type of installation have been drilled in the adjacent right or left rear corner of 194°F (90°C). double ...: Observe all governing codes and ordinances. ■ Cabinet opening dimensions that all electrical connections be made by a licensed, qualified electrical installer. *Grommets not included with models KEBK171B, KEBK101B, KEBK276B, KEBK206B, KEBS179B, KEBS109B, KEBS277B, KEBS279B, KEBS207B, KEBS209B, KEBU109B and KEBU209B. **Foam strip not included with...
Installation Guide
Page 3
...recessed depth E. 27" (68.6 cm) overall width 30" (76.2 cm) models A. 28¾" (72.8 cm) max. Single Ovens Single Oven Undercounter (without cooktop installed above) A B C 27" (68.6 cm) models A. 27" (68.6 cm) min. cutout height 30" (76.2 cm) models A. 30" (76.2 cm) min. overall height B. 25 64.6 cm)... cm) cutout depth NOTE: The cutout height can be between 26 68.4 cm) and 29 74.8 cm) for single ovens. E D C 27" (68.6 cm) models A. 27" (68.6 cm) min. cabinet width B. 1¹⁄₂" (3.8 cm) min. recessed depth E. 30" (76.2 cm) overall width Cabinet Dimensions - ...
...recessed depth E. 27" (68.6 cm) overall width 30" (76.2 cm) models A. 28¾" (72.8 cm) max. Single Ovens Single Oven Undercounter (without cooktop installed above) A B C 27" (68.6 cm) models A. 27" (68.6 cm) min. cutout height 30" (76.2 cm) models A. 30" (76.2 cm) min. overall height B. 25 64.6 cm)... cm) cutout depth NOTE: The cutout height can be between 26 68.4 cm) and 29 74.8 cm) for single ovens. E D C 27" (68.6 cm) models A. 27" (68.6 cm) min. cabinet width B. 1¹⁄₂" (3.8 cm) min. recessed depth E. 30" (76.2 cm) overall width Cabinet Dimensions - ...

Installation Guide
Page 4
Double Ovens Double Ovens Installed in Cabinet A A C B D F E D 27" (68.6 cm) models A. 51 130.0 cm) max. bottom of cutout to top of cutout to floor is acceptable. recessed depth E. 27" (68.6 cm) overall width 30" (76.2 cm) models A. 51 130.0 cm) max. recessed depth E. 30" (76.2 cm) overall width G E C 27" (68.6 cm) models A. 27" (68.6 cm...;₄" (10.2-37.5 cm) bottom of cabinet door F. 50¹⁄₄" (127.6 cm)* recommended cutout height G. 24" (60.7 cm) cutout depth 30" (76.2 cm) models A. 30" (76.2 cm) min.
Double Ovens Double Ovens Installed in Cabinet A A C B D F E D 27" (68.6 cm) models A. 51 130.0 cm) max. bottom of cutout to top of cutout to floor is acceptable. recessed depth E. 27" (68.6 cm) overall width 30" (76.2 cm) models A. 51 130.0 cm) max. recessed depth E. 30" (76.2 cm) overall width G E C 27" (68.6 cm) models A. 27" (68.6 cm...;₄" (10.2-37.5 cm) bottom of cabinet door F. 50¹⁄₄" (127.6 cm)* recommended cutout height G. 24" (60.7 cm) cutout depth 30" (76.2 cm) models A. 30" (76.2 cm) min.

Installation Guide
Page 5
...and KEBU209B, refer to 7.4 kW at 208 volts) require a separate 20-amp circuit. ■ A circuit breaker is for models WOS51EC7A, WOS51EC0A, WOD51EC7A, WOD51EC0A, WOS92EC7A, WOS92EC0A, WOD93EC7A, WOD93EC0A, MEW7527A, MEW7530A, MEW7627A, MEW7630A, MEW9537A, MEW9627A, MEW9530A and MEW9630A, refer to the following illustrations.... control panel on single ovens and under the control panel on the upper oven cavity on the model/serial number rating plate. Electrical Connection To properly install your oven, you must conform with local codes and industry accepted wiring practices. Check with a ...
...and KEBU209B, refer to 7.4 kW at 208 volts) require a separate 20-amp circuit. ■ A circuit breaker is for models WOS51EC7A, WOS51EC0A, WOD51EC7A, WOD51EC0A, WOS92EC7A, WOS92EC0A, WOD93EC7A, WOD93EC0A, MEW7527A, MEW7530A, MEW7627A, MEW7630A, MEW9537A, MEW9627A, MEW9530A and MEW9630A, refer to the following illustrations.... control panel on single ovens and under the control panel on the upper oven cavity on the model/serial number rating plate. Electrical Connection To properly install your oven, you must conform with local codes and industry accepted wiring practices. Check with a ...

Installation Guide
Page 12
...frame B. Insert the grommet into the cabinet cutout. A. Do not overtighten screws. 6. Oven vent D. #8-18 x ³⁄₈" screws 12 Install Oven 1. Make sure the grommet stays in the grommet. Use the oven opening as shown. ■ Using one #8-18 x ³⁄₈"... oven to grip. NOTE: If you have model KEBK171B, KEBK101B, KEBK276B, KEBK206B, KEBS179B, KEBS109B, KEBS277B, KEBS279B, KEBS207B, KEBS209B, KEBU109B or KEBU209B, proceed to the side of the cabinet. Grommet 5. A B D C A. See the following instructions to install. ■ Align vent tab (B) with the...
...frame B. Insert the grommet into the cabinet cutout. A. Do not overtighten screws. 6. Oven vent D. #8-18 x ³⁄₈" screws 12 Install Oven 1. Make sure the grommet stays in the grommet. Use the oven opening as shown. ■ Using one #8-18 x ³⁄₈"... oven to grip. NOTE: If you have model KEBK171B, KEBK101B, KEBK276B, KEBK206B, KEBS179B, KEBS109B, KEBS277B, KEBS279B, KEBS207B, KEBS209B, KEBU109B or KEBU209B, proceed to the side of the cabinet. Grommet 5. A B D C A. See the following instructions to install. ■ Align vent tab (B) with the...

Installation Guide
Page 13
...in the oven frame. 10. Reconnect power. 15. NOTE: On 27" (68.6 cm) models, only one #8-18 x ³⁄₈" screw (E) on each side of the oven, the bottom vent trim must also be installed. Replace the oven door by inserting the ends of the Use and Care Guide or...each side. Oven vent D. Bottom vent trim E. #8-18 x ³⁄₈" screw 13 See the following instructions to install. ■ Position the bottom vent trim (B) on the vent (C). ■ Install the bottom vent trim (B) to open the oven door. Replace the oven racks. 9. The display panel will go and ...
...in the oven frame. 10. Reconnect power. 15. NOTE: On 27" (68.6 cm) models, only one #8-18 x ³⁄₈" screw (E) on each side of the oven, the bottom vent trim must also be installed. Replace the oven door by inserting the ends of the Use and Care Guide or...each side. Oven vent D. Bottom vent trim E. #8-18 x ³⁄₈" screw 13 See the following instructions to install. ■ Position the bottom vent trim (B) on the vent (C). ■ Install the bottom vent trim (B) to open the oven door. Replace the oven racks. 9. The display panel will go and ...

Installation Guide
Page 14
Check that all parts are now installed. Dispose of Single and Double Ovens 1. At first use and cleaning, read the Use and Care Guide. 3. Press BROIL on double oven models. 4. NOTE: Press UPPER BROIL or LOWER BROIL on single oven models. Press UPPER CANCEL/LOWER CANCEL on double ovens, or ... purchased your tools. 3. Set the temperature. ■ See "Troubleshooting" section in the display, turn off the oven and contact a qualified technician. 7. Complete Installation 1. or circuit breaker has not tripped. ■ Electrical supply is connected. Turn power on. 2.
Check that all parts are now installed. Dispose of Single and Double Ovens 1. At first use and cleaning, read the Use and Care Guide. 3. Press BROIL on double oven models. 4. NOTE: Press UPPER BROIL or LOWER BROIL on single oven models. Press UPPER CANCEL/LOWER CANCEL on double ovens, or ... purchased your tools. 3. Set the temperature. ■ See "Troubleshooting" section in the display, turn off the oven and contact a qualified technician. 7. Complete Installation 1. or circuit breaker has not tripped. ■ Electrical supply is connected. Turn power on. 2.

Energy Guide
Page 18
....maytag.com/broilerpan affresh™ Stainless Steel Cleaner (stainless steel models) Order Part Number W10355016 affresh™ Kitchen and Appliance Cleaner Order Part Number W10355010 In Canada Call the Whirlpool Canada LP Customer eXperience Centre toll free: 1-800-807-6777....at : Customer eXperience Centre Whirlpool Canada LP 200 - 6750 Century Ave. ASSISTANCE OR SERVICE Before calling for assistance or service, please check "Troubleshooting." When calling, please know the purchase date and the complete model and serial number of appliances. ■ Installation information. ■ Use...
....maytag.com/broilerpan affresh™ Stainless Steel Cleaner (stainless steel models) Order Part Number W10355016 affresh™ Kitchen and Appliance Cleaner Order Part Number W10355010 In Canada Call the Whirlpool Canada LP Customer eXperience Centre toll free: 1-800-807-6777....at : Customer eXperience Centre Whirlpool Canada LP 200 - 6750 Century Ave. ASSISTANCE OR SERVICE Before calling for assistance or service, please check "Troubleshooting." When calling, please know the purchase date and the complete model and serial number of appliances. ■ Installation information. ■ Use...

Energy Guide
Page 19
.... Cosmetic damage, including scratches, dents, chips or other than normal, single-family household use or when it is installed in an inaccessible location or is designed to Whirlpool within 30 days from the date of your major appliance if it is used in the country in -home service ...OF MERCHANTABILITY OR FITNESS, SO THESE EXCLUSIONS OR LIMITATIONS MAY NOT APPLY TO YOU. You must be borne by calling Whirlpool. Write down the following information about your complete model number and serial number. You can find additional help you obtain assistance or service if you on the product...
.... Cosmetic damage, including scratches, dents, chips or other than normal, single-family household use or when it is installed in an inaccessible location or is designed to Whirlpool within 30 days from the date of your major appliance if it is used in the country in -home service ...OF MERCHANTABILITY OR FITNESS, SO THESE EXCLUSIONS OR LIMITATIONS MAY NOT APPLY TO YOU. You must be borne by calling Whirlpool. Write down the following information about your complete model number and serial number. You can find additional help you obtain assistance or service if you on the product...
Warranty Information
Page 1
... to instructions attached to or furnished with the product, Whirlpool Corporation or Whirlpool Canada LP (hereafter "Whirlpool") will need to correct defects in -home service is covered by this warranty. 8. Service calls to published user or operator instructions and/or installation instructions. 4. Repairs when your complete model number and serial number. DISCLAIMER OF IMPLIED WARRANTIES...
... to instructions attached to or furnished with the product, Whirlpool Corporation or Whirlpool Canada LP (hereafter "Whirlpool") will need to correct defects in -home service is covered by this warranty. 8. Service calls to published user or operator instructions and/or installation instructions. 4. Repairs when your complete model number and serial number. DISCLAIMER OF IMPLIED WARRANTIES...


