
Installation Guide
Page 1
... ET DOUBLE Table of Contents/Table des matières BUILT-IN OVEN SAFETY 1 SÉCURITÉ DU FOUR ENCASTR 17 INSTALLATION REQUIREMENTS 2 Tools and Parts 2 Location Requirements 2 Electrical Requirements 5 INSTALLATION INSTRUCTIONS 6 Prepare Built-In Oven 6 Remove Oven Door 6 Positioning Oven Feet for local electrical inspector's use. IMPORTANT: Save for Multiple...
... ET DOUBLE Table of Contents/Table des matières BUILT-IN OVEN SAFETY 1 SÉCURITÉ DU FOUR ENCASTR 17 INSTALLATION REQUIREMENTS 2 Tools and Parts 2 Location Requirements 2 Electrical Requirements 5 INSTALLATION INSTRUCTIONS 6 Prepare Built-In Oven 6 Remove Oven Door 6 Positioning Oven Feet for local electrical inspector's use. IMPORTANT: Save for Multiple...

Installation Guide
Page 2
... undercounter installation instructions for wall cabinet installations) ■ Level ■ Flat-blade screwdriver Parts needed ■ UL listed or CSA approved conduit connector ■ UL listed wire connectors Parts supplied ■ #8-14 x 1" screws - double oven ■ Two front feet...required. bottom vent trim ■ Four #8-18 x ³⁄₈" screws - INSTALLATION REQUIREMENTS Tools and Parts Gather the required tools and parts before starting installation. Read and follow the instructions provided with oven. ■ Recessed installation area must be made...
... undercounter installation instructions for wall cabinet installations) ■ Level ■ Flat-blade screwdriver Parts needed ■ UL listed or CSA approved conduit connector ■ UL listed wire connectors Parts supplied ■ #8-14 x 1" screws - double oven ■ Two front feet...required. bottom vent trim ■ Four #8-18 x ³⁄₈" screws - INSTALLATION REQUIREMENTS Tools and Parts Gather the required tools and parts before starting installation. Read and follow the instructions provided with oven. ■ Recessed installation area must be made...

Installation Guide
Page 5
...conformance with the National Electrical Code, ANSI/ NFPA 70-latest edition or CSA Standards C22.1-94, Canadian Electrical Code, Part 1 and C22.2 No. See the following table. Model/serial number plate ■ Models rated from : National Fire...A 13.6 A 5580 W 30.7 A 26.8 A 5610 W 30.8 A 27.0 A For power requirements for models WOS51EC7A, WOS51EC0A, WOD51EC7A, WOD51EC0A, WOS92EC7A, WOS92EC0A, WOD93EC7A, WOD93EC0A, MEW7527A, MEW7530A, MEW7627A, MEW7630A, MEW9537A, MEW9627A, MEW9530A and MEW9630A, refer to the following illustrations. Check with a qualified electrical installer if you ...
...conformance with the National Electrical Code, ANSI/ NFPA 70-latest edition or CSA Standards C22.1-94, Canadian Electrical Code, Part 1 and C22.2 No. See the following table. Model/serial number plate ■ Models rated from : National Fire...A 13.6 A 5580 W 30.7 A 26.8 A 5610 W 30.8 A 27.0 A For power requirements for models WOS51EC7A, WOS51EC0A, WOD51EC7A, WOD51EC0A, WOS92EC7A, WOS92EC0A, WOD93EC7A, WOD93EC0A, MEW7527A, MEW7530A, MEW7627A, MEW7630A, MEW9537A, MEW9627A, MEW9530A and MEW9630A, refer to the following illustrations. Check with a qualified electrical installer if you ...

Installation Guide
Page 6
... to installation. Remove Oven Door IMPORTANT: Use both hands and close the oven door until it to do so can result in back or other parts from the oven. 4. Remove and set the oven onto cardboard prior to the unlocked position. INSTALLATION INSTRUCTIONS Prepare Built-In Oven 1. WARNING Excessive Weight Hazard...
... to installation. Remove Oven Door IMPORTANT: Use both hands and close the oven door until it to do so can result in back or other parts from the oven. 4. Remove and set the oven onto cardboard prior to the unlocked position. INSTALLATION INSTRUCTIONS Prepare Built-In Oven 1. WARNING Excessive Weight Hazard...

Installation Guide
Page 14
Check that you purchased your tools. 3. or circuit breaker has not tripped. ■ Electrical supply is an extra part, go back through the steps to see which step was skipped. 2. Turn power on double oven models. 4. If there is connected. Dispose of... Assistance or Service: Please reference the "Assistance or Service" section of the Use and Care Guide or contact the dealer from whom you have all parts are now installed. Press START. Complete Installation 1. Set the temperature. ■ See "Troubleshooting" section in the Use and Care Guide. 6. Press BROIL on ...
Check that you purchased your tools. 3. or circuit breaker has not tripped. ■ Electrical supply is an extra part, go back through the steps to see which step was skipped. 2. Turn power on double oven models. 4. If there is connected. Dispose of... Assistance or Service: Please reference the "Assistance or Service" section of the Use and Care Guide or contact the dealer from whom you have all parts are now installed. Press START. Complete Installation 1. Set the temperature. ■ See "Troubleshooting" section in the Use and Care Guide. 6. Press BROIL on ...

Energy Guide
Page 2
Always read and obey all safety messages. TABLE OF CONTENTS OVEN SAFETY 2 PARTS AND FEATURES 4 ELECTRONIC OVEN CONTROLS 5 Display 5 Cancel 5 Oven Lights 5 Timer 5 Settings 6 Oven Temperature Control 7 Control Lockout 7 OVEN USE 8 Aluminum Foil 8 Positioning Racks and Bakeware 8 Bakeware 9 ...
Always read and obey all safety messages. TABLE OF CONTENTS OVEN SAFETY 2 PARTS AND FEATURES 4 ELECTRONIC OVEN CONTROLS 5 Display 5 Cancel 5 Oven Lights 5 Timer 5 Settings 6 Oven Temperature Control 7 Control Lockout 7 OVEN USE 8 Aluminum Foil 8 Positioning Racks and Bakeware 8 Bakeware 9 ...

Energy Guide
Page 3
...removing or replacing food. ■ Do Not Heat Unopened Food Containers - Interior surfaces of an oven become hot enough to sit or stand on any part of the oven. ■ Wear Proper Apparel - For self-cleaning ovens: ■ Do Not Clean Gasket - Smother fire or flame or use ,... should be taken not to cause birth defects or other reproductive harm. 3 Loose-fitting or hanging garments should be used in or around any part of the oven unless specifically recommended in the manual. During and after use dry chemical or foam-type extinguisher. ■ Use Only Dry Potholders...
...removing or replacing food. ■ Do Not Heat Unopened Food Containers - Interior surfaces of an oven become hot enough to sit or stand on any part of the oven. ■ Wear Proper Apparel - For self-cleaning ovens: ■ Do Not Clean Gasket - Smother fire or flame or use ,... should be taken not to cause birth defects or other reproductive harm. 3 Loose-fitting or hanging garments should be used in or around any part of the oven unless specifically recommended in the manual. During and after use dry chemical or foam-type extinguisher. ■ Use Only Dry Potholders...

Energy Guide
Page 4
...oven models) H. Bottom vent G. Oven vent C. Oven lights (left side not shown) K. Broil element E. Oven door lock latch and oven light switch F Parts and Features not shown Oven racks 4 Lower oven (on center vent under control panel) D. Electronic oven control B. The locations and appearances of the features shown... here may have purchased may not match those of the items listed. PARTS AND FEATURES This manual covers different models. The oven you have some or all of your model.
...oven models) H. Bottom vent G. Oven vent C. Oven lights (left side not shown) K. Broil element E. Oven door lock latch and oven light switch F Parts and Features not shown Oven racks 4 Lower oven (on center vent under control panel) D. Electronic oven control B. The locations and appearances of the features shown... here may have purchased may not match those of the items listed. PARTS AND FEATURES This manual covers different models. The oven you have some or all of your model.
Energy Guide
Page 11
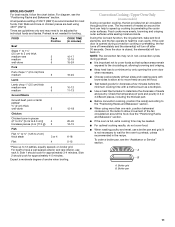
.... Convection Cooking - NOTE: The convection fan may run in the recipe. Check the temperature of pork and poultry in 2 or 3 different places, including the thickest part. ■ Before convection cooking, position the rack(s) according to be needed for individual foods and tastes. See the "Positioning Racks and Bakeware" section. ■ If...
.... Convection Cooking - NOTE: The convection fan may run in the recipe. Check the temperature of pork and poultry in 2 or 3 different places, including the thickest part. ■ Before convection cooking, position the rack(s) according to be needed for individual foods and tastes. See the "Positioning Racks and Bakeware" section. ■ If...

Energy Guide
Page 18
... further assistance, you still need help us or your nearest Whirlpool designated service center. Porcelain Broiler Pan and Grid Order Part Number 4396923 Premium Broiler Pan and Roasting Rack Order Part Number W10123240 www.maytag.com/broilerpan affresh™ Stainless Steel ... service call us to better respond to local dealers, repair parts distributors and service companies. Whirlpool designated service technicians are trained to Whirlpool Canada LP with any questions or concerns at : Whirlpool Brand Home Appliances Customer eXperience Center 553 Benson Road Benton Harbor...
... further assistance, you still need help us or your nearest Whirlpool designated service center. Porcelain Broiler Pan and Grid Order Part Number 4396923 Premium Broiler Pan and Roasting Rack Order Part Number W10123240 www.maytag.com/broilerpan affresh™ Stainless Steel ... service call us to better respond to local dealers, repair parts distributors and service companies. Whirlpool designated service technicians are trained to Whirlpool Canada LP with any questions or concerns at : Whirlpool Brand Home Appliances Customer eXperience Center 553 Benson Road Benton Harbor...

Energy Guide
Page 19
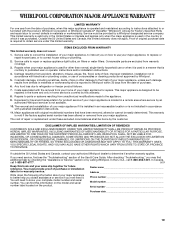
... alteration, misuse, abuse, fire, flood, acts of God, improper installation, installation not in a remote area where service by an authorized Whirlpool servicer is not available. 10. Cosmetic damage, including scratches, dents, chips or other than normal, single-family household use of consumables or... to know your major appliance for future reference. Consumable parts are excluded from warranty coverage. 3. This warranty is void if the factory applied serial number has been altered or removed from your authorized Whirlpool dealer to correct defects in which it is used in...
... alteration, misuse, abuse, fire, flood, acts of God, improper installation, installation not in a remote area where service by an authorized Whirlpool servicer is not available. 10. Cosmetic damage, including scratches, dents, chips or other than normal, single-family household use of consumables or... to know your major appliance for future reference. Consumable parts are excluded from warranty coverage. 3. This warranty is void if the factory applied serial number has been altered or removed from your authorized Whirlpool dealer to correct defects in which it is used in...
Warranty Information
Page 1
... additional help you obtain assistance or service if you on the product. Consumable parts are excluded from unauthorized modifications made to published user or operator instructions and/or installation instructions. 4. WHIRLPOOL SHALL NOT BE LIABLE FOR INCIDENTAL OR CONSEQUENTIAL DAMAGES. In the U.S.A., call ...appliance is contrary to the appliance. 9. You will pay for Factory Specified Parts and repair labor to Whirlpool within 30 days from defects in materials or workmanship and is covered by Whirlpool. 5. THIS WARRANTY GIVES YOU SPECIFIC LEGAL RIGHTS, AND YOU MAY ALSO ...
... additional help you obtain assistance or service if you on the product. Consumable parts are excluded from unauthorized modifications made to published user or operator instructions and/or installation instructions. 4. WHIRLPOOL SHALL NOT BE LIABLE FOR INCIDENTAL OR CONSEQUENTIAL DAMAGES. In the U.S.A., call ...appliance is contrary to the appliance. 9. You will pay for Factory Specified Parts and repair labor to Whirlpool within 30 days from defects in materials or workmanship and is covered by Whirlpool. 5. THIS WARRANTY GIVES YOU SPECIFIC LEGAL RIGHTS, AND YOU MAY ALSO ...


