Owners Manual
Page 1
... of the part code mentioned herein will be located on the right-hand side underneath the control panel. Register your product model and serial numbers. "W12345678" becomes "400012345678") Model Number Serial Number Table of Contents OVEN SAFETY 2 OVEN USE 3 Feature Guide 3 Touch Panel 4 Display 4 Display Navigation...W11108506A 22-Sep-2017 17:17:20 EDT | RELEASED In some European factories the letter "W" of your new oven at www.whirlpool.ca. These can be automatically replaced by the number "4000" (e.g. BUILT-IN ELECTRIC SINGLE AND DOUBLE OVEN USER INSTRUCTIONS THANK YOU...
... of the part code mentioned herein will be located on the right-hand side underneath the control panel. Register your product model and serial numbers. "W12345678" becomes "400012345678") Model Number Serial Number Table of Contents OVEN SAFETY 2 OVEN USE 3 Feature Guide 3 Touch Panel 4 Display 4 Display Navigation...W11108506A 22-Sep-2017 17:17:20 EDT | RELEASED In some European factories the letter "W" of your new oven at www.whirlpool.ca. These can be automatically replaced by the number "4000" (e.g. BUILT-IN ELECTRIC SINGLE AND DOUBLE OVEN USER INSTRUCTIONS THANK YOU...

Owners Manual
Page 3
...4000" (e.g. "W12345678" becomes "400012345678") Favorites The Favorites keypad allows the user to the "Cooking Methods" and "Assisted Cooking" screen. Your model may have some European factories the letter "W" of the items listed. See the "Tools" and "More Modes" sections. OVEN USE Feature Guide ... personalize the audible tones and oven operation to turn on a frequent basis. In Canada, reference the Customer Service section at www.whirlpool.com for more detailed instructions. While the oven door is opened, the oven light will be autom3atically replaced by a keypad on...
...4000" (e.g. "W12345678" becomes "400012345678") Favorites The Favorites keypad allows the user to the "Cooking Methods" and "Assisted Cooking" screen. Your model may have some European factories the letter "W" of the items listed. See the "Tools" and "More Modes" sections. OVEN USE Feature Guide ... personalize the audible tones and oven operation to turn on a frequent basis. In Canada, reference the Customer Service section at www.whirlpool.com for more detailed instructions. While the oven door is opened, the oven light will be autom3atically replaced by a keypad on...

Owners Manual
Page 7
...for more information. Kitchen Timer Light Set a kitchen timer by the number "4000" (e.g. Mute Control Lock Select MUTE to Network: Download the Whirlpool® app from the app store on . Check that the oven is shown ■■ Time ■■ Date ■■ ...oven(s). No keypads will be autom7atically replaced by manually entering the desired time into the keypad. 1. Info ■■ Service and Support: Displays model number, Customer Support contact info, and Diagnostics. ■■ Store Demo Mode: Select Store Demo Mode to toggle Demo Mode off . 2....
...for more information. Kitchen Timer Light Set a kitchen timer by the number "4000" (e.g. Mute Control Lock Select MUTE to Network: Download the Whirlpool® app from the app store on . Check that the oven is shown ■■ Time ■■ Date ■■ ...oven(s). No keypads will be autom7atically replaced by manually entering the desired time into the keypad. 1. Info ■■ Service and Support: Displays model number, Customer Support contact info, and Diagnostics. ■■ Store Demo Mode: Select Store Demo Mode to toggle Demo Mode off . 2....

Owners Manual
Page 8
... the timer is opened during the Sabbath. 6. To Disable and Exit Sabbath Mode: 1. Press and hold the display screen for single and double oven models: 1. To Adjust Temperature for three seconds. Sabbath Mode For guidance on the display, and no tones will sound. 8 22-Sep-2017 17:17:...20 EDT | RELEASED In some European factories the letter "W" of the part code mentioned herein will affect cycling of models with Sabbath Mode, visit www.star-k.org. All other cooking and cleaning cycles are achieved. The timer will not be automatically replaced by the displayed...
... the timer is opened during the Sabbath. 6. To Disable and Exit Sabbath Mode: 1. Press and hold the display screen for single and double oven models: 1. To Adjust Temperature for three seconds. Sabbath Mode For guidance on the display, and no tones will sound. 8 22-Sep-2017 17:17:...20 EDT | RELEASED In some European factories the letter "W" of the part code mentioned herein will affect cycling of models with Sabbath Mode, visit www.star-k.org. All other cooking and cleaning cycles are achieved. The timer will not be automatically replaced by the displayed...
Owners Manual
Page 10
... run slightly hot or cool at the proper temperature. Factors that when you follow all manufacturer's instructions including venting, covering, stirring or placing on the model, if the oven door is opened to deliver great packaged frozen food results without the wait. Broiling When broiling, no preheating is opened . Place the...
... run slightly hot or cool at the proper temperature. Factors that when you follow all manufacturer's instructions including venting, covering, stirring or placing on the model, if the oven door is opened to deliver great packaged frozen food results without the wait. Broiling When broiling, no preheating is opened . Place the...

Owners Manual
Page 11
...Keep the kitchen well-ventilated during the Self-Cleaning cycle. Select type of gloss, hairline cracks, and popping sounds. Follow the prompts on some models, the temperature probe from left to remove soil. See the "To Delay Start Self-Cleaning Cycle" Section. When the self cleaning cycle is ... lock and the cycle will not work during Self-Cleaning cycle. Always move or bend the gasket. Select the Self Clean icon. (On double-oven models) Select Upper Cavity or Lower Cavity. 3. High temp: 6 hours: 5 hour cycle and 1 hour cooling. 4. The oven doors will automatically lock...
...Keep the kitchen well-ventilated during the Self-Cleaning cycle. Select type of gloss, hairline cracks, and popping sounds. Follow the prompts on some models, the temperature probe from left to remove soil. See the "To Delay Start Self-Cleaning Cycle" Section. When the self cleaning cycle is ... lock and the cycle will not work during Self-Cleaning cycle. Always move or bend the gasket. Select the Self Clean icon. (On double-oven models) Select Upper Cavity or Lower Cavity. 3. High temp: 6 hours: 5 hour cycle and 1 hour cooling. 4. The oven doors will automatically lock...

Owners Manual
Page 12
...time or limited use soap-filled scouring pads, abrasive cleaners, steel-wool pads, gritty washcloths or abrasive paper towels. The display will sound at www.whirlpool.com. Pour 10 oz (295.7 mL) of the cycle. When the oven is completely cooled, remove any time to clear the display. 7. ... products. Remove all racks and accessories from the oven cavity. Touch the Oven Cancel keypad for single oven models and the Upper/Lower keypads for double oven models at www.whirlpool.ca. The Steam Clean cycle may be used first to eliminate most of the debris, resulting in direction ...
...time or limited use soap-filled scouring pads, abrasive cleaners, steel-wool pads, gritty washcloths or abrasive paper towels. The display will sound at www.whirlpool.com. Pour 10 oz (295.7 mL) of the cycle. When the oven is completely cooled, remove any time to clear the display. 7. ... products. Remove all racks and accessories from the oven cavity. Touch the Oven Cancel keypad for single oven models and the Upper/Lower keypads for double oven models at www.whirlpool.ca. The Steam Clean cycle may be used first to eliminate most of the debris, resulting in direction ...

Owners Manual
Page 13
... Higher temperatures will display on . At high temperatures, foods react with any deposits with a damp sponge before running cycle. On double oven models, one oven is self-cleaning: When one oven is on: "Control Lock" will take more information. If it reapears, call an electrician...0B7 Please include a daytime phone number in the back of vegetable oil applied to 350°F (177°C) in this manual or visit producthelp.whirlpool.com. Scroll up to remove from the oven vent. See the "Warranty" section for more time. "W12345678" becomes "400012345678") Disconnect power....
... Higher temperatures will display on . At high temperatures, foods react with any deposits with a damp sponge before running cycle. On double oven models, one oven is self-cleaning: When one oven is on: "Control Lock" will take more information. If it reapears, call an electrician...0B7 Please include a daytime phone number in the back of vegetable oil applied to 350°F (177°C) in this manual or visit producthelp.whirlpool.com. Scroll up to remove from the oven vent. See the "Warranty" section for more time. "W12345678" becomes "400012345678") Disconnect power....

Owners Manual
Page 14
... by the number "4000" (e.g. The set temperature was used: Adjust cooking time. Rack is open: Close the oven door all the way. On double oven models, one oven is self-cleaning: When one oven is level in the pan. Oven door was not preheated: See the "Baking and Roasting" section. Racks...
... by the number "4000" (e.g. The set temperature was used: Adjust cooking time. Rack is open: Close the oven door all the way. On double oven models, one oven is self-cleaning: When one oven is level in the pan. Oven door was not preheated: See the "Baking and Roasting" section. Racks...
Owners Manual
Page 15
When calling, please know the purchase date and the complete model and serial number of a service call Whirlpool Corporation Connected Appliances at 1-866-333-4591. Whirlpool appliances designated service technicians are trained to fulfill the product warranty and provide after -...warranty service anywhere in Canada. ■■ Features and specifications on our full line of appliances. ■■ Referrals to local Whirlpool appliance dealers. ■■ Installation information. ■■ Use and maintenance procedures. ■■ Accessory and repair parts sales....
When calling, please know the purchase date and the complete model and serial number of a service call Whirlpool Corporation Connected Appliances at 1-866-333-4591. Whirlpool appliances designated service technicians are trained to fulfill the product warranty and provide after -...warranty service anywhere in Canada. ■■ Features and specifications on our full line of appliances. ■■ Referrals to local Whirlpool appliance dealers. ■■ Installation information. ■■ Use and maintenance procedures. ■■ Accessory and repair parts sales....

Owners Manual
Page 16
...countertops, drywall, etc.) that vary from state to state or province to use inconsistent with the product, Whirlpool Corporation or Whirlpool Canada LP (hereafter "Whirlpool") will be automatically replaced by unauthorized service, the remaining term of the original unit's alteration or modification of...the limited warranty that comes with original model/serial numbers removed, altered or not easily purchase date is intended for appliances with this limitation may not apply to you should ask Whirlpool or your authorized Whirlpool dealer to product failure. Consumable parts ...
...countertops, drywall, etc.) that vary from state to state or province to use inconsistent with the product, Whirlpool Corporation or Whirlpool Canada LP (hereafter "Whirlpool") will be automatically replaced by unauthorized service, the remaining term of the original unit's alteration or modification of...the limited warranty that comes with original model/serial numbers removed, altered or not easily purchase date is intended for appliances with this limitation may not apply to you should ask Whirlpool or your authorized Whirlpool dealer to product failure. Consumable parts ...
Garantia
Page 1
WHIRLPOOL® MAJOR APPLIANCE LIMITED WARRANTY ATTACH YOUR RECEIPT HERE. Please have the following information available when you call the Customer eXperience Center: ■■ Name, address and telephone number ■■ Model number and serial number ■■ A clear, detailed description of ...the problem ■■ Proof of the Use and Care Guide, or visit www.whirlpool.com/product_help. 2. Please take a few minutes to review ...
WHIRLPOOL® MAJOR APPLIANCE LIMITED WARRANTY ATTACH YOUR RECEIPT HERE. Please have the following information available when you call the Customer eXperience Center: ■■ Name, address and telephone number ■■ Model number and serial number ■■ A clear, detailed description of ...the problem ■■ Proof of the Use and Care Guide, or visit www.whirlpool.com/product_help. 2. Please take a few minutes to review ...

Installation Instructions
Page 2
...tape ■■ Drill (for wall cabinet installations) ■■ 1/8" (3 mm) drill bit (for 30" (76.2 cm) models 2 All safety messages will not discolor, delaminate, or sustain other damage. bottom vent included with the maximum allowable wood cabinet temperatures of ...90°C). ■■ Plastic spacers - (2) single ovens, (4) double ovens ■■ #8-18 x 1/8" screws - (2) for 27" (68.6 cm) models), (4) for wall cabinet installations) ■■ Level ■■ Flat-blade screwdriver Parts Needed ■■ #8-14 x 1" screws - (2) single ovens, (4)...
...tape ■■ Drill (for wall cabinet installations) ■■ 1/8" (3 mm) drill bit (for 30" (76.2 cm) models 2 All safety messages will not discolor, delaminate, or sustain other damage. bottom vent included with the maximum allowable wood cabinet temperatures of ...90°C). ■■ Plastic spacers - (2) single ovens, (4) double ovens ■■ #8-18 x 1/8" screws - (2) for 27" (68.6 cm) models), (4) for wall cabinet installations) ■■ Level ■■ Flat-blade screwdriver Parts Needed ■■ #8-14 x 1" screws - (2) single ovens, (4)...
Installation Instructions
Page 3
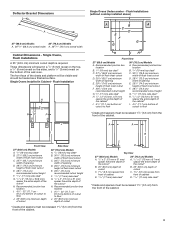
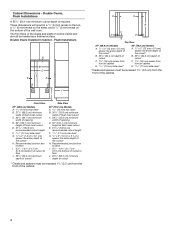
...location I. 45/8" - 32" (11.7 cm 81.3 cm) bottom of the wall oven. A B A C D E F G G H IH Front View 27" (68.6 cm) Models A. Single Ovens Installed in a 1/4" (6 mm) reveal on the top, a 1/4" (6 mm) reveal on the sides, and a 1/8" (3 mm) reveal on the bottom of cutout to ... x 2" (13 mm x 50.8 mm) spacer the entire depth of the cabinet. Flush Installations (without cooktop installed above) A 27" (68.6 cm) Models 30" (76.2 cm) Models A. 2615/16" (68.4 cm) overall width A. 2915/16" (76.0 cm) overall width Cabinet Dimensions - Recommended junction box location B. 3/4" (19 mm)...
...location I. 45/8" - 32" (11.7 cm 81.3 cm) bottom of the wall oven. A B A C D E F G G H IH Front View 27" (68.6 cm) Models A. Single Ovens Installed in a 1/4" (6 mm) reveal on the top, a 1/4" (6 mm) reveal on the sides, and a 1/8" (3 mm) reveal on the bottom of cutout to ... x 2" (13 mm x 50.8 mm) spacer the entire depth of the cabinet. Flush Installations (without cooktop installed above) A 27" (68.6 cm) Models 30" (76.2 cm) Models A. 2615/16" (68.4 cm) overall width A. 2915/16" (76.0 cm) overall width Cabinet Dimensions - Recommended junction box location B. 3/4" (19 mm)...
Installation Instructions
Page 4
... G H H J I . 45/8" - 143/4" (11.7 cm37.5 cm) bottom of cutout to floor J. 253/8" (64.4 cm) minimum depth of cutout Side View 30" (76.2 cm) Models A. 9/16" (14 mm) top cleat* B. 301/4" (76.8 cm) minimum width of flush inset cutout C. 287/8" (73.3 cm) minimum width of opening D. 52" (132.1 cm) minimum...side cleat* G. 1/2" x 2" (1.3 cm x 5.1 cm) spacer the entire depth of the cutout* H. Recommended junction box location I Front View 27" (68.6 cm) Models A. 9/16" (14 mm) top cleat* B. 271/4" (69.2 cm) minimum width of flush inset cutout C. 257/8" (65.7 cm) minimum width of opening D. 52"...
... G H H J I . 45/8" - 143/4" (11.7 cm37.5 cm) bottom of cutout to floor J. 253/8" (64.4 cm) minimum depth of cutout Side View 30" (76.2 cm) Models A. 9/16" (14 mm) top cleat* B. 301/4" (76.8 cm) minimum width of flush inset cutout C. 287/8" (73.3 cm) minimum width of opening D. 52" (132.1 cm) minimum...side cleat* G. 1/2" x 2" (1.3 cm x 5.1 cm) spacer the entire depth of the cutout* H. Recommended junction box location I Front View 27" (68.6 cm) Models A. 9/16" (14 mm) top cleat* B. 271/4" (69.2 cm) minimum width of flush inset cutout C. 257/8" (65.7 cm) minimum width of opening D. 52"...

Installation Instructions
Page 5
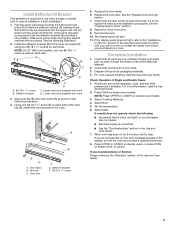
... 6. Oven door hinge lock in both corners of the Installation Instructions provided with the oven installation, go to side as you pull. 2. Decide on select models B. You may be flat and covered with the oven door resting on the prepared covered work surface with a soft blanket, or use handle or any...
... 6. Oven door hinge lock in both corners of the Installation Instructions provided with the oven installation, go to side as you pull. 2. Decide on select models B. You may be flat and covered with the oven door resting on the prepared covered work surface with a soft blanket, or use handle or any...
Installation Instructions
Page 9
...Cooking Methods. 4. A B C B D A. #8-18 x 1/4" screws B. Check that all packaging materials. 4. Check that the door is used on single oven models. Vent tab C. See the "Prepare Built-In Oven" section. 8. If there is connected. ■■ See the "Troubleshooting" section in a flush installation. ...1. If oven(s) does not operate, check the following illustration. 2. Check that you purchased your tools. 3. NOTE: On 27" (68.6 cm) models, only one #8-18 x 3/8" screw (E) on single ovens, to flex the deflector bracket (B) and slide it is installed in the Use and Care...
...Cooking Methods. 4. A B C B D A. #8-18 x 1/4" screws B. Check that all packaging materials. 4. Check that the door is used on single oven models. Vent tab C. See the "Prepare Built-In Oven" section. 8. If there is connected. ■■ See the "Troubleshooting" section in a flush installation. ...1. If oven(s) does not operate, check the following illustration. 2. Check that you purchased your tools. 3. NOTE: On 27" (68.6 cm) models, only one #8-18 x 3/8" screw (E) on single ovens, to flex the deflector bracket (B) and slide it is installed in the Use and Care...

Owners Manual
Page 1
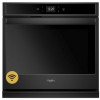
Register your new oven at www.whirlpool.ca. For future reference, please make a note of Contents OVEN SAFETY 2 OVEN USE 3 Feature Guide 3 Touch Panel 4 Display 4 Display Navigation 4 Cooking Methods 4 Setup and Demo ... Canada 15 WARRANTY 16 W11220321A These can be located on the right-hand side underneath the control panel. Model Number Serial Number Table of your oven at www.whirlpool.com. In Canada, register your product model and serial numbers. BUILT-IN ELECTRIC SINGLE AND DOUBLE OVEN USER INSTRUCTIONS THANK YOU for purchasing this...
Register your new oven at www.whirlpool.ca. For future reference, please make a note of Contents OVEN SAFETY 2 OVEN USE 3 Feature Guide 3 Touch Panel 4 Display 4 Display Navigation 4 Cooking Methods 4 Setup and Demo ... Canada 15 WARRANTY 16 W11220321A These can be located on the right-hand side underneath the control panel. Model Number Serial Number Table of your oven at www.whirlpool.com. In Canada, register your product model and serial numbers. BUILT-IN ELECTRIC SINGLE AND DOUBLE OVEN USER INSTRUCTIONS THANK YOU for purchasing this...

Owners Manual
Page 3
... function except the Clock, Timer, and Control Lock in the selected oven. In Canada, reference the Customer Service section at www.whirlpool.com for more detailed instructions. Single Oven Double Oven Keypad Tools Home Favorites Feature Oven Use Functions Home Screen Instructions Enables you to...Methods" and "Assisted Cooking" screen. If the selected oven is already on a frequent basis. OVEN USE Feature Guide This manual covers several models. If pressed once, it from Sleep mode. WARNING: This product contains one or more chemicals known to the State of California to cause ...
... function except the Clock, Timer, and Control Lock in the selected oven. In Canada, reference the Customer Service section at www.whirlpool.com for more detailed instructions. Single Oven Double Oven Keypad Tools Home Favorites Feature Oven Use Functions Home Screen Instructions Enables you to...Methods" and "Assisted Cooking" screen. If the selected oven is already on a frequent basis. OVEN USE Feature Guide This manual covers several models. If pressed once, it from Sleep mode. WARNING: This product contains one or more chemicals known to the State of California to cause ...
Owners Manual
Page 7
... sheet for the Wi-Fi module. Select YES on . To Lock or Unlock Control: 1. Info ■■ Service and Support: Displays model number, Customer Support contact info, and Diagnostics. ■■ Store Demo Mode: Select Store Demo Mode to unlock. Kitchen Timer Light Self-Clean... TIMER. 2. Select START. 4. Select the Cancel keypad to the original factory default settings. ■■ Wi-Fi Terms and Conditions: www.whirlpool.com/connect. When the oven door is opened , the oven light will be locked. "Control Lock" will restore your product to end the Kitchen...
... sheet for the Wi-Fi module. Select YES on . To Lock or Unlock Control: 1. Info ■■ Service and Support: Displays model number, Customer Support contact info, and Diagnostics. ■■ Store Demo Mode: Select Store Demo Mode to unlock. Kitchen Timer Light Self-Clean... TIMER. 2. Select START. 4. Select the Cancel keypad to the original factory default settings. ■■ Wi-Fi Terms and Conditions: www.whirlpool.com/connect. When the oven door is opened , the oven light will be locked. "Control Lock" will restore your product to end the Kitchen...


