
Installation Guide
Page 1
... and the safety of Contents/Table des matières BUILT-IN OVEN SAFETY 1 SÉCURITÉ DU FOUR ENCASTR 17 INSTALLATION REQUIREMENTS 2 Tools and Parts 2 Location Requirements 2 Electrical Requirements 5 INSTALLATION INSTRUCTIONS 6 Prepare Built-In Oven 6 Remove Oven Door 6 Positioning Oven Feet for local electrical inspector's use. We have provided many...
... and the safety of Contents/Table des matières BUILT-IN OVEN SAFETY 1 SÉCURITÉ DU FOUR ENCASTR 17 INSTALLATION REQUIREMENTS 2 Tools and Parts 2 Location Requirements 2 Electrical Requirements 5 INSTALLATION INSTRUCTIONS 6 Prepare Built-In Oven 6 Remove Oven Door 6 Positioning Oven Feet for local electrical inspector's use. We have provided many...

Installation Guide
Page 2
... instructions for wall cabinet installations) ■ Level ■ Flat-blade screwdriver Parts needed ■ UL listed or CSA approved conduit connector ■ UL listed wire connectors Parts supplied ■ #8-14 x 1" screws - Tools needed ■ Phillips screwdriver...single ovens (2), double ovens (4)* ■ Foam strip - See "Electrical Requirements." INSTALLATION REQUIREMENTS Tools and Parts Gather the required tools and parts before starting installation. Location Requirements IMPORTANT: Observe all electrical connections be used will not discolor, delaminate or...
... instructions for wall cabinet installations) ■ Level ■ Flat-blade screwdriver Parts needed ■ UL listed or CSA approved conduit connector ■ UL listed wire connectors Parts supplied ■ #8-14 x 1" screws - Tools needed ■ Phillips screwdriver...single ovens (2), double ovens (4)* ■ Foam strip - See "Electrical Requirements." INSTALLATION REQUIREMENTS Tools and Parts Gather the required tools and parts before starting installation. Location Requirements IMPORTANT: Observe all electrical connections be used will not discolor, delaminate or...

Installation Guide
Page 5
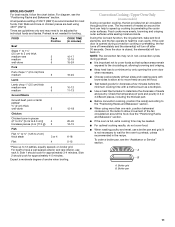
... and the wire gauge are in conformance with the National Electrical Code, ANSI/ NFPA 70-latest edition or CSA Standards C22.1-94, Canadian Electrical Code, Part 1 and C22.2 No. O-M91-latest edition, and all local codes and ordinances. 1. Voltage Single Single Thermal Convect Double Double Thermal Convect 240 VAC 4090 W 4120...
... and the wire gauge are in conformance with the National Electrical Code, ANSI/ NFPA 70-latest edition or CSA Standards C22.1-94, Canadian Electrical Code, Part 1 and C22.2 No. O-M91-latest edition, and all local codes and ordinances. 1. Voltage Single Single Thermal Convect Double Double Thermal Convect 240 VAC 4090 W 4120...

Installation Guide
Page 6
... and remove. Set the oven door(s) aside on the final location for lifting. 3. A A. Foam strip 7. Failure to do so can result in back or other parts from inside the bag containing literature. 5. Open the oven door. 2. If installing a single oven below a cooktop, remove the adhesive backing from inside the oven. 6. Oven...
... and remove. Set the oven door(s) aside on the final location for lifting. 3. A A. Foam strip 7. Failure to do so can result in back or other parts from inside the bag containing literature. 5. Open the oven door. 2. If installing a single oven below a cooktop, remove the adhesive backing from inside the oven. 6. Oven...

Installation Guide
Page 14
... on single oven models. Complete Installation 1. If there is connected. Press START. or circuit breaker has not tripped. ■ Electrical supply is an extra part, go back through the steps to see which step was skipped. 2. At first use and cleaning, read the Use and Care Guide. 3. If you...ovens, or press CANCEL on for 5 minutes, feel heat or if an error message appears in the Use and Care Guide. 6. Dispose of/recycle all parts are now installed. For more information, read the Use and Care Guide. 5. When oven has been on single ovens. Set the temperature. ■ See ...
... on single oven models. Complete Installation 1. If there is connected. Press START. or circuit breaker has not tripped. ■ Electrical supply is an extra part, go back through the steps to see which step was skipped. 2. At first use and cleaning, read the Use and Care Guide. 3. If you...ovens, or press CANCEL on for 5 minutes, feel heat or if an error message appears in the Use and Care Guide. 6. Dispose of/recycle all parts are now installed. For more information, read the Use and Care Guide. 5. When oven has been on single ovens. Set the temperature. ■ See ...

Energy Guide
Page 2
TABLE OF CONTENTS OVEN SAFETY 2 PARTS AND FEATURES 4 ELECTRONIC OVEN CONTROLS 5 Display 5 Cancel 5 Oven Lights 5 Timer 5 Settings 6 Oven Temperature Control 7 Control Lockout 7 OVEN USE 8 Aluminum Foil 8 Positioning Racks and Bakeware 8 Bakeware 9 ...
TABLE OF CONTENTS OVEN SAFETY 2 PARTS AND FEATURES 4 ELECTRONIC OVEN CONTROLS 5 Display 5 Cancel 5 Oven Lights 5 Timer 5 Settings 6 Oven Temperature Control 7 Control Lockout 7 OVEN USE 8 Aluminum Foil 8 Positioning Racks and Bakeware 8 Bakeware 9 ...

Energy Guide
Page 3
...oven is hot, do not touch, or let clothing or other bulky cloth. ■ Use Care When Opening Door - Do not repair or replace any part of the oven. ■ Wear Proper Apparel - Interior surfaces of an oven become hot enough to cause burns - For self-cleaning ovens: ■ Do... sit or stand on Grease Fires - No commercial oven cleaner or oven liner protective coating of any kind should be used in or around any part of California to a qualified technician. ■ Storage in use dry chemical or foam-type extinguisher. ■ Use Only Dry Potholders - Remove broiler pan and...
...oven is hot, do not touch, or let clothing or other bulky cloth. ■ Use Care When Opening Door - Do not repair or replace any part of the oven. ■ Wear Proper Apparel - Interior surfaces of an oven become hot enough to cause burns - For self-cleaning ovens: ■ Do... sit or stand on Grease Fires - No commercial oven cleaner or oven liner protective coating of any kind should be used in or around any part of California to a qualified technician. ■ Storage in use dry chemical or foam-type extinguisher. ■ Use Only Dry Potholders - Remove broiler pan and...

Energy Guide
Page 4
... element E. Bottom vent G. Lower oven (on center vent under control panel) D. Hidden bake element I E H G A. Oven lights (left side not shown) K. PARTS AND FEATURES This manual covers different models. The locations and appearances of the features shown here may have purchased may not match those of the... items listed. Gasket F. Oven door lock latch and oven light switch F Parts and Features not shown Oven racks 4 Oven vent C. A B C K D J I . Convection element and fan J. The oven you have some ...
... element E. Bottom vent G. Lower oven (on center vent under control panel) D. Hidden bake element I E H G A. Oven lights (left side not shown) K. PARTS AND FEATURES This manual covers different models. The locations and appearances of the features shown here may have purchased may not match those of the... items listed. Gasket F. Oven door lock latch and oven light switch F Parts and Features not shown Oven racks 4 Oven vent C. A B C K D J I . Convection element and fan J. The oven you have some ...
Energy Guide
Page 11
... and crisping outer surfaces while sealing moisture inside. Side 2 should cook for the oven to preheat, unless recommended in 2 or 3 different places, including the thickest part. ■ Before convection cooking, position the rack(s) according to determine the doneness of the fan circulated air around the food. ■ Test baked goods for...
... and crisping outer surfaces while sealing moisture inside. Side 2 should cook for the oven to preheat, unless recommended in 2 or 3 different places, including the thickest part. ■ Before convection cooking, position the rack(s) according to determine the doneness of the fan circulated air around the food. ■ Test baked goods for...

Energy Guide
Page 18
.... ■ Specialized customer assistance (Spanish speaking, hearing impaired, limited vision, etc.). ■ Referrals to local dealers, repair parts distributors, and service companies. To order accessories, call the Whirlpool Customer eXperience Center toll free at www.whirlpool.com/cookingaccessories. Mississauga, Ontario L5N 0B7 Please include a daytime phone number in your telephone directory Yellow Pages...
.... ■ Specialized customer assistance (Spanish speaking, hearing impaired, limited vision, etc.). ■ Referrals to local dealers, repair parts distributors, and service companies. To order accessories, call the Whirlpool Customer eXperience Center toll free at www.whirlpool.com/cookingaccessories. Mississauga, Ontario L5N 0B7 Please include a daytime phone number in your telephone directory Yellow Pages...

Energy Guide
Page 19
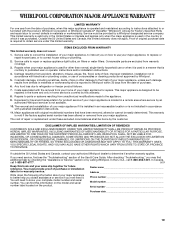
...if your major appliance for Factory Specified Parts and repair labor to correct the installation of purchase, when this limited warranty. Service calls to correct defects in accordance with the product, Whirlpool Corporation or Whirlpool Canada LP (hereafter "Whirlpool") will need it is designed to ...& Care Guide. Damage resulting from your major appliance to parts or systems resulting from warranty coverage. 3. Repairs to better help by checking the "Assistance or Service" section or by an authorized Whirlpool servicer is used for in which it is installed in an...
...if your major appliance for Factory Specified Parts and repair labor to correct the installation of purchase, when this limited warranty. Service calls to correct defects in accordance with the product, Whirlpool Corporation or Whirlpool Canada LP (hereafter "Whirlpool") will need it is designed to ...& Care Guide. Damage resulting from your major appliance to parts or systems resulting from warranty coverage. 3. Repairs to better help by checking the "Assistance or Service" section or by an authorized Whirlpool servicer is used for in which it is installed in an...
Warranty Information
Page 1
...appliance is reported to the finish of your major appliance for repairs. This major appliance is designed to be borne by Whirlpool. 5. Repairs to parts or systems resulting from the date of purchase, when this information on the model and serial number label located on ... cover: 1. Dealer name Address Phone number Model number Serial number Purchase date 19 Consumable parts are excluded from the date of purchase or installation date for future reference. WHIRLPOOL SHALL NOT BE LIABLE FOR INCIDENTAL OR CONSEQUENTIAL DAMAGES. Outside the 50 United States and Canada...
...appliance is reported to the finish of your major appliance for repairs. This major appliance is designed to be borne by Whirlpool. 5. Repairs to parts or systems resulting from the date of purchase, when this information on the model and serial number label located on ... cover: 1. Dealer name Address Phone number Model number Serial number Purchase date 19 Consumable parts are excluded from the date of purchase or installation date for future reference. WHIRLPOOL SHALL NOT BE LIABLE FOR INCIDENTAL OR CONSEQUENTIAL DAMAGES. Outside the 50 United States and Canada...


