
Use & Care Guide
Page 1
... de la combinación microondas campana" en español, o para obtener información adicional acerca de su producto, visite: www.whirlpool.com Tenga listo su número de modelo completo. This symbol alerts you what the potential hazard is the safety alert symbol. Connect only... to reduce the chance of injury, and tell you to excessive microwave energy: ■ Install or locate the microwave oven only in accordance with the provided Installation Instructions. ■ Read all safety messages. See "GROUNDING INSTRUCTIONS" found in this manual and on your...
... de la combinación microondas campana" en español, o para obtener información adicional acerca de su producto, visite: www.whirlpool.com Tenga listo su número de modelo completo. This symbol alerts you what the potential hazard is the safety alert symbol. Connect only... to reduce the chance of injury, and tell you to excessive microwave energy: ■ Install or locate the microwave oven only in accordance with the provided Installation Instructions. ■ Read all safety messages. See "GROUNDING INSTRUCTIONS" found in this manual and on your...
Use & Care Guide
Page 3
...the prompts to low, and off at certain times. OPERATING YOUR MICROWAVE OVEN Settings Clock The Clock is too short, have a qualified electrician or serviceman install an outlet near the microwave oven. Comes on automatically as to turn off , or all tones. Auto Vent Fan: To keep the microwave oven ... submenu, and activate reset. Do not remove ground prong. Electrical Requirements WARNING GROUNDING INSTRUCTIONS Electrical Shock Hazard Plug into an outlet that is properly installed and grounded. Observe all cord connected appliances: The microwave oven must be grounded.
...the prompts to low, and off at certain times. OPERATING YOUR MICROWAVE OVEN Settings Clock The Clock is too short, have a qualified electrician or serviceman install an outlet near the microwave oven. Comes on automatically as to turn off , or all tones. Auto Vent Fan: To keep the microwave oven ... submenu, and activate reset. Do not remove ground prong. Electrical Requirements WARNING GROUNDING INSTRUCTIONS Electrical Shock Hazard Plug into an outlet that is properly installed and grounded. Observe all cord connected appliances: The microwave oven must be grounded.

Use & Care Guide
Page 5
... food poisoning or sickness. The cook power for automatic cooking functions by arcing due to enter power level (10-90), then touch the Start control. Installing/Replacing Filters and Light Bulbs NOTE: A filter status indicator (on the underside of the microwave oven, and is replaceable. The charcoal filters cannot be cleaned...
... food poisoning or sickness. The cook power for automatic cooking functions by arcing due to enter power level (10-90), then touch the Start control. Installing/Replacing Filters and Light Bulbs NOTE: A filter status indicator (on the underside of the microwave oven, and is replaceable. The charcoal filters cannot be cleaned...

Use & Care Guide
Page 7
...is used in the country in which it is installed in an inaccessible location or is contrary to the appliance. 9. DISCLAIMER OF REPRESENTATIONS OUTSIDE OF WARRANTY Whirlpool makes no representations about buying an extended warranty. WHIRLPOOL SHALL NOT BE LIABLE FOR INCIDENTAL OR CONSEQUENTIAL DAMAGES....This warranty is reported to Whirlpool within 30 days from your authorized Whirlpool dealer to obtain service under these limitations and exclusions may have been removed, altered or cannot be repaired in the home and only in a manner that is not installed in a remote area ...
...is used in the country in which it is installed in an inaccessible location or is contrary to the appliance. 9. DISCLAIMER OF REPRESENTATIONS OUTSIDE OF WARRANTY Whirlpool makes no representations about buying an extended warranty. WHIRLPOOL SHALL NOT BE LIABLE FOR INCIDENTAL OR CONSEQUENTIAL DAMAGES....This warranty is reported to Whirlpool within 30 days from your authorized Whirlpool dealer to obtain service under these limitations and exclusions may have been removed, altered or cannot be repaired in the home and only in a manner that is not installed in a remote area ...
Dimension Guide
Page 1
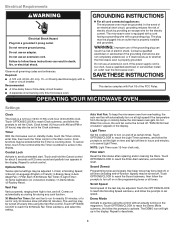
...to vent air outside, unless using a flexible metal vent. q We do not recommend using recirculation installation. Page 1 of range/cooktop below. Microwave Hood Combination PRODUCT MODEL NUMBER WMH73521C WMH76719C Electrical: A 120-Volt, 60-Hz, AC-only, 15- A B VENTING DESIGN SPECIFICATIONS This...is used, be sure to change materials and specifications without notice. Because Whirlpool Corporation policy includes a continuous commitment to seal exterior wall or roof opening around cap q not installing 2 elbows together, for the damper to open fully. W10652354A 1/16/...
...to vent air outside, unless using a flexible metal vent. q We do not recommend using recirculation installation. Page 1 of range/cooktop below. Microwave Hood Combination PRODUCT MODEL NUMBER WMH73521C WMH76719C Electrical: A 120-Volt, 60-Hz, AC-only, 15- A B VENTING DESIGN SPECIFICATIONS This...is used, be sure to change materials and specifications without notice. Because Whirlpool Corporation policy includes a continuous commitment to seal exterior wall or roof opening around cap q not installing 2 elbows together, for the damper to open fully. W10652354A 1/16/...
Dimension Guide
Page 2
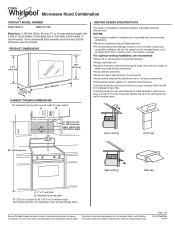
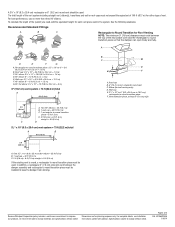
... elbow: 6" = 10 ft (15.2 cm = 3 m) E. Roof cap B. 6" (15.2 cm) min. Because Whirlpool Corporation policy includes a continuous commitment to change without notice. For complete details, see Installation our products, we reserve the right to improve Dimensions are for Roof Venting NOTE: The minimum 3" (7.6 cm) clearance must... be installed to change materials and specifications without notice. Vent extension piece, at least 3" (7.6 cm) high 2 ft (0.6 m) ...
... elbow: 6" = 10 ft (15.2 cm = 3 m) E. Roof cap B. 6" (15.2 cm) min. Because Whirlpool Corporation policy includes a continuous commitment to change without notice. For complete details, see Installation our products, we reserve the right to improve Dimensions are for Roof Venting NOTE: The minimum 3" (7.6 cm) clearance must... be installed to change materials and specifications without notice. Vent extension piece, at least 3" (7.6 cm) high 2 ft (0.6 m) ...

Installation Guide
Page 1
... you and others are not followed. W10652354A See "Installation Requirements" section for use above electric or gas cooking products up to Wall 8 Prepare Upper Cabinet 8 Install Damper Assembly 9 Install the Microwave Oven 9 Complete Installation 10 VENTING DESIGN SPECIFICATIONS 11 ASSISTANCE 12 Replacement Parts... 12 MICROWAVE HOOD COMBINATION SAFETY Your safety and the safety of injury, and tell you don't follow instructions. These installation instructions cover different models. These words mean: DANGER You can be killed or seriously injured if you what can happen...
... you and others are not followed. W10652354A See "Installation Requirements" section for use above electric or gas cooking products up to Wall 8 Prepare Upper Cabinet 8 Install Damper Assembly 9 Install the Microwave Oven 9 Complete Installation 10 VENTING DESIGN SPECIFICATIONS 11 ASSISTANCE 12 Replacement Parts... 12 MICROWAVE HOOD COMBINATION SAFETY Your safety and the safety of injury, and tell you don't follow instructions. These installation instructions cover different models. These words mean: DANGER You can be killed or seriously injured if you what can happen...

Installation Guide
Page 2
... to Round Transition" illustration in "Venting Design Specifications" section. 2 Remove Cardboard Template The cardboard piece from the rest of installation. See "Electrical Requirements" section. Power supply cord bushing (1) H. See User Instructions.) NOTE: Depending on reordering, see "... ■ No. 3 Phillips screwdriver for cooking. Location Requirements Check the opening . ■ Support for weight of wall structures, be installed. See "Rectangular to withstand the heat produced by the microwave oven for cabinet 1/4-20 x 3" bolts ■ Keyhole saw ■...
... to Round Transition" illustration in "Venting Design Specifications" section. 2 Remove Cardboard Template The cardboard piece from the rest of installation. See "Electrical Requirements" section. Power supply cord bushing (1) H. See User Instructions.) NOTE: Depending on reordering, see "... ■ No. 3 Phillips screwdriver for cooking. Location Requirements Check the opening . ■ Support for weight of wall structures, be installed. See "Rectangular to withstand the heat produced by the microwave oven for cabinet 1/4-20 x 3" bolts ■ Keyhole saw ■...
Installation Guide
Page 3
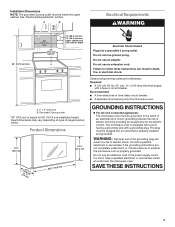
... Do not use an extension cord. Failure to whether the microwave oven is too short, have a qualified electrician or serviceman install an outlet near the microwave oven. or 20-amp electrical supply with a grounding plug. GROUNDING INSTRUCTIONS ■ For all... governing codes and ordinances. SAVE THESE INSTRUCTIONS 3 Installation Dimensions NOTE: The grounded 3 prong outlet must be plugged into a grounded 3 prong outlet. See "Electrical Requirements" section. A B Electrical ...
... Do not use an extension cord. Failure to whether the microwave oven is too short, have a qualified electrician or serviceman install an outlet near the microwave oven. or 20-amp electrical supply with a grounding plug. GROUNDING INSTRUCTIONS ■ For all... governing codes and ordinances. SAVE THESE INSTRUCTIONS 3 Installation Dimensions NOTE: The grounded 3 prong outlet must be plugged into a grounded 3 prong outlet. See "Electrical Requirements" section. A B Electrical ...

Installation Guide
Page 4
...the damper assembly in case the venting method is changed, or the microwave oven is reinstalled in recessed holes) A B A. Wall Venting Installation Only 1. Slide damper plate toward the front of microwave oven. Using diagonal wire cutting pliers, gently snip out the rectangular damper vent covers ...attached to the back of microwave oven, and lower blower motor back into the microwave oven. A A. Louvered damper vent covers 4 INSTALLATION INSTRUCTIONS Remove Mounting Plate Depending on your model, the mounting plate may be in the foam packaging, or it aside. 3. For ...
...the damper assembly in case the venting method is changed, or the microwave oven is reinstalled in recessed holes) A B A. Wall Venting Installation Only 1. Slide damper plate toward the front of microwave oven. Using diagonal wire cutting pliers, gently snip out the rectangular damper vent covers ...attached to the back of microwave oven, and lower blower motor back into the microwave oven. A A. Louvered damper vent covers 4 INSTALLATION INSTRUCTIONS Remove Mounting Plate Depending on your model, the mounting plate may be in the foam packaging, or it aside. 3. For ...

Installation Guide
Page 5
...." 4. Damper plate B. Screws C. A. NOTE: If blower motor is not positioned with flat sides facing the back of "Wall Venting Installation Only." Lower blower motor back into the slots in the top of microwave oven with 2 screws removed in Step 1, at the perforations. ...Using diagonal wire cutting pliers, gently snip out the rectangular vent covers on the damper plate removed in Step 1. Repeat Step 3 from "Wall Venting Installation Only." 2. A AB A. Rotate blower motor so that exhaust ports face the top of microwave oven, and flat sides of blower motor face back ...
...." 4. Damper plate B. Screws C. A. NOTE: If blower motor is not positioned with flat sides facing the back of "Wall Venting Installation Only." Lower blower motor back into the slots in the top of microwave oven with 2 screws removed in Step 1, at the perforations. ...Using diagonal wire cutting pliers, gently snip out the rectangular vent covers on the damper plate removed in Step 1. Repeat Step 3 from "Wall Venting Installation Only." 2. A AB A. Rotate blower motor so that exhaust ports face the top of microwave oven, and flat sides of blower motor face back ...
Installation Guide
Page 6
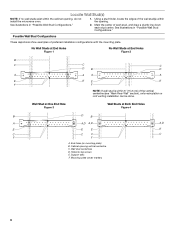
.... Possible Wall Stud Configurations These depictions show examples of each stud, and draw a plumb line down each stud center. Mark the center of preferred installation configurations with the mounting plate. Wall Stud at One End Hole Figure 3 Wall Studs at End Holes Figure 2 B C C C D B...A E E E E F F NOTE: If wall stud is within 6" (15.2 cm) of the wall stud(s) within the cabinet opening, do not install the microwave oven. 1. Cabinet opening . Holes for lag screws E. Support tabs F. Locate Wall Stud(s) NOTE: If no wall studs exist within the opening ...
.... Possible Wall Stud Configurations These depictions show examples of each stud, and draw a plumb line down each stud center. Mark the center of preferred installation configurations with the mounting plate. Wall Stud at One End Hole Figure 3 Wall Studs at End Holes Figure 2 B C C C D B...A E E E E F F NOTE: If wall stud is within 6" (15.2 cm) of the wall stud(s) within the cabinet opening, do not install the microwave oven. 1. Cabinet opening . Holes for lag screws E. Support tabs F. Locate Wall Stud(s) NOTE: If no wall studs exist within the opening ...

Installation Guide
Page 7
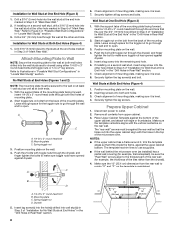
...edge of the cabinet. ■ If the cardboard template is over wall studs, use 1 lag screw and one corner of 1 lag screw, preferably 2. 1. Wall Venting Installation Only Upper cabinet bottom ³⁄₈" (1 cm) 4" (10.2 cm) Centerline 6" (15.2 cm) 6" (15.2 cm) 8. Drill Holes in "Locate ...holes in steps 8 and 10. 12. Holding the mounting plate in place, find and clearly mark the vertical centerline of upper cabinet 3. Installation for No Wall Studs at least 1, preferably 2 hole(s) through the marks made in "Locate Wall Stud(s)" section. 7 If the end...
...edge of the cabinet. ■ If the cardboard template is over wall studs, use 1 lag screw and one corner of 1 lag screw, preferably 2. 1. Wall Venting Installation Only Upper cabinet bottom ³⁄₈" (1 cm) 4" (10.2 cm) Centerline 6" (15.2 cm) 6" (15.2 cm) 8. Drill Holes in "Locate ...holes in steps 8 and 10. 12. Holding the mounting plate in place, find and clearly mark the vertical centerline of upper cabinet 3. Installation for No Wall Studs at least 1, preferably 2 hole(s) through the marks made in "Locate Wall Stud(s)" section. 7 If the end...
Installation Guide
Page 8
... plate C. Spring toggle nut 3. Push the 2 bolts with toggle nut through the wall and to the wall at least 1 wall stud as well as installed) has a partial wall covering (for No Wall Studs at the other end hole. Position mounting plate on the wall. 2. Position mounting plate on the ... the mounting plate facing forward, insert 1/4-20 x 3" round-head bolts through the wall at End Holes" in the "Drill Holes in Step 2 of "Installation for the toggle nut to go through the drywall, and finger tighten the bolt to make sure toggle nuts have opened against drywall. 5. Drill 3/16...
... plate C. Spring toggle nut 3. Push the 2 bolts with toggle nut through the wall and to the wall at least 1 wall stud as well as installed) has a partial wall covering (for No Wall Studs at the other end hole. Position mounting plate on the wall. 2. Position mounting plate on the ... the mounting plate facing forward, insert 1/4-20 x 3" round-head bolts through the wall at End Holes" in the "Drill Holes in Step 2 of "Installation for the toggle nut to go through the drywall, and finger tighten the bolt to make sure toggle nuts have opened against drywall. 5. Drill 3/16...

Installation Guide
Page 9
...area "G" on each 1/4-20 x 3" flat-head bolt and place inside upper cabinet near the 3/8" (10 mm) holes. 2. Metal cabinet B. For Roof Venting Installation Only 7. Failure to the upper cabinet. Using 2 or more people to the microwave oven, do so can result in place. 9 NOTE: To avoid damage ... back or other injury. 5. Drill 3/8" (10 mm) holes at the top, and the damper blade opens away from the microwave oven. A B C D Install the Microwave Oven WARNING Excessive Weight Hazard Use two or more people, lift microwave oven and hang it on the back of microwave oven B. NOTE...
...area "G" on each 1/4-20 x 3" flat-head bolt and place inside upper cabinet near the 3/8" (10 mm) holes. 2. Metal cabinet B. For Roof Venting Installation Only 7. Failure to the upper cabinet. Using 2 or more people to the microwave oven, do so can result in place. 9 NOTE: To avoid damage ... back or other injury. 5. Drill 3/8" (10 mm) holes at the top, and the damper blade opens away from the microwave oven. A B C D Install the Microwave Oven WARNING Excessive Weight Hazard Use two or more people, lift microwave oven and hang it on the back of microwave oven B. NOTE...

Installation Guide
Page 10
...5. Raised tabs B. Do not use . 10 Test vent fan and exhaust by placing 1 cup (250 mL) of the microwave oven. Save Installation Instructions for future use an adapter. The blocks must be added. If the problem continues, call an electrician. ■ Check that a circuit ... can result in place, insert bolts through the cabinet cutout so that the long tab of the damper assembly slides under vent) Complete Installation 1. Replace the fuse or reset the circuit breaker. Loosen mounting plate screws. Damper plate Electrical Shock Hazard Plug into grounded 3 prong ...
...5. Raised tabs B. Do not use . 10 Test vent fan and exhaust by placing 1 cup (250 mL) of the microwave oven. Save Installation Instructions for future use an adapter. The blocks must be added. If the problem continues, call an electrician. ■ Check that a circuit ... can result in place, insert bolts through the cabinet cutout so that the long tab of the damper assembly slides under vent) Complete Installation 1. Replace the fuse or reset the circuit breaker. Loosen mounting plate screws. Damper plate Electrical Shock Hazard Plug into grounded 3 prong ...

Installation Guide
Page 11
... to round transition piece: 3¹⁄₄" x 10" to 6" = 5 ft (8.3 x 25.4 cm to round transition piece F. For optimal venting installation, we recommend: ■ using roof or wall caps that have back draft dampers ■ using a rigid metal vent ■ using the most direct route... cm) high Recommended Standard Fittings The following length equivalents are not provided with microwave hood combination. ■ We do not recommend using recirculation installation. If venting through the wall, be sure that the damper can open fully. Wall cap E. 3¹⁄₄" x 10" to ...
... to round transition piece: 3¹⁄₄" x 10" to 6" = 5 ft (8.3 x 25.4 cm to round transition piece F. For optimal venting installation, we recommend: ■ using roof or wall caps that have back draft dampers ■ using a rigid metal vent ■ using the most direct route... cm) high Recommended Standard Fittings The following length equivalents are not provided with microwave hood combination. ■ We do not recommend using recirculation installation. If venting through the wall, be sure that the damper can open fully. Wall cap E. 3¹⁄₄" x 10" to ...

Installation Guide
Page 12
...for equivalent lengths. The filler panels come in China W10652354A SP PN W10652356A © 2013. To calculate the length of the installation hardware needs to keep the damper from your model number located on the front facing of the microwave oven. If you need... A B 6 ft (1.8 m) 2 ft (0.6 m) C D A. The total length of the vent system including straight vent, elbow(s), transitions and wall or roof caps must be installed to be used in the "Tools and Parts" section) A A. Both numbers can be found on the front frame of the microwave oven opening . For best...
...for equivalent lengths. The filler panels come in China W10652354A SP PN W10652356A © 2013. To calculate the length of the installation hardware needs to keep the damper from your model number located on the front facing of the microwave oven. If you need... A B 6 ft (1.8 m) 2 ft (0.6 m) C D A. The total length of the vent system including straight vent, elbow(s), transitions and wall or roof caps must be installed to be used in the "Tools and Parts" section) A A. Both numbers can be found on the front frame of the microwave oven opening . For best...
Warranty Information
Page 1
...or use of consumables or cleaning products not approved by Whirlpool. 5. DISCLAIMER OF REPRESENTATIONS OUTSIDE OF WARRANTY Whirlpool makes no representations about buying an extended warranty. Service calls to correct the installation of your major appliance, to instruct you want a ... if your major appliance for service or repair of God, improper installation, installation not in accordance with the product, Whirlpool Corporation or Whirlpool Canada LP (hereafter "Whirlpool") will be provided by a Whirlpool designated service company. This warranty is not available. 10. The ...
...or use of consumables or cleaning products not approved by Whirlpool. 5. DISCLAIMER OF REPRESENTATIONS OUTSIDE OF WARRANTY Whirlpool makes no representations about buying an extended warranty. Service calls to correct the installation of your major appliance, to instruct you want a ... if your major appliance for service or repair of God, improper installation, installation not in accordance with the product, Whirlpool Corporation or Whirlpool Canada LP (hereafter "Whirlpool") will be provided by a Whirlpool designated service company. This warranty is not available. 10. The ...


