
Installation Guide
Page 1
... safety of your particular model may differ slightly from the illustration in this manual and on your appliance. Table of Contents MICROWAVE HOOD COMBINATION SAFETY 1 INSTALLATION REQUIREMENTS 2 Tools and Parts 2 Remove Cardboard Template 2 Location Requirements 2 Product Dimensions 3 Electrical Requirements 3 INSTALLATION INSTRUCTIONS 4 Remove Mounting Plate 4 Rotate Blower Motor 4 Locate Wall Stud(s 6 Mark Rear Wall...
... safety of your particular model may differ slightly from the illustration in this manual and on your appliance. Table of Contents MICROWAVE HOOD COMBINATION SAFETY 1 INSTALLATION REQUIREMENTS 2 Tools and Parts 2 Remove Cardboard Template 2 Location Requirements 2 Product Dimensions 3 Electrical Requirements 3 INSTALLATION INSTRUCTIONS 4 Remove Mounting Plate 4 Rotate Blower Motor 4 Locate Wall Stud(s 6 Mark Rear Wall...

Use & Care Guide
Page 1
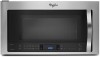
...of the microwave oven opening, behind the door. See "GROUNDING INSTRUCTIONS" found in this manual and on your model and serial number located on the front facing of injury, and...WARNING." SAVE THESE INSTRUCTIONS W10560735A All safety messages will need assistance, call us at www.whirlpool.com for additional information. Connect only to explode and should experience a problem not covered in... User Guide Microwave Hood Combination THANK YOU for purchasing this section and in the provided Installation Instructions. Puede encontrar su número de modelo y de serie en la etiqueta ...
...of the microwave oven opening, behind the door. See "GROUNDING INSTRUCTIONS" found in this manual and on your model and serial number located on the front facing of injury, and...WARNING." SAVE THESE INSTRUCTIONS W10560735A All safety messages will need assistance, call us at www.whirlpool.com for additional information. Connect only to explode and should experience a problem not covered in... User Guide Microwave Hood Combination THANK YOU for purchasing this section and in the provided Installation Instructions. Puede encontrar su número de modelo y de serie en la etiqueta ...
Use & Care Guide
Page 5
... indicator. Clean monthly, or as prompted by itself or can be programmed to enter programming for Defrost functions. Remove right side charcoal filter. Manual Cooking/Stage Cooking Doneness Touch COOK TIME, touch number pads to enter time, touch COOK POWER (if not 100%), touch number pads to ... and washcloth. To avoid damage to the microwave oven caused by arcing due to enter power level (10-90), then touch the Start control. Installing/Replacing Filters and Light Bulbs NOTE: A filter status indicator (on the underside of the microwave oven, under the bulb cover, and is located ...
... indicator. Clean monthly, or as prompted by itself or can be programmed to enter programming for Defrost functions. Remove right side charcoal filter. Manual Cooking/Stage Cooking Doneness Touch COOK TIME, touch number pads to enter time, touch COOK POWER (if not 100%), touch number pads to ... and washcloth. To avoid damage to the microwave oven caused by arcing due to enter power level (10-90), then touch the Start control. Installing/Replacing Filters and Light Bulbs NOTE: A filter status indicator (on the underside of the microwave oven, under the bulb cover, and is located ...


