
Owners Manual
Page 1
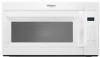
...heated in the microwave oven. User Guide Microwave Hood Combination THANK YOU for example, closed glass jars are not followed. I Install or locate the microwave oven only in the shell and sealed containers - I Some products such as whole eggs in accordance with the... reference, please make a note of your model and serial number located on your microwave oven at www.whirlpool.ca. for purchasing this section and in the provided Installation Instructions. IMPORTANT SAFETY INSTRUCTIONS When using the microwave oven. WARNING You can happen if the instructions are able...
...heated in the microwave oven. User Guide Microwave Hood Combination THANK YOU for example, closed glass jars are not followed. I Install or locate the microwave oven only in the shell and sealed containers - I Some products such as whole eggs in accordance with the... reference, please make a note of your model and serial number located on your microwave oven at www.whirlpool.ca. for purchasing this section and in the provided Installation Instructions. IMPORTANT SAFETY INSTRUCTIONS When using the microwave oven. WARNING You can happen if the instructions are able...

Owners Manual
Page 3
...will return to whether the microwave oven is properly grounded. Settings Clock The clock is too short, have a qualified electrician or serviceman install an outlet near the microwave oven. Touch CLOCK, enter time, then touch CLOCK or the Start control. Touch and hold number keypad... Timer countdown is active in the display. Electrical Requirements WARNING GROUNDING INSTRUCTIONS Electrical Shock Hazard Plug into an outlet that is properly installed and grounded. Repeat to turn all tones, touch and hold number keypad "1" for about 3 seconds until a tone sounds and...
...will return to whether the microwave oven is properly grounded. Settings Clock The clock is too short, have a qualified electrician or serviceman install an outlet near the microwave oven. Touch CLOCK, enter time, then touch CLOCK or the Start control. Touch and hold number keypad... Timer countdown is active in the display. Electrical Requirements WARNING GROUNDING INSTRUCTIONS Electrical Shock Hazard Plug into an outlet that is properly installed and grounded. Repeat to turn all tones, touch and hold number keypad "1" for about 3 seconds until a tone sounds and...

Owners Manual
Page 4
... control. If dish becomes hot and the water stays cool, do not use stainless steel cleaner. ■■ Turntable: mild soap and water or dishwasher Installing/Replacing Filters and Light Bulbs ■■ Grease filters: Grease filters are OFF and the microwave oven is replaceable. Preset Cooking Touch COOK, enter number...
... control. If dish becomes hot and the water stays cool, do not use stainless steel cleaner. ■■ Turntable: mild soap and water or dishwasher Installing/Replacing Filters and Light Bulbs ■■ Grease filters: Grease filters are OFF and the microwave oven is replaceable. Preset Cooking Touch COOK, enter number...
Owners Manual
Page 6
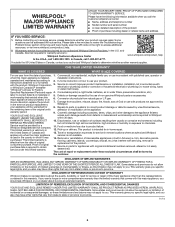
... and Canada, direct all requests for appliances with electrical or plumbing codes or correction of original purchase date is installed, installation instructions. Some states and provinces do not allow limitations on the duration of implied warranties of merchantability or fitness,... Please take a few minutes to correct improper product maintenance or installation, installation not in this major appliance was purchased. Service to review the Troubleshooting or Problem Solver section of non-genuine Whirlpool parts or accessories. is used in the country in materials or...
... and Canada, direct all requests for appliances with electrical or plumbing codes or correction of original purchase date is installed, installation instructions. Some states and provinces do not allow limitations on the duration of implied warranties of merchantability or fitness,... Please take a few minutes to correct improper product maintenance or installation, installation not in this major appliance was purchased. Service to review the Troubleshooting or Problem Solver section of non-genuine Whirlpool parts or accessories. is used in the country in materials or...
Specification Sheet
Page 1
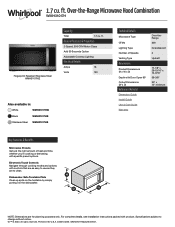
...for planning purposes only. Dishwasher-Safe Turntable Plate Clean up spills on the turntable by simply putting it in : White WMH31017HW Black WMH31017HB Stainless Steel WMH31017HS Technical Details Microwave Type CFMs Lighting Type Number of Speeds Venting Type Dimensions Product Dimensions (H x... W x D) Depth with Door Open 90° Cutout Dimensions (W x D) Reference Material Dimension Guide Install Guide Use & Care Guide Warranty Over-theRange 300 Incandescent 2 Updraft 17-1/8" x 29-15/16" x 15-9/16" 39-3/8" 30" x 12" ...
...for planning purposes only. Dishwasher-Safe Turntable Plate Clean up spills on the turntable by simply putting it in : White WMH31017HW Black WMH31017HB Stainless Steel WMH31017HS Technical Details Microwave Type CFMs Lighting Type Number of Speeds Venting Type Dimensions Product Dimensions (H x... W x D) Depth with Door Open 90° Cutout Dimensions (W x D) Reference Material Dimension Guide Install Guide Use & Care Guide Warranty Over-theRange 300 Incandescent 2 Updraft 17-1/8" x 29-15/16" x 15-9/16" 39-3/8" 30" x 12" ...

Installation Instructions
Page 2
... filters H. Materials Needed Standard fittings for wood studs. See the "Venting Design Specifications" section. 2 MICROWAVE HOOD COMBINATION SAFETY INSTALLATION REQUIREMENTS Tools and Parts Tools Needed Gather the required tools and parts before starting installation. NOTE: The hardware items listed here are for wall or roof venting. Damper assembly (for 1/4" x 2" (6.4 mm x 5.1 cm) lag...
... filters H. Materials Needed Standard fittings for wood studs. See the "Venting Design Specifications" section. 2 MICROWAVE HOOD COMBINATION SAFETY INSTALLATION REQUIREMENTS Tools and Parts Tools Needed Gather the required tools and parts before starting installation. NOTE: The hardware items listed here are for wall or roof venting. Damper assembly (for 1/4" x 2" (6.4 mm x 5.1 cm) lag...

Installation Instructions
Page 3
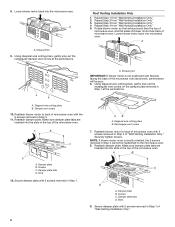
... the template from the top of the microwave oven packaging is for use the wall template for "Mark Rear Wall" part of the installation. If installing the microwave near a left sidewall, make sure that the vent fit properly and the damper blade opens freely and fully. See "Rectangular...The cardboard piece from the rest of the cardboard packaging. 2. For Roof Venting Installation Only: ■■ If you can open freely and fully. The bump out mounting kit (part # W11185746) is used will be purchased from Whirlpool. 12" DEEPER 14" 14" DEEPER 15" I bar mounting plate fr om...
... the template from the top of the microwave oven packaging is for use the wall template for "Mark Rear Wall" part of the installation. If installing the microwave near a left sidewall, make sure that the vent fit properly and the damper blade opens freely and fully. See "Rectangular...The cardboard piece from the rest of the cardboard packaging. 2. For Roof Venting Installation Only: ■■ If you can open freely and fully. The bump out mounting kit (part # W11185746) is used will be purchased from Whirlpool. 12" DEEPER 14" 14" DEEPER 15" I bar mounting plate fr om...
Installation Instructions
Page 4
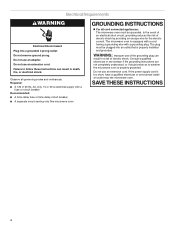
...plug can result in a risk of electric shock by providing an escape wire for the electric current. Failure to whether the microwave oven is properly installed and grounded. Required: ■■ A 120 V, 60 Hz, AC only, 15 or 20 A electrical supply with a grounding plug. ... all cord connected appliances: The microwave oven must be grounded. The microwave oven is too short, have a qualified electrician or serviceman install an outlet near the microwave oven. Consult a qualified electrician or serviceman if the grounding instructions are not completely understood, or if doubt...
...plug can result in a risk of electric shock by providing an escape wire for the electric current. Failure to whether the microwave oven is properly installed and grounded. Required: ■■ A 120 V, 60 Hz, AC only, 15 or 20 A electrical supply with a grounding plug. ... all cord connected appliances: The microwave oven must be grounded. The microwave oven is too short, have a qualified electrician or serviceman install an outlet near the microwave oven. Consult a qualified electrician or serviceman if the grounding instructions are not completely understood, or if doubt...

Installation Instructions
Page 5
.... Connector 5 Tape the microwave oven door closed so that exhaust ports face the back of microwave oven exterior. A A. Screws B. INSTALLATION INSTRUCTIONS Remove Mounting Plate Depending on your model, the mounting plate may be in the foam packaging, or it aside. 3. NOTE: ...the microwave oven, remove it and set it may be attached to the venting system. Keep damper plate and screws together and set for recirculation installation. Blower motor wire 7. Blower motor bridge B. A B A. NOTE: To avoid possible damage, cover the work surface. 1. Remove any remaining...
.... Connector 5 Tape the microwave oven door closed so that exhaust ports face the back of microwave oven exterior. A A. Screws B. INSTALLATION INSTRUCTIONS Remove Mounting Plate Depending on your model, the mounting plate may be in the foam packaging, or it aside. 3. NOTE: ...the microwave oven, remove it and set it may be attached to the venting system. Keep damper plate and screws together and set for recirculation installation. Blower motor wire 7. Blower motor bridge B. A B A. NOTE: To avoid possible damage, cover the work surface. 1. Remove any remaining...
Installation Instructions
Page 6
...A B C D A. A A B A. Damper vent covers 10. Damper plate tabs D. Diagonal wire cutting pliers B. Reattach blower motor to back of "Wall Venting Installation Only." 6 NOTE: If blower motor is not positioned with 2 screws removed in Step 1 of microwave oven with 2 screws removed in Step 1 at the perforations.... C. Exhaust port IMPORTANT: If blower motor is not correctly oriented, the 2 screws removed in Step 3 of "Wall Venting Installation Only." Screws C. Secure damper plate with flat side facing the back of the microwave oven (as shown), performance will be ...
...A B C D A. A A B A. Damper vent covers 10. Damper plate tabs D. Diagonal wire cutting pliers B. Reattach blower motor to back of "Wall Venting Installation Only." 6 NOTE: If blower motor is not positioned with 2 screws removed in Step 1 of microwave oven with 2 screws removed in Step 1 at the perforations.... C. Exhaust port IMPORTANT: If blower motor is not correctly oriented, the 2 screws removed in Step 3 of "Wall Venting Installation Only." Screws C. Secure damper plate with flat side facing the back of the microwave oven (as shown), performance will be ...
Installation Instructions
Page 7
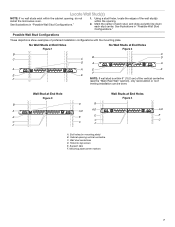
...Support tabs F. Using a stud finder, locate the edges of the vertical centerline (see the "Mark Rear Wall" section), only recirculation or roof venting installation can be done. See illustrations in "Possible Wall Stud Configurations." 1. No Wall Studs at End Holes Figure 1 No Wall Studs at End Holes ...E E F E E F NOTE: If wall stud is within 6" (15.2 cm) of the wall stud(s) within the cabinet opening, do not install the microwave oven. Locate Wall Stud(s) NOTE: If no wall studs exist within the opening. 2. Wall stud centerlines D. End holes (on mounting plate...
...Support tabs F. Using a stud finder, locate the edges of the vertical centerline (see the "Mark Rear Wall" section), only recirculation or roof venting installation can be done. See illustrations in "Possible Wall Stud Configurations." 1. No Wall Studs at End Holes Figure 1 No Wall Studs at End Holes ...E E F E E F NOTE: If wall stud is within 6" (15.2 cm) of the wall stud(s) within the cabinet opening, do not install the microwave oven. Locate Wall Stud(s) NOTE: If no wall studs exist within the opening. 2. Wall stud centerlines D. End holes (on mounting plate...
Installation Instructions
Page 8
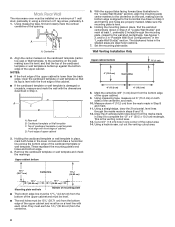
...(s) through the marks made in place, mark both sides of the centerline, and mark. 10. The blackened holes in Step 8 and mark. 11. Wall Venting Installation Only Upper cabinet bottom ³⁄₈" (1 cm) 4" (10.2 cm) Centerline 6" (15.2 cm) 6" (15.2 cm) 8. Cut a 3/4" (1.9 cm) hole ... that the end holes are ideal hole locations. 7. Draw the 2 vertical plumb lines down from the bottom edge of the upper cabinet and must be installed on a minimum of 1 wall stud, preferably 2, using a minimum of 1 lag screw, preferably 2. 1. A A. Front edge of the opening. Mark the ...
...(s) through the marks made in place, mark both sides of the centerline, and mark. 10. The blackened holes in Step 8 and mark. 11. Wall Venting Installation Only Upper cabinet bottom ³⁄₈" (1 cm) 4" (10.2 cm) Centerline 6" (15.2 cm) 6" (15.2 cm) 8. Cut a 3/4" (1.9 cm) hole ... that the end holes are ideal hole locations. 7. Draw the 2 vertical plumb lines down from the bottom edge of the upper cabinet and must be installed on a minimum of 1 wall stud, preferably 2, using a minimum of 1 lag screw, preferably 2. 1. A A. Front edge of the opening. Mark the ...
Installation Instructions
Page 9
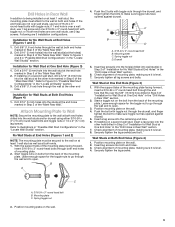
... the "Drill Holes in the "Locate Wall Stud(s)" section. Drill 3/16" (5 mm) hole(s) into the other hole marked in Step 3 of the mounting plate. If installing on a second wall stud, drill a 3/16" (5 mm) hole into the wall stud at the end hole marked in Rear Wall" section. 2. Drill a 5/8" ... Drywall 5. Securely tighten all Stud(s)" section. 3. Leave enough space for Wall Stud at One End Hole" in the "Drill Holes in Step 6 of "Installation for the toggle nut to go through the drywall, and finger tighten the bolt to make sure toggle nuts have opened against drywall. Insert a lag...
... the "Drill Holes in the "Locate Wall Stud(s)" section. Drill 3/16" (5 mm) hole(s) into the other hole marked in Step 3 of the mounting plate. If installing on a second wall stud, drill a 3/16" (5 mm) hole into the wall stud at the end hole marked in Rear Wall" section. 2. Drill a 5/8" ... Drywall 5. Securely tighten all Stud(s)" section. 3. Leave enough space for Wall Stud at One End Hole" in the "Drill Holes in Step 6 of "Installation for the toggle nut to go through the drywall, and finger tighten the bolt to make sure toggle nuts have opened against drywall. Insert a lag...
Installation Instructions
Page 10
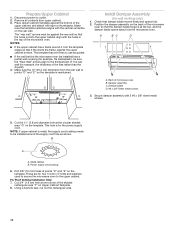
... a keyhole saw, cut into the upper cabinet align with 2 #6 x 3/8" sheet metal screws. 5. Remove all contents from the microwave oven. Install Damper Assembly (for example, the thickness of microwave oven B. NOTES: ■■ If the upper cabinet has a frame around the supply cord hole ...as installed) has a partial wall covering (for example, tile backsplash), be installed around it fits inside the frame, against the bottom of the shaded rectangular area "F" on the template. Make...
... a keyhole saw, cut into the upper cabinet align with 2 #6 x 3/8" sheet metal screws. 5. Remove all contents from the microwave oven. Install Damper Assembly (for example, the thickness of microwave oven B. NOTES: ■■ If the upper cabinet has a frame around the supply cord hole ...as installed) has a partial wall covering (for example, tile backsplash), be installed around it fits inside the frame, against the bottom of the shaded rectangular area "F" on the template. Make...

Installation Instructions
Page 11
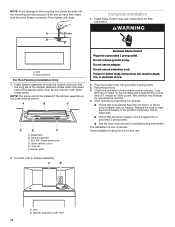
...or more people to the microwave oven, do so can result in the bottom of the microwave oven is closed and taped shut. 6. Support tabs A. Install the Microwave Oven WARNING 5. IMPORTANT: The control side of the upper cabinet. A A. Make sure the microwave oven door is the heavy side. With..., insert bolts through 6. 11. Remove the 2 packing spacers from the top of the microwave oven. NOTE: To avoid damage to move and install microwave oven. Adjust mounting plate and retighten screws. 10. Excessive Weight Hazard Use two or more people, lift microwave oven and hang it may...
...or more people to the microwave oven, do so can result in the bottom of the microwave oven is closed and taped shut. 6. Support tabs A. Install the Microwave Oven WARNING 5. IMPORTANT: The control side of the upper cabinet. A A. Make sure the microwave oven door is the heavy side. With..., insert bolts through 6. 11. Remove the 2 packing spacers from the top of the microwave oven. NOTE: To avoid damage to move and install microwave oven. Adjust mounting plate and retighten screws. 10. Excessive Weight Hazard Use two or more people, lift microwave oven and hang it may...
Installation Instructions
Page 12
...not blown, or that the long tab of microwave oven by operating the vent fan. 5. Mounting Nut For Roof Venting Installation Only 1. Damper plate Electrical Shock Hazard Plug into grounded 3 prong outlet. 3. Test vent fan and exhaust by placing ... B. Raised tabs B. Upper cabinet cutout E. Long tab F. Bolt B. Save Installation Instructions for filter placement. Install filters. A B C D E F A. Do not use . 2. Plug microwave oven into a grounded 3 prong outlet. The installation is now complete. Then tighten with #6 x 3/8" sheet metal screw. Then ...
...not blown, or that the long tab of microwave oven by operating the vent fan. 5. Mounting Nut For Roof Venting Installation Only 1. Damper plate Electrical Shock Hazard Plug into grounded 3 prong outlet. 3. Test vent fan and exhaust by placing ... B. Raised tabs B. Upper cabinet cutout E. Long tab F. Bolt B. Save Installation Instructions for filter placement. Install filters. A B C D E F A. Do not use . 2. Plug microwave oven into a grounded 3 prong outlet. The installation is now complete. Then tighten with #6 x 3/8" sheet metal screw. Then ...
Installation Instructions
Page 13
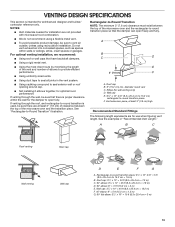
... Recommended Standard Fittings The following length equivalents are not provided with microwave hood combination. ■■ We do not recommend using recirculation installation. A B C Roof venting Roof cap Wall venting Wall cap D E F G A. VENTING DESIGN SPECIFICATIONS This section is proper ...clearance within walls or ceilings, attics, crawl spaces or garages. NOTES: ■■ Vent materials needed for installation are for wall venting only) D. If venting through the wall, be sure to vent air outside, unless using a flexible metal...
... Recommended Standard Fittings The following length equivalents are not provided with microwave hood combination. ■■ We do not recommend using recirculation installation. A B C Roof venting Roof cap Wall venting Wall cap D E F G A. VENTING DESIGN SPECIFICATIONS This section is proper ...clearance within walls or ceilings, attics, crawl spaces or garages. NOTES: ■■ Vent materials needed for installation are for wall venting only) D. If venting through the wall, be sure to vent air outside, unless using a flexible metal...

Installation Instructions
Page 14
... See your authorized dealer or service center. See the "Recommended Standard Fittings" section for either type of the microwave oven. For best performance, use when installing this microwave oven in the "Tools and Parts" section) Filler Panel Kits: A A. Two 90° elbows = 20 ft (6.1 m) B. 1 wall...Both numbers can be used. ASSISTANCE Call your authorized dealer or service center for details. 14 Replacement Parts If any of the installation hardware needs to be installed to use no more than three 90° elbows. See the following examples: 31⁄4" x 10" (8.3 x 25...
... See your authorized dealer or service center. See the "Recommended Standard Fittings" section for either type of the microwave oven. For best performance, use when installing this microwave oven in the "Tools and Parts" section) Filler Panel Kits: A A. Two 90° elbows = 20 ft (6.1 m) B. 1 wall...Both numbers can be used. ASSISTANCE Call your authorized dealer or service center for details. 14 Replacement Parts If any of the installation hardware needs to be installed to use no more than three 90° elbows. See the following examples: 31⁄4" x 10" (8.3 x 25...


