Use & Care Guide
Page 2
... 7 Clock 7 Timer 7 Control Lock 7 Language 7 Weight Entry Mode 7 MICROWAVE OVEN USE 8 Food Characteristics 8 Cooking Guidelines 8 Cookware and Dinnerware 9 Aluminum Foil and Metal 9 Microwave Cooking Power 9 Manual Cooking 10 Cooking in Stages 10 Favorite 10 Sensor Cooking 10 Quick Touch Menu (sensor and non-sensor 11 Weight Defrost / Timed Defrost 12 MICROWAVE...
... 7 Clock 7 Timer 7 Control Lock 7 Language 7 Weight Entry Mode 7 MICROWAVE OVEN USE 8 Food Characteristics 8 Cooking Guidelines 8 Cookware and Dinnerware 9 Aluminum Foil and Metal 9 Microwave Cooking Power 9 Manual Cooking 10 Cooking in Stages 10 Favorite 10 Sensor Cooking 10 Quick Touch Menu (sensor and non-sensor 11 Weight Defrost / Timed Defrost 12 MICROWAVE...
Use & Care Guide
Page 3
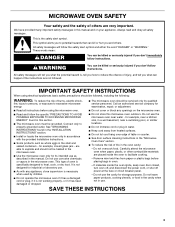
... Do not use . for its intended use . ■ As with the provided Installation Instructions. ■ Some products such as described in this manual and on the microwave oven. ■ Do not store this microwave oven outdoors. Do not overcook food. WARNING You can be killed or seriously injured...you to properly grounded outlet. This is not working properly, or if it is the safety alert symbol. See "GROUNDING INSTRUCTIONS" found in the manual. Remove wire twist-ties from heated surfaces. ■ Do not let cord hang over edge of table or counter. ■ See door ...
... Do not use . for its intended use . ■ As with the provided Installation Instructions. ■ Some products such as described in this manual and on the microwave oven. ■ Do not store this microwave oven outdoors. Do not overcook food. WARNING You can be killed or seriously injured...you to properly grounded outlet. This is not working properly, or if it is the safety alert symbol. See "GROUNDING INSTRUCTIONS" found in the manual. Remove wire twist-ties from heated surfaces. ■ Do not let cord hang over edge of table or counter. ■ See door ...
Use & Care Guide
Page 6
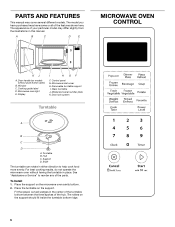
... support should fit inside the turntable bottom ridge. 6 Model and serial number plate K. Door lock system Turntable A B C D A. Hub C. Fit the raised, curved wedges in this manual. To Install: 1. PARTS AND FEATURES This manual may cover several different models. Display I . A B C D E MICROWAVE OVEN CONTROL K J A. Window C.
... support should fit inside the turntable bottom ridge. 6 Model and serial number plate K. Door lock system Turntable A B C D A. Hub C. Fit the raised, curved wedges in this manual. To Install: 1. PARTS AND FEATURES This manual may cover several different models. Display I . A B C D E MICROWAVE OVEN CONTROL K J A. Window C.
Use & Care Guide
Page 7
... and closed for about 5 minutes. Touch and hold number pad 0 for about 5 seconds. The word "door" will appear in the display, touch TIMER to any manual cooking cycle in the display. Cook functions may be started if the microwave oven door has been closed . Repeat to the microwave oven, "0:00" will...
... and closed for about 5 minutes. Touch and hold number pad 0 for about 5 seconds. The word "door" will appear in the display, touch TIMER to any manual cooking cycle in the display. Cook functions may be started if the microwave oven door has been closed . Repeat to the microwave oven, "0:00" will...
Use & Care Guide
Page 10
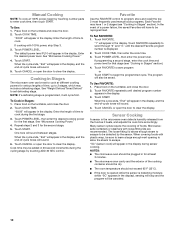
...the cook time accordingly. One tone will cycle first. Cook time may have to program, store and recall the top 3 most frequently used manual cook programs. Each Favorite may be added in 30-second increments during the cycling stage by touching ADD 30 SEC control. To Use FAVORITE:... dry. ■ The room temperature should not exceed 95°F (35°C). ■ If the door is opened while the sensor is displayed. 2. Manual Cooking NOTE: To cook at 100% power, begin the programmed cycle. To Use: 1. To Cook in the display. To Set FAVORITE: 1. If programming ...
...the cook time accordingly. One tone will cycle first. Cook time may have to program, store and recall the top 3 most frequently used manual cook programs. Each Favorite may be added in 30-second increments during the cycling stage by touching ADD 30 SEC control. To Use FAVORITE:... dry. ■ The room temperature should not exceed 95°F (35°C). ■ If the door is opened while the sensor is displayed. 2. Manual Cooking NOTE: To cook at 100% power, begin the programmed cycle. To Use: 1. To Cook in the display. To Set FAVORITE: 1. If programming ...
Use & Care Guide
Page 12
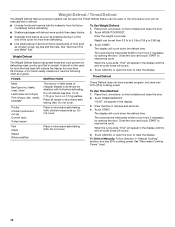
... display. Touch CANCEL or open the door to resume the cycle. To Defrost Manually: Follow direction in pounds. See "Aluminum Foil and Metal" first. The display will sound. 5. Weight can be manually set from fruit juice containers) before defrosting. It should be shielded with foil before..., but uses only 30% (PL3) cooking power. The display will sound. 4. To Use Weight Defrost: 1. Weight Defrost Enter the weight in "Manual Cooking" section, and use 30% cooking power. The cycle may be interrupted briefly to resume the cycle. Timed Defrost Meat Beef (ground, steaks, roast...
... display. Touch CANCEL or open the door to resume the cycle. To Defrost Manually: Follow direction in pounds. See "Aluminum Foil and Metal" first. The display will sound. 5. Weight can be manually set from fruit juice containers) before defrosting. It should be shielded with foil before..., but uses only 30% (PL3) cooking power. The display will sound. 4. To Use Weight Defrost: 1. Weight Defrost Enter the weight in "Manual Cooking" section, and use 30% cooking power. The cycle may be interrupted briefly to resume the cycle. Timed Defrost Meat Beef (ground, steaks, roast...

Installation Guide
Page 1
... BUILT-IN TRIM KIT INSTALLATION INSTRUCTIONS Built-In Trim Kit Models MK2227 MK2220 UL listed for use over any electric or gas built-in this manual and on your appliance.
... BUILT-IN TRIM KIT INSTALLATION INSTRUCTIONS Built-In Trim Kit Models MK2227 MK2220 UL listed for use over any electric or gas built-in this manual and on your appliance.


