Installation Guide
Page 1
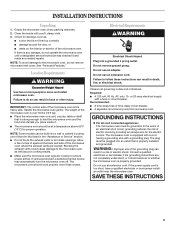
...what the potential hazard is the safety alert symbol. Always read and obey all safety messages. All safety messages will follow instructions. MICROWAVE OVEN BUILT-IN TRIM KIT INSTALLATION INSTRUCTIONS Built-In Trim Kit Models MK2167, MK2160 UL listed for use over any electric or gas ... Préparation de l'ouverture d'encastrement 9 Installation du four à micro-ondes 10 Installation du cadre de la trousse de garniture 11 MICROWAVE OVEN SAFETY Your safety and the safety of injury, and tell you what can be killed or seriously injured if you don't follow the safety ...
...what the potential hazard is the safety alert symbol. Always read and obey all safety messages. All safety messages will follow instructions. MICROWAVE OVEN BUILT-IN TRIM KIT INSTALLATION INSTRUCTIONS Built-In Trim Kit Models MK2167, MK2160 UL listed for use over any electric or gas ... Préparation de l'ouverture d'encastrement 9 Installation du four à micro-ondes 10 Installation du cadre de la trousse de garniture 11 MICROWAVE OVEN SAFETY Your safety and the safety of injury, and tell you what can be killed or seriously injured if you don't follow the safety ...
Installation Guide
Page 2
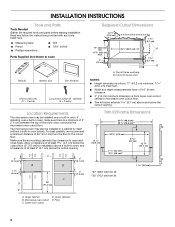
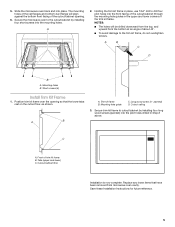
...best usability, we recommend a minimum distance of at least 1 4.0 cm) below ). Upper cabinet B. The microwave oven may be installed in a cabinet by itself (without a built-in oven. Make sure the surrounding cabinetry has clearance to scale Rails (2) Bottom duct Trim kit frame Short screws (14)...11 + 3 extra) Long wood screws (6 - Trim kit frame overhang B. Microwave oven cutout C. Lower cabinets E. Cutout for installation above a built-in oven, make sure there is from the floor to microwave oven cutout floor. ■ Trim kit frame extends 1 2.7 cm) above the ...
...best usability, we recommend a minimum distance of at least 1 4.0 cm) below ). Upper cabinet B. The microwave oven may be installed in a cabinet by itself (without a built-in oven. Make sure the surrounding cabinetry has clearance to scale Rails (2) Bottom duct Trim kit frame Short screws (14)...11 + 3 extra) Long wood screws (6 - Trim kit frame overhang B. Microwave oven cutout C. Lower cabinets E. Cutout for installation above a built-in oven, make sure there is from the floor to microwave oven cutout floor. ■ Trim kit frame extends 1 2.7 cm) above the ...
Installation Guide
Page 3
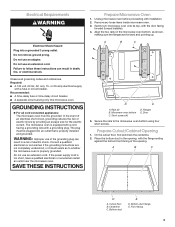
...the grounding instructions are forward and pointing up. Do not use an extension cord. Remove any loose items inside microwave oven. 3. Rails (2) B. Microwave oven bottom C. Short screws (4) D. Prepare Cutout/Cabinet Opening 1. Front facing 3 Do not use an extension cord...risk of electric shock. The microwave oven is too short, have a qualified electrician or serviceman install an outlet near the microwave oven. SAVE THESE INSTRUCTIONS Prepare Microwave Oven 1. Gently turn microwave oven onto its top, with installation. 2. Unplug microwave oven before proceeding with the door...
...the grounding instructions are forward and pointing up. Do not use an extension cord. Remove any loose items inside microwave oven. 3. Rails (2) B. Microwave oven bottom C. Short screws (4) D. Prepare Cutout/Cabinet Opening 1. Front facing 3 Do not use an extension cord...risk of electric shock. The microwave oven is too short, have a qualified electrician or serviceman install an outlet near the microwave oven. SAVE THESE INSTRUCTIONS Prepare Microwave Oven 1. Gently turn microwave oven onto its top, with installation. 2. Unplug microwave oven before proceeding with the door...

Installation Guide
Page 4
... through the bottom duct onto the cutout floor. Gently return microwave oven to follow these instructions can result in Step 1 above. Position microwave oven near cutout opening . A Electrical Shock Hazard Plug into the three holes marked in microwave oven. 4. Plug in Step 4. 6. Realign and install the ...bottom duct with the rail guides on the bottom duct with centerline 4. Bottom duct flange B. Install the Microwave Oven 1. Bottom duct B. Do not remove ground prong. A B A. Mark the three mounting holes through the four mounting holes of ...
... through the bottom duct onto the cutout floor. Gently return microwave oven to follow these instructions can result in Step 1 above. Position microwave oven near cutout opening . A Electrical Shock Hazard Plug into the three holes marked in microwave oven. 4. Plug in Step 4. 6. Realign and install the ...bottom duct with the rail guides on the bottom duct with centerline 4. Bottom duct flange B. Install the Microwave Oven 1. Bottom duct B. Do not remove ground prong. A B A. Mark the three mounting holes through the four mounting holes of ...
Installation Guide
Page 5
...in Step 2 above. Mounting holes B. A B A. Trim kit frame B. Mounting hole guide C. Cutout ceiling 3. Front of the trim kit frame. Secure the microwave oven to drill four pilot holes into the pilot holes drilled in the upper and lower corners of trim kit frame B. The mounting holes of the... rail flanges and bottom duct flange will be drilled downward from the top, and upward from microwave oven cavity. NOTES: ■ The holes will align against the bottom front facing of about 45°. ■ To avoid damage to ...
...in Step 2 above. Mounting holes B. A B A. Trim kit frame B. Mounting hole guide C. Cutout ceiling 3. Front of the trim kit frame. Secure the microwave oven to drill four pilot holes into the pilot holes drilled in the upper and lower corners of trim kit frame B. The mounting holes of the... rail flanges and bottom duct flange will be drilled downward from the top, and upward from microwave oven cavity. NOTES: ■ The holes will align against the bottom front facing of about 45°. ■ To avoid damage to ...

Use & Care Guide
Page 1
or visit our website at... www.whirlpool.com Table of Contents 2 W10434129B Model WMC30516 MICROWAVE OVEN Use & Care Guide For questions about features, operation/performance, parts, accessories or service, call: 1-800-253-1301.
or visit our website at... www.whirlpool.com Table of Contents 2 W10434129B Model WMC30516 MICROWAVE OVEN Use & Care Guide For questions about features, operation/performance, parts, accessories or service, call: 1-800-253-1301.
Use & Care Guide
Page 2
... 3 INSTALLATION INSTRUCTIONS 5 Unpacking 5 Location Requirements 5 Electrical Requirements 5 PARTS AND FEATURES 6 Turntable 6 MICROWAVE OVEN CONTROL 6 Display 7 Start 7 Add 30 Seconds 7 Cancel 7 Tones 7 Clock 7 Timer 7 Control Lock 7 MICROWAVE OVEN USE 8 Food Characteristics 8 Cooking Guidelines 8 Cookware and Dinnerware 8 Aluminum Foil and Metal 9 Microwave Cooking Power 9 Manual Cooking 10 Cooking in Stages 10 Favorite 10 Sensor Cooking 10 Quick...
... 3 INSTALLATION INSTRUCTIONS 5 Unpacking 5 Location Requirements 5 Electrical Requirements 5 PARTS AND FEATURES 6 Turntable 6 MICROWAVE OVEN CONTROL 6 Display 7 Start 7 Add 30 Seconds 7 Cancel 7 Tones 7 Clock 7 Timer 7 Control Lock 7 MICROWAVE OVEN USE 8 Food Characteristics 8 Cooking Guidelines 8 Cookware and Dinnerware 8 Aluminum Foil and Metal 9 Microwave Cooking Power 9 Manual Cooking 10 Cooking in Stages 10 Favorite 10 Sensor Cooking 10 Quick...
Use & Care Guide
Page 3
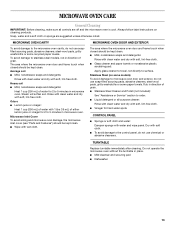
...can burn off power at the fuse or circuit breaker panel. - Do not use corrosive chemicals or vapors in the microwave oven for example, closed , turn oven off, and disconnect the power cord, or shut off the pad and touch electrical parts involving a risk of injury to...leave paper products, cooking utensils, or food in the cavity when not in use. ■ Liquids, such as described in the microwave oven. ■ Use the microwave oven only for industrial or laboratory use the cavity for examination, repair, or adjustment. ■ See door surface cleaning instructions in accordance...
...can burn off power at the fuse or circuit breaker panel. - Do not use corrosive chemicals or vapors in the microwave oven for example, closed , turn oven off, and disconnect the power cord, or shut off the pad and touch electrical parts involving a risk of injury to...leave paper products, cooking utensils, or food in the cavity when not in use. ■ Liquids, such as described in the microwave oven. ■ Use the microwave oven only for industrial or laboratory use the cavity for examination, repair, or adjustment. ■ See door surface cleaning instructions in accordance...
Use & Care Guide
Page 4
...manufacturer's recommended accessories, in this microwave oven when not in use. ■ Do not store anything directly on the microwave oven. This will cause overheating of the microwave oven. ■ Do not cover or block any openings on top of the microwave oven when the microwave oven is operated in convection, combination...operation can result in water. ■ Keep cord away from heated surfaces. ■ Do not let cord hang over edge of the microwave oven with metal foil. for example, near a kitchen sink, in a wet basement, or near a swimming pool, or similar locations. ■...
...manufacturer's recommended accessories, in this microwave oven when not in use. ■ Do not store anything directly on the microwave oven. This will cause overheating of the microwave oven. ■ Do not cover or block any openings on top of the microwave oven when the microwave oven is operated in convection, combination...operation can result in water. ■ Keep cord away from heated surfaces. ■ Do not let cord hang over edge of the microwave oven with metal foil. for example, near a kitchen sink, in a wet basement, or near a swimming pool, or similar locations. ■...
Use & Care Guide
Page 5
... that is properly installed and grounded. Electrical Requirements WARNING Electrical Shock Hazard Plug into an outlet that is strong enough to hold the microwave oven and the food and utensils you place inside with a soft, damp cloth. 3. Do not use an extension cord. Do not use...space at a temperature above 50°F (10°C) for proper operation. Check for the electric current. Failure to move and install microwave oven. Location Requirements WARNING Excessive Weight Hazard Use two or more people to follow these instructions can result in death, fire, or electrical ...
... that is properly installed and grounded. Electrical Requirements WARNING Electrical Shock Hazard Plug into an outlet that is strong enough to hold the microwave oven and the food and utensils you place inside with a soft, damp cloth. 3. Do not use an extension cord. Do not use...space at a temperature above 50°F (10°C) for proper operation. Check for the electric current. Failure to move and install microwave oven. Location Requirements WARNING Excessive Weight Hazard Use two or more people to follow these instructions can result in death, fire, or electrical ...
Use & Care Guide
Page 6
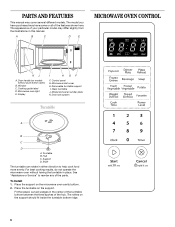
... in the center of the turntable bottom between the three spokes of the hub. Cooking guide label D. The rollers on the microwave oven cavity bottom. 2. Hub C. Place the turntable on models without having the turntable in either direction to reorder any of the parts.... Door lock system Turntable A B C D A. A B C D E MICROWAVE OVEN CONTROL Oz lbs K J A. PARTS AND FEATURES This manual may have some or all of the features shown here. Window C. Fit the raised, curved wedges in...
... in the center of the turntable bottom between the three spokes of the hub. Cooking guide label D. The rollers on the microwave oven cavity bottom. 2. Hub C. Place the turntable on models without having the turntable in either direction to reorder any of the parts.... Door lock system Turntable A B C D A. A B C D E MICROWAVE OVEN CONTROL Oz lbs K J A. PARTS AND FEATURES This manual may have some or all of the features shown here. Window C. Fit the raised, curved wedges in...
Use & Care Guide
Page 7
...End of Timer countdown Five tones ■ End of day. Defrost C. Power (high) D. while the control is opened. It will also turn off . The microwave oven will not erase the time of cycle E F G H I . See "Control Lock" section. Touch CLOCK. When the cook function is over. Touch TIMER.... Power (low to enter desired time. 3. NOTE: To avoid unintentional operation of day. 3. Display When power is first supplied to the microwave oven, "0:00" will be added to any manual cooking cycle in 30-second increments, at any other time, a power failure has occurred. Start...
...End of Timer countdown Five tones ■ End of day. Defrost C. Power (high) D. while the control is opened. It will also turn off . The microwave oven will not erase the time of cycle E F G H I . See "Control Lock" section. Touch CLOCK. When the cook function is over. Touch TIMER.... Power (low to enter desired time. 3. NOTE: To avoid unintentional operation of day. 3. Display When power is first supplied to the microwave oven, "0:00" will be added to any manual cooking cycle in 30-second increments, at any other time, a power failure has occurred. Start...

Use & Care Guide
Page 8
... and reduce spattering. Stir from the food. Do not use . China, Earthenware Follow manufacturer's recommendations. 8 Check for microwave ovens may cause them to move, producing friction and heat which reflect off the metal floor, walls and ceiling and pass through...above the turntable. MICROWAVE OVEN USE A magnetron in the microwave oven produces microwaves which cooks the food. ■ To avoid damage to the microwave oven, do not lean on or allow children to swing on the microwave oven door. ■ To avoid damage to the microwave oven, do not operate microwave oven when it is ...
... and reduce spattering. Stir from the food. Do not use . China, Earthenware Follow manufacturer's recommendations. 8 Check for microwave ovens may cause them to move, producing friction and heat which reflect off the metal floor, walls and ceiling and pass through...above the turntable. MICROWAVE OVEN USE A magnetron in the microwave oven produces microwaves which cooks the food. ■ To avoid damage to the microwave oven, do not lean on or allow children to swing on the microwave oven door. ■ To avoid damage to the microwave oven, do not operate microwave oven when it is ...
Use & Care Guide
Page 9
...MATERIAL RECOMMENDATIONS Melamine Follow manufacturer's recommendations. Pottery and Clay Follow manufacturer's recommendations. To Test Cookware or Dinnerware for use in the microwave oven. 9 OK for Use Racks and bakeware supplied with another metal object during manual cooking, depending on some metal can occur and... cause damage to the microwave oven, do not allow contact with the microwave oven (on the power level of light) can be used in microwave oven with high water content, such as cheese and egg dishes, pudding and...
...MATERIAL RECOMMENDATIONS Melamine Follow manufacturer's recommendations. Pottery and Clay Follow manufacturer's recommendations. To Test Cookware or Dinnerware for use in the microwave oven. 9 OK for Use Racks and bakeware supplied with another metal object during manual cooking, depending on some metal can occur and... cause damage to the microwave oven, do not allow contact with the microwave oven (on the power level of light) can be used in microwave oven with high water content, such as cheese and egg dishes, pudding and...
Use & Care Guide
Page 10
... sure to leave a large enough vent opening to allow the steam to set to scroll through "2" and "3," until desired program number appears in the microwave oven detects humidity released from the food as it will have 1 or 2 stages (see "Cooking in the display), sensing will stop and the program will...power for that stage (see "Cooking in the display, and the end-of time to begin by the sensor. Touch START. NOTES: ■ The microwave oven should not exceed 95°F (35°C). ■ If the door is opened while the sensor is detecting moisture (while "SC" appears in Stages"...
... sure to leave a large enough vent opening to allow the steam to set to scroll through "2" and "3," until desired program number appears in the microwave oven detects humidity released from the food as it will have 1 or 2 stages (see "Cooking in the display), sensing will stop and the program will...power for that stage (see "Cooking in the display, and the end-of time to begin by the sensor. Touch START. NOTES: ■ The microwave oven should not exceed 95°F (35°C). ■ If the door is opened while the sensor is detecting moisture (while "SC" appears in Stages"...
Use & Care Guide
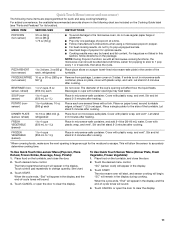
Page 11
...) 1 to 4 potatoes, 10 oz (283 g) each Pierce each , refrigerated turntable. Place on paper towel, around turntable edges, at all microwave cooking functions, the microwave oven should be attended at least 1" (2.5 cm) apart. DINNER PLATE (sensor, reheat) 10-16 oz (283-454 g), Place food on the turntable...SERVING SIZE INSTRUCTIONS POPCORN (non-sensor) 3.5 oz (99 g) 3.0 oz (85 g) 1.75 oz (50 g) ■ To avoid damage to the microwave oven, do not use regular paper bags or glassware. ■ Pop only one several times with all times. For bag sizes not listed in the display...
...) 1 to 4 potatoes, 10 oz (283 g) each Pierce each , refrigerated turntable. Place on paper towel, around turntable edges, at all microwave cooking functions, the microwave oven should be attended at least 1" (2.5 cm) apart. DINNER PLATE (sensor, reheat) 10-16 oz (283-454 g), Place food on the turntable...SERVING SIZE INSTRUCTIONS POPCORN (non-sensor) 3.5 oz (99 g) 3.0 oz (85 g) 1.75 oz (50 g) ■ To avoid damage to the microwave oven, do not use regular paper bags or glassware. ■ Pop only one several times with all times. For bag sizes not listed in the display...

Use & Care Guide
Page 12
... powers for more even defrosting. ■ Use small pieces of aluminum foil to shield parts of irregular shaped cuts should not be used , or the microwave oven can be set to defrost. ■ Unwrap foods and remove lids (for example, from 0.3 lb to 6.3 lbs (136 g to clear the display. Meat... weight will appear in the display, and the end-of -cycle tones will count down the defrost time. Do not cover. Enter the time in microwave-safe baking dish, chicken breast side up. DEF3 - Touch START. When the cycle ends, "End" will appear in the display. Place food, ...
... powers for more even defrosting. ■ Use small pieces of aluminum foil to shield parts of irregular shaped cuts should not be used , or the microwave oven can be set to defrost. ■ Unwrap foods and remove lids (for example, from 0.3 lb to 6.3 lbs (136 g to clear the display. Meat... weight will appear in the display, and the end-of -cycle tones will count down the defrost time. Do not cover. Enter the time in microwave-safe baking dish, chicken breast side up. DEF3 - Touch START. When the cycle ends, "End" will appear in the display. Place food, ...
Use & Care Guide
Page 13
...otherwise noted. Steam will soften soil. Rinse with clean water and dry with soft, lint-free cloth. Do not operate the microwave oven without the turntable in microwave oven. Average soil ■ Mild, nonabrasive soaps and detergents: Rinse with clean water and dry with soft, lint-free cloth.... Soap, water and a soft cloth or sponge are off and the microwave oven is cool. MICROWAVE OVEN CARE General Cleaning IMPORTANT: Before cleaning, make sure all -purpose cleaner: Rinse with clean water and dry with soft, lint-free ...
...otherwise noted. Steam will soften soil. Rinse with clean water and dry with soft, lint-free cloth. Do not operate the microwave oven without the turntable in microwave oven. Average soil ■ Mild, nonabrasive soaps and detergents: Rinse with clean water and dry with soft, lint-free cloth.... Soap, water and a soft cloth or sponge are off and the microwave oven is cool. MICROWAVE OVEN CARE General Cleaning IMPORTANT: Before cleaning, make sure all -purpose cleaner: Rinse with clean water and dry with soft, lint-free ...
Use & Care Guide
Page 14
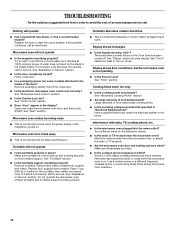
... cup (250 mL) of water on Clock. See "Assistance or Service" section. See "Timer" section. See "Microwave Oven Control" section. ■ Is the Control Lock set properly? Microwave oven door looks wavy ■ This is normal and occurs when the power supply in the magnetron cycles on some models)... attached to the inside of the door? Do not operate the microwave oven without turntable and turntable support working properly? Display shows messages ■ Is the display showing "0:00"? Use a corded phone or a ...
... cup (250 mL) of water on Clock. See "Assistance or Service" section. See "Timer" section. See "Microwave Oven Control" section. ■ Is the Control Lock set properly? Microwave oven door looks wavy ■ This is normal and occurs when the power supply in the magnetron cycles on some models)... attached to the inside of the door? Do not operate the microwave oven without turntable and turntable support working properly? Display shows messages ■ Is the display showing "0:00"? Use a corded phone or a ...
Use & Care Guide
Page 15
...In Kits This countertop microwave oven can also look in the United States. ASSISTANCE OR SERVICE Before calling for the toll-free number. In the U.S.A. Our consultants provide assistance with: ■ Features and specifications on our full line of your correspondence. Whirlpool designated service technicians .... These kits are made with any questions or concerns at: Whirlpool Brand Home Appliances Customer eXperience Center 553 Benson Road Benton Harbor, MI 49022-2692 Please include a daytime phone number in wall oven, up to order replacement parts, we recommend that you can be...
...In Kits This countertop microwave oven can also look in the United States. ASSISTANCE OR SERVICE Before calling for the toll-free number. In the U.S.A. Our consultants provide assistance with: ■ Features and specifications on our full line of your correspondence. Whirlpool designated service technicians .... These kits are made with any questions or concerns at: Whirlpool Brand Home Appliances Customer eXperience Center 553 Benson Road Benton Harbor, MI 49022-2692 Please include a daytime phone number in wall oven, up to order replacement parts, we recommend that you can be...


