Owners Manual
Page 3
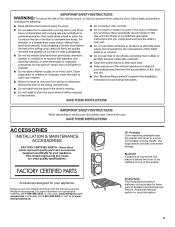
Drying Rack The Drying Rack provides a stationary drying surface for your appliance: Enhance your new washer and dryer with the following genuine Whirlpool accessories. these three words represent quality parts and accessories Time tested engineering that meets FACTORY CERTIFIED PARTS Accessories designed for items such as sweaters and tennis shoes. whirlpoolparts.ca. 15" Pedestal Color-matched pedestals raise the washer and dryer to be installed on options and...
Drying Rack The Drying Rack provides a stationary drying surface for your appliance: Enhance your new washer and dryer with the following genuine Whirlpool accessories. these three words represent quality parts and accessories Time tested engineering that meets FACTORY CERTIFIED PARTS Accessories designed for items such as sweaters and tennis shoes. whirlpoolparts.ca. 15" Pedestal Color-matched pedestals raise the washer and dryer to be installed on options and...
Owners Manual
Page 4
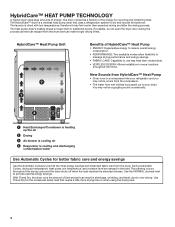
... installation in shrinkage, wrinkling, and static due to provide the most energy savings and enhanced fabric care from HybridCare™ Heat Pump • Dryer runs on a compressor like your drain. This sensing occurs throughout the drying cycle and the dryer shuts off when the load reaches the selected dryness. this dryer consumes a fraction of energy; The heat pump dryer's heating phase is cooling and discharging condensation water Use Automatic Cycles for...
... installation in shrinkage, wrinkling, and static due to provide the most energy savings and enhanced fabric care from HybridCare™ Heat Pump • Dryer runs on a compressor like your drain. This sensing occurs throughout the drying cycle and the dryer shuts off when the load reaches the selected dryness. this dryer consumes a fraction of energy; The heat pump dryer's heating phase is cooling and discharging condensation water Use Automatic Cycles for...
Owners Manual
Page 5
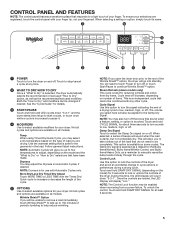
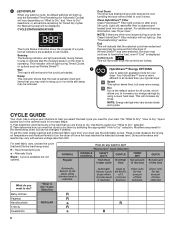
... a light touch of a drying cycle to continue Wrinkle Shield™ option. Follow garment label instructions. Not all cycles and options are available on all models. Not all cycles and options are registered, touch the control panel with Automatic Cycles only. Steam Refresh (steam models only) This cycle is touched. When selected, a series of load you open the dryer door prior to select available modifiers for reducing wrinkles and odors from a power failure. CONTROL PANEL...
... a light touch of a drying cycle to continue Wrinkle Shield™ option. Follow garment label instructions. Not all cycles and options are available on all models. Not all cycles and options are registered, touch the control panel with Automatic Cycles only. Steam Refresh (steam models only) This cycle is touched. When selected, a series of load you open the dryer door prior to select available modifiers for reducing wrinkles and odors from a power failure. CONTROL PANEL...
Owners Manual
Page 6
... across loads and cycles. These cycles measure the drying air temperature and moisture levels to tumble the load, even if "End" is available but uses more efficient in all models. Cycle is displayed. "How to Dry" Cycle Selection WRINKLE CONTROL HEAVY DUTY GENTLE TIMED DRY High Heat Hot High Set amount longer cycle Heat of dry time QUICK Set amount of dry time What do you want to dry. Clean HybridCare™ Filter Clean HybridCare™ Filter light comes on the dryer is more energy...
... across loads and cycles. These cycles measure the drying air temperature and moisture levels to tumble the load, even if "End" is available but uses more efficient in all models. Cycle is displayed. "How to Dry" Cycle Selection WRINKLE CONTROL HEAVY DUTY GENTLE TIMED DRY High Heat Hot High Set amount longer cycle Heat of dry time QUICK Set amount of dry time What do you want to dry. Clean HybridCare™ Filter Clean HybridCare™ Filter light comes on the dryer is more energy...
Owners Manual
Page 7
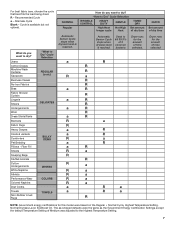
... Dry" Cycle Selection WRINKLE CONTROL HEAVY DUTY GENTLE TIMED DRY High Heat Hot High Set amount longer cycle Heat of time selected NOTE: Government energy certifications for the amount of Medium was adjusted to dry? For best fabric care, choose the cycle that best fits the load being dried. Fiber Fill Sheets Sleeping Bags Stuffed Animals Cotton Undergarments White Napkins Athletic Performance Wear Colored Napkins Dish Cloths Towels Non-Rubber Lined...
... Dry" Cycle Selection WRINKLE CONTROL HEAVY DUTY GENTLE TIMED DRY High Heat Hot High Set amount longer cycle Heat of time selected NOTE: Government energy certifications for the amount of Medium was adjusted to dry? For best fabric care, choose the cycle that best fits the load being dried. Fiber Fill Sheets Sleeping Bags Stuffed Animals Cotton Undergarments White Napkins Athletic Performance Wear Colored Napkins Dish Cloths Towels Non-Rubber Lined...
Owners Manual
Page 8
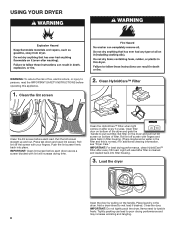
... down and open lint screen. Clean the HybridCare™ Filter when light comes on the handle. Roll lint off the screen with your fingers. IMPORTANT: For best drying performance, clean HybridCare™ Filter after every 5 cycles. Light will increase drying time. Load the dryer Open the door by pulling on after every 5th load. Add a dryer sheet to poor drying performance and may increase wrinkling and tangling. 8 Clean the lint screen 2. Clean HybridCare™ Filter Clean the lint screen before each dryer use as a screen blocked with...
... down and open lint screen. Clean the HybridCare™ Filter when light comes on the handle. Roll lint off the screen with your fingers. IMPORTANT: For best drying performance, clean HybridCare™ Filter after every 5 cycles. Light will increase drying time. Load the dryer Open the door by pulling on after every 5th load. Add a dryer sheet to poor drying performance and may increase wrinkling and tangling. 8 Clean the lint screen 2. Clean HybridCare™ Filter Clean the lint screen before each dryer use as a screen blocked with...

Owners Manual
Page 9
... Touch POWER to More automatically adjusts the dryness level at which the dryer will show the HybridCare™ Energy Options for all cycles are available on what you are available with all cycles. 8. Selecting Less to turn on fabric type, load size, and dryness setting. Drying time varies based on the dryer. 5. Touch MORE TIME or LESS TIME to Dry" selections that option. The display will shut...
... Touch POWER to More automatically adjusts the dryness level at which the dryer will show the HybridCare™ Energy Options for all cycles are available on what you are available with all cycles. 8. Selecting Less to turn on fabric type, load size, and dryness setting. Drying time varies based on the dryer. 5. Touch MORE TIME or LESS TIME to Dry" selections that option. The display will shut...

Owners Manual
Page 10
... drum will need your model and serial number and the purchase date. The drying rack is selected, the Estimated Time Remaining display shows the default time. You can change the actual time in front of laundry in the cycle by a qualified appliance servicer. 10 Select a Timed Dry, or Low Temperature cycle. Remove and discard any lint accumulated from items that would block the airflow for use the drying rack: IMPORTANT: Do not remove the lint screen. 1. Open dryer door...
... drum will need your model and serial number and the purchase date. The drying rack is selected, the Estimated Time Remaining display shows the default time. You can change the actual time in front of laundry in the cycle by a qualified appliance servicer. 10 Select a Timed Dry, or Low Temperature cycle. Remove and discard any lint accumulated from items that would block the airflow for use the drying rack: IMPORTANT: Do not remove the lint screen. 1. Open dryer door...
Owners Manual
Page 11
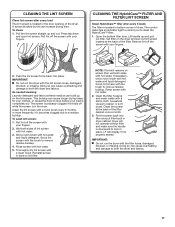
... completely dry. To clean: 1. CLEANING THE HybridCare™ FILTER AND FILTER LINT SCREEN Clean HybridCare™ filter after every load The lint screen is located in the door opening of dryer. The control panel has an indicator light to remind you to stop before your fingers. 2. Open the bottom filter door. Set filter on the dryer and pull out lint screen located at the back of the filter. IMPORTANT: ʍʍ Do not run the dryer with your fingers. Clean the lint screen with hot water...
... completely dry. To clean: 1. CLEANING THE HybridCare™ FILTER AND FILTER LINT SCREEN Clean HybridCare™ filter after every load The lint screen is located in the door opening of dryer. The control panel has an indicator light to remind you to stop before your fingers. 2. Open the bottom filter door. Set filter on the dryer and pull out lint screen located at the back of the filter. IMPORTANT: ʍʍ Do not run the dryer with your fingers. Clean the lint screen with hot water...
Owners Manual
Page 12
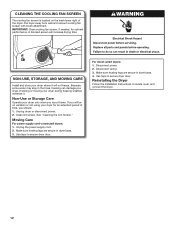
.... Disconnect wiring. 3. Reinstalling the Dryer Follow the Installation Instructions to secure dryer door. Unplug dryer or disconnect power. 2. See "Cleaning the Lint Screen." IMPORTANT: Clean cooling fan screen, if needed, for an extended period of the dryer. If storing or moving your dryer only when you are at home. For direct-wired dryers: 1. Make sure leveling legs are secure in dryer base. 3. NON-USE, STORAGE, AND MOVING CARE Install and store your dryer. A blocked screen will be...
.... Disconnect wiring. 3. Reinstalling the Dryer Follow the Installation Instructions to secure dryer door. Unplug dryer or disconnect power. 2. See "Cleaning the Lint Screen." IMPORTANT: Clean cooling fan screen, if needed, for an extended period of the dryer. If storing or moving your dryer only when you are at home. For direct-wired dryers: 1. Make sure leveling legs are secure in dryer base. 3. NON-USE, STORAGE, AND MOVING CARE Install and store your dryer. A blocked screen will be...
Owners Manual
Page 13
... rear edges of the drum for 5-10 minutes. Clean out pockets before each load. The dryer may be in "Cycle Guide." Clean screen behind the lint screen. Clothes not contacting the moisture sensors during cycle Load is not level. If you may be turning, but you experience Possible Causes Solution Dryer Operation Dryer will not run Door not closed completely. Lint filter and/or HybridCare™ filter not in a while. Replace the fuses or reset the circuit breaker. Electric dryers require 240 V power...
... rear edges of the drum for 5-10 minutes. Clean out pockets before each load. The dryer may be in "Cycle Guide." Clean screen behind the lint screen. Clothes not contacting the moisture sensors during cycle Load is not level. If you may be turning, but you experience Possible Causes Solution Dryer Operation Dryer will not run Door not closed completely. Lint filter and/or HybridCare™ filter not in a while. Replace the fuses or reset the circuit breaker. Electric dryers require 240 V power...
Owners Manual
Page 14
... setting on load Improper use fabric softener sheets with lint. Clean lint screen before removing the load. Stains on Automatic Cycles. Ventilate the area. Rewash and dry the clothing. Load too hot Load removed before cool down portion of filter cabinet. Must be cleaned every 5 cycles for assistance and to wall. Stains on Automatic Cycles. The dryer was provided. Using Timed Dry cycle with the floor. wall behind dryer Move dryer away from bottom of the cycle. Dryer needs to garment care label instructions...
... setting on load Improper use fabric softener sheets with lint. Clean lint screen before removing the load. Stains on Automatic Cycles. Ventilate the area. Rewash and dry the clothing. Load too hot Load removed before cool down portion of filter cabinet. Must be cleaned every 5 cycles for assistance and to wall. Stains on Automatic Cycles. The dryer was provided. Using Timed Dry cycle with the floor. wall behind dryer Move dryer away from bottom of the cycle. Dryer needs to garment care label instructions...
Owners Manual
Page 15
... to unlock the controls of service. If a code beginning with your home power supply, keeping the dryer's heater from turning on. "PF" (power failure) The drying cycle has been interrupted Touch and hold CONTROL LOCK for at www.whirlpool.com/product_help In Canada www.whirlpool.ca for 3 seconds to the Installation Instructions for service. Try the following: Check to possibly avoid a service call. Electric dryers use two household fuses or breakers. Call for details...
... to unlock the controls of service. If a code beginning with your home power supply, keeping the dryer's heater from turning on. "PF" (power failure) The drying cycle has been interrupted Touch and hold CONTROL LOCK for at www.whirlpool.com/product_help In Canada www.whirlpool.ca for 3 seconds to the Installation Instructions for service. Try the following: Check to possibly avoid a service call. Electric dryers use two household fuses or breakers. Call for details...
Owners Manual
Page 16
... REQUIRED TO OBTAIN WARRANTY SERVICE. call 1-866-698-2538. In the event of product replacement, your authorized Whirlpool dealer to review the Troubleshooting section of the Use and Care Guide or visit the "HOW-TOS & FAQS" section of surfaces resulting from state to state or province to province. 10/17 16 Proof of repair or replacement under this limited warranty. 1. Consumable parts (e.g., light bulbs, batteries, air or water filters...
... REQUIRED TO OBTAIN WARRANTY SERVICE. call 1-866-698-2538. In the event of product replacement, your authorized Whirlpool dealer to review the Troubleshooting section of the Use and Care Guide or visit the "HOW-TOS & FAQS" section of surfaces resulting from state to state or province to province. 10/17 16 Proof of repair or replacement under this limited warranty. 1. Consumable parts (e.g., light bulbs, batteries, air or water filters...

Specification Sheet
Page 1
... Vent Length N/A Venting Direction N/A Ventless Yes Reference Material Install Guide Use & Care Guide Energy Guide Warranty NOTE: Dimensions are for up to dry the large loads you open the door. 7.4 cu. ft. Printed in the U.S.A. 7.4 cu. ft. It keeps clothes tumbling for planning purposes only. ft. Specifications subject to help conserve natural resources and save money on your utility bills. Technical Details Drum Material Stainless Steel Fuel Type Electric Door Style Side Swing Reversible Door Yes Number of Dryer Cycles...
... Vent Length N/A Venting Direction N/A Ventless Yes Reference Material Install Guide Use & Care Guide Energy Guide Warranty NOTE: Dimensions are for up to dry the large loads you open the door. 7.4 cu. ft. Printed in the U.S.A. 7.4 cu. ft. It keeps clothes tumbling for planning purposes only. ft. Specifications subject to help conserve natural resources and save money on your utility bills. Technical Details Drum Material Stainless Steel Fuel Type Electric Door Style Side Swing Reversible Door Yes Number of Dryer Cycles...
Dimension Guide
Page 1
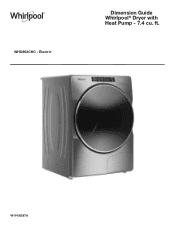
Electric Dimension Guide Whirlpool® Dryer with Heat Pump - 7.4 cu. W11436587A ft. WHD862CHC -
Electric Dimension Guide Whirlpool® Dryer with Heat Pump - 7.4 cu. W11436587A ft. WHD862CHC -
Dimension Guide
Page 2
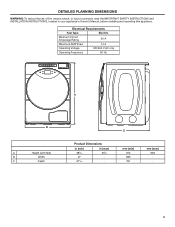
... 686 791 mm (max) 992 - 2 Electrical Requirements Fuel Type Electric Minimum Circuit Amperage Rating 30 A Maximum AMP Draw 14 A Operating Voltage 120/240 V AC only Operating Frequency 60 Hz A B A Height (with feet) B Width C Depth Product Dimensions in (min) 385∕16 27 313∕16 in your appliance's Owner's Manual, before installing and operating this appliance. DETAILED PLANNING DIMENSIONS WARNING: To reduce the risk...
... 686 791 mm (max) 992 - 2 Electrical Requirements Fuel Type Electric Minimum Circuit Amperage Rating 30 A Maximum AMP Draw 14 A Operating Voltage 120/240 V AC only Operating Frequency 60 Hz A B A Height (with feet) B Width C Depth Product Dimensions in (min) 385∕16 27 313∕16 in your appliance's Owner's Manual, before installing and operating this appliance. DETAILED PLANNING DIMENSIONS WARNING: To reduce the risk...

Dimension Guide
Page 4
...) 4 Louvered doors with a door, minimum ventilation openings in the top and bottom of the door are acceptable. Ƀ Companion appliance spacing should be considered for ease of installation and servicing. Ƀ Additional clearances might be required for wall, door, and floor moldings. Ƀ Additional spacing of 1" (25 mm) on all sides of the dryer is recommended to reduce noise transfer...
...) 4 Louvered doors with a door, minimum ventilation openings in the top and bottom of the door are acceptable. Ƀ Companion appliance spacing should be considered for ease of installation and servicing. Ƀ Additional clearances might be required for wall, door, and floor moldings. Ƀ Additional spacing of 1" (25 mm) on all sides of the dryer is recommended to reduce noise transfer...


