

Warranty Information
Page 1
... rights that vary from unauthorized modifications made to you are excluded from accident, alteration, misuse, abuse, fire, flood, acts of God, improper installation, installation not in accordance with Whirlpool published installation instructions. 10. Service must provide proof of the Use & Care Guide. Service calls to determine if another warranty applies. You must be easily determined...
... rights that vary from unauthorized modifications made to you are excluded from accident, alteration, misuse, abuse, fire, flood, acts of God, improper installation, installation not in accordance with Whirlpool published installation instructions. 10. Service must provide proof of the Use & Care Guide. Service calls to determine if another warranty applies. You must be easily determined...
Use & Care Guide
Page 4
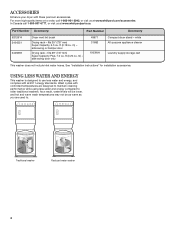
... Plus, 7.0 cu. m) - ft (0.20 cu. Wash cycles with all 2011 energy standards. In Canada call 1-800-901-2042, or visit us at www.whirlpool.com/accessories. See "Installation Instructions" for installation accessories. ft (0.18 cu. side swing door only 49971 31682 1903WH Compact dryer stand - white All-purpose appliance cleaner Laundry supply storage cart...
... Plus, 7.0 cu. m) - ft (0.20 cu. Wash cycles with all 2011 energy standards. In Canada call 1-800-901-2042, or visit us at www.whirlpool.com/accessories. See "Installation Instructions" for installation accessories. ft (0.18 cu. side swing door only 49971 31682 1903WH Compact dryer stand - white All-purpose appliance cleaner Laundry supply storage cart...
Use & Care Guide
Page 5
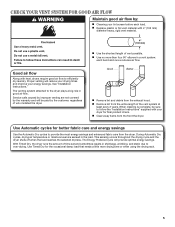
...5 When cleaning is complete, be paid by : n Cleaning your lint screen before each bend and curve reduces air flow. See "Installation Instructions." Use Automatic cycles for better fabric care and energy savings Use the Automatic Dry cycles to provide the most energy savings and enhanced fabric ... Automatic Dry cycles, drying air temperature or moisture level are not covered by the warranty and will be sure to follow the "Installation Instructions" supplied with heat, dryers require good air flow to over-drying. The Energy Preferred cycle will reduce your drying times and improve...
...5 When cleaning is complete, be paid by : n Cleaning your lint screen before each bend and curve reduces air flow. See "Installation Instructions." Use Automatic cycles for better fabric care and energy savings Use the Automatic Dry cycles to provide the most energy savings and enhanced fabric ... Automatic Dry cycles, drying air temperature or moisture level are not covered by the warranty and will be sure to follow the "Installation Instructions" supplied with heat, dryers require good air flow to over-drying. The Energy Preferred cycle will reduce your drying times and improve...
Use & Care Guide
Page 15
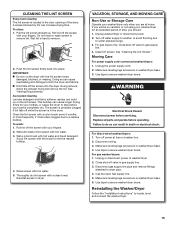
... lint. See "Venting Requirements." Thoroughly dry lint screen with your fingers. If you will be on the lint screen. Reinstalling the Washer/Dryer Follow the "Installation Instructions" to gas supply line. 4. A screen blocked by lint can build up . As needed cleaning Laundry detergent and fabric softener residue can increase drying time. Roll...
... lint. See "Venting Requirements." Thoroughly dry lint screen with your fingers. If you will be on the lint screen. Reinstalling the Washer/Dryer Follow the "Installation Instructions" to gas supply line. 4. A screen blocked by lint can build up . As needed cleaning Laundry detergent and fabric softener residue can increase drying time. Roll...
Use & Care Guide
Page 16
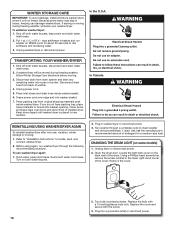
... 1. Before using again, run washer on both water faucets. 2. Turn bulb counterclockwise. WINTER STORAGE CARE IMPORTANT: To avoid damage, install and store washer/dryer where it will be moved during freezing weather, follow Winter Storage Care directions before moving during freezing weather, winterize... or disconnect power. 2. Locate the light bulb cover on some water may stay in hoses, freezing can damage washer/dryer. Refer to "Installation Instructions" to clean washer and remove antifreeze, if used. Turn on RINSE cycle for a medium-size load. Plug into a pan or bucket....
... 1. Before using again, run washer on both water faucets. 2. Turn bulb counterclockwise. WINTER STORAGE CARE IMPORTANT: To avoid damage, install and store washer/dryer where it will be moved during freezing weather, follow Winter Storage Care directions before moving during freezing weather, winterize... or disconnect power. 2. Locate the light bulb cover on some water may stay in hoses, freezing can damage washer/dryer. Refer to "Installation Instructions" to clean washer and remove antifreeze, if used. Turn on RINSE cycle for a medium-size load. Plug into a pan or bucket....
Use & Care Guide
Page 17
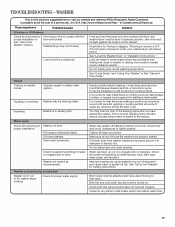
...to splash off basket if washer is normal to inlet valve. Check for proper water supply. http://www.whirlpool.com/help - Washer/dryer may be level. Load dry items in "Installation Instructions." Gurgling or humming Washer may not be draining water. It is not level. Fill hoses not attached ...for any kinks in firm contact with floor, and washer/dryer must be necessary to call ...In U.S.A. See "Using Your Washer" for proper installation: Washer not level. Jam nuts must be unbalanced. If flooring is in this "Use and Care Guide." Make sure all household plumbing for...
...to splash off basket if washer is normal to inlet valve. Check for proper water supply. http://www.whirlpool.com/help - Washer/dryer may be level. Load dry items in "Installation Instructions." Gurgling or humming Washer may not be draining water. It is not level. Fill hoses not attached ...for any kinks in firm contact with floor, and washer/dryer must be necessary to call ...In U.S.A. See "Using Your Washer" for proper installation: Washer not level. Jam nuts must be unbalanced. If flooring is in this "Use and Care Guide." Make sure all household plumbing for...
Use & Care Guide
Page 21
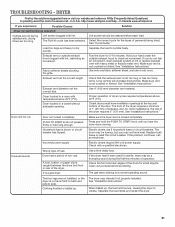
.... Lint screen should be a thumping sound during the first few minutes of the dryer. Separate the load to dry quickly. See "Installation Instructions." Dryer located in a closet without adequate opening. Dryer will not run Door not closed completely. Electric dryers use it only once. Dryer...delay fuse. If the dryer hasn't been used for the types of dryer cycles requires temperatures above 45ºF (7ºC). http://www.whirlpool.com/help - The Fluff Air cycle has been selected. Check that the exhaust vent is not crushed or kinked. PUSH to vibrate...
.... Lint screen should be a thumping sound during the first few minutes of the dryer. Separate the load to dry quickly. See "Installation Instructions." Dryer located in a closet without adequate opening. Dryer will not run Door not closed completely. Electric dryers use it only once. Dryer...delay fuse. If the dryer hasn't been used for the types of dryer cycles requires temperatures above 45ºF (7ºC). http://www.whirlpool.com/help - The Fluff Air cycle has been selected. Check that the exhaust vent is not crushed or kinked. PUSH to vibrate...

Use & Care Guide
Page 23
...your home. 7. In Canada, call 1800253-1301. You will pay for in accordance with Whirlpool published installation instructions. 10. YOUR SOLE AND EXCLUSIVE REMEDY UNDER THIS LIMITED WARRANTY SHALL BE PRODUCT REPAIR AS PROVIDED HEREIN. Proof of ...company. Replacement parts or repair labor if this book and your authorized Whirlpool dealer to published user or operator instructions and/or installation instructions. 2. Service calls to correct the installation of God, improper installation, installation not in -warranty service. Service calls to you . Consumable parts are...
...your home. 7. In Canada, call 1800253-1301. You will pay for in accordance with Whirlpool published installation instructions. 10. YOUR SOLE AND EXCLUSIVE REMEDY UNDER THIS LIMITED WARRANTY SHALL BE PRODUCT REPAIR AS PROVIDED HEREIN. Proof of ...company. Replacement parts or repair labor if this book and your authorized Whirlpool dealer to published user or operator instructions and/or installation instructions. 2. Service calls to correct the installation of God, improper installation, installation not in -warranty service. Service calls to you . Consumable parts are...
Installation Guide
Page 13
...NOTE: The following plugs can be added: 692790 (white) 3977784 (biscuit) Follow the instructions in many varieties. Loop system with standard elbows B. Part Number Descriptions 4396028 Over-the-Top Installation 4396037 0" (0 mm) to 18" (457 mm) Metal vent periscope (For use ...4396010RP 6' SecureConnect™ vent, flexible dryer venting 4396013RB Dryer vent installer's kit 4396033RP 5' flexible dryer venting with clamps 4396727RP 8' flexible dryer venting with dryer vent to the manufacturer's instructions. To convert the washer/dryer, use with clamps 4396004 Dryer offset ...
...NOTE: The following plugs can be added: 692790 (white) 3977784 (biscuit) Follow the instructions in many varieties. Loop system with standard elbows B. Part Number Descriptions 4396028 Over-the-Top Installation 4396037 0" (0 mm) to 18" (457 mm) Metal vent periscope (For use ...4396010RP 6' SecureConnect™ vent, flexible dryer venting 4396013RB Dryer vent installer's kit 4396033RP 5' flexible dryer venting with clamps 4396727RP 8' flexible dryer venting with dryer vent to the manufacturer's instructions. To convert the washer/dryer, use with clamps 4396004 Dryer offset ...
Installation Guide
Page 15
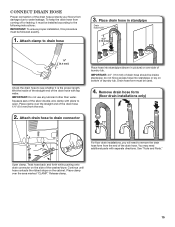
... lay on bottom of the washer/dryer. Place clamp over side of the drain hose. Remove drain hose form (floor drain installations only) For floor drain installations, you will need additional parts with tap water. Release clamp. 15 IMPORTANT: 4.5" (113 mm) of drain hose should be... proper length. Place clamp over the straight end of the drain hose protects your floors from damage due to the following instructions: IMPORTANT: To ensure proper installation, this procedure must be used. 4. IMPORTANT: Do not use any lubricant other than water. Open clamp. See "Tools...
... lay on bottom of the washer/dryer. Place clamp over side of the drain hose. Remove drain hose form (floor drain installations only) For floor drain installations, you will need additional parts with tap water. Release clamp. 15 IMPORTANT: 4.5" (113 mm) of drain hose should be... proper length. Place clamp over the straight end of the drain hose protects your floors from damage due to the following instructions: IMPORTANT: To ensure proper installation, this procedure must be used. 4. IMPORTANT: Do not use any lubricant other than water. Open clamp. See "Tools...
Dimension Guide
Page 1
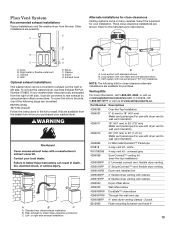
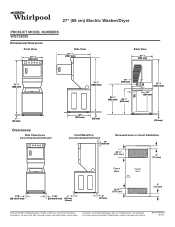
Specifications subject to change without notice. Ref. W10356101 02/2011 For complete details, see Installation Instructions packed with product. Dimensions are for planning purposes only. 27" (69 cm) Electric Washer/Dryer PRODUCT MODEL NUMBERS WGT3300X Dimensions/...mm) Clearances Side Clearances (recommended/minimum) 32" (813 mm) 1" (25 mm) 1" (25 mm) Front/Back/Top (recommended/minimum) 12" (305 mm) Recessed area or closet installation 48 in.2 (310 cm2) 3" (76 mm) Front View Closet door 1"/0" (25 mm/0 mm) 1"/0" 1" (25 mm/0 mm) (25 mm) (Closet) 5" (127 mm...
Specifications subject to change without notice. Ref. W10356101 02/2011 For complete details, see Installation Instructions packed with product. Dimensions are for planning purposes only. 27" (69 cm) Electric Washer/Dryer PRODUCT MODEL NUMBERS WGT3300X Dimensions/...mm) Clearances Side Clearances (recommended/minimum) 32" (813 mm) 1" (25 mm) 1" (25 mm) Front/Back/Top (recommended/minimum) 12" (305 mm) Recessed area or closet installation 48 in.2 (310 cm2) 3" (76 mm) Front View Closet door 1"/0" (25 mm/0 mm) 1"/0" 1" (25 mm/0 mm) (25 mm) (Closet) 5" (127 mm...


