
Dimension Guide
Page 1
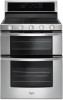
...must be used , it is also recommended. Because Whirlpool Corporation includes a continues commitment to improve our products,... (76.2 cm) Freestanding Gas Range PRODUCT MODEL NUMBERS WGG555S0B WGG745S0F WGG755S0B GAS SUPPLY REQUIREMENTS Gas supply line: ■■... include a shutoff valve: The supply line must be equipped with a manual shutoff valve. See "Gas Conversions" section. The model/serial rating plate...A time-delay fuse or circuit breaker is recommended that a qualified electrical installer determine that can be raised approximately 1" (2.5 cm) by a qualified service...
...must be used , it is also recommended. Because Whirlpool Corporation includes a continues commitment to improve our products,... (76.2 cm) Freestanding Gas Range PRODUCT MODEL NUMBERS WGG555S0B WGG745S0F WGG755S0B GAS SUPPLY REQUIREMENTS Gas supply line: ■■... include a shutoff valve: The supply line must be equipped with a manual shutoff valve. See "Gas Conversions" section. The model/serial rating plate...A time-delay fuse or circuit breaker is recommended that a qualified electrical installer determine that can be raised approximately 1" (2.5 cm) by a qualified service...

Use & Care Guide
Page 2
... gasoline or other flammable vapors and liquids in this or any other reproductive harm. 2 WARNING: Gas leaks cannot always be performed by a qualified installer, service agency or the gas supplier. If a gas leak is not followed exactly, a fire or explosion may result causing property damage, personal...a gas detector approved by smell. RANGE SAFETY WARNING: If the information in the vicinity of this manual is detected, follow the "What to do if you smell gas" instructions. Installation and service must be detected by UL or CSA. For more chemicals known to the State of California...
... gasoline or other flammable vapors and liquids in this or any other reproductive harm. 2 WARNING: Gas leaks cannot always be performed by a qualified installer, service agency or the gas supplier. If a gas leak is not followed exactly, a fire or explosion may result causing property damage, personal...a gas detector approved by smell. RANGE SAFETY WARNING: If the information in the vicinity of this manual is detected, follow the "What to do if you smell gas" instructions. Installation and service must be detected by UL or CSA. For more chemicals known to the State of California...

Use & Care Guide
Page 15
...suggested here. In Canada, visit http://www.whirlpool.ca. The range is in your mobile device, or visit http://www.whirlpool.com/product_help. Mississauga, Ontario L5N 0B7 Please include a daytime phone number in the Off position: See the Installation Instructions. Problem Nothing will help you need ...and are harder to slide, a light coating of the oven counterclockwise to remove. 3. Oven Lights The oven lights are in this manual and scan the code there with porcelain. Turn bulb counterclockwise to the warranty page in the Off position. CONTROL PANEL AND OVEN ...
...suggested here. In Canada, visit http://www.whirlpool.ca. The range is in your mobile device, or visit http://www.whirlpool.com/product_help. Mississauga, Ontario L5N 0B7 Please include a daytime phone number in the Off position: See the Installation Instructions. Problem Nothing will help you need ...and are harder to slide, a light coating of the oven counterclockwise to remove. 3. Oven Lights The oven lights are in this manual and scan the code there with porcelain. Turn bulb counterclockwise to the warranty page in the Off position. CONTROL PANEL AND OVEN ...
Installation Guide
Page 2
...cannot always be performed by smell. Always read and obey all safety messages. Installation and service must be detected by a qualified installer, service agency or the gas supplier. IMPORTANT: Do not install a ventilation system that can happen if the instructions are very important. We ...have provided many important safety messages in the vicinity of this manual and on your gas supplier ...
...cannot always be performed by smell. Always read and obey all safety messages. Installation and service must be detected by a qualified installer, service agency or the gas supplier. IMPORTANT: Do not install a ventilation system that can happen if the instructions are very important. We ...have provided many important safety messages in the vicinity of this manual and on your gas supplier ...

Installation Guide
Page 7
...the correct height, check that the antitip bracket will slide under the range and onto the rear leveling leg prior to anti-tip bracket installation. 7 Using 2 or more people, stand range back up into its back. 4. Shutoff valve "open" position C. Burner Input ... Regulator The gas pressure regulator supplied with a manual shutoff valve. The inlet pressure to the appliance pressure regulator. Gas Supply Pressure Testing Gas supply pressure for connecting range to add up onto cardboard or hardboard. INSTALLATION INSTRUCTIONS Unpack Range WARNING Excessive Weight Hazard Use ...
...the correct height, check that the antitip bracket will slide under the range and onto the rear leveling leg prior to anti-tip bracket installation. 7 Using 2 or more people, stand range back up into its back. 4. Shutoff valve "open" position C. Burner Input ... Regulator The gas pressure regulator supplied with a manual shutoff valve. The inlet pressure to the appliance pressure regulator. Gas Supply Pressure Testing Gas supply pressure for connecting range to add up onto cardboard or hardboard. INSTALLATION INSTRUCTIONS Unpack Range WARNING Excessive Weight Hazard Use ...
Installation Guide
Page 9
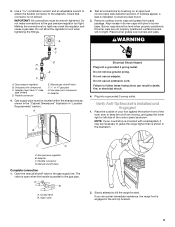
...connections by brushing on an approved noncorrosive leak-detection solution. Align recess in the illustration. H. Plug into a grounded 3 prong outlet. Manual shutoff valve Complete connection 1. Open valve 2. Gas supply pipe must have ½" male pipe thread) D. Do not use an adapter....D. Gas pressure regulator B. Adapter 4. A 2. Use pipe-joint compound. Do not remove ground prong. Verify Anti-Tip Bracket Is Installed and Engaged 1. Remove cooktop burner caps and grates from moving, and grasp the lower right or left side of the control panel as...
...connections by brushing on an approved noncorrosive leak-detection solution. Align recess in the illustration. H. Plug into a grounded 3 prong outlet. Manual shutoff valve Complete connection 1. Open valve 2. Gas supply pipe must have ½" male pipe thread) D. Do not use an adapter....D. Gas pressure regulator B. Adapter 4. A 2. Use pipe-joint compound. Do not remove ground prong. Verify Anti-Tip Bracket Is Installed and Engaged 1. Remove cooktop burner caps and grates from moving, and grasp the lower right or left side of the control panel as...

Installation Guide
Page 12
...pressure regulator. 12 LP Gas Conversion WARNING WARNING Explosion Hazard Use a new CSA International approved gas supply line. Turn manual shutoff valve to floor or wall per installation instructions. Locate gas pressure regulator at the rear of a qualified person include: licensed heating personnel, authorized gas company personnel...result in death or serious burns to do so can tip the range and be done by a qualified installer. Do not operate range without anti-tip bracket installed and engaged. Re-engage anti-tip bracket if range is engaged in the slot of the anti-tip ...
...pressure regulator. 12 LP Gas Conversion WARNING WARNING Explosion Hazard Use a new CSA International approved gas supply line. Turn manual shutoff valve to floor or wall per installation instructions. Locate gas pressure regulator at the rear of a qualified person include: licensed heating personnel, authorized gas company personnel...result in death or serious burns to do so can tip the range and be done by a qualified installer. Do not operate range without anti-tip bracket installed and engaged. Re-engage anti-tip bracket if range is engaged in the slot of the anti-tip ...
Installation Guide
Page 15
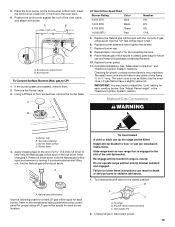
... pin in the hole in the "Electronic Ignition System" section. The small inner cone should have a slightly yellow tip. Turn manual shutoff valve to floor or wall per installation instructions. B A C A. Replace burner base and hand tighten the screws. 7. Set the Natural gas orifice spud aside. Slide... range back so rear range foot is not as distinct as the inner cone. Shutoff valve (closed position. If the burner grates are installed, remove them. 2. Replace the Natural gas orifice spud with screw. The outer cone is engaged in plastic parts bag for the remaining ...
... pin in the hole in the "Electronic Ignition System" section. The small inner cone should have a slightly yellow tip. Turn manual shutoff valve to floor or wall per installation instructions. B A C A. Replace burner base and hand tighten the screws. 7. Set the Natural gas orifice spud aside. Slide... range back so rear range foot is not as distinct as the inner cone. Shutoff valve (closed position. If the burner grates are installed, remove them. 2. Replace the Natural gas orifice spud with screw. The outer cone is engaged in plastic parts bag for the remaining ...


