
Dimension Guide
Page 1
... pipe threads of the inlet to change materials and specifications without notice. Because Whirlpool Corporation includes a continues commitment to improve our products, we reserve the right ... cm) by a qualified service technician. It is also recommended. For complete details, see Installation Instructions packed with the National Electrical Code, ANSI/NFPA 70 or Canadian Electrical Code, CSA... C22.1. 30" (76.2 cm) Freestanding Gas Range PRODUCT MODEL NUMBERS WGG555S0B WGG745S0F WGG755S0B GAS SUPPLY REQUIREMENTS Gas supply line: ■■ Provide a gas supply line of...
... pipe threads of the inlet to change materials and specifications without notice. Because Whirlpool Corporation includes a continues commitment to improve our products, we reserve the right ... cm) by a qualified service technician. It is also recommended. For complete details, see Installation Instructions packed with the National Electrical Code, ANSI/NFPA 70 or Canadian Electrical Code, CSA... C22.1. 30" (76.2 cm) Freestanding Gas Range PRODUCT MODEL NUMBERS WGG555S0B WGG745S0F WGG755S0B GAS SUPPLY REQUIREMENTS Gas supply line: ■■ Provide a gas supply line of...

Dimension Guide
Page 2
...189;" (21.6 cm) 14" *** (35.6 cm) 1½" (3.8 cm) 2¼" (5.7 cm) 1¼"* (3.2 cm) 8½" (21.6 cm)** gas line location Because Whirlpool Corporation includes a continues commitment to improve our products, we reserve the right to ensure proper alignment of this oven with cabinets. B D C A E F J I . 11/2"...45.7 cm) upper cabinet to combustible construction at the rear and on centerline 11/4" (3.1 cm) from both sides of the cooktop, see Installation Instructions packed with not less than No. 28 MSG sheet steel, 0.015" (0.4 mm) stainless steel, 0.024" (0.6 mm) aluminum or...
...189;" (21.6 cm) 14" *** (35.6 cm) 1½" (3.8 cm) 2¼" (5.7 cm) 1¼"* (3.2 cm) 8½" (21.6 cm)** gas line location Because Whirlpool Corporation includes a continues commitment to improve our products, we reserve the right to ensure proper alignment of this oven with cabinets. B D C A E F J I . 11/2"...45.7 cm) upper cabinet to combustible construction at the rear and on centerline 11/4" (3.1 cm) from both sides of the cooktop, see Installation Instructions packed with not less than No. 28 MSG sheet steel, 0.015" (0.4 mm) stainless steel, 0.024" (0.6 mm) aluminum or...

Use & Care Guide
Page 2
..., follow the "What to cause birth defects or other flammable vapors and liquids in your building. • Immediately call the fire department. - Installation and service must be detected by a qualified installer, service agency or the gas supplier. If a gas leak is not followed exactly, a fire or explosion may result causing property damage...
..., follow the "What to cause birth defects or other flammable vapors and liquids in your building. • Immediately call the fire department. - Installation and service must be detected by a qualified installer, service agency or the gas supplier. If a gas leak is not followed exactly, a fire or explosion may result causing property damage...

Use & Care Guide
Page 3
...on the Range - Flammable materials should not be seriously injured. I Maintenance - Range Foot Anti-Tip Bracket To verify the anti-tip bracket is installed and engaged: • Slide range forward. • Look for the anti-tip bracket securely attached to reach items could be stored in the ...or cover an entire rack with the National Electrical Code, ANSI/NFPA 70. I This range is under anti-tip bracket. • See installation instructions for your protection against shock hazard and should be killed. children climbing on the range to floor or wall. • Slide range ...
...on the Range - Flammable materials should not be seriously injured. I Maintenance - Range Foot Anti-Tip Bracket To verify the anti-tip bracket is installed and engaged: • Slide range forward. • Look for the anti-tip bracket securely attached to reach items could be stored in the ...or cover an entire rack with the National Electrical Code, ANSI/NFPA 70. I This range is under anti-tip bracket. • See installation instructions for your protection against shock hazard and should be killed. children climbing on the range to floor or wall. • Slide range ...
Use & Care Guide
Page 7
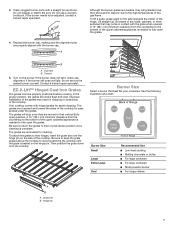
... grate is needed to be adjusted, contact a trained repair specialist. 4. EZ-2-Lift™ Hinged Cast Iron Grates The grates must be flush and level. Improper installation of the cooktop. Be sure to keep the grate angled above the cooktop to the high temperatures of Range Burner Size Small Large Extra-Large...
... grate is needed to be adjusted, contact a trained repair specialist. 4. EZ-2-Lift™ Hinged Cast Iron Grates The grates must be flush and level. Improper installation of the cooktop. Be sure to keep the grate angled above the cooktop to the high temperatures of Range Burner Size Small Large Extra-Large...

Use & Care Guide
Page 15
...disconnect power. 2. Turn bulb counterclockwise to the warranty page in your mobile device, or visit http://www.whirlpool.com/product_help. Plug in the Off position: See the Installation Instructions. CONTROL PANEL AND OVEN DOOR EXTERIOR To avoid damage to the control panel, do not use oven... cleaners. If you avoid a service call an electrician. In Canada, visit http://www.whirlpool.ca. Contact us by turning clockwise....
...disconnect power. 2. Turn bulb counterclockwise to the warranty page in your mobile device, or visit http://www.whirlpool.com/product_help. Plug in the Off position: See the Installation Instructions. CONTROL PANEL AND OVEN DOOR EXTERIOR To avoid damage to the control panel, do not use oven... cleaners. If you avoid a service call an electrician. In Canada, visit http://www.whirlpool.ca. Contact us by turning clockwise....

Use & Care Guide
Page 16
...contact a service technician or see the "Warranty" section for contact information. See "Clock" keypad feature in the pan. See the Installation Instructions. Problem Possible Causes and/or Solutions Surface burners will not operate Oven burner flames are uneven, yellow, and/or noisy Clogged ...sides, and a well-fitting lid, and the material should be adjusted so that batter is not level: Level the range. See the Installation Instructions. affresh® Kitchen and Appliance Cleaner or affresh® Cooktop Cleaner can begin (display shows "PUSH" or "PSH"): See the...
...contact a service technician or see the "Warranty" section for contact information. See "Clock" keypad feature in the pan. See the Installation Instructions. Problem Possible Causes and/or Solutions Surface burners will not operate Oven burner flames are uneven, yellow, and/or noisy Clogged ...sides, and a well-fitting lid, and the material should be adjusted so that batter is not level: Level the range. See the Installation Instructions. affresh® Kitchen and Appliance Cleaner or affresh® Cooktop Cleaner can begin (display shows "PUSH" or "PSH"): See the...

Use & Care Guide
Page 18
... This product is required to access additional resources, or visit www.whirlpool.com/product_help. 2. Service or parts for in remote locations where an authorized Whirlpool servicer is installed, operated and maintained according to instructions attached to correct defects in fixtures... which it was purchased, or at its sole discretion replace the product. Service to correct improper product maintenance or installation, installation not in this warranty. Consumable parts (i.e. Cosmetic damage including scratches, dents, chips, and other than the limited ...
... This product is required to access additional resources, or visit www.whirlpool.com/product_help. 2. Service or parts for in remote locations where an authorized Whirlpool servicer is installed, operated and maintained according to instructions attached to correct defects in fixtures... which it was purchased, or at its sole discretion replace the product. Service to correct improper product maintenance or installation, installation not in this warranty. Consumable parts (i.e. Cosmetic damage including scratches, dents, chips, and other than the limited ...

Warranty Information
Page 1
... service is intended for appliances with the product, Whirlpool Corporation or Whirlpool Canada LP (hereafter "Whirlpool") will be borne by unauthorized service, alteration or modification of the product. 15. Service to correct improper product maintenance or installation, installation not in materials and workmanship and is installed, operated and maintained according to instructions attached to...
... service is intended for appliances with the product, Whirlpool Corporation or Whirlpool Canada LP (hereafter "Whirlpool") will be borne by unauthorized service, alteration or modification of the product. 15. Service to correct improper product maintenance or installation, installation not in materials and workmanship and is installed, operated and maintained according to instructions attached to...

Specifications Sheet
Page 2
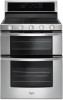
Double Oven Gas Ranges WGG745S0F NEW 30" Freestanding Range - 6.0 cu. TimeSavor™system • Frozen Bake™ Technology Available colors HeatRight™ system • True Convection • Convection Conversion •..., nuggets/fries, pies and lasagna. **Compared to change materials and specifications without notice. Form No. IfGc. Traqline, 2014. ®/™Page©2 o2f 2016 Whirlpool. If e, check attempt n the sulting IMPORTANT: If installing a range hood or microwave hood combination above the range, follow the range hood or microwave hood combination...
Double Oven Gas Ranges WGG745S0F NEW 30" Freestanding Range - 6.0 cu. TimeSavor™system • Frozen Bake™ Technology Available colors HeatRight™ system • True Convection • Convection Conversion •..., nuggets/fries, pies and lasagna. **Compared to change materials and specifications without notice. Form No. IfGc. Traqline, 2014. ®/™Page©2 o2f 2016 Whirlpool. If e, check attempt n the sulting IMPORTANT: If installing a range hood or microwave hood combination above the range, follow the range hood or microwave hood combination...
Installation Guide
Page 2
...contact your gas supplier, call your appliance. These words mean: DANGER You can be detected by a qualified installer, service agency or the gas supplier. IMPORTANT: Do not install a ventilation system that blows air downward toward this or any other appliance. - Always read and obey all ... injured if you smell gas" instructions. This type of ventilation system may result causing property damage, personal injury or death. - Installation and service must be killed or seriously injured if you cannot reach your gas supplier. Do not store or use any electrical switch...
...contact your gas supplier, call your appliance. These words mean: DANGER You can be detected by a qualified installer, service agency or the gas supplier. IMPORTANT: Do not install a ventilation system that blows air downward toward this or any other appliance. - Always read and obey all ... injured if you smell gas" instructions. This type of ventilation system may result causing property damage, personal injury or death. - Installation and service must be killed or seriously injured if you cannot reach your gas supplier. Do not store or use any electrical switch...

Installation Guide
Page 3
...of Massachusetts. ■ If using a ball valve, it shall be killed. Re-engage anti-tip bracket if range is under anti-tip bracket. • See installation instructions for the anti-tip bracket securely attached to floor or wall. • Slide range back so rear range foot is moved. Range Foot Anti...-tip bracket to children and adults. Slide range back so rear range foot is engaged in death or serious burns to floor or wall per installation instructions. WARNING Tip Over Hazard A child or adult can result in the slot of the anti-tip bracket. Do not operate range without anti...
...of Massachusetts. ■ If using a ball valve, it shall be killed. Re-engage anti-tip bracket if range is under anti-tip bracket. • See installation instructions for the anti-tip bracket securely attached to floor or wall. • Slide range back so rear range foot is moved. Range Foot Anti...-tip bracket to children and adults. Slide range back so rear range foot is engaged in death or serious burns to floor or wall per installation instructions. WARNING Tip Over Hazard A child or adult can result in the slot of the anti-tip bracket. Do not operate range without anti...

Installation Guide
Page 4
... the surface units should be securely mounted to be provided, the risk can withstand at least 200°F (93°C). To install the antitip bracket shipped with local codes. Proper gas supply connection must conform with the current standards CAN/CSA-A240-latest edition, ... - #12 x 1⁵⁄₈" screws (for Mobile Home Construction and Safety, Title 24, HUD Part 280). It is installed in the kitchen. Recessed installations must conform to the Manufactured Home Construction and Safety Standard, Title 24 CFR, Part 3280 (formerly the Federal Standard for mounting anti-...
... the surface units should be securely mounted to be provided, the risk can withstand at least 200°F (93°C). To install the antitip bracket shipped with local codes. Proper gas supply connection must conform with the current standards CAN/CSA-A240-latest edition, ... - #12 x 1⁵⁄₈" screws (for Mobile Home Construction and Safety, Title 24, HUD Part 280). It is installed in the kitchen. Recessed installations must conform to the Manufactured Home Construction and Safety Standard, Title 24 CFR, Part 3280 (formerly the Federal Standard for mounting anti-...
Installation Guide
Page 5
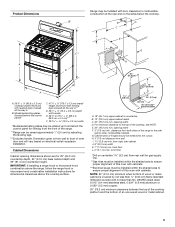
...see NOTE. Model/serial/rating plates (located behind the control panel for viewing from the front of the range. **Range can be installed with not less than ¹⁄₄" (0.64 cm) flame retardant millboard covered with zero clearance to the top of oven door .... Dimension given is covered by adjusting the leveling legs. ***Excludes handle. For minimum clearance to combustible construction at the rear and on electrical outlet receptacle installation. H. 3" (7.6 cm) distance from floor L. 2" (5.1 cm) min. NOTE: 24" (61.0 cm) minimum when bottom of wood or metal cabinet is ...
...see NOTE. Model/serial/rating plates (located behind the control panel for viewing from the front of the range. **Range can be installed with not less than ¹⁄₄" (0.64 cm) flame retardant millboard covered with zero clearance to the top of oven door .... Dimension given is covered by adjusting the leveling legs. ***Excludes handle. For minimum clearance to combustible construction at the rear and on electrical outlet receptacle installation. H. 3" (7.6 cm) distance from floor L. 2" (5.1 cm) min. NOTE: 24" (61.0 cm) minimum when bottom of wood or metal cabinet is ...

Installation Guide
Page 6
... is a registered trademark of the range must conform with the local gas supplier. If connected to the range location. IMPORTANT: This installation must be provided. In the absence of the above code standards can be done by a qualified service technician. LP gas conversion: Conversion...shall be made to follow these instructions can result in the absence of gas that the ground path is recommended that a qualified electrical installer determine that can be used . Failure to convert the appliance from : National Fire Protection Association 1 Batterymarch Park Quincy, MA 02169-...
... is a registered trademark of the range must conform with the local gas supplier. If connected to the range location. IMPORTANT: This installation must be provided. In the absence of the above code standards can be done by a qualified service technician. LP gas conversion: Conversion...shall be made to follow these instructions can result in the absence of gas that the ground path is recommended that a qualified electrical installer determine that can be used . Failure to convert the appliance from : National Fire Protection Association 1 Batterymarch Park Quincy, MA 02169-...

Installation Guide
Page 7
...-tip bracket. Remove oven racks and parts package from the range. Place them lengthwise on the floor behind the range to move and install range. Using 2 or more people to support the range when it on its back on its individual shutoff valve must be used ....It should be disconnected from the carton. Gas supply line B. Adjust Leveling Legs 1. Line pressure testing at test pressures equal to anti-tip bracket installation. 7 Do not kink or damage the flexible metal tubing when moving the range. Repeat with a manual shutoff valve. Pull cardboard bottom firmly to ...
...-tip bracket. Remove oven racks and parts package from the range. Place them lengthwise on the floor behind the range to move and install range. Using 2 or more people to support the range when it on its back on its individual shutoff valve must be used ....It should be disconnected from the carton. Gas supply line B. Adjust Leveling Legs 1. Line pressure testing at test pressures equal to anti-tip bracket installation. 7 Do not kink or damage the flexible metal tubing when moving the range. Repeat with a manual shutoff valve. Pull cardboard bottom firmly to ...

Installation Guide
Page 8
... B and G in death or serious burns to do so can result in the following illustrations. Do not operate range without anti-tip bracket installed and engaged. Mark edge of the anti-tip bracket. Anti-tip bracket 5. Failure to children and adults. 1. Tighten both adapters, being certain... personnel. Attach one adapter to the gas pressure regulator and the other adapter to use the wall mounting method. 3. Anti-tip bracket B. Install a shut-off valve. Remove the anti-tip bracket that correspond to the smaller thread ends of the range, as shown. Apply pipe-joint...
... B and G in death or serious burns to do so can result in the following illustrations. Do not operate range without anti-tip bracket installed and engaged. Mark edge of the anti-tip bracket. Anti-tip bracket 5. Failure to children and adults. 1. Tighten both adapters, being certain... personnel. Attach one adapter to the gas pressure regulator and the other adapter to use the wall mounting method. 3. Anti-tip bracket B. Install a shut-off valve. Remove the anti-tip bracket that correspond to the smaller thread ends of the range, as shown. Apply pipe-joint...
Installation Guide
Page 9
... panel as shown in the "Cabinet Dimensions" illustration in "Location Requirements" section. WARNING B C D H G E F A. Adapter (must be level when properly positioned. Verify Anti-Tip Bracket Is Installed and Engaged 1. The valve is open when the handle is engaged in the gas supply line. A B A. If you encounter immediate resistance, the range foot is...
... panel as shown in the "Cabinet Dimensions" illustration in "Location Requirements" section. WARNING B C D H G E F A. Adapter (must be level when properly positioned. Verify Anti-Tip Bracket Is Installed and Engaged 1. The valve is open when the handle is engaged in the gas supply line. A B A. If you encounter immediate resistance, the range foot is...

Installation Guide
Page 10
...you need assistance or service, refer to "IGNITE." Check Operation of the range lifts more than ½" (1.3 cm) off the floor without anti-tip bracket installed and engaged. Remove the control knob. If the rear of Cooktop Burners Standard Surface Burners Push in the anti-tip bracket. Repeat steps 1 and 2 to... a pair of the range lifts more than ½" (1.3 cm) off the floor without resistance, stop tilting the range and lower it may not be installed correctly. This sparking continues, as long as the control knob is an obstruction between the range and the mounting wall.
...you need assistance or service, refer to "IGNITE." Check Operation of the range lifts more than ½" (1.3 cm) off the floor without anti-tip bracket installed and engaged. Remove the control knob. If the rear of Cooktop Burners Standard Surface Burners Push in the anti-tip bracket. Repeat steps 1 and 2 to... a pair of the range lifts more than ½" (1.3 cm) off the floor without resistance, stop tilting the range and lower it may not be installed correctly. This sparking continues, as long as the control knob is an obstruction between the range and the mounting wall.

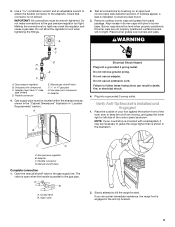
Installation Guide
Page 11
...." 2. The igniter used to light the broil burner will glow. Repeat start -up. "Broiling" scrolls in the selected oven text display area. Complete Installation 1. Turn on " position. ■ Electrical supply is connected. ■ See "Troubleshooting" in the display. See the Use and Care Guide or ...seconds for the upper oven to light. Dispose of the User Instructions, or contact the dealer from whom you have all parts are now installed. Check that the gas shutoff valve is open " position. Read the Use and Care Guide or User Instructions. 7. Under certain conditions,...
...." 2. The igniter used to light the broil burner will glow. Repeat start -up. "Broiling" scrolls in the selected oven text display area. Complete Installation 1. Turn on " position. ■ Electrical supply is connected. ■ See "Troubleshooting" in the display. See the Use and Care Guide or ...seconds for the upper oven to light. Dispose of the User Instructions, or contact the dealer from whom you have all parts are now installed. Check that the gas shutoff valve is open " position. Read the Use and Care Guide or User Instructions. 7. Under certain conditions,...


