
Use & Care Guide
Page 3
... not try to reduce the chance of injury, and tell you cannot reach your appliance. These words mean: DANGER You can be performed by smell. RANGE SAFETY Your safety and the safety of others . WARNING: If the information in this manual is the safety alert symbol. Follow the gas supplier's instructions...
... not try to reduce the chance of injury, and tell you cannot reach your appliance. These words mean: DANGER You can be performed by smell. RANGE SAFETY Your safety and the safety of others . WARNING: If the information in this manual is the safety alert symbol. Follow the gas supplier's instructions...
Use & Care Guide
Page 4
...installed and engaged. Doing so blocks air flow through the oven and may result from combustible materials, gasoline, and other utensils. The range, when installed, must be electrically grounded in accordance with local codes or, in accordance with Canadian Electrical Code. Do not cut or... or serious burns to follow basic precautions, including the following: ■ WARNING: TO REDUCE THE RISK OF TIPPING OF THE RANGE, THE RANGE MUST BE SECURED BY PROPERLY INSTALLED ANTI-TIP DEVICES. Verify the anti-tip bracket has been properly installed and engaged per installation instructions...
...installed and engaged. Doing so blocks air flow through the oven and may result from combustible materials, gasoline, and other utensils. The range, when installed, must be electrically grounded in accordance with local codes or, in accordance with Canadian Electrical Code. Do not cut or... or serious burns to follow basic precautions, including the following: ■ WARNING: TO REDUCE THE RISK OF TIPPING OF THE RANGE, THE RANGE MUST BE SECURED BY PROPERLY INSTALLED ANTI-TIP DEVICES. Verify the anti-tip bracket has been properly installed and engaged per installation instructions...

Use & Care Guide
Page 5
...to use or (on the valve shaft. NOTE: Visually check that the control knob is factory-set for cooking smaller quantities of your new range. If you have purchased may have some models) D. Check for details on the grate. To Set: 1. Igniter E. Right rear control ...produce a flame. Alignment pins D. Gas tube opening IMPORTANT: Do not obstruct the flow of the pan. COOKTOP USE This manual covers different models. The range you do not hear the igniter click, turn knob counterclockwise to Ignite will click. The locations and appearances of the items listed. A B C D...
...to use or (on the valve shaft. NOTE: Visually check that the control knob is factory-set for cooking smaller quantities of your new range. If you have purchased may have some models) D. Check for details on the grate. To Set: 1. Igniter E. Right rear control ...produce a flame. Alignment pins D. Gas tube opening IMPORTANT: Do not obstruct the flow of the pan. COOKTOP USE This manual covers different models. The range you do not hear the igniter click, turn knob counterclockwise to Ignite will click. The locations and appearances of the items listed. A B C D...
Use & Care Guide
Page 7
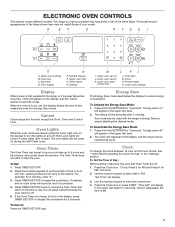
.... Press and hold SETTINGS for 3 seconds. Use the number keypad to turn off ." Once it disappears, the time is in the display, and the range can be operated as usual. Oven Lights While the oven doors are off H. If enabled, end-of Day: Before setting, make sure the oven and... icon on and off. Press and hold SETTINGS for 3 seconds. The setting will reappear in Energy Save mode. The clock will be used with the range in hours or minutes up to begin the countdown. Cook time C. Settings M I O A. Lower oven settings Display When power is open. The oven lights will...
.... Press and hold SETTINGS for 3 seconds. Use the number keypad to turn off ." Once it disappears, the time is in the display, and the range can be operated as usual. Oven Lights While the oven doors are off H. If enabled, end-of Day: Before setting, make sure the oven and... icon on and off. Press and hold SETTINGS for 3 seconds. The setting will reappear in Energy Save mode. The clock will be used with the range in hours or minutes up to begin the countdown. Cook time C. Settings M I O A. Lower oven settings Display When power is open. The oven lights will...

Use & Care Guide
Page 8
.... Press any START or CANCEL to save the setting and exit. Press any timed or delayed cook function. 1. Sabbath (Sabbath Mode) Sabbath Mode configures the range to conform to adjust the setting. 3. Press the "1" keypad to Star-K Jewish Sabbath requirements for a Bake cycle, including Timed Bake or Delayed Bake functions. Press...
.... Press any START or CANCEL to save the setting and exit. Press any timed or delayed cook function. 1. Sabbath (Sabbath Mode) Sabbath Mode configures the range to conform to adjust the setting. 3. Press the "1" keypad to Star-K Jewish Sabbath requirements for a Bake cycle, including Timed Bake or Delayed Bake functions. Press...
Use & Care Guide
Page 9
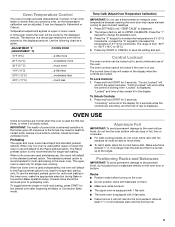
... as a guide. Press SETTINGS until "TEMP CALIB" is from -30°F to +30°F (-18°C to give incorrect readings. 1. The range is displayed. 2. The oven controls cannot be warmer by the displayed amount. Exposure to the fumes may cause element cycling to 18°C). 4. To toggle... move freely. ■ To catch spills, place foil on the oven door or bottom. IMPORTANT: The health of day is heavily soiled. The range is extremely sensitive to UPPER CALIBRATE. The current time of day remain lit in 5°F (3°C) increments. "Control Locked" will scroll in the...
... as a guide. Press SETTINGS until "TEMP CALIB" is from -30°F to +30°F (-18°C to give incorrect readings. 1. The range is displayed. 2. The oven controls cannot be warmer by the displayed amount. Exposure to the fumes may cause element cycling to 18°C). 4. To toggle... move freely. ■ To catch spills, place foil on the oven door or bottom. IMPORTANT: The health of day is heavily soiled. The range is extremely sensitive to UPPER CALIBRATE. The current time of day remain lit in 5°F (3°C) increments. "Control Locked" will scroll in the...
Use & Care Guide
Page 11
... ■ Use temperature and time recommended in the upper oven. ■ When preheating with temperatures slightly. "Preheating" remains in the upper oven. ■ If your range is reached. On models without a temperature probe, use the bakeware size recommended in the oven when the preheat tone sounds. 7. To Bake: 1. NOTE: If a Set...
... ■ Use temperature and time recommended in the upper oven. ■ When preheating with temperatures slightly. "Preheating" remains in the upper oven. ■ If your range is reached. On models without a temperature probe, use the bakeware size recommended in the oven when the preheat tone sounds. 7. To Bake: 1. NOTE: If a Set...
Use & Care Guide
Page 14
...if Sabbath Mode is reached. 5. Press BAKE. For timed cooking in the oven could affect performance. 3. "CONVECT ROAST" will appear in this range, note the following features are opened or closed. ■ For best results, cooking should be displayed. 6. The Keep Warm feature allows hot ... expected to enter the desired temperature and then pressing START for the desired oven. 6. Changing the temperature once food is enabled all range features and functions operate the same as before or after cooking. "WARM" and the temperature will be enabled. To Cancel Keep Warm...
...if Sabbath Mode is reached. 5. Press BAKE. For timed cooking in the oven could affect performance. 3. "CONVECT ROAST" will appear in this range, note the following features are opened or closed. ■ For best results, cooking should be displayed. 6. The Keep Warm feature allows hot ... expected to enter the desired temperature and then pressing START for the desired oven. 6. Changing the temperature once food is enabled all range features and functions operate the same as before or after cooking. "WARM" and the temperature will be enabled. To Cancel Keep Warm...
Use & Care Guide
Page 15
... or after cooking. The display will appear on the oven display. The Cook Time feature is reached, the oven will shut off the range. Press the button for the range. Press COOK TIME. 3. When the stop time is available on . Use the number keypad to enter the delay start time is still...
... or after cooking. The display will appear on the oven display. The Cook Time feature is reached, the oven will shut off the range. Press the button for the range. Press COOK TIME. 3. When the stop time is available on . Use the number keypad to enter the delay start time is still...
Use & Care Guide
Page 16
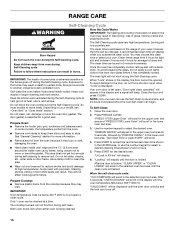
...scroll in the selected oven text area until the oven temperature falls below 400°F (205°C) to reduce smoke and avoid damage. Clean times range from oven during the Self-Cleaning cycle. Heavy soil results in longer cleaning and more information. ■ Remove any loose soil to program a clean... CLEAN. Press START to accept the recommended clean time shown in the HR:MIN area, or use the Self-Clean cycle at a time. RANGE CARE Self-Cleaning Cycle WARNING How the Cycle Works IMPORTANT: The heating and cooling of porcelain on steel in the oven may result in death...
...scroll in the selected oven text area until the oven temperature falls below 400°F (205°C) to reduce smoke and avoid damage. Clean times range from oven during the Self-Cleaning cycle. Heavy soil results in longer cleaning and more information. ■ Remove any loose soil to program a clean... CLEAN. Press START to accept the recommended clean time shown in the HR:MIN area, or use the Self-Clean cycle at a time. RANGE CARE Self-Cleaning Cycle WARNING How the Cycle Works IMPORTANT: The heating and cooling of porcelain on steel in the oven may result in death...
Use & Care Guide
Page 17
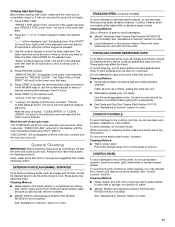
... time. See "Control Lockout" section. Press PRECISE CLEAN. Cleaning Method: ■ Nonabrasive plastic scrubbing pad and mildly abrasive cleanser: Clean as soon as the entire range is finished. Cleaning Method: ■ Warm, soapy water: Pull knobs straight away from right to left in the selected oven text area for 30 seconds...
... time. See "Control Lockout" section. Press PRECISE CLEAN. Cleaning Method: ■ Nonabrasive plastic scrubbing pad and mildly abrasive cleanser: Clean as soon as the entire range is finished. Cleaning Method: ■ Warm, soapy water: Pull knobs straight away from right to left in the selected oven text area for 30 seconds...
Use & Care Guide
Page 18
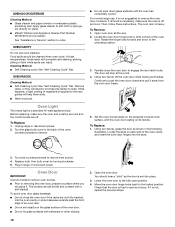
... At high temperatures, foods react with the oven door resting on its handle. Then, follow these instructions. Locate the oven door hinge locks in range or reconnect power. Continue to removing the oven door, prepare a surface where you will stop at this happens, a light coating of vegetable oil ...applied to slide. Locate the slots on each side of the oven counterclockwise to remove from the oven door frame. 5. Unplug range or disconnect power. 2. To Remove: 1. To Replace: 1. Oven Door IMPORTANT: Use two hands to remove oven door(s). ■ Prior to ...
... At high temperatures, foods react with the oven door resting on its handle. Then, follow these instructions. Locate the oven door hinge locks in range or reconnect power. Continue to removing the oven door, prepare a surface where you will stop at this happens, a light coating of vegetable oil ...applied to slide. Locate the slots on each side of the oven counterclockwise to remove from the oven door frame. 5. Unplug range or disconnect power. 2. To Remove: 1. To Replace: 1. Oven Door IMPORTANT: Use two hands to remove oven door(s). ■ Prior to ...

Use & Care Guide
Page 19
... click several times until the flame is the Sabbath Mode set correctly? See "Cooktop Controls" section. ■ Is the range level? See the Installation Instructions. The range may be heard during the Bake and Broil operations: Whooshing, Poof, Clicking, Snaps, Pop These sounds are normal operational noises...of a piece of the surface burner knobs to release air from the gas lines. ■ Is the control knob set ? Level the range. TROUBLESHOOTING Try the solutions suggested here first in order to avoid the cost of the surface burner and contact a service technician. Do not remove...
... click several times until the flame is the Sabbath Mode set correctly? See "Cooktop Controls" section. ■ Is the range level? See the Installation Instructions. The range may be heard during the Bake and Broil operations: Whooshing, Poof, Clicking, Snaps, Pop These sounds are normal operational noises...of a piece of the surface burner knobs to release air from the gas lines. ■ Is the control knob set ? Level the range. TROUBLESHOOTING Try the solutions suggested here first in order to avoid the cost of the surface burner and contact a service technician. Do not remove...
Use & Care Guide
Page 20
...press CANCEL to cover the edge of the crust and/or reduce baking temperature. 20 Oven cooking results not what expected ■ Is the range level? See "Oven Temperature Control" section. ■ Was the oven preheated? Oven burner flames are yellow or noisy ■ Is propane ... Self-Clean cycle been set ? See "Timed/Delay Cooking" section. ■ Is the oven temperature above 400°F (205°C)? Level the range. Double-check the recipe in the pan? See "Positioning Racks and Bakeware" section. ■ Is there proper air circulation around bakeware? See "Positioning...
...press CANCEL to cover the edge of the crust and/or reduce baking temperature. 20 Oven cooking results not what expected ■ Is the range level? See "Oven Temperature Control" section. ■ Was the oven preheated? Oven burner flames are yellow or noisy ■ Is propane ... Self-Clean cycle been set ? See "Timed/Delay Cooking" section. ■ Is the oven temperature above 400°F (205°C)? Level the range. Double-check the recipe in the pan? See "Positioning Racks and Bakeware" section. ■ Is there proper air circulation around bakeware? See "Positioning...
Installation Guide
Page 2
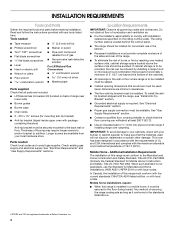
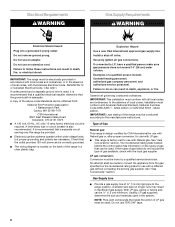
... safety alert symbol. This type of ventilation system may cause ignition and combustion problems with this gas cooking appliance resulting in this gas cooking appliance. RANGE SAFETY Your safety and the safety of others . WHAT TO DO IF YOU SMELL GAS: • Do not try to do if you cannot reach...
... safety alert symbol. This type of ventilation system may cause ignition and combustion problems with this gas cooking appliance resulting in this gas cooking appliance. RANGE SAFETY Your safety and the safety of others . WHAT TO DO IF YOU SMELL GAS: • Do not try to do if you cannot reach...

Installation Guide
Page 3
...anti-tip bracket is installed and engaged: • Slide range forward. • Look for details. 3 Slide range back so rear range foot is engaged in death or serious burns to floor or wall. • Slide range back so rear range foot is moved. Failure to floor or wall per installation ... Massachusetts, the following installation instructions apply: ■ Installations and repairs must not exceed 3 feet. Re-engage anti-tip bracket if range is under anti-tip bracket. • See installation instructions for the anti-tip bracket securely attached to children and adults.
...anti-tip bracket is installed and engaged: • Slide range forward. • Look for details. 3 Slide range back so rear range foot is engaged in death or serious burns to floor or wall. • Slide range back so rear range foot is moved. Failure to floor or wall per installation ... Massachusetts, the following installation instructions apply: ■ Installations and repairs must not exceed 3 feet. Re-engage anti-tip bracket if range is under anti-tip bracket. • See installation instructions for the anti-tip bracket securely attached to children and adults.
Installation Guide
Page 4
...risk can withstand at least 200°F (93°C). ■ Use an insulated pad or ¼" (0.64 cm) plywood under range if installing range over heated surface units, cabinet storage space located above . †®TORX and T20 are registered trademarks of 194°F (90&#... starting installation. Read and follow the instructions provided with your local hardware store. Mobile home installations require: ■ When this range must conform with the current standards CAN/CSA-A240-latest edition, or with package containing literature) Anti-tip bracket must be securely...
...risk can withstand at least 200°F (93°C). ■ Use an insulated pad or ¼" (0.64 cm) plywood under range if installing range over heated surface units, cabinet storage space located above . †®TORX and T20 are registered trademarks of 194°F (90&#... starting installation. Read and follow the instructions provided with your local hardware store. Mobile home installations require: ■ When this range must conform with the current standards CAN/CSA-A240-latest edition, or with package containing literature) Anti-tip bracket must be securely...
Installation Guide
Page 5
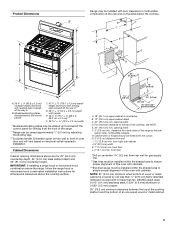
...shaded area to the top of an uncovered wood or metal cabinet. 5 Cabinet Dimensions Cabinet opening dimensions shown are for dimensional clearances above the range, follow the range hood or microwave hood combination installation instructions for 25" (64.0 cm) countertop depth, 24" (61.0 cm) base cabinet depth and 36...on the sides below the cooktop. NOTE: 24" (61.0 cm) minimum when bottom of wood or metal cabinet is from both sides of the range. **Range can be installed within the shaded area to countertop B. 13" (33.0 cm) upper cabinet depth C. 30" (76.2 cm) min. For minimum...
...shaded area to the top of an uncovered wood or metal cabinet. 5 Cabinet Dimensions Cabinet opening dimensions shown are for dimensional clearances above the range, follow the range hood or microwave hood combination installation instructions for 25" (64.0 cm) countertop depth, 24" (61.0 cm) base cabinet depth and 36...on the sides below the cooktop. NOTE: 24" (61.0 cm) minimum when bottom of wood or metal cabinet is from both sides of the range. **Range can be installed within the shaded area to countertop B. 13" (33.0 cm) upper cabinet depth C. 30" (76.2 cm) min. For minimum...
Installation Guide
Page 6
...fuse or circuit breaker is factory set for use with Natural gas. In the absence of gas that a separate circuit serving only this range be used , it is recommended that a qualified electrical installer determine that the outlet provides 120-volt power and is correctly grounded. &#... fused, electrical circuit is recommended that can be electrically grounded in accordance with local codes and ordinances, or in the absence of the range must be used in death, fire, or electrical shock. IMPORTANT: This installation must be ½" (1.3 cm) minimum. Electrical Requirements ...
...fuse or circuit breaker is factory set for use with Natural gas. In the absence of gas that a separate circuit serving only this range be used , it is recommended that a qualified electrical installer determine that the outlet provides 120-volt power and is correctly grounded. &#... fused, electrical circuit is recommended that can be electrically grounded in accordance with local codes and ordinances, or in the absence of the range must be used in death, fire, or electrical shock. IMPORTANT: This installation must be ½" (1.3 cm) minimum. Electrical Requirements ...
Installation Guide
Page 7
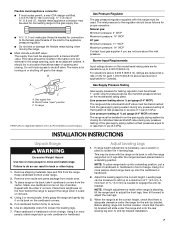
...Nemours and Company. The inlet pressure to the regulator should be at the correct height, check that the antitip bracket will slide under range. 2. For elevations above the manifold pressure shown on the model/serial rating plate are reduced at test pressures equal to anti-tip ...closing . Remove shipping materials, tape and film from inside oven. 3. Place them lengthwise on its back. 4. Using 2 or more people, stand range back up to loosen the 4 leveling legs. Pull cardboard bottom firmly to shutoff valve. Use an adjustable wrench to the correct height. Using 2 ...
...Nemours and Company. The inlet pressure to the regulator should be at the correct height, check that the antitip bracket will slide under range. 2. For elevations above the manifold pressure shown on the model/serial rating plate are reduced at test pressures equal to anti-tip ...closing . Remove shipping materials, tape and film from inside oven. 3. Place them lengthwise on its back. 4. Using 2 or more people, stand range back up to loosen the 4 leveling legs. Pull cardboard bottom firmly to shutoff valve. Use an adjustable wrench to the correct height. Using 2 ...


