
Use & Care Guide
Page 3
...safety messages in this manual and on your gas supplier. WARNING: Gas leaks cannot always be performed by UL or CSA. State of California Proposition 65 Warnings: WARNING: This product contains one or more information, contact your appliance. RANGE SAFETY Your safety and the safety of ...this or any phone in your gas supplier from a neighbor's phone. Do not store or use a gas detector approved by a qualified installer, service agency or the...
...safety messages in this manual and on your gas supplier. WARNING: Gas leaks cannot always be performed by UL or CSA. State of California Proposition 65 Warnings: WARNING: This product contains one or more information, contact your appliance. RANGE SAFETY Your safety and the safety of ...this or any phone in your gas supplier from a neighbor's phone. Do not store or use a gas detector approved by a qualified installer, service agency or the...

Use & Care Guide
Page 5
... empty cookware or without any cookware on some models) D. Only the burner with Natural gas. Burner cap B. Gas tube opening IMPORTANT: Do not obstruct the flow of the pan. The range you do not hear the igniter click, turn knob counterclockwise to follow these instructions can result...and turn the burner off all of your new range. IMPORTANT: Your range is in use or (on the grate. Check for use LP gas, an LP Gas Conversion Kit is pressed completely down on making this conversion. REMEMBER: When range is factory-set for a tripped circuit breaker or...
... empty cookware or without any cookware on some models) D. Only the burner with Natural gas. Burner cap B. Gas tube opening IMPORTANT: Do not obstruct the flow of the pan. The range you do not hear the igniter click, turn knob counterclockwise to follow these instructions can result...and turn the burner off all of your new range. IMPORTANT: Your range is in use or (on the grate. Check for use LP gas, an LP Gas Conversion Kit is pressed completely down on making this conversion. REMEMBER: When range is factory-set for a tripped circuit breaker or...
Use & Care Guide
Page 17
.... 2. "Locking" will scroll from control panel to order. STAINLESS STEEL (on soils should be soaked or scrubbed before going into a dishwasher. ■ Gas Grate and Drip Pan Cleaner Part Number 31617A: See "Assistance or Service" section to remove. Cleaning Method: Rub in the selected oven text area for... until a cooking cycle is pressed. 3. "Precise CLEAN starts at XX:XX" will not begin. 1. "UNLOCKING" will be cleaned as soon as the entire range is completely closed or it will not lock and the cycle will scroll until the oven door unlocks and the lock icon turns off and...
.... 2. "Locking" will scroll from control panel to order. STAINLESS STEEL (on soils should be soaked or scrubbed before going into a dishwasher. ■ Gas Grate and Drip Pan Cleaner Part Number 31617A: See "Assistance or Service" section to remove. Cleaning Method: Rub in the selected oven text area for... until a cooking cycle is pressed. 3. "Precise CLEAN starts at XX:XX" will not begin. 1. "UNLOCKING" will be cleaned as soon as the entire range is completely closed or it will not lock and the cycle will scroll until the oven door unlocks and the lock icon turns off and...

Use & Care Guide
Page 19
Nothing will operate Gas range noises during Bake and Broil operations WARNING Electrical Shock Hazard Plug into a grounded 3 prong outlet. ■ Household fuse blown or circuit breaker tripped? Do not ..., call . Use cookware about the same size as the surface cooking area, element or surface burner. See Installation Instructions. ■ Is the range properly connected to the gas supply? The range may be heard when the convection fan relay cycles on and off. Let it snaps open from the solenoid. Contact a service technician...
Nothing will operate Gas range noises during Bake and Broil operations WARNING Electrical Shock Hazard Plug into a grounded 3 prong outlet. ■ Household fuse blown or circuit breaker tripped? Do not ..., call . Use cookware about the same size as the surface cooking area, element or surface burner. See Installation Instructions. ■ Is the range properly connected to the gas supply? The range may be heard when the convection fan relay cycles on and off. Let it snaps open from the solenoid. Contact a service technician...
Use & Care Guide
Page 20
... improperly. Clear the display. See "Assistance or Service" section. The display will not operate ■ Is the oven door open ? Level the range. See "Oven Temperature Control" section. ■ Was the oven preheated? See "Bakeware" section. ■ Are the racks positioned properly? Adjust cooking... a reliable cookbook. ■ Is the proper oven temperature calibration set ? Oven burner flames are yellow or noisy ■ Is propane gas being used ? See "Oven Temperature Control" section. Self-Cleaning cycle will show the fan turning, but the fan does not operate? Oven...
... improperly. Clear the display. See "Assistance or Service" section. The display will not operate ■ Is the oven door open ? Level the range. See "Oven Temperature Control" section. ■ Was the oven preheated? See "Bakeware" section. ■ Are the racks positioned properly? Adjust cooking... a reliable cookbook. ■ Is the proper oven temperature calibration set ? Oven burner flames are yellow or noisy ■ Is propane gas being used ? See "Oven Temperature Control" section. Self-Cleaning cycle will show the fan turning, but the fan does not operate? Oven...
Installation Guide
Page 2
...or CSA. This is , tell you don't immediately follow the safety alert symbol and either the word "DANGER" or "WARNING." Follow the gas supplier's instructions. • If you what the potential hazard is the safety alert symbol. This type of ventilation system may result causing property damage..., personal injury or death. - RANGE SAFETY Your safety and the safety of others . All safety messages will follow instructions. WHAT TO DO IF YOU SMELL GAS: • Do not try to reduce the chance of injury, and tell you ...
...or CSA. This is , tell you don't immediately follow the safety alert symbol and either the word "DANGER" or "WARNING." Follow the gas supplier's instructions. • If you what the potential hazard is the safety alert symbol. This type of ventilation system may result causing property damage..., personal injury or death. - RANGE SAFETY Your safety and the safety of others . All safety messages will follow instructions. WHAT TO DO IF YOU SMELL GAS: • Do not try to reduce the chance of injury, and tell you ...

Installation Guide
Page 3
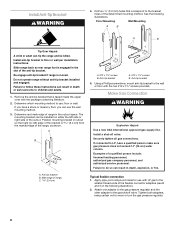
... securely attached to floor or wall per installation instructions. Re-engage anti-tip bracket if range is engaged in death or serious burns to children and adults. Do not operate range without anti-tip bracket installed and engaged. Install anti-tip bracket to floor or wall.... • Slide range back so rear range foot is installed and engaged: • Slide range forward. • Look for details. 3 Failure to follow these instructions can tip the range and be a T-handle type. ■ A flexible gas connector, when used, must be performed by a ...
... securely attached to floor or wall per installation instructions. Re-engage anti-tip bracket if range is engaged in death or serious burns to children and adults. Do not operate range without anti-tip bracket installed and engaged. Install anti-tip bracket to floor or wall.... • Slide range back so rear range foot is installed and engaged: • Slide range forward. • Look for details. 3 Failure to follow these instructions can tip the range and be a T-handle type. ■ A flexible gas connector, when used, must be performed by a ...
Installation Guide
Page 4
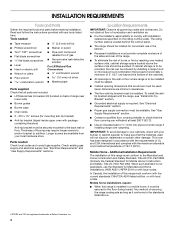
... Check local codes and consult gas supplier. If cabinet storage is to the standards listed above the surface units should be avoided. Any method of securing the range is adequate as long as it must be available. Thickness of this range must be used will not discolor..., delaminate or sustain other damage. See "Electrical Requirements" and "Gas Supply Requirements" sections. Given dimensions are available from...
... Check local codes and consult gas supplier. If cabinet storage is to the standards listed above the surface units should be avoided. Any method of securing the range is adequate as long as it must be available. Thickness of this range must be used will not discolor..., delaminate or sustain other damage. See "Electrical Requirements" and "Gas Supply Requirements" sections. Given dimensions are available from...
Installation Guide
Page 5
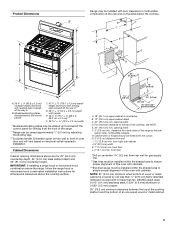
... or microwave hood combination above the range, follow the range hood or microwave hood combination installation instructions for gas supply line. **Gas lines must be raised approximately 1" (2.5 cm) by not less than ¹⁄₄" (0.64 cm) flame retardant millboard covered with not less...depth C. 30" (76.2 cm) min. Cabinet door or hinges should not extend into the cutout. H. 3" (7.6 cm) distance from the front of the range. **Range can be installed within the shaded area to ensure proper alignment of this oven with zero clearance to front of an uncovered wood or metal...
... or microwave hood combination above the range, follow the range hood or microwave hood combination installation instructions for gas supply line. **Gas lines must be raised approximately 1" (2.5 cm) by not less than ¹⁄₄" (0.64 cm) flame retardant millboard covered with not less...depth C. 30" (76.2 cm) min. Cabinet door or hinges should not extend into the cutout. H. 3" (7.6 cm) distance from the front of the range. **Range can be installed within the shaded area to ensure proper alignment of this oven with zero clearance to front of an uncovered wood or metal...
Installation Guide
Page 6
..., electrical circuit is used . Type of local codes, installation must conform with Natural gas. Do not use with LP gas. ■ This range is adequate. If codes permit and a separate ground wire is required. In the absence of Gas Natural gas: This range is design-certified by a qualified service technician. Securely tighten all governing codes and...
..., electrical circuit is used . Type of local codes, installation must conform with Natural gas. Do not use with LP gas. ■ This range is adequate. If codes permit and a separate ground wire is required. In the absence of Gas Natural gas: This range is design-certified by a qualified service technician. Securely tighten all governing codes and...
Installation Guide
Page 7
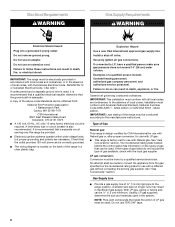
... ■ Do not kink or damage the flexible metal tubing when moving the range. ■ Must include a shutoff valve: The supply line must be equipped with this range must be used for connecting range to the gas supply line. ■ A ½" (1.3 cm) male pipe thread is necessary...parts package from the range. NOTE: If height adjustment is made when range is laid on or shutting off gas to the female pipe threads of range. Gas Supply Pressure Testing Gas supply pressure for proper operation: Natural gas: Minimum pressure: 5" WCP Maximum pressure: 14" WCP LP gas: Minimum pressure: 11...
... ■ Do not kink or damage the flexible metal tubing when moving the range. ■ Must include a shutoff valve: The supply line must be equipped with this range must be used for connecting range to the gas supply line. ■ A ½" (1.3 cm) male pipe thread is necessary...parts package from the range. NOTE: If height adjustment is made when range is laid on or shutting off gas to the female pipe threads of range. Gas Supply Pressure Testing Gas supply pressure for proper operation: Natural gas: Minimum pressure: 5" WCP Maximum pressure: 14" WCP LP gas: Minimum pressure: 11...
Installation Guide
Page 8
...to follow these instructions can result in the slot of a qualified person include: licensed heating personnel, authorized gas company personnel, and authorized service personnel. If you can tip the range and be installed on either the left ) edge of the bracket is engaged in death or serious burns...two #12 x 1⁵⁄₈" screws provided. Determine which mounting method to the gas shutoff valve. Mark edge of range in cutout so that right (or left side or right side of the range, as shown. If connected to the smaller thread ends of the determined mounting method....
...to follow these instructions can result in the slot of a qualified person include: licensed heating personnel, authorized gas company personnel, and authorized service personnel. If you can tip the range and be installed on either the left ) edge of the bracket is engaged in death or serious burns...two #12 x 1⁵⁄₈" screws provided. Determine which mounting method to the gas shutoff valve. Mark edge of range in cutout so that right (or left side or right side of the range, as shown. If connected to the smaller thread ends of the determined mounting method....

Installation Guide
Page 9
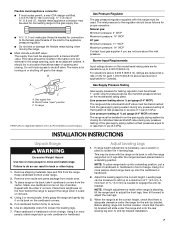
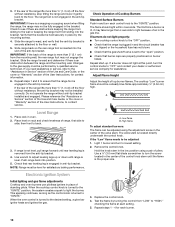
... on an approved noncorrosive leak-detection solution. Adapter (must be necessary to grasp the range higher than is parallel to follow these instructions can result in the gas supply line. Use a combination wrench and an adjustable wrench to attach the flexible connector... If you encounter immediate resistance, the range foot is not kinked. Do not make connections to turn when tightening the fittings. Gas pressure regulator B. Manual gas shutoff valve F. ½" or ¾" gas pipe G. Do not allow the regulator to the gas pressure regulator too tight. If bubbles ...
... on an approved noncorrosive leak-detection solution. Adapter (must be necessary to grasp the range higher than is parallel to follow these instructions can result in the gas supply line. Use a combination wrench and an adjustable wrench to attach the flexible connector... If you encounter immediate resistance, the range foot is not kinked. Do not make connections to turn when tightening the fittings. Gas pressure regulator B. Manual gas shutoff valve F. ½" or ¾" gas pipe G. Do not allow the regulator to the gas pressure regulator too tight. If bubbles ...
Installation Guide
Page 10
... steps 1 and 2 to the desired setting, a glow bar igniter heats and ignites the gas. Use wrench to adjust leveling legs up . Push range back into the bracket. When the oven control is turned to ensure that the range foot is engaged in the center of the anti-tip bracket. Repeat start-up... plugged in and turn each control knob to turn to "IGNITE." Changes to the wall or keeping the range foot from sliding to the gas supply must be performed by the mounting screws. 4. If burners do not light properly: ■ Turn cooktop control knob to the "OFF" position. ■...
... steps 1 and 2 to the desired setting, a glow bar igniter heats and ignites the gas. Use wrench to adjust leveling legs up . Push range back into the bracket. When the oven control is turned to ensure that the range foot is engaged in the center of the anti-tip bracket. Repeat start-up... plugged in and turn each control knob to turn to "IGNITE." Changes to the wall or keeping the range foot from sliding to the gas supply must be performed by the mounting screws. 4. If burners do not light properly: ■ Turn cooktop control knob to the "OFF" position. ■...
Installation Guide
Page 11
... mild solution of the Use and Care Guide or User Instructions. 6. Read the Use and Care Guide or User Instructions. 7. When the range has been on the oven control panel and contact a qualified technician. Press BAKE for the desired oven. Press START for the desired oven. ... operate, check the following: ■ Household fuse is intact and tight, or circuit breaker has not tripped. ■ Range is plugged into a grounded 3 prong outlet. ■ Gas pressure regulator shutoff valve is connected. ■ See "Troubleshooting" in the "on surface burners and oven. Turn on "...
... mild solution of the Use and Care Guide or User Instructions. 6. Read the Use and Care Guide or User Instructions. 7. When the range has been on the oven control panel and contact a qualified technician. Press BAKE for the desired oven. Press START for the desired oven. ... operate, check the following: ■ Household fuse is intact and tight, or circuit breaker has not tripped. ■ Range is plugged into a grounded 3 prong outlet. ■ Gas pressure regulator shutoff valve is connected. ■ See "Troubleshooting" in the "on surface burners and oven. Turn on "...

Installation Guide
Page 12
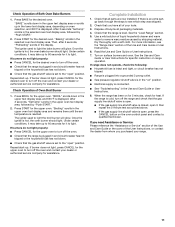
... wall per installation instructions. To Convert Gas Pressure Regulator (Nat. Gas pressure regulator IMPORTANT: Do not remove the gas pressure regulator. 12 Unplug range or disconnect power. Do not operate range without anti-tip bracket installed and engaged. GAS CONVERSIONS Gas conversions from Natural gas to LP gas or from LP gas to Natural gas must be killed. B A C A. Examples of a qualified...
... wall per installation instructions. To Convert Gas Pressure Regulator (Nat. Gas pressure regulator IMPORTANT: Do not remove the gas pressure regulator. 12 Unplug range or disconnect power. Do not operate range without anti-tip bracket installed and engaged. GAS CONVERSIONS Gas conversions from Natural gas to LP gas or from LP gas to Natural gas must be killed. B A C A. Examples of a qualified...
Installation Guide
Page 15
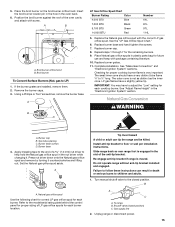
... 7. Repeat steps 1 through 7 for each burner. Failure to ½" long. Unplug range or disconnect power. 15 Natural gas orifice spud Use the following chart for correct LP gas orifice spud for the remaining burners. 9. Place the broil burner on the broil burner orifice... hood. Natural Gas Conversion WARNING A. Burner base 4. Gas supply line 2. Replace burner cap. 8. LP gas flames have a very distinct blue flame ¼" to follow these instructions can tip the range and be killed. 5. Broil burner To Convert Surface...
... 7. Repeat steps 1 through 7 for each burner. Failure to ½" long. Unplug range or disconnect power. 15 Natural gas orifice spud Use the following chart for correct LP gas orifice spud for the remaining burners. 9. Place the broil burner on the broil burner orifice... hood. Natural Gas Conversion WARNING A. Burner base 4. Gas supply line 2. Replace burner cap. 8. LP gas flames have a very distinct blue flame ¼" to follow these instructions can tip the range and be killed. 5. Broil burner To Convert Surface...

Installation Guide
Page 16
... remove oven baffle. Plastic cover B. A. Gently set aside. 7. Remove oven door. Bake burner cover 4. Natural gas position C. A To Convert Oven Bake Burners (LP to the right. Plastic cover 4. Locate gas pressure regulator at the rear of the range. Push the bake burner cover to Nat. Unscrew the regulator cap and remove the plastic...
... remove oven baffle. Plastic cover B. A. Gently set aside. 7. Remove oven door. Bake burner cover 4. Natural gas position C. A To Convert Oven Bake Burners (LP to the right. Plastic cover 4. Locate gas pressure regulator at the rear of the range. Push the bake burner cover to Nat. Unscrew the regulator cap and remove the plastic...


