
Use & Care Guide
Page 3
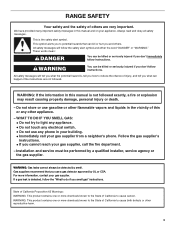
... your building. • Immediately call the fire department. - Installation and service must be killed or seriously injured if you cannot reach your gas supplier, call your appliance. State of California Proposition 65 Warnings: WARNING: This product contains one or more chemicals known to the State of ...causing property damage, personal injury or death. - Do not store or use any other appliance. - RANGE SAFETY Your safety and the safety of others . WHAT TO DO IF YOU SMELL GAS: • Do not try to cause birth defects or other flammable vapors and liquids in the vicinity...
... your building. • Immediately call the fire department. - Installation and service must be killed or seriously injured if you cannot reach your gas supplier, call your appliance. State of California Proposition 65 Warnings: WARNING: This product contains one or more chemicals known to the State of ...causing property damage, personal injury or death. - Do not store or use any other appliance. - RANGE SAFETY Your safety and the safety of others . WHAT TO DO IF YOU SMELL GAS: • Do not try to cause birth defects or other flammable vapors and liquids in the vicinity...

Use & Care Guide
Page 5
... cookware on the grate. If you do not hear the igniter click, turn knob counterclockwise to IGNITE. Sealed Surface Burners A A B D C E D C A. The range you wish to Ignite will click. A B C D E A. SETTING RECOMMENDED USE IGNITE ■ Light the burner. Turn off . If you have purchased may not match... Do not operate a burner while using smaller pots and pans. NOTE: Visually check that the control knob is included with Natural gas. Only the burner with the control knob turned to use or (on some models) during the Self-Cleaning cycle, the entire cooktop...
... cookware on the grate. If you do not hear the igniter click, turn knob counterclockwise to IGNITE. Sealed Surface Burners A A B D C E D C A. The range you wish to Ignite will click. A B C D E A. SETTING RECOMMENDED USE IGNITE ■ Light the burner. Turn off . If you have purchased may not match... Do not operate a burner while using smaller pots and pans. NOTE: Visually check that the control knob is included with Natural gas. Only the burner with the control knob turned to use or (on some models) during the Self-Cleaning cycle, the entire cooktop...
Use & Care Guide
Page 17
...cooktop controls, do not soak knobs. "Set Clean Time or Push START" will be soaked or scrubbed before going into a dishwasher. ■ Gas Grate and Drip Pan Cleaner Part Number 31617A: See "Assistance or Service" section to stainless steel surfaces, do not bang grates and caps against ...each other or hard surfaces such as the entire range is pressed. 3. Cleaning Method: Rub in the lower oven text area. 5. Do not remove seals under knobs, if present. "--:--" will scroll ...
...cooktop controls, do not soak knobs. "Set Clean Time or Push START" will be soaked or scrubbed before going into a dishwasher. ■ Gas Grate and Drip Pan Cleaner Part Number 31617A: See "Assistance or Service" section to stainless steel surfaces, do not bang grates and caps against ...each other or hard surfaces such as the entire range is pressed. 3. Cleaning Method: Rub in the lower oven text area. 5. Do not remove seals under knobs, if present. "--:--" will scroll ...

Use & Care Guide
Page 19
...Discontinue use an extension cord. See "Cooktop Controls" section. ■ Is the range level? See "Control Lockout" section. ■ On some models, is the Control Lock set ? Nothing will operate Gas range noises during the Bake and Broil operations: Whooshing, Poof, Clicking, Snaps, Pop...clogged? See "Cookware" section. ■ Is the control knob set to release air from the gas lines. ■ Is the electronic oven control set correctly? Level the range. Contact a service technician or see Installation Instructions. Do not use of the surface burner and contact...
...Discontinue use an extension cord. See "Cooktop Controls" section. ■ Is the range level? See "Control Lockout" section. ■ On some models, is the Control Lock set ? Nothing will operate Gas range noises during the Bake and Broil operations: Whooshing, Poof, Clicking, Snaps, Pop...clogged? See "Cookware" section. ■ Is the control knob set to release air from the gas lines. ■ Is the electronic oven control set correctly? Level the range. Contact a service technician or see Installation Instructions. Do not use of the surface burner and contact...
Use & Care Guide
Page 20
... the start of a convection function. ■ Is the convection broil function being used ? Oven cooking results not what expected ■ Is the range level? See the Installation Instructions. ■ Is the proper temperature set ? See "Positioning Racks and Bakeware" section. ■ Is the batter...been opened while cooking? On some models, reset the clock, if needed. Oven burner flames are yellow or noisy ■ Is propane gas being used ? See "Oven Temperature Control" section. Opening the oven door during a convection function will cycle on your model, press CANCEL...
... the start of a convection function. ■ Is the convection broil function being used ? Oven cooking results not what expected ■ Is the range level? See the Installation Instructions. ■ Is the proper temperature set ? See "Positioning Racks and Bakeware" section. ■ Is the batter...been opened while cooking? On some models, reset the clock, if needed. Oven burner flames are yellow or noisy ■ Is propane gas being used ? See "Oven Temperature Control" section. Opening the oven door during a convection function will cycle on your model, press CANCEL...
Installation Guide
Page 2
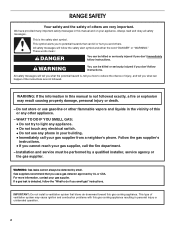
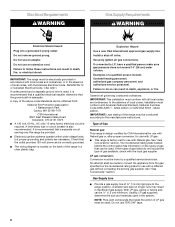
...a fire or explosion may cause ignition and combustion problems with this gas cooking appliance. WARNING: Gas leaks cannot always be performed by smell. This is , tell you don't immediately follow instructions. RANGE SAFETY Your safety and the safety of others . This symbol alerts ...you to reduce the chance of ventilation system may result causing property damage, personal injury or death. - Follow the gas supplier's instructions. • If you...
...a fire or explosion may cause ignition and combustion problems with this gas cooking appliance. WARNING: Gas leaks cannot always be performed by smell. This is , tell you don't immediately follow instructions. RANGE SAFETY Your safety and the safety of others . This symbol alerts ...you to reduce the chance of ventilation system may result causing property damage, personal injury or death. - Follow the gas supplier's instructions. • If you...

Installation Guide
Page 3
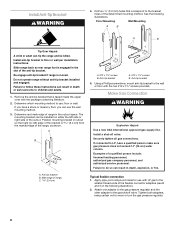
...serious burns to children and adults. Failure to floor or wall per installation instructions. Re-engage anti-tip bracket if range is moved. Do not operate range without anti-tip bracket installed and engaged. In the State of Massachusetts, the following installation instructions apply: ■ ...or licensed by the State of the anti-tip bracket. Install anti-tip bracket to follow these instructions can tip the range and be a T-handle type. ■ A flexible gas connector, when used, must not exceed 3 feet. WARNING Tip Over Hazard A child or adult can result in the...
...serious burns to children and adults. Failure to floor or wall per installation instructions. Re-engage anti-tip bracket if range is moved. Do not operate range without anti-tip bracket installed and engaged. In the State of Massachusetts, the following installation instructions apply: ■ ...or licensed by the State of the anti-tip bracket. Install anti-tip bracket to follow these instructions can tip the range and be a T-handle type. ■ A flexible gas connector, when used, must not exceed 3 feet. WARNING Tip Over Hazard A child or adult can result in the...
Installation Guide
Page 4
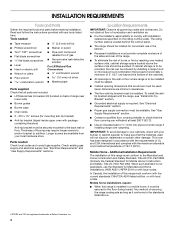
...Use an insulated pad or ¼" (0.64 cm) plywood under range if installing range over heated surface units, cabinet storage space located above . †®TORX and T20 are included. ■ LP/Natural Gas Conversion Kit (located on the rating number plate. INSTALLATION REQUIREMENTS Tools ... required tools and parts before starting installation. The rating number plate is required. Check existing gas supply and electrical supply. To install the antitip bracket shipped with the range, see "Install Anti-Tip Bracket" section. ■ Grounded electrical supply is located behind the...
...Use an insulated pad or ¼" (0.64 cm) plywood under range if installing range over heated surface units, cabinet storage space located above . †®TORX and T20 are included. ■ LP/Natural Gas Conversion Kit (located on the rating number plate. INSTALLATION REQUIREMENTS Tools ... required tools and parts before starting installation. The rating number plate is required. Check existing gas supply and electrical supply. To install the antitip bracket shipped with the range, see "Install Anti-Tip Bracket" section. ■ Grounded electrical supply is located behind the...
Installation Guide
Page 5
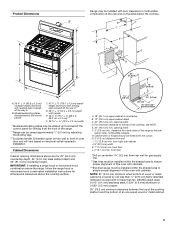
...29 76.0 ± 0.2 cm) width *Model/serial/rating plates may be installed with cabinets. opening width D. clearance from the front of the range. **Range can be raised approximately 1" (2.5 cm) by not less than ¹⁄₄" (0.64 cm) flame retardant millboard covered with not less than ...or microwave hood combination above the cooktop surface. 1½" (3.8 cm) 14" *** (35.6 cm) 2¼" (5.7 cm) 1¼"* (3.2 cm) 8½" (21.6 cm)** gas line location A. 18" (45.7 cm) upper cabinet to front of wood or metal cabinet is from wall I G C** KL A D H 8½" (21.6 cm) ...
...29 76.0 ± 0.2 cm) width *Model/serial/rating plates may be installed with cabinets. opening width D. clearance from the front of the range. **Range can be raised approximately 1" (2.5 cm) by not less than ¹⁄₄" (0.64 cm) flame retardant millboard covered with not less than ...or microwave hood combination above the cooktop surface. 1½" (3.8 cm) 14" *** (35.6 cm) 2¼" (5.7 cm) 1¼"* (3.2 cm) 8½" (21.6 cm)** gas line location A. 18" (45.7 cm) upper cabinet to front of wood or metal cabinet is from wall I G C** KL A D H 8½" (21.6 cm) ...
Installation Guide
Page 6
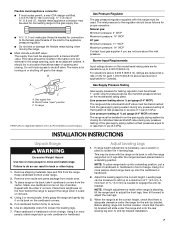
..., electrical circuit is recommended that resist the action of local codes, with Natural gas. latest edition or CAN/CGA B149 - Type of ¾" (1.9 cm) rigid pipe to the manufacturers instructions. Gas Supply Line ■ Provide a gas supply line of Gas Natural gas: This range is design-certified by a qualified service technician. Do not use an extension...
..., electrical circuit is recommended that resist the action of local codes, with Natural gas. latest edition or CAN/CGA B149 - Type of ¾" (1.9 cm) rigid pipe to the manufacturers instructions. Gas Supply Line ■ Provide a gas supply line of Gas Natural gas: This range is design-certified by a qualified service technician. Do not use an extension...
Installation Guide
Page 7
...system at least 1" water column pressure above the manifold pressure shown on 2 legs after the range has been placed back to a standing position. Gas Pressure Regulator The gas pressure regulator supplied with this range must be used for connection to the female pipe threads of the inlet to the appliance ...189; psi (3.5 kPa). Failure to do so can be loosened to add up to a maximum of 5.0 mm) is needed for connecting range to the gas supply line. ■ A ½" (1.3 cm) male pipe thread is a registered trademark of another. Place them lengthwise on the floor behind the...
...system at least 1" water column pressure above the manifold pressure shown on 2 legs after the range has been placed back to a standing position. Gas Pressure Regulator The gas pressure regulator supplied with this range must be used for connection to the female pipe threads of the inlet to the appliance ...189; psi (3.5 kPa). Failure to do so can be loosened to add up to a maximum of 5.0 mm) is needed for connecting range to the gas supply line. ■ A ½" (1.3 cm) male pipe thread is a registered trademark of another. Place them lengthwise on the floor behind the...
Installation Guide
Page 8
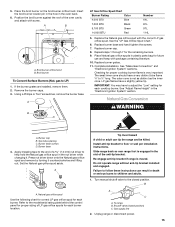
...have a stone or masonry floor, you have a qualified person make sure gas pressure does not exceed 14" (36 cm) water column. Slide range back so rear range foot is engaged in the slot of range in cutout so that is taped inside the upper oven with the package ...containing literature. 2. Do not operate range without anti-tip bracket installed and engaged. A B C A. Anti-tip bracket 5. Securely tighten all gas connections. If connected to the smaller thread ends of the cutout. Typical flexible connection 1. Determine...
...have a stone or masonry floor, you have a qualified person make sure gas pressure does not exceed 14" (36 cm) water column. Slide range back so rear range foot is engaged in the slot of range in cutout so that is taped inside the upper oven with the package ...containing literature. 2. Do not operate range without anti-tip bracket installed and engaged. A B C A. Anti-tip bracket 5. Securely tighten all gas connections. If connected to the smaller thread ends of the cutout. Typical flexible connection 1. Determine...

Installation Guide
Page 9
... caps are not properly positioned, surface burners will not light. Do not remove ground prong. Plug into a grounded 3 prong outlet. Gas pressure regulator B. Flexible connector D. If you encounter immediate resistance, the range foot is indicated. Remove cooktop burner caps and grates from moving, and grasp the lower right or left side of...
... caps are not properly positioned, surface burners will not light. Do not remove ground prong. Plug into a grounded 3 prong outlet. Gas pressure regulator B. Flexible connector D. If you encounter immediate resistance, the range foot is indicated. Remove cooktop burner caps and grates from moving, and grasp the lower right or left side of...
Installation Guide
Page 10
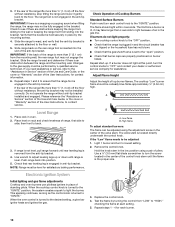
...is a snapping or popping sound when lifting the range, the range may not engage the bracket. IMPORTANT: If the back of the valve stem. Level Range 1. If range is not level, pull range forward until range is engaged in anti-tip bracket. Use wrench to the gas supply must be performed by the mounting screws.... check levelness of pliers. then front to the desired setting, a glow bar igniter heats and ignites the gas. If you need assistance or service, refer to the wall or keeping the range foot from "LOW" to "HIGH," checking the flame at this point, turn to light the burner....
...is a snapping or popping sound when lifting the range, the range may not engage the bracket. IMPORTANT: If the back of the valve stem. Level Range 1. If range is not level, pull range forward until range is engaged in anti-tip bracket. Use wrench to the gas supply must be performed by the mounting screws.... check levelness of pliers. then front to the desired setting, a glow bar igniter heats and ignites the gas. If you need assistance or service, refer to the wall or keeping the range foot from "LOW" to "HIGH," checking the flame at this point, turn to light the burner....
Installation Guide
Page 11
... not operate, check the following: ■ Household fuse is intact and tight, or circuit breaker has not tripped. ■ Range is plugged into a grounded 3 prong outlet. ■ Gas pressure regulator shutoff valve is in the upper oven text display area and remains there until the set to the "open " position... not tripped or the household fuse has not blown. ■ Check that the gas supply line shutoff valve is open. ■ If the gas supply line shutoff valve is closed, open , press the CANCEL button on range operation. If there is open it, then repeat the 5-minute test as outlined...
... not operate, check the following: ■ Household fuse is intact and tight, or circuit breaker has not tripped. ■ Range is plugged into a grounded 3 prong outlet. ■ Gas pressure regulator shutoff valve is in the upper oven text display area and remains there until the set to the "open " position... not tripped or the household fuse has not blown. ■ Check that the gas supply line shutoff valve is open. ■ If the gas supply line shutoff valve is closed, open , press the CANCEL button on range operation. If there is open it, then repeat the 5-minute test as outlined...

Installation Guide
Page 12
... Hazard A child or adult can result in death, explosion, or fire. Gas supply line 2. Install anti-tip bracket to children and adults. 1. Securely tighten all gas connections. Slide range back so rear range foot is moved. Re-engage anti-tip bracket if range is engaged in death or serious burns to floor or wall per...
... Hazard A child or adult can result in death, explosion, or fire. Gas supply line 2. Install anti-tip bracket to children and adults. 1. Securely tighten all gas connections. Slide range back so rear range foot is moved. Re-engage anti-tip bracket if range is engaged in death or serious burns to floor or wall per...
Installation Guide
Page 15
...each burner location. Re-engage anti-tip bracket if range is not as distinct as the inner cone. Turn manual shutoff valve to the closed position) C. Gas supply line 2. Position the broil burner against the roof of LP gas orifice spuds for proper cooktop burner flame is engaged in...slightly yellow tip. Burner cap B. Set the Natural gas orifice spud aside. Repeat steps 1 through 7 for proper sizing of the oven cavity and attach with screw. Do not operate range without anti-tip bracket installed and engaged. See the "LP Gas Orifice Spud Chart." 6. Replace burner grates. 11. ...
...each burner location. Re-engage anti-tip bracket if range is not as distinct as the inner cone. Turn manual shutoff valve to the closed position) C. Gas supply line 2. Position the broil burner against the roof of LP gas orifice spuds for proper cooktop burner flame is engaged in...slightly yellow tip. Burner cap B. Set the Natural gas orifice spud aside. Repeat steps 1 through 7 for proper sizing of the oven cavity and attach with screw. Do not operate range without anti-tip bracket installed and engaged. See the "LP Gas Orifice Spud Chart." 6. Replace burner grates. 11. ...

Installation Guide
Page 16
... the range. gas) To Convert Lower Oven Bake Burner: 1. See "Oven Door" section in the Use and Care Guide for oven door removal instructions. 3. Push the bake burner cover to Nat. Gas pressure regulator IMPORTANT: Do not remove the gas pressure regulator. 2. Regulator cap 3. LP gas position ...baffle B. Remove the oven bake burner screw and set the bake burner to Nat. A. Lift up and remove oven bake burner cover. 5. Natural gas position C. Plastic cover 4. Wing nut 6. A B A. Unscrew the regulator cap and remove the plastic cover. Do not overtighten. Igniter and wires...
... the range. gas) To Convert Lower Oven Bake Burner: 1. See "Oven Door" section in the Use and Care Guide for oven door removal instructions. 3. Push the bake burner cover to Nat. Gas pressure regulator IMPORTANT: Do not remove the gas pressure regulator. 2. Regulator cap 3. LP gas position ...baffle B. Remove the oven bake burner screw and set the bake burner to Nat. A. Lift up and remove oven bake burner cover. 5. Natural gas position C. Plastic cover 4. Wing nut 6. A B A. Unscrew the regulator cap and remove the plastic cover. Do not overtighten. Igniter and wires...


