

Use & Care Guide
Page 5
... click, turn knob counterclockwise to a boil. Electric igniters automatically light the surface burners when control knobs are turned to use LP gas, an LP Gas Conversion Kit is pressed completely down on making this conversion. Check that the burner has lit. All the surface burners will produce a flame. Igniter E. The locations and appearances of...
... click, turn knob counterclockwise to a boil. Electric igniters automatically light the surface burners when control knobs are turned to use LP gas, an LP Gas Conversion Kit is pressed completely down on making this conversion. Check that the burner has lit. All the surface burners will produce a flame. Igniter E. The locations and appearances of...
Installation Guide
Page 4
...and T20 are registered trademarks of burns or fire by installing a range hood or microwave hood combination that are included. ■ LP/Natural Gas Conversion Kit (located on the rating number plate. See "Electrical Requirements" section. ■ Proper gas supply connection must be sealed. ...avoided. Longer screws are minimum clearances. ■ The floor anti-tip bracket must be securely mounted to LP gas ■ Noncorrosive leak-detection solution For LP/Natural Gas Conversions ■ ½" combination wrench 7.0 mm) nut driver ■ Masking tape Parts supplied Check that...
...and T20 are registered trademarks of burns or fire by installing a range hood or microwave hood combination that are included. ■ LP/Natural Gas Conversion Kit (located on the rating number plate. See "Electrical Requirements" section. ■ Proper gas supply connection must be sealed. ...avoided. Longer screws are minimum clearances. ■ The floor anti-tip bracket must be securely mounted to LP gas ■ Noncorrosive leak-detection solution For LP/Natural Gas Conversions ■ ½" combination wrench 7.0 mm) nut driver ■ Masking tape Parts supplied Check that...
Installation Guide
Page 6
...only, 15-amp fused, electrical circuit is adequate. Securely tighten all gas connections. latest edition or CAN/CGA B149 - See "Gas Conversions" section. A smaller size pipe on the model/serial rating plate for use with LP gas. ■ This range is used in the absence of ¾" (1.9 cm) rigid pipe to... service personnel. Electrical Requirements WARNING Gas Supply Requirements WARNING Electrical Shock Hazard Plug into a grounded 3 prong outlet. If connected to the range location. LP gas conversion: Conversion must conform with Natural gas or, after proper...
...only, 15-amp fused, electrical circuit is adequate. Securely tighten all gas connections. latest edition or CAN/CGA B149 - See "Gas Conversions" section. A smaller size pipe on the model/serial rating plate for use with LP gas. ■ This range is used in the absence of ¾" (1.9 cm) rigid pipe to... service personnel. Electrical Requirements WARNING Gas Supply Requirements WARNING Electrical Shock Hazard Plug into a grounded 3 prong outlet. If connected to the range location. LP gas conversion: Conversion must conform with Natural gas or, after proper...

Installation Guide
Page 12
... gas pressure regulator at the rear of a qualified person include: licensed heating personnel, authorized gas company personnel, and authorized service personnel. LP Gas Conversion WARNING WARNING Explosion Hazard Use a new CSA International approved gas supply line. To Convert Gas Pressure Regulator (Nat. gas to do so...floor or wall per installation instructions. Install a shut-off valve. Unplug range or disconnect power. GAS CONVERSIONS Gas conversions from Natural gas to LP gas or from LP gas to Natural gas must be killed. Tip Over Hazard A child or adult can result in ...
... gas pressure regulator at the rear of a qualified person include: licensed heating personnel, authorized gas company personnel, and authorized service personnel. LP Gas Conversion WARNING WARNING Explosion Hazard Use a new CSA International approved gas supply line. To Convert Gas Pressure Regulator (Nat. gas to do so...floor or wall per installation instructions. Install a shut-off valve. Unplug range or disconnect power. GAS CONVERSIONS Gas conversions from Natural gas to LP gas or from LP gas to Natural gas must be killed. Tip Over Hazard A child or adult can result in ...
Installation Guide
Page 14
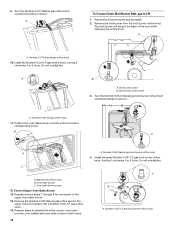
... A. Oven bake burner screw To Convert Upper Oven Bake Burner 12. Repeat previous steps 1 through 8 for conversion of the oven while changing the orifice hood. Number 0.037 LP gas broil burner orifice hood Do not overtighten. Bake burner orifice hood B. Number 0.054 Natural gas broil burner...using screw. B A A C A. Do not overtighten. .037 A A. Number 0.070 Natural gas orifice hood 10. Install the Number 0.044 LP gas orifice hood, turning it clockwise 4 or 5 turns. Turn the Number 0.054 Natural gas broil burner orifice hood counterclockwise to reinstall the orifice...
... A. Oven bake burner screw To Convert Upper Oven Bake Burner 12. Repeat previous steps 1 through 8 for conversion of the oven while changing the orifice hood. Number 0.037 LP gas broil burner orifice hood Do not overtighten. Bake burner orifice hood B. Number 0.054 Natural gas broil burner...using screw. B A A C A. Do not overtighten. .037 A A. Number 0.070 Natural gas orifice hood 10. Install the Number 0.044 LP gas orifice hood, turning it clockwise 4 or 5 turns. Turn the Number 0.054 Natural gas broil burner orifice hood counterclockwise to reinstall the orifice...
Installation Guide
Page 15
... rating plate behind the control panel for each burner location. B A C A. A B A. Natural Gas Conversion WARNING A. Burner cap B. Gas tube opening C. Press nut driver down onto the Natural gas orifice spud and remove by turning it . Gas supply line 2. 5. See the "LP Gas Orifice Spud Chart." 6. See "Make Gas Connection" and "Electronic Ignition System...
... rating plate behind the control panel for each burner location. B A C A. A B A. Natural Gas Conversion WARNING A. Burner cap B. Gas tube opening C. Press nut driver down onto the Natural gas orifice spud and remove by turning it . Gas supply line 2. 5. See the "LP Gas Orifice Spud Chart." 6. See "Make Gas Connection" and "Electronic Ignition System...

Installation Guide
Page 17
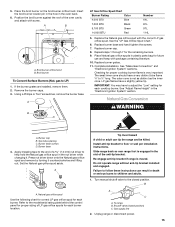
...oven and replace with a Number 0.055 Natural gas orifice spud. 14. Broil burner orifice hood 17 B A C A. Remove the Number 0.037 LP gas orifice spud in the back of the upper oven bake burner. 13. Remove broil burner screw and set aside. 2. A A. Broil burner screw... hood B. Reverse steps to remove. Do not overtighten. Repeat previous steps 1 through 8 for conversion of the oven while changing the orifice hood. gas) 1. A 11. Turn the Number 0.044 LP gas orifice hood counterclockwise to reinstall the orifice covers, oven bake burners, oven baffles and oven ...
...oven and replace with a Number 0.055 Natural gas orifice spud. 14. Broil burner orifice hood 17 B A C A. Remove the Number 0.037 LP gas orifice spud in the back of the upper oven bake burner. 13. Remove broil burner screw and set aside. 2. A A. Broil burner screw... hood B. Reverse steps to remove. Do not overtighten. Repeat previous steps 1 through 8 for conversion of the oven while changing the orifice hood. gas) 1. A 11. Turn the Number 0.044 LP gas orifice hood counterclockwise to reinstall the orifice covers, oven bake burners, oven baffles and oven ...

