
Installation Guide
Page 1
Canada Only 5 INSTALLATION INSTRUCTIONS 5 Unpack Range 5 Adjust Leveling Legs 5 Install Anti-Tip Bracket 6 Electrical Connection - Always read and obey all safety messages. WARNING You can be killed or seriously injured if you what the potential hazard is the...can happen if the instructions are very important. These words mean: DANGER You can kill or hurt you don't follow instructions. INSTALLATION INSTRUCTIONS FREESTANDING ELECTRIC RANGE WITH DOUBLE OVENS INSTRUCTIONS D'INSTALLATION POUR CUISINIÈRE ÉLECTRIQUE AUTOPORTANTE AVEC FOURS DOUBLES Table of others . Only...
Canada Only 5 INSTALLATION INSTRUCTIONS 5 Unpack Range 5 Adjust Leveling Legs 5 Install Anti-Tip Bracket 6 Electrical Connection - Always read and obey all safety messages. WARNING You can be killed or seriously injured if you what the potential hazard is the...can happen if the instructions are very important. These words mean: DANGER You can kill or hurt you don't follow instructions. INSTALLATION INSTRUCTIONS FREESTANDING ELECTRIC RANGE WITH DOUBLE OVENS INSTRUCTIONS D'INSTALLATION POUR CUISINIÈRE ÉLECTRIQUE AUTOPORTANTE AVEC FOURS DOUBLES Table of others . Only...

Installation Guide
Page 2
... Home Installations, ANSI A225.1/NFPA 501A or with package containing literature) Anti-tip bracket must be made by installing a range hood that all electrical connections be used in death or serious burns to children and adults. Any method of the cabinets. ■ Cabinet opening...■ A UL listed power supply cord kit marked for details. To install the antitip bracket shipped with the range, see "Install Anti-Tip Bracket" section. ■ Grounded electrical supply is under anti-tip bracket. • See installation instructions for use with nominal 1³⁄₈" ...
... Home Installations, ANSI A225.1/NFPA 501A or with package containing literature) Anti-tip bracket must be made by installing a range hood that all electrical connections be used in death or serious burns to children and adults. Any method of the cabinets. ■ Cabinet opening...■ A UL listed power supply cord kit marked for details. To install the antitip bracket shipped with the range, see "Install Anti-Tip Bracket" section. ■ Grounded electrical supply is under anti-tip bracket. • See installation instructions for use with nominal 1³⁄₈" ...

Installation Guide
Page 3
...from the front of an uncovered wood or metal cabinet. 3 opening width F. D. opening width. from right side cabinet H. 2" (5.1 cm) min. A freestanding range may be installed next to countertop B. 13" (33.0 cm) upper cabinet depth C. 30" (76.2 cm) min. U.S.A.: 30" (76.2 cm) min.... Dimension given is covered by adjusting the leveling legs. **Model/serial/rating plates may be rotated up from wall or range will vary based on electric outlet receptacle installation. For minimum clearance to front of the cooktop, see NOTE. B D C A E J G I . 7" (17.8 cm...
...from the front of an uncovered wood or metal cabinet. 3 opening width F. D. opening width. from right side cabinet H. 2" (5.1 cm) min. A freestanding range may be installed next to countertop B. 13" (33.0 cm) upper cabinet depth C. 30" (76.2 cm) min. U.S.A.: 30" (76.2 cm) min.... Dimension given is covered by adjusting the leveling legs. **Model/serial/rating plates may be rotated up from wall or range will vary based on electric outlet receptacle installation. For minimum clearance to front of the cooktop, see NOTE. B D C A E J G I . 7" (17.8 cm...

Installation Guide
Page 4
... may permit the use a 4-wire power supply cord rated at least 4 ft (1.22 m) long. See the "Electrical Connection - U.S.A. The fourth (grounding) conductor must determine the type of the range inside a clear plastic bag. 3-wire receptacle (10-50R) 4 Only If codes permit and a separate ground wire is...diagram is located on the Tech Sheet. ■ The Tech Sheet is located on the appliance end must conform with ranges. Electrical Connection To properly install your range, you will be provided at the junction box). ■ Wire sizes and connections must be using and follow the...
... may permit the use a 4-wire power supply cord rated at least 4 ft (1.22 m) long. See the "Electrical Connection - U.S.A. The fourth (grounding) conductor must determine the type of the range inside a clear plastic bag. 3-wire receptacle (10-50R) 4 Only If codes permit and a separate ground wire is...diagram is located on the Tech Sheet. ■ The Tech Sheet is located on the appliance end must conform with ranges. Electrical Connection To properly install your range, you will be provided at the junction box). ■ Wire sizes and connections must be using and follow the...

Installation Guide
Page 5
... loosen the 4 leveling legs. Using 2 or more people, stand range back up into a standard 14-50R wall receptacle. NOTE: To place range back up onto the cardboard or hardboard. 2. Before sliding range into its back. 4. Electrical Requirements - Be sure that the ground path is within reach of... cord. Place them lengthwise on the floor behind the range to support the range when it is recommended that a qualified electrical installer determine that the electrical connection and wire size are in conformance with the range supported on its final location, check that there is ...
... loosen the 4 leveling legs. Using 2 or more people, stand range back up into a standard 14-50R wall receptacle. NOTE: To place range back up onto the cardboard or hardboard. 2. Before sliding range into its back. 4. Electrical Requirements - Be sure that the ground path is within reach of... cord. Place them lengthwise on the floor behind the range to support the range when it is recommended that a qualified electrical installer determine that the electrical connection and wire size are in conformance with the range supported on its final location, check that there is ...

Installation Guide
Page 7
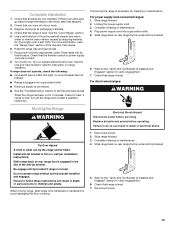
... supply cord strain relief ■ Assemble a UL listed strain relief in death, fire, or electrical shock. Plug into a grounded outlet. Electrically ground range. A 3. Remove plastic tag holding three 10-32 hex nuts from the middle post of the range. Allow enough slack to easily attach the wiring to remove cover. Use Phillips screwdriver to...
... supply cord strain relief ■ Assemble a UL listed strain relief in death, fire, or electrical shock. Plug into a grounded outlet. Electrically ground range. A 3. Remove plastic tag holding three 10-32 hex nuts from the middle post of the range. Allow enough slack to easily attach the wiring to remove cover. Use Phillips screwdriver to...

Installation Guide
Page 8
...on rear of electrical connection: 4-wire (recommended) 3-wire (if 4-wire is not available) Electrical Connection Options If your home has: And you will be Go to Section: connecting to: 4-wire receptacle (NEMA type 14-50R) A UL listed, 250-volt minimum, 40-amp, range power supply cord...direct 5" (12.7 cm) 3-wire receptacle (NEMA type 10-50R) A fused disconnect or circuit breaker box A UL listed, 250-volt minimum, 40-amp, range power supply cord 4-wire connection: Direct wire 3-wire connection: Power supply cord 3-wire direct 1" (2.5 cm) 3" (7.6 cm) A fused disconnect or circuit breaker...
...on rear of electrical connection: 4-wire (recommended) 3-wire (if 4-wire is not available) Electrical Connection Options If your home has: And you will be Go to Section: connecting to: 4-wire receptacle (NEMA type 14-50R) A UL listed, 250-volt minimum, 40-amp, range power supply cord...direct 5" (12.7 cm) 3-wire receptacle (NEMA type 10-50R) A fused disconnect or circuit breaker box A UL listed, 250-volt minimum, 40-amp, range power supply cord 4-wire connection: Direct wire 3-wire connection: Power supply cord 3-wire direct 1" (2.5 cm) 3" (7.6 cm) A fused disconnect or circuit breaker...

Installation Guide
Page 10
...Wire Installation: Copper or Aluminum Wire This range may be cut out and removed. Metal ground strap B. Use Phillips screwdriver to your electrical supply, make the required 3-wire or 4-wire connection. 1. A B 3" (7.6 cm) 2. Complete electrical connection according to remove the ground-link screw.... Cord/conduit plate D. Strip the insulation back 1" (2.5 cm) from the back of electrical supply (4-wire or 3-wire connection). Allow enough slack in the wire to the center terminal block post with ranges. 5. Neutral (white) wire F. Line 1 (black) C. Replace terminal block access cover...
...Wire Installation: Copper or Aluminum Wire This range may be cut out and removed. Metal ground strap B. Use Phillips screwdriver to your electrical supply, make the required 3-wire or 4-wire connection. 1. A B 3" (7.6 cm) 2. Complete electrical connection according to remove the ground-link screw.... Cord/conduit plate D. Strip the insulation back 1" (2.5 cm) from the back of electrical supply (4-wire or 3-wire connection). Allow enough slack in the wire to the center terminal block post with ranges. 5. Neutral (white) wire F. Line 1 (black) C. Replace terminal block access cover...
Installation Guide
Page 13
..." section in death or electrical shock. When the range has been on surface elements and oven. If range is level. Plug power supply cord into a grounded outlet. ■ Electrical supply is plugged into a grounded outlet. 5. Check that the range is intact and tight; For direct-wired ranges: WARNING Moving the Range WARNING Electrical Shock Hazard Disconnect power before...
..." section in death or electrical shock. When the range has been on surface elements and oven. If range is level. Plug power supply cord into a grounded outlet. ■ Electrical supply is plugged into a grounded outlet. 5. Check that the range is intact and tight; For direct-wired ranges: WARNING Moving the Range WARNING Electrical Shock Hazard Disconnect power before...

Use & Care Guide
Page 4
...units may result in the manual. Absence of these liners may be careful to sit or stand on any part of the range unless specifically recommended in a risk of electric shock, or fire. ■ Glazed Cooking Utensils - If a wet sponge or cloth is cool. Always place oven ...become hot enough to cool. Grease should never be allowed to persons, or damage when using the range. ■ User Servicing - IMPORTANT SAFETY INSTRUCTIONS WARNING: To reduce the risk of fire, electrical shock, injury to accumulate on hood or filter. ■ When flambeing foods under the hood, ...
...units may result in the manual. Absence of these liners may be careful to sit or stand on any part of the range unless specifically recommended in a risk of electric shock, or fire. ■ Glazed Cooking Utensils - If a wet sponge or cloth is cool. Always place oven ...become hot enough to cool. Grease should never be allowed to persons, or damage when using the range. ■ User Servicing - IMPORTANT SAFETY INSTRUCTIONS WARNING: To reduce the risk of fire, electrical shock, injury to accumulate on hood or filter. ■ When flambeing foods under the hood, ...

Dimension Guide
Page 1
... Whirlpool Corporation policy includes a continuous commitment to improve Dimensions are for: 25" (63.5 cm) countertop depth, 24" (61 cm) base cabinet depth, 36" (91.4 cm) countertop height IMPORTANT: If installing a range hood or microwave hood combination above the range,... cm) min. 30" (76 cm) Freestanding Electric Range PRODUCT MODEL NUMBERS PRODUCT DIMENSIONS WGE555S0B Electrical Connection: To properly install your range, you must be connected to the proper electrical voltage and frequency as specified on electric outlet receptacle installation. The model/serial rating plate ...
... Whirlpool Corporation policy includes a continuous commitment to improve Dimensions are for: 25" (63.5 cm) countertop depth, 24" (61 cm) base cabinet depth, 36" (91.4 cm) countertop height IMPORTANT: If installing a range hood or microwave hood combination above the range,... cm) min. 30" (76 cm) Freestanding Electric Range PRODUCT MODEL NUMBERS PRODUCT DIMENSIONS WGE555S0B Electrical Connection: To properly install your range, you must be connected to the proper electrical voltage and frequency as specified on electric outlet receptacle installation. The model/serial rating plate ...


