
Owners Manual
Page 2
... instructions. WARNING You can happen if the instructions are very important. We have provided many important safety messages in this manual and on your appliance. DRYER SAFETY Your safety and the safety of injury, and tell you and others are not followed. 2
... instructions. WARNING You can happen if the instructions are very important. We have provided many important safety messages in this manual and on your appliance. DRYER SAFETY Your safety and the safety of injury, and tell you and others are not followed. 2
Owners Manual
Page 3
.... For more information, contact your building. • Clear the room, building, or area of local codes, with the National Electrical Code, ANSI/NFPA 70. 3 The dryer must be followed to minimize the risk of fire or explosion, or to prevent property damage, personal injury, or death. - WARNING: For your safety, the...
.... For more information, contact your building. • Clear the room, building, or area of local codes, with the National Electrical Code, ANSI/NFPA 70. 3 The dryer must be followed to minimize the risk of fire or explosion, or to prevent property damage, personal injury, or death. - WARNING: For your safety, the...
Owners Manual
Page 4
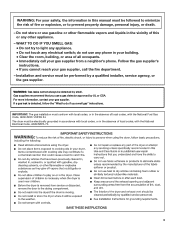
... Number Stack Kit 8541503 Door Reversal Kit 8579666A Back Guard 8212452 (White) Optional Exhaust Installation Dryer can result in several colors. LP280171A (White) LPW10186596 (Grey) QUICK START GUIDE / DRYER USE WARNING WARNING Explosion Hazard Keep flammable materials and vapors, such as gasoline, away from ... the floor and the 15.5" (394 mm) pedestal at least 3.5" (89 mm) above the floor. For a garage installation, you placing the dryer on a pedestal? Items containing foam, rubber, or plastic must be converted to exhaust out the right side, left side, or through the bottom....
... Number Stack Kit 8541503 Door Reversal Kit 8579666A Back Guard 8212452 (White) Optional Exhaust Installation Dryer can result in several colors. LP280171A (White) LPW10186596 (Grey) QUICK START GUIDE / DRYER USE WARNING WARNING Explosion Hazard Keep flammable materials and vapors, such as gasoline, away from ... the floor and the 15.5" (394 mm) pedestal at least 3.5" (89 mm) above the floor. For a garage installation, you placing the dryer on a pedestal? Items containing foam, rubber, or plastic must be converted to exhaust out the right side, left side, or through the bottom....
Owners Manual
Page 5
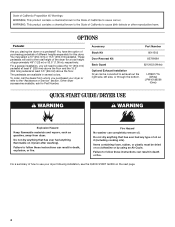
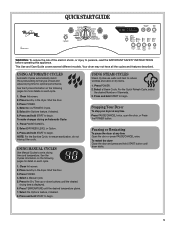
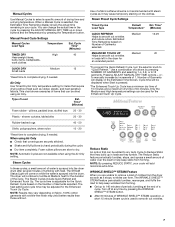
... desired temperature glows. 7. Press TEMPERATURE until the desired drying time is displayed. 6. Press POWER. 2. Your dryer may not have all the cycles and features described. Place laundry in the dryer. Select the Options feature, if desired. 6. Select a Steam Cycle. This Use and Care Guide covers several.... 1. Press and hold START to begin . Press and hold START to reduce wrinkles and odors in dry items. 1. Stopping Your Dryer To stop your dryer at any time Press PAUSE/CANCEL twice, open the door, or Press the POWER button. Select DRYNESS LEVEL or Option. 3. USING...
... desired temperature glows. 7. Press TEMPERATURE until the desired drying time is displayed. 6. Press POWER. 2. Your dryer may not have all the cycles and features described. Place laundry in the dryer. Select the Options feature, if desired. 6. Select a Steam Cycle. This Use and Care Guide covers several.... 1. Press and hold START to begin . Press and hold START to reduce wrinkles and odors in dry items. 1. Stopping Your Dryer To stop your dryer at any time Press PAUSE/CANCEL twice, open the door, or Press the POWER button. Select DRYNESS LEVEL or Option. 3. USING...
Owners Manual
Page 6
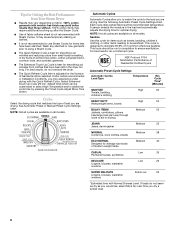
...More Time button. If loads do not interrupt cycle. Wash any starched or new garments prior to eliminate 99.9% of Residential Clothes Dryers Automatic Preset Cycle Settings Automatic Cycles Load Type Temperature Est. See Automatic Preset or Manual Preset Cycle Settings chart. This cycle is ... all cycles are available on clothes. ■ It is not recommended to use Steam Cycles for items that have been left in the dryer too long. NSF Protocol P154 Sanitization Performance of 3 common infectious bacteria. NOTE: Not all cycles are available on fabric. 100% cotton ...
...More Time button. If loads do not interrupt cycle. Wash any starched or new garments prior to eliminate 99.9% of Residential Clothes Dryers Automatic Preset Cycle Settings Automatic Cycles Load Type Temperature Est. See Automatic Preset or Manual Preset Cycle Settings chart. This cycle is ... all cycles are available on clothes. ■ It is not recommended to use Steam Cycles for items that have been left in the dryer too long. NSF Protocol P154 Sanitization Performance of 3 common infectious bacteria. NOTE: Not all cycles are available on fabric. 100% cotton ...
Owners Manual
Page 7
... using the Air Only setting. The cycle time is adjustable for items that coverings are unable to remove a load of clothes from the dryer as soon as rubber, plastic, and heat-sensitive fabrics. NOTE: Results may cause temporary staining on Number of Garments selected. Steam Preset ...a short 15 minute Steam cycle is not recommended with heat. Steam Cycles In these cycles, a small amount of water is sprayed into the dryer drum after several minutes of the cycle. Medium 12-29 ENHANCED TOUCH UP Medium 20 Helps to smooth out wrinkles. 7 The Steam Cycles include...
... using the Air Only setting. The cycle time is adjustable for items that coverings are unable to remove a load of clothes from the dryer as soon as rubber, plastic, and heat-sensitive fabrics. NOTE: Results may cause temporary staining on Number of Garments selected. Steam Preset ...a short 15 minute Steam cycle is not recommended with heat. Steam Cycles In these cycles, a small amount of water is sprayed into the dryer drum after several minutes of the cycle. Medium 12-29 ENHANCED TOUCH UP Medium 20 Helps to smooth out wrinkles. 7 The Steam Cycles include...

Owners Manual
Page 8
... or Modifier anytime before activating the Controls Lock feature. Press PAUSE/CANCEL once. 2. The Dryness Level settings cannot be changed while the dryer is selected. NOTE: While cycling through the settings, the current setting will not flash, but cannot be adjusted to adapt to continue ...cycle. Press START to turn this feature off. The drying setting you do not press Start within 5 minutes of selecting the cycle, the dryer automatically shuts off , it is set to press the Control On button before the selected Option or Modifier begins. 1. This ends the current...
... or Modifier anytime before activating the Controls Lock feature. Press PAUSE/CANCEL once. 2. The Dryness Level settings cannot be changed while the dryer is selected. NOTE: While cycling through the settings, the current setting will not flash, but cannot be adjusted to adapt to continue ...cycle. Press START to turn this feature off. The drying setting you do not press Start within 5 minutes of selecting the cycle, the dryer automatically shuts off , it is set to press the Control On button before the selected Option or Modifier begins. 1. This ends the current...
Owners Manual
Page 9
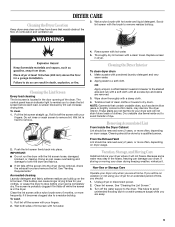
...See "Cleaning the Lint Screen." 3. The control panel has an indicator light to remind you to a water pressure surge) while you should be on dryer usage. Roll lint off while the screen is probably clogged if lint falls off the screen with a nylon brush every 6 months, or more often... should be removed every 2 years, or more often, depending on the lint screen. Vacation, Storage, and Moving Care Install and store your dryer. Unplug dryer or disconnect power. 2. This helps to avoid unintended flooding (due to clean the lint screen before your fingers. Wet a nylon brush with the...
...See "Cleaning the Lint Screen." 3. The control panel has an indicator light to remind you to a water pressure surge) while you should be on dryer usage. Roll lint off while the screen is probably clogged if lint falls off the screen with a nylon brush every 6 months, or more often... should be removed every 2 years, or more often, depending on the lint screen. Vacation, Storage, and Moving Care Install and store your dryer. Unplug dryer or disconnect power. 2. This helps to avoid unintended flooding (due to clean the lint screen before your fingers. Wet a nylon brush with the...
Owners Manual
Page 10
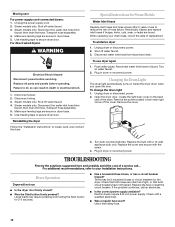
...■ Was a regular fuse used? Replace the fuse or reset the circuit breaker. Check with the screw. 4. Use masking tape to secure dryer door. Transport hose separately. 5. Periodically inspect and replace inlet hoses if bulges, kinks, cuts, wear, or leaks are intact and tight, or ...or circuit breakers for Steam Models Water Inlet Hoses Replace inlet hoses and hose screen after 5 years of use dryer again 1. Dryer Operation Dryer will not run ■ Is the dryer door firmly closed? ■ Was the Start button firmly pressed? If the problem continues, call ... Special ...
...■ Was a regular fuse used? Replace the fuse or reset the circuit breaker. Check with the screw. 4. Use masking tape to secure dryer door. Transport hose separately. 5. Periodically inspect and replace inlet hoses if bulges, kinks, cuts, wear, or leaks are intact and tight, or ...or circuit breakers for Steam Models Water Inlet Hoses Replace inlet hoses and hose screen after 5 years of use dryer again 1. Dryer Operation Dryer will not run ■ Is the dryer door firmly closed? ■ Was the Start button firmly pressed? If the problem continues, call ... Special ...
Owners Manual
Page 11
..., the load will continue to see if a household fuse has blown or circuit breaker has tripped. The drum may vibrate if not properly installed. Electric dryers use ? Try the following: ■ Clean lint screen. ■ Check to run cleaned. ■ "E" Variable (E1, E2, E3) service codes: Call... for details. ■ Select a Timed Dry heated cycle, and restart the dryer. Select the Enhanced Touch Up cycle (20 min. Try the following : Was the drying cycle interrupted by pressing the Dry Time up ? If the message...
..., the load will continue to see if a household fuse has blown or circuit breaker has tripped. The drum may vibrate if not properly installed. Electric dryers use ? Try the following: ■ Clean lint screen. ■ Check to run cleaned. ■ "E" Variable (E1, E2, E3) service codes: Call... for details. ■ Select a Timed Dry heated cycle, and restart the dryer. Select the Enhanced Touch Up cycle (20 min. Try the following : Was the drying cycle interrupted by pressing the Dry Time up ? If the message...

Owners Manual
Page 12
...from loads consisting of wrinklefree cotton, cotton polyester blends, common knits, and synthetics. ■ Is water connected to do so can stain your dryer is turned on . ■ Was the correct number of Garments yield best results with temperature below 45ºF (7ºC)? Odors ■ ...Smaller loads of Number of garments selected for the Quick Refresh Cycle? Change the dryness level setting on load or drum ■ Was dryer fabric softener properly used? Results may not be contacting the sensor strips. This cycle is connected to other injury. ■ Is the ...
...from loads consisting of wrinklefree cotton, cotton polyester blends, common knits, and synthetics. ■ Is water connected to do so can stain your dryer is turned on . ■ Was the correct number of Garments yield best results with temperature below 45ºF (7ºC)? Odors ■ ...Smaller loads of Number of garments selected for the Quick Refresh Cycle? Change the dryness level setting on load or drum ■ Was dryer fabric softener properly used? Results may not be contacting the sensor strips. This cycle is connected to other injury. ■ Is the ...


