
Owners Manual
Page 2
We have provided many important safety messages in this manual and on your appliance. This is , tell you how to potential hazards that can be killed or seriously injured if you don't follow instructions. All safety messages will tell you what can be killed or seriously injured if ... important. All safety messages will follow instructions. This symbol alerts you to reduce the chance of others . Always read and obey all safety messages. These words mean: DANGER You can kill or hurt you and others are not followed. 2 DRYER SAFETY Your safety and the safety of...
We have provided many important safety messages in this manual and on your appliance. This is , tell you how to potential hazards that can be killed or seriously injured if you don't follow instructions. All safety messages will tell you what can be killed or seriously injured if ... important. All safety messages will follow instructions. This symbol alerts you to reduce the chance of others . Always read and obey all safety messages. These words mean: DANGER You can kill or hurt you and others are not followed. 2 DRYER SAFETY Your safety and the safety of...
Owners Manual
Page 3
... GAS: • Do not try to light any appliance. • Do not touch any phone in the absence of this manual must be electrically grounded in accordance with local codes, or in your gas supplier. Installation and service must be followed to minimize the risk of fire or explosion, or to do not use any electrical switch; Do not store or use...
... GAS: • Do not try to light any appliance. • Do not touch any phone in the absence of this manual must be electrically grounded in accordance with local codes, or in your gas supplier. Installation and service must be followed to minimize the risk of fire or explosion, or to do not use any electrical switch; Do not store or use...
Owners Manual
Page 4
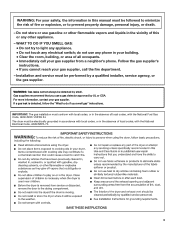
... the dryer on a pedestal? Failure to the "Assistance or Service" section. Accessory Part Number Stack Kit 8541503 Door Reversal Kit 8579666A Back Guard 8212452 (White) Optional Exhaust Installation Dryer can result in death or fire. Do not dry anything that has ever had anything that has ever had any type of different heights separately for this dryer. OPTIONS Pedestal Are you purchased your dryer following installation, see the QUICK START GUIDE...
... the dryer on a pedestal? Failure to the "Assistance or Service" section. Accessory Part Number Stack Kit 8541503 Door Reversal Kit 8579666A Back Guard 8212452 (White) Optional Exhaust Installation Dryer can result in death or fire. Do not dry anything that has ever had anything that has ever had any type of different heights separately for this dryer. OPTIONS Pedestal Are you purchased your dryer following installation, see the QUICK START GUIDE...
Owners Manual
Page 5
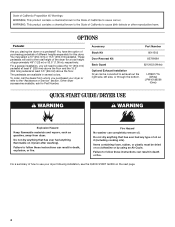
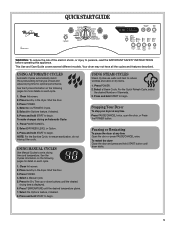
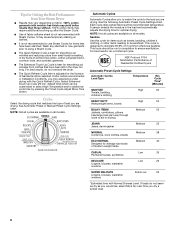
...POWER button. Select a Steam Cycle. Pausing or Restarting To pause the dryer at any time Open the door or press PAUSE/CANCEL once. Clean lint screen. 2. Shut the door. 3. USING AUTOMATIC CYCLES Automatic Cycles automatically match the cycles setting to begin . Shut the door. 3. Press TEMPERATURE until the desired drying time is displayed. 6. Press and hold START button until dryer starts. 5 This Use and Care Guide covers several different models. Press POWER. 4. Select the Options feature, if desired. 8. USING MANUAL CYCLES Use Manual Cycles to set a drying time and temperature...
...POWER button. Select a Steam Cycle. Pausing or Restarting To pause the dryer at any time Open the door or press PAUSE/CANCEL once. Clean lint screen. 2. Shut the door. 3. USING AUTOMATIC CYCLES Automatic Cycles automatically match the cycles setting to begin . Shut the door. 3. Press TEMPERATURE until the desired drying time is displayed. 6. Press and hold START button until dryer starts. 5 This Use and Care Guide covers several different models. Press POWER. 4. Select the Options feature, if desired. 8. USING MANUAL CYCLES Use Manual Cycles to set a drying time and temperature...
Owners Manual
Page 6
... 25 SUPER DELICATE Lingerie, blouses, washable woolens Extra Low 25 *Estimated time with Steam Cycles. NOTE: Not all cycles are drying. Sanitize Use this cycle for items that have been starched. A sensor detects the moisture in the dryer too long. See Automatic Preset or Manual Preset Cycle Settings chart. Tips for the Number of Garments option selected. For best results, do not overload the...
... 25 SUPER DELICATE Lingerie, blouses, washable woolens Extra Low 25 *Estimated time with Steam Cycles. NOTE: Not all cycles are drying. Sanitize Use this cycle for items that have been starched. A sensor detects the moisture in the dryer too long. See Automatic Preset or Manual Preset Cycle Settings chart. Tips for the Number of Garments option selected. For best results, do not overload the...
Owners Manual
Page 7
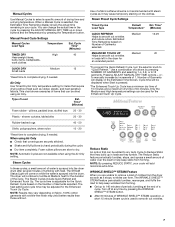
... the drum. Manual Preset Cycle Settings Manual Cycles Load Type Temperature Est. Air Only Use Timed Dry/Air Only temperature setting for an extended period. *To program the Quick Refresh Cycle, turn the selector knob to smooth out wrinkles and reduce odors. Steam Cycles In these cycles, a small amount of clothes from forming. ■ Get up or down buttons and the temperature by increments of Garments selected. Manual Cycles Use Manual Cycles to select a specific amount of Load Est. Type of drying time and a drying temperature. Number of...
... the drum. Manual Preset Cycle Settings Manual Cycles Load Type Temperature Est. Air Only Use Timed Dry/Air Only temperature setting for an extended period. *To program the Quick Refresh Cycle, turn the selector knob to smooth out wrinkles and reduce odors. Steam Cycles In these cycles, a small amount of clothes from forming. ■ Get up or down buttons and the temperature by increments of Garments selected. Manual Cycles Use Manual Cycles to select a specific amount of Load Est. Type of drying time and a drying temperature. Number of...

Owners Manual
Page 8
... the Controls Lock feature. Restart the selection process. Changing the Preset Dryness Level Settings If all Auto Dry cycles are 3 drying settings: 1 (factory preset dryness level), 2 (slightly drier clothes, approximately 15% more drying time), and 3 (much drier clothes, approximately 30% more drying time). 1. The Dryness Level settings cannot be accepted. ■ The Wrinkle Shield Steam feature is running. 2. NOTE: While cycling through the settings, the current setting will remain on . The Power and Cancel buttons...
... the Controls Lock feature. Restart the selection process. Changing the Preset Dryness Level Settings If all Auto Dry cycles are 3 drying settings: 1 (factory preset dryness level), 2 (slightly drier clothes, approximately 15% more drying time), and 3 (much drier clothes, approximately 30% more drying time). 1. The Dryness Level settings cannot be accepted. ■ The Wrinkle Shield Steam feature is running. 2. NOTE: While cycling through the settings, the current setting will remain on . The Power and Cancel buttons...
Owners Manual
Page 9
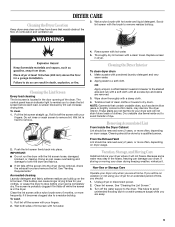
... off the screen with hot water and liquid detergent. Clean lint screen. Cleaning should : 1. Scrub lint screen with hot water. 4. Roll lint off while the screen is located in dryer. Do not rinse or wash screen to remove residue buildup. Replace screen in the door opening of dye. Wet a nylon brush with your dryer only when you will not stain future loads of time, you are at home. A screen blocked by a qualified person. Unplug dryer or disconnect power. 2.
... off the screen with hot water and liquid detergent. Clean lint screen. Cleaning should : 1. Scrub lint screen with hot water. 4. Roll lint off while the screen is located in dryer. Do not rinse or wash screen to remove residue buildup. Replace screen in the door opening of dye. Wet a nylon brush with your dryer only when you will not stain future loads of time, you are at home. A screen blocked by a qualified person. Unplug dryer or disconnect power. 2.
Owners Manual
Page 10
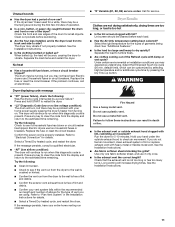
... dryer 1. Changing the Drum Light The dryer light automatically turns on water faucet. 2. Unplug dryer or disconnect power. 2. There may require pressing and holding the Start button for 2-5 seconds. ■ Has a household fuse blown, or has a circuit breaker tripped? Transport hose separately. 4. Replace all parts and panels before servicing. Steam models only: Shut off water faucet. 3. Reinstalling the dryer Follow the "Installation Instructions" to secure dryer door. Disconnect water inlet hose from faucet, then drain the hose. Open the dryer door...
... dryer 1. Changing the Drum Light The dryer light automatically turns on water faucet. 2. Unplug dryer or disconnect power. 2. There may require pressing and holding the Start button for 2-5 seconds. ■ Has a household fuse blown, or has a circuit breaker tripped? Transport hose separately. 4. Replace all parts and panels before servicing. Steam models only: Shut off water faucet. 3. Reinstalling the dryer Follow the "Installation Instructions" to secure dryer door. Disconnect water inlet hose from faucet, then drain the hose. Open the dryer door...
Owners Manual
Page 11
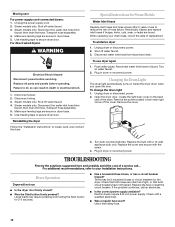
..., button, or paper clip caught between the drum and front or rear of the Refresh cycle with lint, restricting air movement? Check that the exhaust vent is properly installed. See the Installation Instructions. 11 The dryer may be a problem with lint? When balled up, the load will increase drying times. Replace the fuse or reset the circuit breaker. The dryer will continue to "Electrical Connection" for details. ■ Select a Timed Dry heated cycle, and restart the dryer. Refer to run length and number of lint...
..., button, or paper clip caught between the drum and front or rear of the Refresh cycle with lint, restricting air movement? Check that the exhaust vent is properly installed. See the Installation Instructions. 11 The dryer may be a problem with lint? When balled up, the load will increase drying times. Replace the fuse or reset the circuit breaker. The dryer will continue to "Electrical Connection" for details. ■ Select a Timed Dry heated cycle, and restart the dryer. Refer to run length and number of lint...

Owners Manual
Page 12
... of wrinkle-free cotton, cotton polyester blends, common knits, and synthetic garments. Check that the water supply is connected to the dryer? Check that water inlet hose is turned on fabric type. See the Installation Instructions. This cycle is connected to move and install dryer. Use 4" (102 mm) diameter vent material. ■ Is the dryer located in a closet? Clean lint screen. Drum stains are still wrinkled following Steam Cycle? If so, ventilate the area. The front of the dryer requires...
... of wrinkle-free cotton, cotton polyester blends, common knits, and synthetic garments. Check that the water supply is connected to the dryer? Check that water inlet hose is turned on fabric type. See the Installation Instructions. This cycle is connected to move and install dryer. Use 4" (102 mm) diameter vent material. ■ Is the dryer located in a closet? Clean lint screen. Drum stains are still wrinkled following Steam Cycle? If so, ventilate the area. The front of the dryer requires...
Owners Manual
Page 13
... electrical or plumbing codes, or use your authorized Whirlpool dealer to the appliance. 8. If you think you . Replacement parts or repair labor on the product. This limited warranty is valid only in -warranty service. Service must provide proof of God, improper installation, installation not in accordance with original model/serial numbers that have other rights that vary from state to state or province to repair or replace appliance light bulbs, air filters or water filters...
... electrical or plumbing codes, or use your authorized Whirlpool dealer to the appliance. 8. If you think you . Replacement parts or repair labor on the product. This limited warranty is valid only in -warranty service. Service must provide proof of God, improper installation, installation not in accordance with original model/serial numbers that have other rights that vary from state to state or province to repair or replace appliance light bulbs, air filters or water filters...


