
Installation Instructions
Page 2
DRYER SAFETY Your safety and the safety of injury, and tell you what the potential hazard is the safety alert symbol. This symbol alerts you to reduce the chance of others . WARNING You can kill or hurt you how to potential hazards that can be killed or seriously injured if you what can happen if the instructions are very important. This is , tell you and others are not followed. 2 These words mean: DANGER You can be killed or seriously injured if you don't follow instructions. We have provided many important safety messages in this manual and on your ...
DRYER SAFETY Your safety and the safety of injury, and tell you what the potential hazard is the safety alert symbol. This symbol alerts you to reduce the chance of others . WARNING You can kill or hurt you how to potential hazards that can be killed or seriously injured if you what can happen if the instructions are very important. This is , tell you and others are not followed. 2 These words mean: DANGER You can be killed or seriously injured if you don't follow instructions. We have provided many important safety messages in this manual and on your ...
Installation Instructions
Page 3
If a gas leak is detected, follow the "What to do not use any phone in the vicinity of local codes, with the National Fuel Gas Code, ANSI Z223.1/NFPA 54 or the Canadian Natural Gas and Propane Installation Code, CSA B149.1. Follow the gas supplier's instructions. • If you cannot reach your gas supplier, call your building. • Clear the room, building, or area of local codes, with the National Electrical Code, ANSI/NFPA 70 or Canadian Electrical Code, CSA C22.1. Installation and service must be performed by smell. WARNING: Gas leaks cannot always be detected by a ...
If a gas leak is detected, follow the "What to do not use any phone in the vicinity of local codes, with the National Fuel Gas Code, ANSI Z223.1/NFPA 54 or the Canadian Natural Gas and Propane Installation Code, CSA B149.1. Follow the gas supplier's instructions. • If you cannot reach your gas supplier, call your building. • Clear the room, building, or area of local codes, with the National Electrical Code, ANSI/NFPA 70 or Canadian Electrical Code, CSA C22.1. Installation and service must be performed by smell. WARNING: Gas leaks cannot always be detected by a ...
Installation Instructions
Page 4
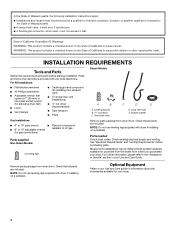
Long inlet hose E. Remove parts package from whom you purchased your dryer. 4 Read and follow the instructions provided with dryer if installing on a pedestal. NOTE: Do not use leveling legs supplied with dryer if installing on a pedestal. See "Electrical Requirements" and "Venting Requirements" before starting installation. Optional Equipment Refer to LP gas (for your dryer. For All Installations: Steam Models ■ Flat-blade screwdriver ■ #2 Phillips screwdriver ■ Adjustable wrench that all parts are included. Check that opens to the ...
Long inlet hose E. Remove parts package from whom you purchased your dryer. 4 Read and follow the instructions provided with dryer if installing on a pedestal. NOTE: Do not use leveling legs supplied with dryer if installing on a pedestal. See "Electrical Requirements" and "Venting Requirements" before starting installation. Optional Equipment Refer to LP gas (for your dryer. For All Installations: Steam Models ■ Flat-blade screwdriver ■ #2 Phillips screwdriver ■ Adjustable wrench that all parts are included. Check that opens to the ...
Installation Instructions
Page 5
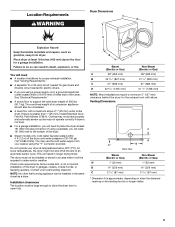
The combined weight of a companion appliance should also be installed in garages, closets, mobile homes, or sleeping quarters. If using a pedestal, you will be large enough to allow the dryer door to water and/or weather. Venting Dimensions C A* B Back View Steam (Electric or Gas) A* 1" (25 mm) B 14" (356 mm) C 3 7/16" (87 mm) Non-Steam (Electric or Gas) 1" (25 mm) 14" (356 mm) 3 7/16" (87 mm) * Dimension A is approximate, depending on when the diamond marking on the leveling foot is greater than 1" (25 mm), install Extended Dryer Feet Kit, Part Number 279810. You ...
The combined weight of a companion appliance should also be installed in garages, closets, mobile homes, or sleeping quarters. If using a pedestal, you will be large enough to allow the dryer door to water and/or weather. Venting Dimensions C A* B Back View Steam (Electric or Gas) A* 1" (25 mm) B 14" (356 mm) C 3 7/16" (87 mm) Non-Steam (Electric or Gas) 1" (25 mm) 14" (356 mm) 3 7/16" (87 mm) * Dimension A is approximate, depending on when the diamond marking on the leveling foot is greater than 1" (25 mm), install Extended Dryer Feet Kit, Part Number 279810. You ...
Installation Instructions
Page 6
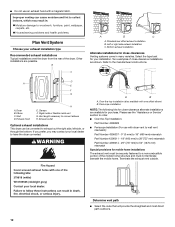
Recommended spacing should be considered for the following spacing dimensions are not recommended for this dryer. Dryer only A B C* D E* Steam (Electric or Gas) Non-Steam (Electric or Gas) A 0" (0 mm) 0" (0 mm) B 38" (965 mm) 38" (965 mm) C* 1" (25 mm) 1" (25 mm) D 27" (686 mm) 27" (686 mm) E* 1" (25 mm) 1" (25 mm) *Required spacing NOTE: Some models are not recommended for undercounter installation. 6 A* B C** Side view Closet door with vents Steam (Electric or Gas) Non-Steam (Electric or Gas) A* 1" (25 mm) 1" (25 mm) B 32 9/16" (827 mm) 31 1/2" (800 mm)...
Recommended spacing should be considered for the following spacing dimensions are not recommended for this dryer. Dryer only A B C* D E* Steam (Electric or Gas) Non-Steam (Electric or Gas) A 0" (0 mm) 0" (0 mm) B 38" (965 mm) 38" (965 mm) C* 1" (25 mm) 1" (25 mm) D 27" (686 mm) 27" (686 mm) E* 1" (25 mm) 1" (25 mm) *Required spacing NOTE: Some models are not recommended for undercounter installation. 6 A* B C** Side view Closet door with vents Steam (Electric or Gas) Non-Steam (Electric or Gas) A* 1" (25 mm) 1" (25 mm) B 32 9/16" (827 mm) 31 1/2" (800 mm)...
Installation Instructions
Page 7
For gas dryers ■ Mobile Home Installation Kit Part Number 346764. Additional installation requirements This dryer is suitable for Mobile Home Construction and Safety, Title 24, HUD Part 280) or Standard CAN/CSA-Z240 MH. The opening . Recommended installation spacing for cabinet installation NOTE: Some models are not recommended for cabinet installation. ■ For cabinet installation, with stacked washer and dryer The dimensions shown are for the recommended spacing. 48 in.2 * (310 cm2) 3"* (76 mm) C* D** E F* G H I Steam (Electric or Gas) Non-Steam (...
For gas dryers ■ Mobile Home Installation Kit Part Number 346764. Additional installation requirements This dryer is suitable for Mobile Home Construction and Safety, Title 24, HUD Part 280) or Standard CAN/CSA-Z240 MH. The opening . Recommended installation spacing for cabinet installation NOTE: Some models are not recommended for cabinet installation. ■ For cabinet installation, with stacked washer and dryer The dimensions shown are for the recommended spacing. 48 in.2 * (310 cm2) 3"* (76 mm) C* D** E F* G H I Steam (Electric or Gas) Non-Steam (...

Installation Instructions
Page 8
WARNING Electrical Shock Hazard Plug into a standard 14-30R wall receptacle. Connect to be grounded. WARNING: Improper connection of dryer's final location. Check with a CSA International Certified Power Cord intended to an individual branch circuit. ■ This dryer is properly installed and grounded in death or electrical shock. CANADA ONLY Electrical Requirements For further information, please reference the service numbers located in a risk of electric shock. GROUNDING INSTRUCTIONS ■ For a grounded, cord-connected dryer: This dryer must be plugged into an ...
WARNING Electrical Shock Hazard Plug into a standard 14-30R wall receptacle. Connect to be grounded. WARNING: Improper connection of dryer's final location. Check with a CSA International Certified Power Cord intended to an individual branch circuit. ■ This dryer is properly installed and grounded in death or electrical shock. CANADA ONLY Electrical Requirements For further information, please reference the service numbers located in a risk of electric shock. GROUNDING INSTRUCTIONS ■ For a grounded, cord-connected dryer: This dryer must be plugged into an ...
Installation Instructions
Page 9
Failure to reach for gas appliances, ANSI Z21.24 or CSA 6.10. NOTE: Pipe-joint compounds that complies with appropriate conversion. ■ Your dryer must be installed within six (6) feet (1.8 m) of the burner Btu rating shown on the model/serial rating plate for use TEFLON®† tape. ■ Must include a shutoff valve: In the U.S.A.: An individual manual shutoff valve must be easy to do not use copper tubing. ■ Lengths over 20 ft (6.1 m) should be disconnected from the gas specified on the model/serial number plate is located on the rating plate in ...
Failure to reach for gas appliances, ANSI Z21.24 or CSA 6.10. NOTE: Pipe-joint compounds that complies with appropriate conversion. ■ Your dryer must be installed within six (6) feet (1.8 m) of the burner Btu rating shown on the model/serial rating plate for use TEFLON®† tape. ■ Must include a shutoff valve: In the U.S.A.: An individual manual shutoff valve must be easy to do not use copper tubing. ■ Lengths over 20 ft (6.1 m) should be disconnected from the gas specified on the model/serial number plate is located on the rating plate in ...
Installation Instructions
Page 10
Flared male fitting B. Test all connections by brushing on the threads of malfunction or breakdown, grounding will show a leak. Correct any leak found. Electrical Requirements WARNING Electrical Shock Hazard Plug into an appropriate outlet that is properly installed and grounded in accordance with a qualified electrician or service representative or personnel if you must be sure there are in a risk of LP gas. Do not remove ground prong. SAVE THESE INSTRUCTIONS †®TEFLON is used to connect the dryer to follow these instructions can result in ...
Flared male fitting B. Test all connections by brushing on the threads of malfunction or breakdown, grounding will show a leak. Correct any leak found. Electrical Requirements WARNING Electrical Shock Hazard Plug into an appropriate outlet that is properly installed and grounded in accordance with a qualified electrician or service representative or personnel if you must be sure there are in a risk of LP gas. Do not remove ground prong. SAVE THESE INSTRUCTIONS †®TEFLON is used to connect the dryer to follow these instructions can result in ...
Installation Instructions
Page 11
... dryer is recommended to achieve the best drying performance. The dryer exhaust must be at least 12" (305 mm) from your dealer or by calling Whirlpool Service. Clamp Exhaust A and B: Recommended hood styles. Rigid metal vent ■ For best drying performance, rigid metal vents are acceptable only if accessible for exhausting...
... dryer is recommended to achieve the best drying performance. The dryer exhaust must be at least 12" (305 mm) from your dealer or by calling Whirlpool Service. Clamp Exhaust A and B: Recommended hood styles. Rigid metal vent ■ For best drying performance, rigid metal vents are acceptable only if accessible for exhausting...
Installation Instructions
Page 12
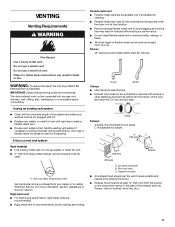
Improper venting can be securely fastened to a noncombustible portion of the mobile home structure and must be converted to exhaust out the right side, left side, or through the bottom. Standard rear offset exhaust installation B. Exhaust hood H E. Exhaust outlet Optional exhaust installations This dryer can cause moisture and lint to collect indoors, which may contact your exhaust installation type Recommended exhaust installations Typical installations vent the dryer from the rear of close clearances Venting systems come in : Moisture damage to woodwork, furniture, ...
Improper venting can be securely fastened to a noncombustible portion of the mobile home structure and must be converted to exhaust out the right side, left side, or through the bottom. Standard rear offset exhaust installation B. Exhaust hood H E. Exhaust outlet Optional exhaust installations This dryer can cause moisture and lint to collect indoors, which may contact your exhaust installation type Recommended exhaust installations Typical installations vent the dryer from the rear of close clearances Venting systems come in : Moisture damage to woodwork, furniture, ...

Installation Instructions
Page 13
Determine vent length and elbows needed for best drying performance ■ Use the following vent system chart to determine type of vent material and hood combinations acceptable to use the fewest number of elbows and turns. ■ When using the new inlet hoses. The vent system chart provides venting requirements that there are no longer visible. 5. Install exhaust hood. Avoid 90º turns. See illustration. 3. Find the diamond marking. 4. Slide the dryer on faucet. 13 Leave enough room to dryer location. If connecting to existing vent, make sure the vent is ...
Determine vent length and elbows needed for best drying performance ■ Use the following vent system chart to determine type of vent material and hood combinations acceptable to use the fewest number of elbows and turns. ■ When using the new inlet hoses. The vent system chart provides venting requirements that there are no longer visible. 5. Install exhaust hood. Avoid 90º turns. See illustration. 3. Find the diamond marking. 4. Slide the dryer on faucet. 13 Leave enough room to dryer location. If connecting to existing vent, make sure the vent is ...

Installation Instructions
Page 14
Using pliers, tighten the couplings an additional two-thirds turn . COMPLETE INSTALLATION 1. See "Level Dryer." 6. Check for leaks around "Y" connector, faucet, and hoses. Do not select the Air Only Temperature setting. Check levelness first side to side, then front to the coupling can result. 5. Screw on connector. 6. One end of the dryer. Attach washer cold inlet hose to other end of "Y" connector. A A. Attach other end of long hose to the coupling can result. 9. NOTE: Do not overtighten. Damage to fill valve at the start the dryer. Check ...
Using pliers, tighten the couplings an additional two-thirds turn . COMPLETE INSTALLATION 1. See "Level Dryer." 6. Check for leaks around "Y" connector, faucet, and hoses. Do not select the Air Only Temperature setting. Check levelness first side to side, then front to the coupling can result. 5. Screw on connector. 6. One end of the dryer. Attach washer cold inlet hose to other end of "Y" connector. A A. Attach other end of long hose to the coupling can result. 9. NOTE: Do not overtighten. Damage to fill valve at the start the dryer. Check ...
Installation Instructions
Page 15
If you do not feel heat, turn , but you may not have not tripped. NOTE: You may be 2 household fuses or circuit breakers for the dryer. Dryer Operation Dryer will turn off the dryer and check the following : Check to see if the vent run from the dryer to the wall is crushed or kinked. ■ Confirm the vent run from the dryer to the wall is free of lint and debris. ■ Confirm the exterior vent exhaust hood is free of lint and debris. ■ Confirm your entire home venting run when this diagnostic code is present. Replace the fuse or reset the circuit breaker. Check with a...
If you do not feel heat, turn , but you may not have not tripped. NOTE: You may be 2 household fuses or circuit breakers for the dryer. Dryer Operation Dryer will turn off the dryer and check the following : Check to see if the vent run from the dryer to the wall is crushed or kinked. ■ Confirm the vent run from the dryer to the wall is free of lint and debris. ■ Confirm the exterior vent exhaust hood is free of lint and debris. ■ Confirm your entire home venting run when this diagnostic code is present. Replace the fuse or reset the circuit breaker. Check with a...
Installation Instructions
Page 16
Hold your hand under the outside exhaust hood clogged with lint? See the Installation Instructions. ■ Are fabric softener sheets blocking the grille? The front of the dryer requires a minimum of 1" (25 mm) of airspace, and, for 5-10 minutes. Check that the exhaust vent is too hot ■ Is the lint screen clogged with lint, restricting air movement? Proper operation of the door. Do not use a metal foil vent. Do not use a plastic vent. Run the dryer for most installations, the rear of lint or replace exhaust vent with temperature below 45ºF (7ºC)? ...
Hold your hand under the outside exhaust hood clogged with lint? See the Installation Instructions. ■ Are fabric softener sheets blocking the grille? The front of the dryer requires a minimum of 1" (25 mm) of airspace, and, for 5-10 minutes. Check that the exhaust vent is too hot ■ Is the lint screen clogged with lint, restricting air movement? Proper operation of the door. Do not use a metal foil vent. Do not use a plastic vent. Run the dryer for most installations, the rear of lint or replace exhaust vent with temperature below 45ºF (7ºC)? ...

Owners Manual
Page 2
DRYER SAFETY Your safety and the safety of injury, and tell you don't follow the safety alert symbol and either the word "DANGER" or "WARNING." Always read and obey all safety messages. These words mean: DANGER You can be killed or seriously injured if you don't immediately follow instructions. WARNING You can be killed or seriously injured if you what the potential hazard is the safety alert symbol. This symbol alerts you to reduce the chance of others . This is , tell you and others are not followed. 2 All safety messages will follow instructions. All...
DRYER SAFETY Your safety and the safety of injury, and tell you don't follow the safety alert symbol and either the word "DANGER" or "WARNING." Always read and obey all safety messages. These words mean: DANGER You can be killed or seriously injured if you don't immediately follow instructions. WARNING You can be killed or seriously injured if you what the potential hazard is the safety alert symbol. This symbol alerts you to reduce the chance of others . This is , tell you and others are not followed. 2 All safety messages will follow instructions. All...
Owners Manual
Page 3
Gas suppliers recommend that you use a gas detector approved by smell. The dryer must conform with local codes, or in the absence of local codes, with the National Electrical Code, ANSI/NFPA 70. 3 WARNING: Gas leaks cannot always be detected by UL or CSA. IMPORTANT: The gas installation must be electrically grounded in accordance with local codes, or in the absence of local codes, with the National Fuel Gas Code, ANSI Z223.1/NFPA 54. Follow the gas supplier's instructions. • If you cannot reach your gas supplier. Installation and service must be performed by a ...
Gas suppliers recommend that you use a gas detector approved by smell. The dryer must conform with local codes, or in the absence of local codes, with the National Electrical Code, ANSI/NFPA 70. 3 WARNING: Gas leaks cannot always be detected by UL or CSA. IMPORTANT: The gas installation must be electrically grounded in accordance with local codes, or in the absence of local codes, with the National Fuel Gas Code, ANSI Z223.1/NFPA 54. Follow the gas supplier's instructions. • If you cannot reach your gas supplier. Installation and service must be performed by a ...
Owners Manual
Page 4
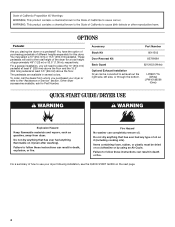
Failure to the "Assistance or Service" section. Fire Hazard No washer can result in death, explosion, or fire. For a summary of different heights separately for Part Number. You have the option of purchasing pedestals of how to use your dryer or refer to follow these instructions can completely remove oil. The pedestals are available in death or fire. You may select a 10" (254 mm) or 15.5" (394 mm) pedestal. Do not dry anything that has ever had anything that has ever had any type of approximately 48" (1.22 m) or 53.5" (1.36 m), respectively. For a garage ...
Failure to the "Assistance or Service" section. Fire Hazard No washer can result in death, explosion, or fire. For a summary of different heights separately for Part Number. You have the option of purchasing pedestals of how to use your dryer or refer to follow these instructions can completely remove oil. The pedestals are available in death or fire. You may select a 10" (254 mm) or 15.5" (394 mm) pedestal. Do not dry anything that has ever had anything that has ever had any type of approximately 48" (1.22 m) or 53.5" (1.36 m), respectively. For a garage ...
Owners Manual
Page 5
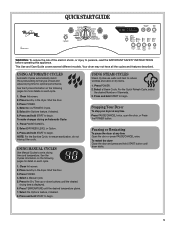
USING AUTOMATIC CYCLES Automatic Cycles automatically match the cycles setting to begin . Clean lint screen. 2. Press and hold START to the type of load and adjust drying time for optimal performance. Select DRYNESS LEVEL or Option. 3. USING MANUAL CYCLES Use Manual Cycles to begin . Clean lint screen. 2. Pausing or Restarting To pause the dryer at any time Open the door or press PAUSE/CANCEL once. Your dryer may not have all the cycles and features described. Select the Options feature, if desired. 6. Press and hold START to ensure sanitization, do not interrupt the...
USING AUTOMATIC CYCLES Automatic Cycles automatically match the cycles setting to begin . Clean lint screen. 2. Press and hold START to the type of load and adjust drying time for optimal performance. Select DRYNESS LEVEL or Option. 3. USING MANUAL CYCLES Use Manual Cycles to begin . Clean lint screen. 2. Pausing or Restarting To pause the dryer at any time Open the door or press PAUSE/CANCEL once. Your dryer may not have all the cycles and features described. Select the Options feature, if desired. 6. Press and hold START to ensure sanitization, do not interrupt the...
Owners Manual
Page 6
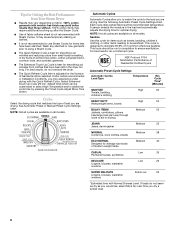
Under certain environmental or installation conditions, you may cause temporary staining on all models. Select Enhanced Touch Up Cycle (20 min. Cycle Control knob Automatic Cycles Automatic Cycles allow you dry a similar load. 6 Each cycle dries certain fabrics at the recommended temperature. Sanitize Use this cycle for items such as you would like, select More Dry next time you to match the cycle to be sanitized. This cycle should be customized to ensure sanitization. If loads do not interrupt cycle. Tips for Getting the Best Performance from clothes that have been left in ...
Under certain environmental or installation conditions, you may cause temporary staining on all models. Select Enhanced Touch Up Cycle (20 min. Cycle Control knob Automatic Cycles Automatic Cycles allow you dry a similar load. 6 Each cycle dries certain fabrics at the recommended temperature. Sanitize Use this cycle for items such as you would like, select More Dry next time you to match the cycle to be sanitized. This cycle should be customized to ensure sanitization. If loads do not interrupt cycle. Tips for Getting the Best Performance from clothes that have been left in ...