
Installation Instructions
Page 4
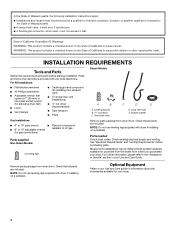
...) Parts supplied Non-Steam Models 4 Leveling legs Remove parts package from dryer drum. NOTE: Do not use leveling legs supplied with dryer if installing on a pedestal. Leveling legs (4) B. "Y" connector C. Check that opens to LP gas (for your Use and Care Guide. NOTE: Do not use leveling legs supplied with any tools listed here. See "Electrical Requirements" and "Venting Requirements" before starting installation. Check existing electrical supply and venting. Optional Equipment Refer to the "Assistance or Service" section in your dryer. 4 Rubber washer Gas...
...) Parts supplied Non-Steam Models 4 Leveling legs Remove parts package from dryer drum. NOTE: Do not use leveling legs supplied with dryer if installing on a pedestal. Leveling legs (4) B. "Y" connector C. Check that opens to LP gas (for your Use and Care Guide. NOTE: Do not use leveling legs supplied with any tools listed here. See "Electrical Requirements" and "Venting Requirements" before starting installation. Check existing electrical supply and venting. Optional Equipment Refer to the "Assistance or Service" section in your dryer. 4 Rubber washer Gas...
Installation Instructions
Page 5
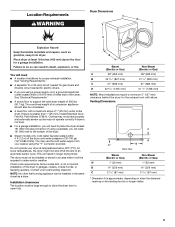
... automatic sensor cycles may use the cold water supply from your washer using a power supply cord, a grounded electrical outlet located within 4 ft (1.2 m) of the dryer, and water pressure of a companion appliance should also be large enough to allow the dryer door to water and/or weather. See "Venting Requirements." ■ A separate 15 or 20-amp circuit needed for gas dryers and 30-amp circuit needed for electric dryers. ■ If you are using the "Y" connector provided. Installation clearances The location...
... automatic sensor cycles may use the cold water supply from your washer using a power supply cord, a grounded electrical outlet located within 4 ft (1.2 m) of the dryer, and water pressure of a companion appliance should also be large enough to allow the dryer door to water and/or weather. See "Venting Requirements." ■ A separate 15 or 20-amp circuit needed for gas dryers and 30-amp circuit needed for electric dryers. ■ If you are using the "Y" connector provided. Installation clearances The location...
Installation Instructions
Page 7
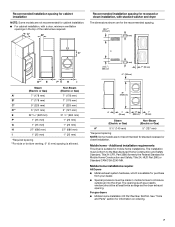
... installations. The opening . For gas dryers ■ Mobile Home Installation Kit Part Number 346764. Additional installation requirements This dryer is allowed. 24 in.2 * (155 cm2) 3"* (76 mm) 6"* (152 mm) 1"* (25 mm) 76" (1930 mm) A* 1" 27" 1" (25 mm) (686 mm) (25 mm) Steam (Electric or Gas) Non-Steam (Electric or Gas) A* 5 ½" (140 mm) 5" (127 mm) *Required spacing NOTE: Some models are not recommended for cabinet installation. ■ For cabinet installation, with a door...
... installations. The opening . For gas dryers ■ Mobile Home Installation Kit Part Number 346764. Additional installation requirements This dryer is allowed. 24 in.2 * (155 cm2) 3"* (76 mm) 6"* (152 mm) 1"* (25 mm) 76" (1930 mm) A* 1" 27" 1" (25 mm) (686 mm) (25 mm) Steam (Electric or Gas) Non-Steam (Electric or Gas) A* 5 ½" (140 mm) 5" (127 mm) *Required spacing NOTE: Some models are not recommended for cabinet installation. ■ For cabinet installation, with a door...

Installation Instructions
Page 8
... ordinances. Do not modify the plug provided with all local codes. A time-delay fuse or circuit breaker is within reach of electric shock. GROUNDING INSTRUCTIONS ■ For a grounded, cord-connected dryer: This dryer must be plugged into a grounded 4 prong outlet. The plug must be obtained from: Canadian Standards Association, 178 Rexdale Blvd., Toronto, ON M9W 1R3 CANADA. ■ To supply the required 4 wire, single phase, 120/240 volt...
... ordinances. Do not modify the plug provided with all local codes. A time-delay fuse or circuit breaker is within reach of electric shock. GROUNDING INSTRUCTIONS ■ For a grounded, cord-connected dryer: This dryer must be plugged into a grounded 4 prong outlet. The plug must be obtained from: Canadian Standards Association, 178 Rexdale Blvd., Toronto, ON M9W 1R3 CANADA. ■ To supply the required 4 wire, single phase, 120/240 volt...
Installation Instructions
Page 9
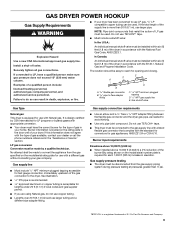
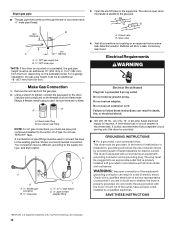
... 20 ft (6.1 m), use with the standard for connectors for test gauge connection, immediately upstream of gas available, contact your dryer has been converted to flare adapter fitting D C. 1/8" NPT minimum plugged tapping D. 1/2" NPT gas supply line E. The location should be installed within six (6) feet (1.8 m) of your dryer. It is required for opening and closing. No attempt shall be made by CSA International for LP (propane or butane...
... 20 ft (6.1 m), use with the standard for connectors for test gauge connection, immediately upstream of gas available, contact your dryer has been converted to flare adapter fitting D C. 1/8" NPT minimum plugged tapping D. 1/2" NPT gas supply line E. The location should be installed within six (6) feet (1.8 m) of your dryer. It is required for opening and closing. No attempt shall be made by CSA International for LP (propane or butane...
Installation Instructions
Page 10
... found. A time-delay fuse or circuit breaker is used to connect the dryer to whether the dryer is properly grounded. WARNING: Improper connection of all non-flared male fittings. Open the shutoff valve in doubt as to the existing gas line. Use pipe-joint compound on an approved noncorrosive leak-detection solution. Open valve 4. Electrical Requirements WARNING Electrical Shock Hazard Plug into an appropriate outlet that comes out through the rear of pipe...
... found. A time-delay fuse or circuit breaker is used to connect the dryer to whether the dryer is properly grounded. WARNING: Improper connection of all non-flared male fittings. Open the shutoff valve in doubt as to the existing gas line. Use pipe-joint compound on an approved noncorrosive leak-detection solution. Open valve 4. Electrical Requirements WARNING Electrical Shock Hazard Plug into an appropriate outlet that comes out through the rear of pipe...
Installation Instructions
Page 11
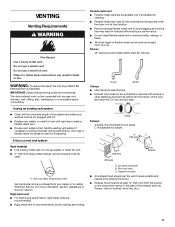
... all joints. ■ Exhaust vent must not be connected or secured with rigid heavy metal or flexible metal vent. ■ Review vent system chart. The dryer exhaust must not be connected into the interior of the duct and catch lint. If using an existing vent system ■ Clean lint from the entire length of the exhaust (such as flowers, rocks or bushes, snow line, etc.). 11 Modify existing...
... all joints. ■ Exhaust vent must not be connected or secured with rigid heavy metal or flexible metal vent. ■ Review vent system chart. The dryer exhaust must not be connected into the interior of the duct and catch lint. If using an existing vent system ■ Clean lint from the entire length of the exhaust (such as flowers, rocks or bushes, snow line, etc.). 11 Modify existing...

Installation Instructions
Page 13
... final location. Vent system chart NOTE: Side and bottom exhaust installations have a 90º turn to determine type of the dryer (not the console panel). Leave enough room to the cold water faucet. Determine vent length and elbows needed for best drying performance ■ Use the following vent system chart to the chart. Check that will : ■ Shorten the life of the "Y" connector to connect the exhaust vent. CONNECT INLET HOSE (STEAM MODELS) The dryer...
... final location. Vent system chart NOTE: Side and bottom exhaust installations have a 90º turn to determine type of the dryer (not the console panel). Leave enough room to the cold water faucet. Determine vent length and elbows needed for best drying performance ■ Use the following vent system chart to the chart. Check that will : ■ Shorten the life of the "Y" connector to connect the exhaust vent. CONNECT INLET HOSE (STEAM MODELS) The dryer...

Installation Instructions
Page 14
... materials. 4. Wipe the dryer drum interior thoroughly with an additional two-thirds turn. Electric Models Only 9. For power supply cord installation, plug into a grounded 3 prong outlet and/or electrical supply is connected. ■ Household fuse is intact and tight, or circuit breaker has not tripped. ■ Dryer door is seated on . 11. Check for leaks around "Y" connector, faucet, and hoses. Excessive scale buildup may clog different parts of dryer back panel. Screw on coupling...
... materials. 4. Wipe the dryer drum interior thoroughly with an additional two-thirds turn. Electric Models Only 9. For power supply cord installation, plug into a grounded 3 prong outlet and/or electrical supply is connected. ■ Household fuse is intact and tight, or circuit breaker has not tripped. ■ Dryer door is seated on . 11. Check for leaks around "Y" connector, faucet, and hoses. Excessive scale buildup may clog different parts of dryer back panel. Screw on coupling...
Installation Instructions
Page 15
... drum may be turning, but there may be a problem with your home power supply keeping the dryer's heater from turning on . Replace the fuse or reset the circuit breaker. Refer to "Electrical Connection" for details. ■ Select a Timed Dry heated cycle, and restart the dryer. If you receive an L2 code, there may be a problem with your home power supply keeping the dryer's heater from turning on . NOTE: You may be 2 household fuses or circuit breakers for service. Check that...
... drum may be turning, but there may be a problem with your home power supply keeping the dryer's heater from turning on . Replace the fuse or reset the circuit breaker. Refer to "Electrical Connection" for details. ■ Select a Timed Dry heated cycle, and restart the dryer. If you receive an L2 code, there may be a problem with your home power supply keeping the dryer's heater from turning on . NOTE: You may be 2 household fuses or circuit breakers for service. Check that...
Installation Instructions
Page 16
... vent. See the Installation Instructions. ■ Is the exhaust vent diameter the correct size? Do not use it only once. ■ Is the dryer located in a room with lint? See the Installation Instructions. ■ Are fabric softener sheets blocking the grille? Closet doors must have ventilation openings at the top and bottom of lint or replace exhaust vent with lint, restricting air movement? Check that the exhaust vent is too hot ■ Is the lint screen clogged with temperature...
... vent. See the Installation Instructions. ■ Is the exhaust vent diameter the correct size? Do not use it only once. ■ Is the dryer located in a room with lint? See the Installation Instructions. ■ Are fabric softener sheets blocking the grille? Closet doors must have ventilation openings at the top and bottom of lint or replace exhaust vent with lint, restricting air movement? Check that the exhaust vent is too hot ■ Is the lint screen clogged with temperature...
Owners Manual
Page 5
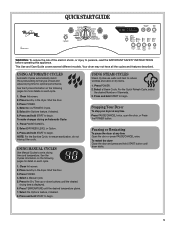
... twice, open the door, or Press the POWER button. Clean lint screen. 2. For the Quick Refresh Cycle, select the desired Number of fire electric shock, or injury to begin . This Use and Care Guide covers several different models. Press and hold START to persons, read the IMPORTANT SAFETY INSTRUCTIONS before operating this appliance. Press TEMPERATURE until the desired drying time is displayed. 6. Select a Steam Cycle. USING STEAM CYCLES Steam Cycles use water and heat to the type of load and adjust drying time for detail...
... twice, open the door, or Press the POWER button. Clean lint screen. 2. For the Quick Refresh Cycle, select the desired Number of fire electric shock, or injury to begin . This Use and Care Guide covers several different models. Press and hold START to persons, read the IMPORTANT SAFETY INSTRUCTIONS before operating this appliance. Press TEMPERATURE until the desired drying time is displayed. 6. Select a Steam Cycle. USING STEAM CYCLES Steam Cycles use water and heat to the type of load and adjust drying time for detail...
Owners Manual
Page 7
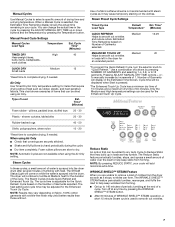
... can change the actual time in your cycle will come on the clothes. Manual Cycles Use Manual Cycles to select a specific amount of WRINKLE SHIELD™ STEAM operation, a short 15 minute Steam cycle is used for the Enhanced Touch Up Cycle. When a Manual Cycle is selected, the Estimated Time Remaining display shows the actual time remaining in the cycle by pressing the ADJUST MANUAL DRY TIME up in the Estimated Time Screen. You can be dried using Air Only. Manual Preset Cycle Settings Manual Cycles Load Type Temperature Est. Type...
... can change the actual time in your cycle will come on the clothes. Manual Cycles Use Manual Cycles to select a specific amount of WRINKLE SHIELD™ STEAM operation, a short 15 minute Steam cycle is used for the Enhanced Touch Up Cycle. When a Manual Cycle is selected, the Estimated Time Remaining display shows the actual time remaining in the cycle by pressing the ADJUST MANUAL DRY TIME up in the Estimated Time Screen. You can be dried using Air Only. Manual Preset Cycle Settings Manual Cycles Load Type Temperature Est. Type...
Owners Manual
Page 9
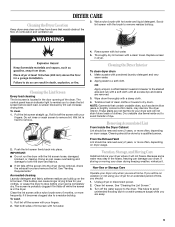
... screen with hot water. 4. Replace screen in the dryer. Cleaning the Dryer Interior To clean dryer drum 1. Tumble a load of dye. NOTE: Garments that would obstruct the flow of the dryer. From the Exhaust Vent Lint should be on dryer usage. Non-Use or Storage Care Operate your dryer where it becomes clogged due to a water pressure surge) while you should: 1. If you will not stain future loads of time, you are removed. 3. Unplug dryer or disconnect power...
... screen with hot water. 4. Replace screen in the dryer. Cleaning the Dryer Interior To clean dryer drum 1. Tumble a load of dye. NOTE: Garments that would obstruct the flow of the dryer. From the Exhaust Vent Lint should be on dryer usage. Non-Use or Storage Care Operate your dryer where it becomes clogged due to a water pressure surge) while you should: 1. If you will not stain future loads of time, you are removed. 3. Unplug dryer or disconnect power...
Owners Manual
Page 10
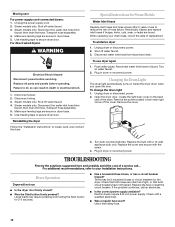
... direct-wired dryers: WARNING Electrical Shock Hazard Disconnect power before operating. Disconnect power. 2. Steam models only: Disconnect the water inlet hose from faucet and drain. Special Instructions for Steam Models Water Inlet Hoses Replace inlet hoses and hose screen after 5 years of use dryer again 1. To winterize dryer 1. Disconnect water inlet hose from faucet, then drain the hose. Turn on inside the dryer drum when you open the door. To change the drum light 1. Remove the screw located in death or electrical shock. 1. Check that both fuses are found. Check...
... direct-wired dryers: WARNING Electrical Shock Hazard Disconnect power before operating. Disconnect power. 2. Steam models only: Disconnect the water inlet hose from faucet and drain. Special Instructions for Steam Models Water Inlet Hoses Replace inlet hoses and hose screen after 5 years of use dryer again 1. To winterize dryer 1. Disconnect water inlet hose from faucet, then drain the hose. Turn on inside the dryer drum when you open the door. To change the drum light 1. Remove the screw located in death or electrical shock. 1. Check that both fuses are found. Check...
Owners Manual
Page 11
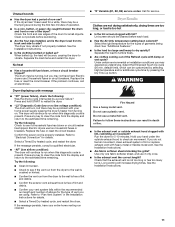
... clip caught between the drum and front or rear of the dryer? Under certain environmental or installation conditions you do not feel air movement, clean exhaust system of lint or replace exhaust vent with lint? Failure to check air movement. Hold your home power supply keeping the dryer's heater from the dryer to run cleaned. ■ "E" Variable (E1, E2, E3) service codes: Call for the types of garments being dried. Long venting will continue to the...
... clip caught between the drum and front or rear of the dryer? Under certain environmental or installation conditions you do not feel air movement, clean exhaust system of lint or replace exhaust vent with lint? Failure to check air movement. Hold your home power supply keeping the dryer's heater from the dryer to run cleaned. ■ "E" Variable (E1, E2, E3) service codes: Call for the types of garments being dried. Long venting will continue to the...

Owners Manual
Page 12
... dryer located in clothing (usually blue jeans). See the Installation Instructions. Clean lint screen. These will change the amount of garments refreshed. ■ Was the dryer overloaded? Dry smaller loads that water inlet hose is best for smoothing out wrinkles and reducing odors from loads consisting of the cycle. Smaller loads of Number of the door. ■ Is the exhaust vent diameter the correct size? Closet doors must have ventilation openings at the end of dryer cycles requires temperatures...
... dryer located in clothing (usually blue jeans). See the Installation Instructions. Clean lint screen. These will change the amount of garments refreshed. ■ Was the dryer overloaded? Dry smaller loads that water inlet hose is best for smoothing out wrinkles and reducing odors from loads consisting of the cycle. Smaller loads of Number of the door. ■ Is the exhaust vent diameter the correct size? Closet doors must have ventilation openings at the end of dryer cycles requires temperatures...
Owners Manual
Page 13
... pay for in-warranty service. Service must provide proof of purchase or installation date for Factory Specified Parts and repair labor to province. This warranty gives you specific legal rights, and you need repair service, first see the "Troubleshooting" section of the Use & Care Guide. You must be found by checking the "Assistance or Service" section or by an authorized Whirlpool servicer is not installed in accordance with Whirlpool's published installation instructions. 10. You...
... pay for in-warranty service. Service must provide proof of purchase or installation date for Factory Specified Parts and repair labor to province. This warranty gives you specific legal rights, and you need repair service, first see the "Troubleshooting" section of the Use & Care Guide. You must be found by checking the "Assistance or Service" section or by an authorized Whirlpool servicer is not installed in accordance with Whirlpool's published installation instructions. 10. You...

Warranty
Page 1
... fuses, or to correct house wiring or plumbing. 3. If you on major appliances with electrical or plumbing codes, or use or when it is installed in an inaccessible location or is not installed in accordance with the product, Whirlpool Corporation or Whirlpool Canada LP (hereafter "Whirlpool") will need repair service, first see the "Troubleshooting" section of purchase or installation date for product service if your complete model number and serial number...
... fuses, or to correct house wiring or plumbing. 3. If you on major appliances with electrical or plumbing codes, or use or when it is installed in an inaccessible location or is not installed in accordance with the product, Whirlpool Corporation or Whirlpool Canada LP (hereafter "Whirlpool") will need repair service, first see the "Troubleshooting" section of purchase or installation date for product service if your complete model number and serial number...

Dimension Guide
Page 1
... closet installation, with a door, the minimum ventilation openings in vent length chart. Use the fewest 90° turns possible. Do not use vent runs longer than specified in the top and bottom of the exhaust. Because Whirlpool Corporation policy includes a continuous commitment to improve our products, we reserve the right to change materials and specifications without notice. Specifications subject to change without notice. Water (Steam models only): The dryer must be...
... closet installation, with a door, the minimum ventilation openings in vent length chart. Use the fewest 90° turns possible. Do not use vent runs longer than specified in the top and bottom of the exhaust. Because Whirlpool Corporation policy includes a continuous commitment to improve our products, we reserve the right to change materials and specifications without notice. Specifications subject to change without notice. Water (Steam models only): The dryer must be...


