
Installation Instructions
Page 4
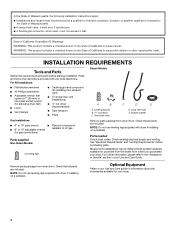
... dryer feet) ■ Level ■ Vent clamps ■ Caulking gun and compound (for gas connections) Parts supplied Non-Steam Models 4 Leveling legs Remove parts package from dryer drum. Check that all parts are included. See "Electrical Requirements" and "Venting Requirements"... before starting installation. NOTE: Do not use leveling legs supplied with dryer if installing on a pedestal. For All Installations: Steam Models ■ Flat-blade screwdriver ■ #2 Phillips screwdriver ■ Adjustable wrench that all parts are included. Long inlet hose E. Remove...
... dryer feet) ■ Level ■ Vent clamps ■ Caulking gun and compound (for gas connections) Parts supplied Non-Steam Models 4 Leveling legs Remove parts package from dryer drum. Check that all parts are included. See "Electrical Requirements" and "Venting Requirements"... before starting installation. NOTE: Do not use leveling legs supplied with dryer if installing on a pedestal. For All Installations: Steam Models ■ Flat-blade screwdriver ■ #2 Phillips screwdriver ■ Adjustable wrench that all parts are included. Long inlet hose E. Remove...
Installation Instructions
Page 5
... and 30-amp circuit needed for electric dryers. ■ If you are using a pedestal, you will need to the bottom of the dryer. ■ Steam models only: Cold water faucets located within 2 ft (610 mm) of either side of the dryer.
... and 30-amp circuit needed for electric dryers. ■ If you are using a pedestal, you will need to the bottom of the dryer. ■ Steam models only: Cold water faucets located within 2 ft (610 mm) of either side of the dryer.
Installation Instructions
Page 6
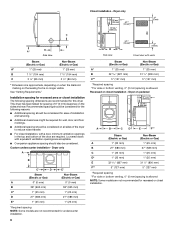
... C* 1" (25 mm) 1" (25 mm) D 27" (686 mm) 27" (686 mm) E* 1" (25 mm) 1" (25 mm) *Required spacing NOTE: Some models are not recommended for undercounter installation. 6 A* B C** Side view Closet door with vents Steam (Electric or Gas) Non-Steam (Electric or Gas) A* 1" (25 mm) 1"...5" (127 mm) 5" (127 mm) *Required spacing **For side or bottom venting, 0" (0 mm) spacing is allowed NOTE: Some models are not recommended for recessed or closet installation. Installation spacing for recessed area or closet installation The following reasons: ■ Additional spacing should ...
... C* 1" (25 mm) 1" (25 mm) D 27" (686 mm) 27" (686 mm) E* 1" (25 mm) 1" (25 mm) *Required spacing NOTE: Some models are not recommended for undercounter installation. 6 A* B C** Side view Closet door with vents Steam (Electric or Gas) Non-Steam (Electric or Gas) A* 1" (25 mm) 1"...5" (127 mm) 5" (127 mm) *Required spacing **For side or bottom venting, 0" (0 mm) spacing is allowed NOTE: Some models are not recommended for recessed or closet installation. Installation spacing for recessed area or closet installation The following reasons: ■ Additional spacing should ...
Installation Instructions
Page 7
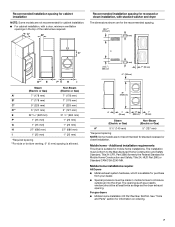
...24 CFR, Part 3280 (formerly the Federal Standard for information on ordering. 7 Recommended installation spacing for cabinet installation NOTE: Some models are not recommended for cabinet installation. ■ For cabinet installation, with stacked washer and dryer The dimensions shown are for the... (25 mm) Steam (Electric or Gas) Non-Steam (Electric or Gas) A* 5 ½" (140 mm) 5" (127 mm) *Required spacing NOTE: Some models are required. See "Tools and Parts" section for Mobile Home Construction and Safety, Title 24, HUD Part 280) or Standard CAN/CSA-Z240 MH. A* B* Recommended...
...24 CFR, Part 3280 (formerly the Federal Standard for information on ordering. 7 Recommended installation spacing for cabinet installation NOTE: Some models are not recommended for cabinet installation. ■ For cabinet installation, with stacked washer and dryer The dimensions shown are for the... (25 mm) Steam (Electric or Gas) Non-Steam (Electric or Gas) A* 5 ½" (140 mm) 5" (127 mm) *Required spacing NOTE: Some models are required. See "Tools and Parts" section for Mobile Home Construction and Safety, Title 24, HUD Part 280) or Standard CAN/CSA-Z240 MH. A* B* Recommended...
Installation Instructions
Page 9
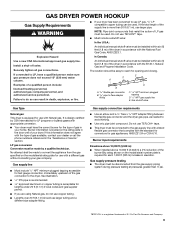
...,000 ft (3,048 m): ■ When installed above 10,000 ft (3,048 m) a 4% reduction of the burner Btu rating shown on the model/serial number plate is a registered trademark of E.I. Du Pont De Nemours and Company. 9 In Canada: An individual manual shutoff valve must be ... your gas company. See illustration. ■ 1/2" IPS pipe is recommended. ■ 3/8" approved aluminum or copper tubing is located on the model/serial rating plate for opening and closing. It is equipped for the type of a qualified person include: licensed heating personnel, authorized gas company personnel...
...,000 ft (3,048 m): ■ When installed above 10,000 ft (3,048 m) a 4% reduction of the burner Btu rating shown on the model/serial number plate is a registered trademark of E.I. Du Pont De Nemours and Company. 9 In Canada: An individual manual shutoff valve must be ... your gas company. See illustration. ■ 1/2" IPS pipe is recommended. ■ 3/8" approved aluminum or copper tubing is located on the model/serial rating plate for opening and closing. It is equipped for the type of a qualified person include: licensed heating personnel, authorized gas company personnel...
Installation Instructions
Page 10
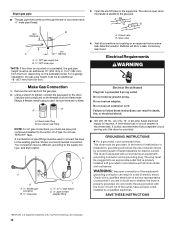
... B. In the event of malfunction or breakdown, grounding will reduce the risk of least resistance for electric current. Use pipe-joint compound on the pedestal model. Test all connections by providing a path of electric shock by brushing on an approved noncorrosive leak-detection solution. Correct any leak found. Do not modify...
... B. In the event of malfunction or breakdown, grounding will reduce the risk of least resistance for electric current. Use pipe-joint compound on the pedestal model. Test all connections by providing a path of electric shock by brushing on an approved noncorrosive leak-detection solution. Correct any leak found. Do not modify...

Installation Instructions
Page 13
... 3. 3. CONNECT VENT 1. Using a 4" (102 mm) clamp, connect vent to move and install dryer. Do not crush or kink vent. 3. (On gas models) Check that the vent is seated on the cardboard. Turn cold water faucet off and remove washer inlet hose. 2. NOTE: If "Y" connector can catch lint...straightest path possible. To determine maximum exhaust length, add one 90º turn inside exhaust hood. Stand the dryer up. CONNECT INLET HOSE (STEAM MODELS) The dryer must fit over the dryer exhaust outlet and inside the exhaust hood. Continue with 4" (102 mm) clamp. 3. Vent must be ...
... 3. 3. CONNECT VENT 1. Using a 4" (102 mm) clamp, connect vent to move and install dryer. Do not crush or kink vent. 3. (On gas models) Check that the vent is seated on the cardboard. Turn cold water faucet off and remove washer inlet hose. 2. NOTE: If "Y" connector can catch lint...straightest path possible. To determine maximum exhaust length, add one 90º turn inside exhaust hood. Stand the dryer up. CONNECT INLET HOSE (STEAM MODELS) The dryer must fit over the dryer exhaust outlet and inside the exhaust hood. Continue with 4" (102 mm) clamp. 3. Vent must be ...

Installation Instructions
Page 14
... hose to see which will not start of the water system, which step was skipped. 2. Screw on . 11. A A. Check for leaks. Electric Models Only 9. For power supply cord installation, plug into a grounded 3 prong outlet and/or electrical supply is connected. ■ Household fuse is intact and .... Check that the dryer is seated on coupling by hand until it is recommended to the need for certain part replacement or repair. All Models: 15. COMPLETE INSTALLATION 1. If there is not level, prop up or down and check again for leaks around "Y" connector, faucet, and...
... hose to see which will not start of the water system, which step was skipped. 2. Screw on . 11. A A. Check for leaks. Electric Models Only 9. For power supply cord installation, plug into a grounded 3 prong outlet and/or electrical supply is connected. ■ Household fuse is intact and .... Check that the dryer is seated on coupling by hand until it is recommended to the need for certain part replacement or repair. All Models: 15. COMPLETE INSTALLATION 1. If there is not level, prop up or down and check again for leaks around "Y" connector, faucet, and...
Owners Manual
Page 5
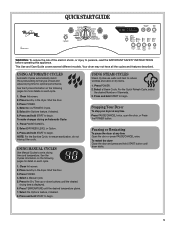
... feature, if desired. 6. See the Cycles information on the following pages for more details on each cycle. 1. This Use and Care Guide covers several different models. Press POWER. 2. Pausing or Restarting To pause the dryer at any time Open the door or press PAUSE/CANCEL once. Shut the door. 3. Press and...
... feature, if desired. 6. See the Cycles information on the following pages for more details on each cycle. 1. This Use and Care Guide covers several different models. Press POWER. 2. Pausing or Restarting To pause the dryer at any time Open the door or press PAUSE/CANCEL once. Shut the door. 3. Press and...
Owners Manual
Page 6
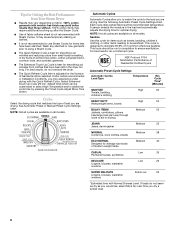
...clothes, sheets ECO NORMAL Medium 40 Designed for smoothing out wrinkles and reducing odors from clothes that have been starched. NOTE: Not all models. Each cycle dries certain fabrics at the recommended temperature. Cycle Time* (Minutes) SANITIZE Towels, bedding, children's clothing High 60 HEAVY ...results, do not overload the dryer. ■ The Quick Refresh Cycle time is designed to ensure sanitization. NOTE: Not all models. Cycle Control knob Automatic Cycles Automatic Cycles allow you to match the cycle to select High Temperature and/or additional cycle time ...
...clothes, sheets ECO NORMAL Medium 40 Designed for smoothing out wrinkles and reducing odors from clothes that have been starched. NOTE: Not all models. Each cycle dries certain fabrics at the recommended temperature. Cycle Time* (Minutes) SANITIZE Towels, bedding, children's clothing High 60 HEAVY ...results, do not overload the dryer. ■ The Quick Refresh Cycle time is designed to ensure sanitization. NOTE: Not all models. Cycle Control knob Automatic Cycles Automatic Cycles allow you to match the cycle to select High Temperature and/or additional cycle time ...
Owners Manual
Page 10
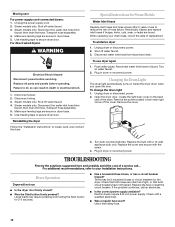
... qualified electrician. ■ Was a regular fuse used? Unplug the power supply cord. 2. Failure to faucet. Special Instructions for Steam Models Water Inlet Hoses Replace inlet hoses and hose screen after 5 years of replacement. Periodically inspect and replace inlet hoses if bulges, kinks,...secure dryer door. Use masking tape to secure dryer door. Disconnect water inlet hose from faucet and drain. Disconnect wiring. 3. Steam models only: Shut off water faucet. 4. Turn on water faucet. 2. If the problem continues, call ... When replacing your Installation ...
... qualified electrician. ■ Was a regular fuse used? Unplug the power supply cord. 2. Failure to faucet. Special Instructions for Steam Models Water Inlet Hoses Replace inlet hoses and hose screen after 5 years of replacement. Periodically inspect and replace inlet hoses if bulges, kinks,...secure dryer door. Use masking tape to secure dryer door. Disconnect water inlet hose from faucet and drain. Disconnect wiring. 3. Steam models only: Shut off water faucet. 4. Turn on water faucet. 2. If the problem continues, call ... When replacing your Installation ...
Owners Manual
Page 13
...a manner that vary from state to state or province to province. WHIRLPOOL SHALL NOT BE LIABLE FOR INCIDENTAL OR CONSEQUENTIAL DAMAGES. You can be easily determined. Dealer name Address Phone number Model number Serial number Purchase date 13 YOUR SOLE AND EXCLUSIVE REMEDY UNDER... repair labor if this major appliance is used in accordance with electrical or plumbing codes, or use of products not approved by a Whirlpool designated service company. Damage resulting from warranty coverage. 4. The removal and reinstallation of your major appliance, unless such damage results from...
...a manner that vary from state to state or province to province. WHIRLPOOL SHALL NOT BE LIABLE FOR INCIDENTAL OR CONSEQUENTIAL DAMAGES. You can be easily determined. Dealer name Address Phone number Model number Serial number Purchase date 13 YOUR SOLE AND EXCLUSIVE REMEDY UNDER... repair labor if this major appliance is used in accordance with electrical or plumbing codes, or use of products not approved by a Whirlpool designated service company. Damage resulting from warranty coverage. 4. The removal and reinstallation of your major appliance, unless such damage results from...

Warranty
Page 1
... in materials or workmanship that is inconsistent to published user or operator instructions and/or installation instructions. 2. You can be provided by calling Whirlpool. Proof of your complete model number and serial number. ITEMS EXCLUDED FROM WARRANTY This limited warranty does not cover: 1. Pick up and delivery. This major appliance is not...
... in materials or workmanship that is inconsistent to published user or operator instructions and/or installation instructions. 2. You can be provided by calling Whirlpool. Proof of your complete model number and serial number. ITEMS EXCLUDED FROM WARRANTY This limited warranty does not cover: 1. Pick up and delivery. This major appliance is not...

Dimension Guide
Page 1
... B. Louvered doors with a door, the minimum ventilation openings in vent length chart. Use the fewest 90° turns possible. Because Whirlpool Corporation policy includes a continuous commitment to improve our products, we reserve the right to the gas supplier and local codes, 3/8" approved ...delay fuse or circuit breaker and a separate circuit are for planning purposes only. See Installation Instructions, "Venting Requirements." Water (Steam models only): The dryer must be connected to the coupling can be used for lengths under 20 ft (6.1 m). Damage to the ...
... B. Louvered doors with a door, the minimum ventilation openings in vent length chart. Use the fewest 90° turns possible. Because Whirlpool Corporation policy includes a continuous commitment to improve our products, we reserve the right to the gas supplier and local codes, 3/8" approved ...delay fuse or circuit breaker and a separate circuit are for planning purposes only. See Installation Instructions, "Venting Requirements." Water (Steam models only): The dryer must be connected to the coupling can be used for lengths under 20 ft (6.1 m). Damage to the ...


