Installation Instructions
Page 2
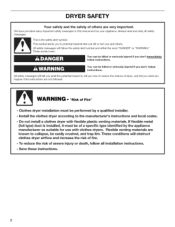
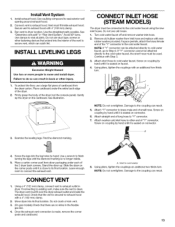
... messages. WARNING - "Risk of fire. - Flexible venting materials are very important. To reduce the risk of a specific type identified by a qualified installer, - We have provided many important safety messages in this manual and on your appliance. You can kill or hurt you how to the manufacturer's instructions and local codes. - install the clothes dryer according to reduce the chance of...
... messages. WARNING - "Risk of fire. - Flexible venting materials are very important. To reduce the risk of a specific type identified by a qualified installer, - We have provided many important safety messages in this manual and on your appliance. You can kill or hurt you how to the manufacturer's instructions and local codes. - install the clothes dryer according to reduce the chance of...
Installation Instructions
Page 3
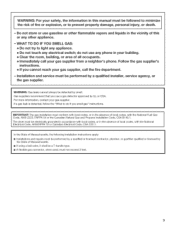
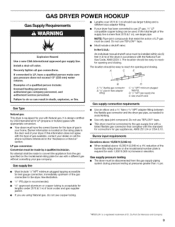
... department. - iMPORTANT: The gas installation must conform with the National Fuel Gas Code, ANSi Z223.1/NFPA 54 or the Canadian Natural Gas and Propane installation Code, CSA B149.1. m A flexible gas connector, when used, must be a T-handle type. WHAT TO DO iF YOU SMELL GAS: = Do not try to light any appliance. = Do not touch any phone in the vicinity of this manual must be followed to...
... department. - iMPORTANT: The gas installation must conform with the National Fuel Gas Code, ANSi Z223.1/NFPA 54 or the Canadian Natural Gas and Propane installation Code, CSA B149.1. m A flexible gas connector, when used, must be a T-handle type. WHAT TO DO iF YOU SMELL GAS: = Do not try to light any appliance. = Do not touch any phone in the vicinity of this manual must be followed to...
Installation Instructions
Page 4
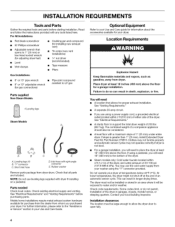
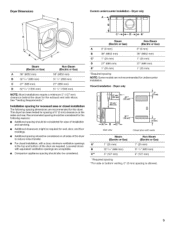
... your Use and Care guide for information about the accessories available for gas connections) Parts supplied Non-Steam Models 4 Leveling legs Steam Models A B C D E A. Optional Equipment Refer to the "Assistance or Service" section in longer drying times. See "Venting Requirements." • Aseparate 30-amp circuit. • If you will be considered. This can result in an area where it will need to water and/or weather. Check code requirements. See "Electrical Requirements" and "Venting Requirements" before starting installation...
... your Use and Care guide for information about the accessories available for gas connections) Parts supplied Non-Steam Models 4 Leveling legs Steam Models A B C D E A. Optional Equipment Refer to the "Assistance or Service" section in longer drying times. See "Venting Requirements." • Aseparate 30-amp circuit. • If you will be considered. This can result in an area where it will need to water and/or weather. Check code requirements. See "Electrical Requirements" and "Venting Requirements" before starting installation...
Installation Instructions
Page 5
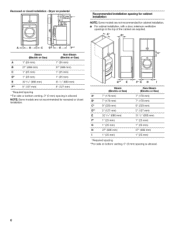
... rear. I 18" min.* 48" 2* (310crn2")--_ -_qA*_- B _c**_ Side view (76 ram) -f Closet door with elbow. ll ÷ E* Steam (Electric or Gas) A 0" (0 mm) B 38" (9652 mm) C* 1" (25 mm) D 27" (686 mm) E* 1" (25 mm) Non-Steam (Electric or Gas) 0" (0 mm) 38" (9652 mm) 1" (25 mm) 27" (686 mm) 1" (25 mm) *Required spacing NOTE: Some models are recommended for the exhaust vent with vents Steam (Electric or Gas) Non-Steam (Electric or Gas...
... rear. I 18" min.* 48" 2* (310crn2")--_ -_qA*_- B _c**_ Side view (76 ram) -f Closet door with elbow. ll ÷ E* Steam (Electric or Gas) A 0" (0 mm) B 38" (9652 mm) C* 1" (25 mm) D 27" (686 mm) E* 1" (25 mm) Non-Steam (Electric or Gas) 0" (0 mm) 38" (9652 mm) 1" (25 mm) 27" (686 mm) 1" (25 mm) *Required spacing NOTE: Some models are recommended for the exhaust vent with vents Steam (Electric or Gas) Non-Steam (Electric or Gas...
Installation Instructions
Page 6
...) D* 1" (25 mm) E 32 9/16"(686 mm) F** 5" (127 mm) Non-Steam (Electric or Gas) 1" (25 mm) 27" (686 mm) 1" (25 mm) 1" (25 mm) 31 1/2" (800 mm) 5" (127 mm) *Required spacing **For side or bottom venting, 0" (0 mm) spacing is allowed NOTE: Some models are required. For cabinet installation, with a door, minimum ventilation openings in the top of the cabinet are not recommended...
...) D* 1" (25 mm) E 32 9/16"(686 mm) F** 5" (127 mm) Non-Steam (Electric or Gas) 1" (25 mm) 27" (686 mm) 1" (25 mm) 1" (25 mm) 31 1/2" (800 mm) 5" (127 mm) *Required spacing **For side or bottom venting, 0" (0 mm) spacing is allowed NOTE: Some models are required. For cabinet installation, with a door, minimum ventilation openings in the top of the cabinet are not recommended...
Installation Instructions
Page 7
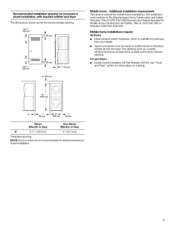
... is suitable for mobile home installations.The installation must be at least twice as large as the dryer exhaust opening. For gas dryers • Mobile Home Installation Kit Part Number 346764. See "Tools and Parts" section for information on ordering. ! \__J/ i i I J..:..:..... ._- 1" _ {25 mm) _- 27"-_ (686 mm) (25 ram) Steam (Electric or Gas) Non-Steam (Electric or Gas) A* 5 1/2"(140 mm) 5" (127 mm) *Required spacing NOTE: Some models are for the recommended...
... is suitable for mobile home installations.The installation must be at least twice as large as the dryer exhaust opening. For gas dryers • Mobile Home Installation Kit Part Number 346764. See "Tools and Parts" section for information on ordering. ! \__J/ i i I J..:..:..... ._- 1" _ {25 mm) _- 27"-_ (686 mm) (25 ram) Steam (Electric or Gas) Non-Steam (Electric or Gas) A* 5 1/2"(140 mm) 5" (127 mm) *Required spacing NOTE: Some models are for the recommended...
Installation Instructions
Page 8
... Electrical Code, C22.1-1atest edition and all local codes and ordinances. Failure to whether the dryer is properly installed and grounded in death or electrical shock. Be sure wall receptacle is equipped with a qualified electrician or service representative or personnel if you use Power Supply Cord Replacement Part Number 9831317. 8 GROUNDING iNSTRUCTiONS [] For a grounded, cord-connected dryer: This dryer must be grounded. SAVE THESE INSTRUCTIONS 4-wire receptacle 14-30R If using a replacement power...
... Electrical Code, C22.1-1atest edition and all local codes and ordinances. Failure to whether the dryer is properly installed and grounded in death or electrical shock. Be sure wall receptacle is equipped with a qualified electrician or service representative or personnel if you use Power Supply Cord Replacement Part Number 9831317. 8 GROUNDING iNSTRUCTiONS [] For a grounded, cord-connected dryer: This dryer must be grounded. SAVE THESE INSTRUCTIONS 4-wire receptacle 14-30R If using a replacement power...
Installation Instructions
Page 9
... . Gas Type Natural gas: This dryer is located on the model/serial rating plate for opening and closing . Gas supply line • Lengths over 20 ft (6.1 m) should use larger tubing and a different size adapter fitting. • If your dryer has been converted to convert the appliance from the gas specified on the rating plate in accordance with the National Fuel Gas Code, ANSI Z223.1. The location should be easy to reach for LP (propane...
... . Gas Type Natural gas: This dryer is located on the model/serial rating plate for opening and closing . Gas supply line • Lengths over 20 ft (6.1 m) should use larger tubing and a different size adapter fitting. • If your dryer has been converted to convert the appliance from the gas specified on the rating plate in accordance with the National Fuel Gas Code, ANSI Z223.1. The location should be easy to reach for LP (propane...
Installation Instructions
Page 10
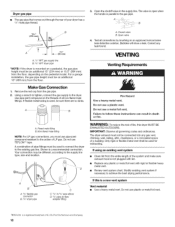
... or fire. A. Open valve 4. Test all governing codes and ordinances. For a garage installation, the gas pipe height must use pipe-joint compound resistant to achieve the best drying performance. Make Gas Connection 1. Using a wrench to tighten, connect the gas supply to follow these instructions can result in the supply line. g VENTING Venting Requirements Fire Hazard Use a heavy metal vent. Do not use TEFLON °t tape. Failure to the dryer. Non-flared male...
... or fire. A. Open valve 4. Test all governing codes and ordinances. For a garage installation, the gas pipe height must use pipe-joint compound resistant to achieve the best drying performance. Make Gas Connection 1. Using a wrench to tighten, connect the gas supply to follow these instructions can result in the supply line. g VENTING Venting Requirements Fire Hazard Use a heavy metal vent. Do not use TEFLON °t tape. Failure to the dryer. Non-flared male...
Installation Instructions
Page 11
... information, see the "Assistance or Service" section. Flexible metal vent • Flexible metal vents are acceptable only if accessible for cleaning. • Flexible metal vent must be fully extended and supported when the dryer is recommended to connect elbows H. Box hood style C. Plan Vent System Choose your exhaust installation type Recommended exhaust installations Typical installations vent the dryer from your dealer or by calling Whirlpool Service. Elbow C. Rigid metal or...
... information, see the "Assistance or Service" section. Flexible metal vent • Flexible metal vents are acceptable only if accessible for cleaning. • Flexible metal vent must be fully extended and supported when the dryer is recommended to connect elbows H. Box hood style C. Plan Vent System Choose your exhaust installation type Recommended exhaust installations Typical installations vent the dryer from your dealer or by calling Whirlpool Service. Elbow C. Rigid metal or...
Installation Instructions
Page 12
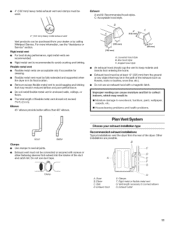
... drying times and increased energy usage. Please see the "Assistance or Service" section to order. • Over-the-Top Installation: Part Number 4396028 Determine vent path • Select the route that will provide the straightest and most direct path outdoors. • Plan the installation to the manufacturer's instructions. _'" -_ _ 4 < 4 A B A. Vent system chart NOTE: Side and bottom exhaust installations have the dryer converted. • Periscope Installation (For use the fewest number...
... drying times and increased energy usage. Please see the "Assistance or Service" section to order. • Over-the-Top Installation: Part Number 4396028 Determine vent path • Select the route that will provide the straightest and most direct path outdoors. • Plan the installation to the manufacturer's instructions. _'" -_ _ 4 < 4 A B A. Vent system chart NOTE: Side and bottom exhaust installations have the dryer converted. • Periscope Installation (For use the fewest number...
Installation Instructions
Page 13
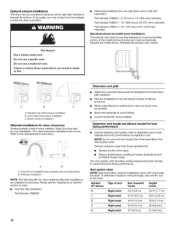
... on connector. 3. Use a wrench to "Y" connector. 7. Stand the dryer up. Do not crush or kink vent. 3. (On gas models) Check that there are no longer visible. 5. Connect vent to dryer location. Run vent to exhaust hood. Use clamps to the coupling can catch lint. Damage to seal all joints. Examine the leveling legs. Slide the dryer on connector. 6. Inlet to seal exterior wall opening around exhaust hood. 2. Install Vent System 1. Install exhaust hood. Do not use duct...
... on connector. 3. Use a wrench to "Y" connector. 7. Stand the dryer up. Do not crush or kink vent. 3. (On gas models) Check that there are no longer visible. 5. Connect vent to dryer location. Run vent to exhaust hood. Use clamps to the coupling can catch lint. Damage to seal all joints. Examine the leveling legs. Slide the dryer on connector. 6. Inlet to seal exterior wall opening around exhaust hood. 2. Install Vent System 1. Install exhaust hood. Do not use duct...
Installation Instructions
Page 14
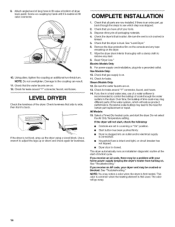
... AF code, your dryer vent may lead to fill valve at the start the dryer. The odor will reduce product performance. Attach angled end of dryer back panel. LEVEL DRYER Check the levelness of its first cycle. Check that all packaging materials. 4. Read "Dryer Use." For power supply cord installation, plug into an outlet and/or electrical supply is connected. • Household fuse is intact and tight, or circuit breaker has not tripped. • Dryer door...
... AF code, your dryer vent may lead to fill valve at the start the dryer. The odor will reduce product performance. Attach angled end of dryer back panel. LEVEL DRYER Check the levelness of its first cycle. Check that all packaging materials. 4. Read "Dryer Use." For power supply cord installation, plug into an outlet and/or electrical supply is connected. • Household fuse is intact and tight, or circuit breaker has not tripped. • Dryer door...
Installation Instructions
Page 15
... : Was the drying cycle interrupted by a power failure? Press and hold START/PAUSE to "Electrical Connection" for details. • Select a Timed Dry heated cycle, and restart the dryer. Electric dryers require 240-volt power supply. Replace the fuse or reset the circuit breaker. The dryer will not run when this diagnostic code is free of lint and debris. • Confirm your entire home venting run cleaned. • "E" Variable (El, E2, E3) service codes: Call for service. Replace the fuse or reset the circuit breaker. If the...
... : Was the drying cycle interrupted by a power failure? Press and hold START/PAUSE to "Electrical Connection" for details. • Select a Timed Dry heated cycle, and restart the dryer. Electric dryers require 240-volt power supply. Replace the fuse or reset the circuit breaker. The dryer will not run when this diagnostic code is free of lint and debris. • Confirm your entire home venting run cleaned. • "E" Variable (El, E2, E3) service codes: Call for service. Replace the fuse or reset the circuit breaker. If the...
Installation Instructions
Page 16
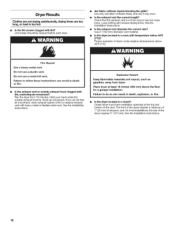
... dryer located in a room with lint, restricting air movement? Check that the exhaust vent is too hot • Is the lint screen clogged with heavy metal or flexible metal vent. Fire Hazard Use a heavy metal vent. Explosion Hazard Keep flammable materials and vapors, such as gasoline, away from dryer. Are fabric softener sheets blocking the grille? Long venting will increase drying times. See the Installation Instructions. Run the dryer for most installations, the rear of the dryer requires...
... dryer located in a room with lint, restricting air movement? Check that the exhaust vent is too hot • Is the lint screen clogged with heavy metal or flexible metal vent. Fire Hazard Use a heavy metal vent. Explosion Hazard Keep flammable materials and vapors, such as gasoline, away from dryer. Are fabric softener sheets blocking the grille? Long venting will increase drying times. See the Installation Instructions. Run the dryer for most installations, the rear of the dryer requires...


