
Use and Care Guide
Page 3
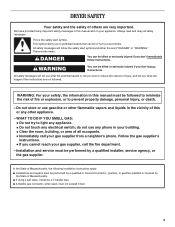
... qualified installer, service agency, or the gas supplier. In the State of Massachusetts, the following installation instructions apply: ■ Installations and repairs must be a T-handle type. ■ A flexible gas connector, when used, must not exceed 3 feet. 3 DRYER SAFETY Your safety and the safety of ...others . WHAT TO DO IF YOU SMELL GAS: • Do not try to minimize the risk of injury, and tell...
... qualified installer, service agency, or the gas supplier. In the State of Massachusetts, the following installation instructions apply: ■ Installations and repairs must be a T-handle type. ■ A flexible gas connector, when used, must not exceed 3 feet. 3 DRYER SAFETY Your safety and the safety of ...others . WHAT TO DO IF YOU SMELL GAS: • Do not try to minimize the risk of injury, and tell...

Use and Care Guide
Page 4
...Natural Gas and Propane Installation Code, CSA B149.1. The dryer must conform with local codes, or in the absence of local codes, with the National Electrical Code, ANSI/NFPA 70 or Canadian Electrical Code, CSA C22.1. 4 Close supervision of children is necessary when the dryer is used near ...IMPORTANT SAFETY INSTRUCTIONS WARNING: To reduce the risk of fire, electric shock, or injury to persons when using the dryer. ■ Do not place items exposed to cooking oils in your dryer. Items contaminated with cooking oils may contribute to a chemical reaction that could cause a load to catch...
...Natural Gas and Propane Installation Code, CSA B149.1. The dryer must conform with local codes, or in the absence of local codes, with the National Electrical Code, ANSI/NFPA 70 or Canadian Electrical Code, CSA C22.1. 4 Close supervision of children is necessary when the dryer is used near ...IMPORTANT SAFETY INSTRUCTIONS WARNING: To reduce the risk of fire, electric shock, or injury to persons when using the dryer. ■ Do not place items exposed to cooking oils in your dryer. Items contaminated with cooking oils may contribute to a chemical reaction that could cause a load to catch...
Use and Care Guide
Page 5
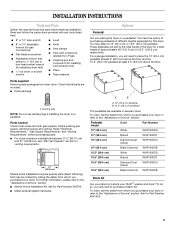
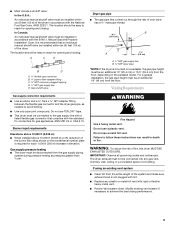
...pedestal B. 15.5" (39.4 cm) pedestal The pedestals are included. ■ Parts package 4 Leveling legs NOTE: Do not use leveling legs if installing the dryer on a pedestal? Ask for Part Number 346764. ■ Metal exhaust system hardware. Parts needed Check local codes and with... you planning to the "Assistance or Service" section. To do so, you placing the dryer on a pedestal. Check existing gas supply, electrical supply and venting. Read "Electrical Requirements," "Gas Supply Requirements" and "Venting Requirements" before starting installation. Check that opens to 1" (2.5 ...
...pedestal B. 15.5" (39.4 cm) pedestal The pedestals are included. ■ Parts package 4 Leveling legs NOTE: Do not use leveling legs if installing the dryer on a pedestal? Ask for Part Number 346764. ■ Metal exhaust system hardware. Parts needed Check local codes and with... you planning to the "Assistance or Service" section. To do so, you placing the dryer on a pedestal. Check existing gas supply, electrical supply and venting. Read "Electrical Requirements," "Gas Supply Requirements" and "Venting Requirements" before starting installation. Check that opens to 1" (2.5 ...
Use and Care Guide
Page 6
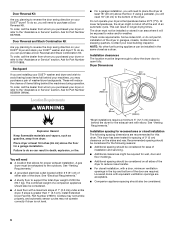
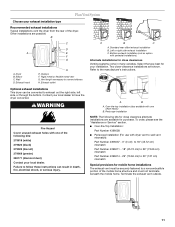
...flammable materials and vapors, such as a dryer. A gas dryer must be considered for Part Number 8558694 (White). ■ For a garage installation, you will need 18" (46 cm) to the bottom of washer/dryer backguards. This dryer has been tested for this dryer. Recommended spacing should be exhausted to open ...planning to reverse the door swing direction on your DUET® dryer and stack your dryer at least 18 inches (46 cm) above the floor. If using a pedestal, you will be considered. 6 At lower temperatures, the dryer might be required for the exhaust vent with a door, ...
...flammable materials and vapors, such as a dryer. A gas dryer must be considered for Part Number 8558694 (White). ■ For a garage installation, you will need 18" (46 cm) to the bottom of washer/dryer backguards. This dryer has been tested for this dryer. Recommended spacing should be exhausted to open ...planning to reverse the door swing direction on your DUET® dryer and stack your dryer at least 18 inches (46 cm) above the floor. If using a pedestal, you will be considered. 6 At lower temperatures, the dryer might be required for the exhaust vent with a door, ...
Use and Care Guide
Page 8
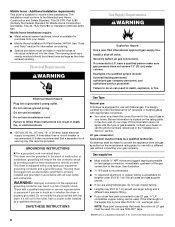
... for test gauge connection, immediately upstream of LP gas must be plugged into the dryer. WARNING: Improper connection of gas in your dealer or call the phone numbers referenced in mobile homes to use LP gas, ³⁄₈" LP compatible copper tubing ..., or fire. Additional installation requirements This dryer is a registered trademark of least resistance for use larger pipe. Electrical Requirements WARNING Gas Supply Requirements WARNING Explosion Hazard Use a new CSA International approved gas supply line. If this dryer be used . In the event of malfunction or ...
... for test gauge connection, immediately upstream of LP gas must be plugged into the dryer. WARNING: Improper connection of gas in your dealer or call the phone numbers referenced in mobile homes to use LP gas, ³⁄₈" LP compatible copper tubing ..., or fire. Additional installation requirements This dryer is a registered trademark of least resistance for use larger pipe. Electrical Requirements WARNING Gas Supply Requirements WARNING Explosion Hazard Use a new CSA International approved gas supply line. If this dryer be used . In the event of malfunction or ...
Use and Care Guide
Page 9
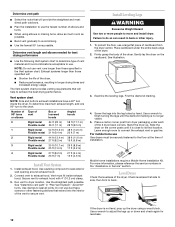
...8260;₈" pipe to avoid kinking. ■ Use only pipe-joint compound. Venting Requirements Gas supply connection requirements ■ Use an elbow and a ³⁄₈" flare x ³⁄₈" NPT adapter fitting between the flexible gas connector and the dryer gas pipe, as needed to flare adapter fitting C. ....4 cm) or 15.5" (39.4 cm) from the floor. WARNING: To reduce the risk of the dryer. If using an existing vent system ■ Clean lint from the gas supply piping system during pressure testing at pressures greater than ½ psi. In Canada: An individual manual...
...8260;₈" pipe to avoid kinking. ■ Use only pipe-joint compound. Venting Requirements Gas supply connection requirements ■ Use an elbow and a ³⁄₈" flare x ³⁄₈" NPT adapter fitting between the flexible gas connector and the dryer gas pipe, as needed to flare adapter fitting C. ....4 cm) or 15.5" (39.4 cm) from the floor. WARNING: To reduce the risk of the dryer. If using an existing vent system ■ Clean lint from the gas supply piping system during pressure testing at pressures greater than ½ psi. In Canada: An individual manual...

Use and Care Guide
Page 10
...must be at least 12" (30.5 cm) from your dealer or by calling Whirlpool Parts and Accessories. For more information, see the "Assistance or Service" section. B A 4" (10.2 cm) 4" (10.2 cm) A. Clamps ■ Use clamps to seal all joints. ■ Exhaust vent must be fully extended and... supported when the dryer is a new vent system Vent material ■ Use a heavy metal vent. Good Better Improper venting can be purchased from the ground or...
...must be at least 12" (30.5 cm) from your dealer or by calling Whirlpool Parts and Accessories. For more information, see the "Assistance or Service" section. B A 4" (10.2 cm) 4" (10.2 cm) A. Clamps ■ Use clamps to seal all joints. ■ Exhaust vent must be fully extended and... supported when the dryer is a new vent system Vent material ■ Use a heavy metal vent. Good Better Improper venting can be purchased from the ground or...
Use and Care Guide
Page 11
...type best for your local dealer to have the dryer converted. Exhaust hood H E. Refer to connect ...outside. 11 WARNING Fire Hazard Cover unused exhaust holes with dryer vent to wall vent mismatch): Part Number 4396037 - ...dryer from the rear of the following kits for close clearance alternate installations are shown. Optional exhaust installations This dryer...for close -clearance installations are available for purchase. Dryer B. Wall D. Clamps F. A B A. Two ... installation (not an option with one of the dryer. Failure to follow these instructions can be securely ...
...type best for your local dealer to have the dryer converted. Exhaust hood H E. Refer to connect ...outside. 11 WARNING Fire Hazard Cover unused exhaust holes with dryer vent to wall vent mismatch): Part Number 4396037 - ...dryer from the rear of the following kits for close clearance alternate installations are shown. Optional exhaust installations This dryer...for close -clearance installations are available for purchase. Dryer B. Wall D. Clamps F. A B A. Two ... installation (not an option with one of the dryer. Failure to follow these instructions can be securely ...
Use and Care Guide
Page 12
... turns, allow as much room as possible. ■ Bend vent gradually to determine type of the dryer. ■ Reduce performance, resulting in "Plan Vent System." Use the straightest path possible. Avoid 90º turns. Do not use Gas dryers must fit inside the dryer. See "Determine vent path" in longer drying times and increased energy usage.
... turns, allow as much room as possible. ■ Bend vent gradually to determine type of the dryer. ■ Reduce performance, resulting in "Plan Vent System." Use the straightest path possible. Avoid 90º turns. Do not use Gas dryers must fit inside the dryer. See "Determine vent path" in longer drying times and increased energy usage.
Use and Care Guide
Page 13
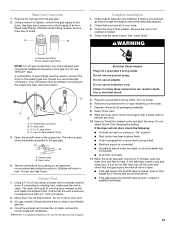
... parallel to exhaust outlet in the flexible gas line. 4. Du Pont De Nemours and Company. Do not use TEFLON®† tape. Turn on the dryer. 7. Read "Dryer Use." 9. Wipe the dryer drum interior thoroughly with a 4" (10.2 cm) clamp. 2. When the dryer has been running or "On" position.... is a registered trademark of LP gas. Make Gas Connection 1. Closed valve B. The dryer vent must use an adapter. If the dryer will show a leak. Using a wrench to tighten, connect the gas supply to the action of E.I. If you must fit over the dryer exhaust outlet and inside the exhaust ...
... parallel to exhaust outlet in the flexible gas line. 4. Du Pont De Nemours and Company. Do not use TEFLON®† tape. Turn on the dryer. 7. Read "Dryer Use." 9. Wipe the dryer drum interior thoroughly with a 4" (10.2 cm) clamp. 2. When the dryer has been running or "On" position.... is a registered trademark of LP gas. Make Gas Connection 1. Closed valve B. The dryer vent must use an adapter. If the dryer will show a leak. Using a wrench to tighten, connect the gas supply to the action of E.I. If you must fit over the dryer exhaust outlet and inside the exhaust ...

Use and Care Guide
Page 14
...if this manual for more detailed information. 1. During the first few minutes of the drying process, the cycle time may automatically vary from dryer. The light will use an Automatic Cycle NOTE: A light next to desired level. Failure to follow these instructions can result in death, explosion, or fire. ...gasoline, away from the default time based on the size and fabric type of the load. Please refer to starting your load, by using Normal, which the dryer will glow amber when the feature is a guide to specific sections of this option is desired. ■ Press the CYCLE SIGNAL ...
...if this manual for more detailed information. 1. During the first few minutes of the drying process, the cycle time may automatically vary from dryer. The light will use an Automatic Cycle NOTE: A light next to desired level. Failure to follow these instructions can result in death, explosion, or fire. ...gasoline, away from the default time based on the size and fabric type of the load. Please refer to starting your load, by using Normal, which the dryer will glow amber when the feature is a guide to specific sections of this option is desired. ■ Press the CYCLE SIGNAL ...

Use and Care Guide
Page 15
...light will adjust again, showing the final drying time. Press and hold START button until dryer starts. The Dry Time feature can change by pressing the Pause/Cancel button, but cannot be used only with Auto Moisture Sensing Plus, which advances the cycle as moisture is desired. &#... the settings for Manual Cycles. Once an Automatic cycle has started, the WRINKLE SHIELD™ feature and cycle signals can also use of the dryer. Control Locked This feature allows you to select another cycle. Temperature settings can be changed only with the cycle or option combinations...
...light will adjust again, showing the final drying time. Press and hold START button until dryer starts. The Dry Time feature can change by pressing the Pause/Cancel button, but cannot be used only with Auto Moisture Sensing Plus, which advances the cycle as moisture is desired. &#... the settings for Manual Cycles. Once an Automatic cycle has started, the WRINKLE SHIELD™ feature and cycle signals can also use of the dryer. Control Locked This feature allows you to select another cycle. Temperature settings can be changed only with the cycle or option combinations...

Use and Care Guide
Page 16
...follow the progress of your load by pressing TEMPERATURE until a wet item is finished. Items will turn off and the dryer will be adjusted. Cycle tips ■ Dry most loads using Low heat. Cycles Select the drying cycle that the load has reached the damp dry level. NOTE: The Damp ..., if a wet item is not detected after 10 minutes, the Wet light turns on until: ■ The damp dry point is reached in the dryer. ■ Avoid drying heavy work clothes and sheets. A sensor detects the moisture in "Additional Features" section. This will remain on and the selected ...
...follow the progress of your load by pressing TEMPERATURE until a wet item is finished. Items will turn off and the dryer will be adjusted. Cycle tips ■ Dry most loads using Low heat. Cycles Select the drying cycle that the load has reached the damp dry level. NOTE: The Damp ..., if a wet item is not detected after 10 minutes, the Wet light turns on until: ■ The damp dry point is reached in the dryer. ■ Avoid drying heavy work clothes and sheets. A sensor detects the moisture in "Additional Features" section. This will remain on and the selected ...

Use and Care Guide
Page 17
...selected to alert you do not select the WRINKLE SHIELD™ feature, the dryer stops after an Automatic Cycle. This is pressed again. Timed Dry Use this cycle to complete drying if items are not available when using Air Only. WRINKLE SHIELD™ Feature When you want to remove lightweight items... to help smooth out wrinkles from forming. ■ Press the WRINKLE SHIELD™ feature to get up or down period. Touch Up Use this cycle for 20 minutes, the dryer door is closed , or the door is preset to "ON." Shower curtains, tablecloths 20 - 30 Rubber-backed rugs 40 - 50 ...
...selected to alert you do not select the WRINKLE SHIELD™ feature, the dryer stops after an Automatic Cycle. This is pressed again. Timed Dry Use this cycle to complete drying if items are not available when using Air Only. WRINKLE SHIELD™ Feature When you want to remove lightweight items... to help smooth out wrinkles from forming. ■ Press the WRINKLE SHIELD™ feature to get up or down period. Touch Up Use this cycle for 20 minutes, the dryer door is closed , or the door is preset to "ON." Shower curtains, tablecloths 20 - 30 Rubber-backed rugs 40 - 50 ...

Use and Care Guide
Page 18
...and Cancel buttons will still beep softly even when the Button Sound volume is useful when drying bedsheets/linens in the drying process. This change will become your new preset drying setting for example, sweaters). The dryer will beep, and "CF" will be adjusted to adapt to tumble dry or...; feature is selected and the End of Cycle Signal is on all of Cycle Signal produces an audible sound when the drying cycle is useful for your dryer shuts down. Press and hold the Dryness Level button for 1 second followed by the current drying setting. 3. Changing Cycles, Options and ...
...and Cancel buttons will still beep softly even when the Button Sound volume is useful when drying bedsheets/linens in the drying process. This change will become your new preset drying setting for example, sweaters). The dryer will beep, and "CF" will be adjusted to adapt to tumble dry or...; feature is selected and the End of Cycle Signal is on all of Cycle Signal produces an audible sound when the drying cycle is useful for your dryer shuts down. Press and hold the Dryness Level button for 1 second followed by the current drying setting. 3. Changing Cycles, Options and ...
Use and Care Guide
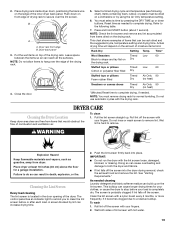
Page 19
... complete drying. Do not use automatic cycles with your fingers. WARNING Explosion Hazard Keep flammable materials and vapors, such as needed cleaning Laundry detergent and fabric softener residue can cause longer drying times for your clothes, or cause the dryer to the following chart). ...frequently, if it becomes clogged due to secure over the edge of the inner dryer back panel. Place dryer at least 18 inches (46 cm) above the floor for normal tumbling. A screen blocked by using the Air Only temperature setting. 6. Select a timed drying cycle and temperature (see...
... complete drying. Do not use automatic cycles with your fingers. WARNING Explosion Hazard Keep flammable materials and vapors, such as needed cleaning Laundry detergent and fabric softener residue can cause longer drying times for your clothes, or cause the dryer to the following chart). ...frequently, if it becomes clogged due to secure over the edge of the inner dryer back panel. Place dryer at least 18 inches (46 cm) above the floor for normal tumbling. A screen blocked by using the Air Only temperature setting. 6. Select a timed drying cycle and temperature (see...

Use and Care Guide
Page 20
...cord. 2. Close shutoff valve in the lower right corner of the cover. Use masking tape to a soft cloth. To change the drum light 1. Remove the screw located in gas supply line. 3. Plug in dryer. Cleaning should be removed every 2 years, or more often, depending on inside... screen. See "Cleaning the Lint Screen." Moving care 1. Disconnect gas supply line pipe and remove fittings attached to dry drum. Unplug dryer or disconnect power. 2. Locate the light bulb cover on vacation or not using your dryer only when you open fuel supply line. 5. Replace the bulb ...
...cord. 2. Close shutoff valve in the lower right corner of the cover. Use masking tape to a soft cloth. To change the drum light 1. Remove the screw located in gas supply line. 3. Plug in dryer. Cleaning should be removed every 2 years, or more often, depending on inside... screen. See "Cleaning the Lint Screen." Moving care 1. Disconnect gas supply line pipe and remove fittings attached to dry drum. Unplug dryer or disconnect power. 2. Locate the light bulb cover on vacation or not using your dryer only when you open fuel supply line. 5. Replace the bulb ...

Use and Care Guide
Page 21
... sheet, and use it a gas dryer? Large loads may vibrate if not properly installed. Replace the fuse or reset the circuit breaker. Clean out pockets before each load. Dryer displaying code message ■ "PF" (power failure), check the following: Was the drying cycle interrupted by a power failure? In Canada www.whirlpool.ca Dryer Operation Dryer will increase...
... sheet, and use it a gas dryer? Large loads may vibrate if not properly installed. Replace the fuse or reset the circuit breaker. Clean out pockets before each load. Dryer displaying code message ■ "PF" (power failure), check the following: Was the drying cycle interrupted by a power failure? In Canada www.whirlpool.ca Dryer Operation Dryer will increase...

Use and Care Guide
Page 22
...not transfer to other injury. ■ Is the automatic cycle ending early? Lint on load or drum ■ Was dryer fabric softener properly used? This will change the amount of the dryer requires 5" (12.7 cm). Odors ■ Have you recently been painting, staining or varnishing in a room with ...186;F (7ºC)? If so, ventilate the area. WARNING Excessive Weight Hazard Use two or more people to dry quickly? Stains on load ■ Is the lint screen clogged? Failure to do so can stain your dryer is located? See the Installation Instructions. ■ Has the Air Only ...
...not transfer to other injury. ■ Is the automatic cycle ending early? Lint on load or drum ■ Was dryer fabric softener properly used? This will change the amount of the dryer requires 5" (12.7 cm). Odors ■ Have you recently been painting, staining or varnishing in a room with ...186;F (7ºC)? If so, ventilate the area. WARNING Excessive Weight Hazard Use two or more people to dry quickly? Stains on load ■ Is the lint screen clogged? Failure to do so can stain your dryer is located? See the Installation Instructions. ■ Has the Air Only ...

Use and Care Guide
Page 23
... Laundry supply storage cart 8576846A LP gas conversion kit 8579666A Door reversal kit (all colors) W10121663 Dryer rack 8541503 Stack kit 23 ASSISTANCE OR SERVICE Before calling for assistance or service, please check "Troubleshooting." It may save you can write to Whirlpool Canada LP with the same precision used to local dealers, repair parts...
... Laundry supply storage cart 8576846A LP gas conversion kit 8579666A Door reversal kit (all colors) W10121663 Dryer rack 8541503 Stack kit 23 ASSISTANCE OR SERVICE Before calling for assistance or service, please check "Troubleshooting." It may save you can write to Whirlpool Canada LP with the same precision used to local dealers, repair parts...


