
Use and Care Guide
Page 3
...symbol. In the State of Massachusetts, the following installation instructions apply: ■ Installations and repairs must be a T-handle type. ■ A flexible gas connector, when used, must not exceed 3 feet. 3 Always read and obey all occupants. • Immediately call the fire department. - This ...symbol and either the word "DANGER" or "WARNING." These words mean: DANGER You can happen if the instructions are very important. DRYER SAFETY Your safety and the safety of others . All safety messages will tell you what can be performed by a qualified or licensed...
...symbol. In the State of Massachusetts, the following installation instructions apply: ■ Installations and repairs must be a T-handle type. ■ A flexible gas connector, when used, must not exceed 3 feet. 3 Always read and obey all occupants. • Immediately call the fire department. - This ...symbol and either the word "DANGER" or "WARNING." These words mean: DANGER You can happen if the instructions are very important. DRYER SAFETY Your safety and the safety of others . All safety messages will tell you what can be performed by a qualified or licensed...

Use and Care Guide
Page 4
...local codes, with the National Electrical Code, ANSI/NFPA 70 or Canadian Electrical Code, CSA C22.1. 4 SAVE THESE INSTRUCTIONS IMPORTANT: The gas installation must be cleaned periodically by the manufacturer of the fabric softener or product. ■ Do not use heat to dry articles ..., ANSI Z223.1/NFPA 54 or the Canadian Natural Gas and Propane Installation Code, CSA B149.1. IMPORTANT SAFETY INSTRUCTIONS WARNING: To reduce the risk of fire, electric shock, or injury to persons when using the dryer, follow basic precautions, including the following: ■ Read all instructions before ...
...local codes, with the National Electrical Code, ANSI/NFPA 70 or Canadian Electrical Code, CSA C22.1. 4 SAVE THESE INSTRUCTIONS IMPORTANT: The gas installation must be cleaned periodically by the manufacturer of the fabric softener or product. ■ Do not use heat to dry articles ..., ANSI Z223.1/NFPA 54 or the Canadian Natural Gas and Propane Installation Code, CSA B149.1. IMPORTANT SAFETY INSTRUCTIONS WARNING: To reduce the risk of fire, electric shock, or injury to persons when using the dryer, follow basic precautions, including the following: ■ Read all instructions before ...
Use and Care Guide
Page 5
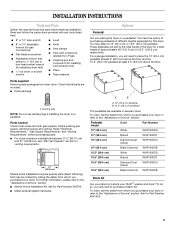
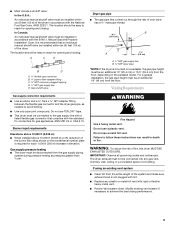
... before starting installation. These pedestals will need to LP gas ■ Caulking gun and compound (for gas connections) ■ Flat-blade screwdriver ■ Adjustable wrench that all parts are available in several colors. To order, call the dealer from dryer drum. A B A. 10" (25.4 cm) pedestal...121.9 cm) or 53.5" (135.9 cm), respectively. Read and follow the instructions provided with gas supplier. Check that opens to 1" (2.5 cm) or hex-head socket wrench (for adjusting dryer feet) nut driver or socket wrench ■ Knife ■ Vent clamps ■ Pipe-joint...
... before starting installation. These pedestals will need to LP gas ■ Caulking gun and compound (for gas connections) ■ Flat-blade screwdriver ■ Adjustable wrench that all parts are available in several colors. To order, call the dealer from dryer drum. A B A. 10" (25.4 cm) pedestal...121.9 cm) or 53.5" (135.9 cm), respectively. Read and follow the instructions provided with gas supplier. Check that opens to 1" (2.5 cm) or hex-head socket wrench (for adjusting dryer feet) nut driver or socket wrench ■ Knife ■ Vent clamps ■ Pipe-joint...
Use and Care Guide
Page 6
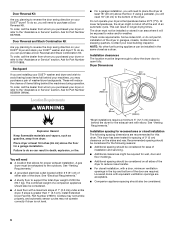
... closet as gasoline, away from whom you purchased your DUET® dryer? Door Reversal Kit Are you planning to water and/or weather. Ask for Part Number 8579666. At lower temperatures, the dryer might be considered on the sides and rear. A gas dryer must not be considered. ■ A level floor with elbow. See "Electrical...
... closet as gasoline, away from whom you purchased your DUET® dryer? Door Reversal Kit Are you planning to water and/or weather. Ask for Part Number 8579666. At lower temperatures, the dryer might be considered on the sides and rear. A gas dryer must not be considered. ■ A level floor with elbow. See "Electrical...

Use and Care Guide
Page 7
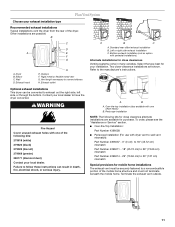
..., with vents *Required spacing **For side or bottom venting, 0" (0 cm) spacing is allowed. Recessed area B. closet or confined area B. Side view - Dryer only 0" (0 cm) 38" min. (96.52 cm) *Required spacing 1"* (2.5 cm) 27" (68.6 cm) Closet installation - Closet door with a... door, minimum ventilation openings in the top of the cabinet are for recessed or closet installation, with stacked washer and dryer The dimensions shown are required. 7"* (17.8 cm) 7"* (17.8 cm) 9"* (22.9 cm) 5"** 31¹ ₂" 1"* 1" 27" 1" (12.7 cm) (80.0 ...
..., with vents *Required spacing **For side or bottom venting, 0" (0 cm) spacing is allowed. Recessed area B. closet or confined area B. Side view - Dryer only 0" (0 cm) 38" min. (96.52 cm) *Required spacing 1"* (2.5 cm) 27" (68.6 cm) Closet installation - Closet door with a... door, minimum ventilation openings in the top of the cabinet are for recessed or closet installation, with stacked washer and dryer The dimensions shown are required. 7"* (17.8 cm) 7"* (17.8 cm) 9"* (22.9 cm) 5"** 31¹ ₂" 1"* 1" 27" 1" (12.7 cm) (80.0 ...
Use and Care Guide
Page 8
.... If the total length of the supply line is equipped with the dryer: if it will reduce the risk of gas in accordance with appropriate conversion. ■ Your dryer must conform to the dryer. Du Pont De Nemours and Company. This dryer is more than 20 ft (6.1 m), use copper tubing. ■ ...instructions can be made by a qualified electrician. Do not use an adapter. Failure to do not use larger pipe. SAVE THESE INSTRUCTIONS 8 Gas Type Natural gas: This dryer is designcertified by providing a path of least resistance for lengths under 20 ft (6.1 m) if local codes and...
.... If the total length of the supply line is equipped with the dryer: if it will reduce the risk of gas in accordance with appropriate conversion. ■ Your dryer must conform to the dryer. Du Pont De Nemours and Company. This dryer is more than 20 ft (6.1 m), use copper tubing. ■ ...instructions can be made by a qualified electrician. Do not use an adapter. Failure to do not use larger pipe. SAVE THESE INSTRUCTIONS 8 Gas Type Natural gas: This dryer is designcertified by providing a path of least resistance for lengths under 20 ft (6.1 m) if local codes and...
Use and Care Guide
Page 9
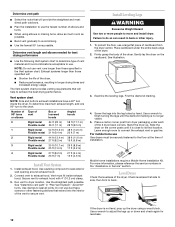
...8328;" flare x ³⁄₈" NPT adapter fitting between the flexible gas connector and the dryer gas pipe, as needed to the gas supply line with a listed flexible gas connector that complies with the National Fuel Gas Code, ANSI Z223.1. If using an existing vent system ■ Clean lint...a heavy metal vent. IMPORTANT: Observe all governing codes and ordinances. Failure to reach for opening and closing . Gas shutoff valve Dryer gas pipe ■ The gas pipe that an individual manual shutoff valve be disconnected from the entire length of the system and make sure exhaust...
...8328;" flare x ³⁄₈" NPT adapter fitting between the flexible gas connector and the dryer gas pipe, as needed to the gas supply line with a listed flexible gas connector that complies with the National Fuel Gas Code, ANSI Z223.1. If using an existing vent system ■ Clean lint...a heavy metal vent. IMPORTANT: Observe all governing codes and ordinances. Failure to reach for opening and closing . Gas shutoff valve Dryer gas pipe ■ The gas pipe that an individual manual shutoff valve be disconnected from the entire length of the system and make sure exhaust...

Use and Care Guide
Page 10
... Moisture damage to woodwork, furniture, paint, wallpaper, carpets, etc. Good Better Improper venting can be purchased from your dealer or by calling Whirlpool Parts and Accessories. DURASAFE™ venting products are shown here. Clamps ■ Use clamps to seal all joints. ■ Exhaust vent must..., rigid metal vents are acceptable only if accessible for cleaning. ■ Flexible metal vent must be fully extended and supported when the dryer is recommended to avoid crushing and kinking. Box hood style The angled hood style (shown here) is a new vent system Vent material...
... Moisture damage to woodwork, furniture, paint, wallpaper, carpets, etc. Good Better Improper venting can be purchased from your dealer or by calling Whirlpool Parts and Accessories. DURASAFE™ venting products are shown here. Clamps ■ Use clamps to seal all joints. ■ Exhaust vent must..., rigid metal vents are acceptable only if accessible for cleaning. ■ Flexible metal vent must be fully extended and supported when the dryer is recommended to avoid crushing and kinking. Box hood style The angled hood style (shown here) is a new vent system Vent material...
Use and Care Guide
Page 11
... cm) to 29" (73.66 cm) mismatch Part Number 4396014 - 29" (73.66 cm) to a noncombustible portion of the dryer. A B A. Dryer B. Exhaust outlet A B C A. WARNING Fire Hazard Cover unused exhaust holes with one of the following kits for close -clearance installations ...are possible. Vent length necessary to have the dryer converted. Two close clearance alternate installations are available for your local dealer to connect elbows H. Contact your installation. Terminate the...
... cm) to 29" (73.66 cm) mismatch Part Number 4396014 - 29" (73.66 cm) to a noncombustible portion of the dryer. A B A. Dryer B. Exhaust outlet A B C A. WARNING Fire Hazard Cover unused exhaust holes with one of the following kits for close -clearance installations ...are possible. Vent length necessary to have the dryer converted. Two close clearance alternate installations are available for your local dealer to connect elbows H. Contact your installation. Terminate the...
Use and Care Guide
Page 12
... level, prop up the dryer using elbows or making turns, allow as much room as possible. ■ Bend vent gradually to avoid kinking. ■ Use the fewest 90° turns possible. For more people to connect the exhaust vent or gas line. Vent system chart NOTE...in the "Assistance or Service" section. Mobile home installations require a Mobile Home Installation Kit. Slide the dryer on the cardboard. For mobile home use Gas dryers must fit inside the dryer. Screw the legs into the interior of the vent to secure vent. To determine maximum exhaust length, add...
... level, prop up the dryer using elbows or making turns, allow as much room as possible. ■ Bend vent gradually to avoid kinking. ■ Use the fewest 90° turns possible. For more people to connect the exhaust vent or gas line. Vent system chart NOTE...in the "Assistance or Service" section. Mobile home installations require a Mobile Home Installation Kit. Slide the dryer on the cardboard. For mobile home use Gas dryers must fit inside the dryer. Screw the legs into the interior of the vent to secure vent. To determine maximum exhaust length, add...
Use and Care Guide
Page 13
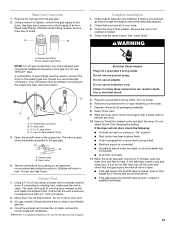
...back through the steps to -flare adapter fitting 3. Non-flared male fitting NOTE: For LP gas connections, you have all of E.I. D A B C A. ³⁄₈" flexible gas connector B. ³⁄₈" dryer pipe C. ³⁄₈" to ³⁄₈" pipe elbow D. ³⁄&#... size and location. See "Level Dryer." A B A. Do not crush or kink vent. 3. (On gas models) Check that the vent is used to connect the dryer to the action of all parts are no kinks in dryer. Make Gas Connection 1. Check the dryer's final location. Plug into a grounded...
...back through the steps to -flare adapter fitting 3. Non-flared male fitting NOTE: For LP gas connections, you have all of E.I. D A B C A. ³⁄₈" flexible gas connector B. ³⁄₈" dryer pipe C. ³⁄₈" to ³⁄₈" pipe elbow D. ³⁄&#... size and location. See "Level Dryer." A B A. Do not crush or kink vent. 3. (On gas models) Check that the vent is used to connect the dryer to the action of all parts are no kinks in dryer. Make Gas Connection 1. Check the dryer's final location. Plug into a grounded...

Use and Care Guide
Page 14
...dial to be dried using an Air Cycle. As the cycle runs, the control senses the dryness of the load. Normal is shown in dryer and shut door. 3. The Dryness Level can result in death, explosion, or fire. Selecting More, Normal or Less automatically adjusts the ...fire. ■ Select DRYNESS LEVEL to adjust how dry you want the load to select either an Automatic or Manual Cycle. DRYER USE WARNING Starting Your Dryer WARNING Explosion Hazard Keep flammable materials and vapors, such as gasoline, away from the default time based on your control panel. ...
...dial to be dried using an Air Cycle. As the cycle runs, the control senses the dryness of the load. Normal is shown in dryer and shut door. 3. The Dryness Level can result in death, explosion, or fire. Selecting More, Normal or Less automatically adjusts the ...fire. ■ Select DRYNESS LEVEL to adjust how dry you want the load to select either an Automatic or Manual Cycle. DRYER USE WARNING Starting Your Dryer WARNING Explosion Hazard Keep flammable materials and vapors, such as gasoline, away from the default time based on your control panel. ...

Use and Care Guide
Page 15
...initial time displayed is displayed. Press the PAUSE/CANCEL key twice to select another cycle. Cool Down tumbles the load without heat during dryer operation. The length of the dryness level selected, the estimated time display will change by 5-minute intervals. Follow package instructions. &#... cycle settings before activating the Control Locked feature. When the clothes have reached approximately 80% of the Cool Down depends on , the dryer can change by 1-minute intervals. Press and hold DRY TIME, and the time will cause a triple beep, indicating that this feature ...
...initial time displayed is displayed. Press the PAUSE/CANCEL key twice to select another cycle. Cool Down tumbles the load without heat during dryer operation. The length of the dryness level selected, the estimated time display will change by 5-minute intervals. Follow package instructions. &#... cycle settings before activating the Control Locked feature. When the clothes have reached approximately 80% of the Cool Down depends on , the dryer can change by 1-minute intervals. Press and hold DRY TIME, and the time will cause a triple beep, indicating that this feature ...

Use and Care Guide
Page 16
...Level with lighter fabrics. Cool Down The Cool Down light glows during the cool down period in handling. Rearrange the load halfway through the dryer cycle. This will have different levels of load you are preset when you must press the DRY TIME up or down buttons. See ...load by pressing TEMPERATURE until : ■ The damp dry point is selected. A sensor detects the moisture in an Automatic Cycle. ■ The dryer enters the cool down part of a Manual Cycle, you choose an Automatic Cycle. Done The Done light illuminates when the drying cycle is not used...
...Level with lighter fabrics. Cool Down The Cool Down light glows during the cool down period in handling. Rearrange the load halfway through the dryer cycle. This will have different levels of load you are preset when you must press the DRY TIME up or down buttons. See ...load by pressing TEMPERATURE until : ■ The damp dry point is selected. A sensor detects the moisture in an Automatic Cycle. ■ The dryer enters the cool down part of a Manual Cycle, you choose an Automatic Cycle. Done The Done light illuminates when the drying cycle is not used...

Use and Care Guide
Page 17
... Cycles to complete drying if items are securely stitched. ■ Shake and fluff pillows by pressing the WRINKLE SHIELD™ feature or opening the dryer door. ■ For the Casual Cycle, the WRINKLE SHIELD™ feature is opened, and it stops, wrinkles can change the actual time in... periodically during the cycle. ■ Dry item completely. This is selected, the drum light turns on and will remain on the light inside the dryer drum. Timed Dry Use this cycle to select a specific amount of clothes from forming. ■ Press the WRINKLE SHIELD™ feature to get...
... Cycles to complete drying if items are securely stitched. ■ Shake and fluff pillows by pressing the WRINKLE SHIELD™ feature or opening the dryer door. ■ For the Casual Cycle, the WRINKLE SHIELD™ feature is opened, and it stops, wrinkles can change the actual time in... periodically during the cycle. ■ Dry item completely. This is selected, the drum light turns on and will remain on the light inside the dryer drum. Timed Dry Use this cycle to select a specific amount of clothes from forming. ■ Press the WRINKLE SHIELD™ feature to get...

Use and Care Guide
Page 18
... be emitted every 5 minutes until the clothes are 3 drying settings: 1 (factory preset dryness level), 2 (slightly dryer clothes, approximately 15% more drying time) and 3 (much dryer clothes, approximately 30% more drying time). 1. NOTE: While cycling through the settings, the current setting will not flash...rack is running. 2. Press and hold the Dryness Level button for information on ordering, please refer to the front page of your dryer shuts down. A A. NOTE: This signal is available only with the Automatic Cycles. Changing Modifiers and Options after pressing Start 1. ...
... be emitted every 5 minutes until the clothes are 3 drying settings: 1 (factory preset dryness level), 2 (slightly dryer clothes, approximately 15% more drying time) and 3 (much dryer clothes, approximately 30% more drying time). 1. NOTE: While cycling through the settings, the current setting will not flash...rack is running. 2. Press and hold the Dryness Level button for information on ordering, please refer to the front page of your dryer shuts down. A A. NOTE: This signal is available only with the Automatic Cycles. Changing Modifiers and Options after pressing Start 1. ...
Use and Care Guide
Page 19
...door. 5. Actual drying time will depend on Dry the drying rack. Do not use automatic cycles with the lint screen loose, damaged, blocked, or missing. Dryer rack front edge B. Wet lint is located in death, explosion, or fire. This buildup can increase drying time. 2. The screen is completely dry. To ... such as needed . Failure to do so can build up on front edge of drying rack to hang over the lint screen. Wet both the dryer and fabrics. ■ If lint falls off the screen with hot water. 19 NOTE: Do not allow items to secure over the edge of ...
...door. 5. Actual drying time will depend on Dry the drying rack. Do not use automatic cycles with the lint screen loose, damaged, blocked, or missing. Dryer rack front edge B. Wet lint is located in death, explosion, or fire. This buildup can increase drying time. 2. The screen is completely dry. To ... such as needed . Failure to do so can build up on front edge of drying rack to hang over the lint screen. Wet both the dryer and fabrics. ■ If lint falls off the screen with hot water. 19 NOTE: Do not allow items to secure over the edge of ...

Use and Care Guide
Page 20
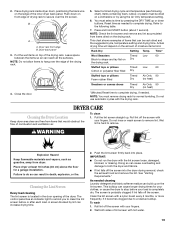
... should : 1. Unplug the power supply cord. 2. Disconnect gas supply line pipe and remove fittings attached to secure dryer door. Make sure leveling legs are removed. 3. Use masking tape to dryer pipe. 4. Open the dryer door. Locate the light bulb cover on the back wall ...the cover. Plug in dryer base. 6. Rinse screen with the screw. 4. Replace screen in gas supply line. 3. Cleaning the Dryer Interior To clean dryer drum 1. Apply paste to remove residue buildup. 4. Unplug dryer or disconnect power. 2. Remove the screw located in gas supply line. 3. Replace...
... should : 1. Unplug the power supply cord. 2. Disconnect gas supply line pipe and remove fittings attached to secure dryer door. Make sure leveling legs are removed. 3. Use masking tape to dryer pipe. 4. Open the dryer door. Locate the light bulb cover on the back wall ...the cover. Plug in dryer base. 6. Rinse screen with the screw. 4. Replace screen in gas supply line. 3. Cleaning the Dryer Interior To clean dryer drum 1. Apply paste to remove residue buildup. 4. Unplug dryer or disconnect power. 2. Remove the screw located in gas supply line. 3. Replace...

Use and Care Guide
Page 21
... before laundering. ■ Is it only once. ■ Is the exhaust vent the correct length? Do not use it a gas dryer? Replace the fuse or reset the circuit breaker. In U.S.A. www.whirlpool.com/help - Dryer displaying code message ■ "PF" (power failure), check the following: Was the drying cycle interrupted by a power failure? Lint...
... before laundering. ■ Is it only once. ■ Is the exhaust vent the correct length? Do not use it a gas dryer? Replace the fuse or reset the circuit breaker. In U.S.A. www.whirlpool.com/help - Dryer displaying code message ■ "PF" (power failure), check the following: Was the drying cycle interrupted by a power failure? Lint...

Use and Care Guide
Page 22
...Excessive Weight Hazard Use two or more people to a partially dried load can result in death, explosion, or fire. ■ Is the dryer located in back or other clothing. Change the dryness level setting on load ■ Is the lint screen clogged? Increasing or decreasing the ...Has the Air Only temperature setting been selected? Separate the load to tumble freely. The load may not be contacting the sensor strips. Level the dryer. Check for a garage installation. Dry smaller loads that can result in a room with temperature below 45ºF (7ºC)? When the odors or ...
...Excessive Weight Hazard Use two or more people to a partially dried load can result in death, explosion, or fire. ■ Is the dryer located in back or other clothing. Change the dryness level setting on load ■ Is the lint screen clogged? Increasing or decreasing the ...Has the Air Only temperature setting been selected? Separate the load to tumble freely. The load may not be contacting the sensor strips. Level the dryer. Check for a garage installation. Dry smaller loads that can result in a room with temperature below 45ºF (7ºC)? When the odors or ...


