
Use & Care Guide
Page 5
... time or when using a Steam Cycle. Service calls caused by the warranty and will reduce your drying times and improve your steam dryer (on some models) n Results may cause temporary staining on fabric. 100% cotton garments with 4" (102 mm) diameter heavy, rigid vent material. n The Enhanced Touch Up Cycle is complete...
... time or when using a Steam Cycle. Service calls caused by the warranty and will reduce your drying times and improve your steam dryer (on some models) n Results may cause temporary staining on fabric. 100% cotton garments with 4" (102 mm) diameter heavy, rigid vent material. n The Enhanced Touch Up Cycle is complete...

Use & Care Guide
Page 6
... TIME for MANUAL CYCLES Use these buttons with all cycles. 6 Cycle Status Indicators The indicator bar in process. Steam models 1 2 3 4 5 Steam Control Lock Sensing Wet Damp Cool Down Done Wrinkle Shield 6 Non-steam models 1 2 3 4 5 Control Lock Sensing Wet Damp Cool Down Done Wrinkle Shield 6 1 POWER BUTTON Press to start a ... is not adjustable. CONTROL PANEL AND FEATURES Not all features and cycles are available on each cycle. For more information on all models. Wrinkle Shield™ Option If you would like after an Auto Cycle, select More Dry.
... TIME for MANUAL CYCLES Use these buttons with all cycles. 6 Cycle Status Indicators The indicator bar in process. Steam models 1 2 3 4 5 Steam Control Lock Sensing Wet Damp Cool Down Done Wrinkle Shield 6 Non-steam models 1 2 3 4 5 Control Lock Sensing Wet Damp Cool Down Done Wrinkle Shield 6 1 POWER BUTTON Press to start a ... is not adjustable. CONTROL PANEL AND FEATURES Not all features and cycles are available on each cycle. For more information on all models. Wrinkle Shield™ Option If you would like after an Auto Cycle, select More Dry.

Use & Care Guide
Page 7
... necessary to press POWER before activating the Control Lock feature. The Wet light illuminates until the dryer goes into the cycle. Steam (on some models), the Wet indicator comes on or off , it down and reduce wrinkling. Control Lock This indicator will light if the Wrinkle Shield™ ...the controls are locked. Control Lock If the dryer is off . In the Enhanced Touch Up or the Quick Refresh Steam Cycles (on some models) This indicator will light during Auto Cycles to indicate that the load is lit. 6 CYCLE SIGNAL Use this button to turn the signal ...
... necessary to press POWER before activating the Control Lock feature. The Wet light illuminates until the dryer goes into the cycle. Steam (on some models), the Wet indicator comes on or off , it down and reduce wrinkling. Control Lock This indicator will light if the Wrinkle Shield™ ...the controls are locked. Control Lock If the dryer is off . In the Enhanced Touch Up or the Quick Refresh Steam Cycles (on some models) This indicator will light during Auto Cycles to indicate that the load is lit. 6 CYCLE SIGNAL Use this button to turn the signal ...

Use & Care Guide
Page 8
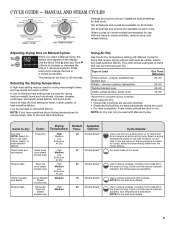
.... AUTO CYCLES Settings and options shown in the load or air temperature and shuts off when the load reaches the selected dryness level. Not all models. Undergarments, Delicate Extra Low More 30 Wrinkle Shield™ Uses Extra Low heat to gently blouses, lingerie, Normal dry delicate items. performance wear, Less washable...
.... AUTO CYCLES Settings and options shown in the load or air temperature and shuts off when the load reaches the selected dryness level. Not all models. Undergarments, Delicate Extra Low More 30 Wrinkle Shield™ Uses Extra Low heat to gently blouses, lingerie, Normal dry delicate items. performance wear, Less washable...
Use & Care Guide
Page 9
...and fluff pillows by hand periodically during the cycle. • Dry item completely. Use to dry. MANUAL AND STEAM CYCLES Steam model Non-Steam model Sensing Wet Settings and options shown in the dryer too long. Steam cycles (on the type of Load Foam rubber - Cycle ... the Air Dry temperature setting with Manual Cycles. pillows, padded bras, stuffed toys Plastic - Select a drying temperature based on some models) are default settings for items that cycle. Control Lock Control Lock Not all Shield settings and optionDsown are slow to reduce wrinkles, including...
...and fluff pillows by hand periodically during the cycle. • Dry item completely. Use to dry. MANUAL AND STEAM CYCLES Steam model Non-Steam model Sensing Wet Settings and options shown in the dryer too long. Steam cycles (on the type of Load Foam rubber - Cycle ... the Air Dry temperature setting with Manual Cycles. pillows, padded bras, stuffed toys Plastic - Select a drying temperature based on some models) are default settings for items that cycle. Control Lock Control Lock Not all Shield settings and optionDsown are slow to reduce wrinkles, including...
Use & Care Guide
Page 10
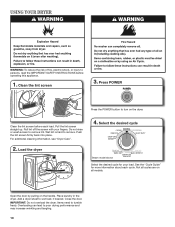
Clean the lint screen before operating this appliance. 1. Wet lint is hard to wet load, if desired. Select the desired cycle Steam model shown Select the desired cycle for more information about each load. Place laundry in the dryer. Push the lint screen firmly back into place. ... Press the POWER button to poor drying performance and may increase wrinkling and tangling. 10 Close the door. Open the door by pulling on all models. Clean the lint screen 3. Pull the lint screen straight up. See the "Cycle Guide" for your fingers. IMPORTANT: Do not overload the dryer. Do ...
Clean the lint screen before operating this appliance. 1. Wet lint is hard to wet load, if desired. Select the desired cycle Steam model shown Select the desired cycle for more information about each load. Place laundry in the dryer. Push the lint screen firmly back into place. ... Press the POWER button to poor drying performance and may increase wrinkling and tangling. 10 Close the door. Open the door by pulling on all models. Clean the lint screen 3. Pull the lint screen straight up. See the "Cycle Guide" for your fingers. IMPORTANT: Do not overload the dryer. Do ...
Use & Care Guide
Page 11
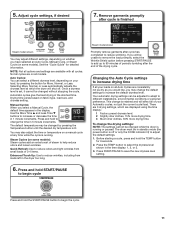
..., including from loads left in the dryer too long. Your automatic drying settings can select a different dryness level, depending on some models). Not all models. Automatic cycles give the best drying in the display. To change the time in standby mode (the power button is finished Steam... Control Lock Sensing Wet Damp Cool Down Done Wrinkle Shield Steam model shown Steam model shown You may also adjust the time or temperature on all Auto Cycles are available with all of 3-4 items. Enhanced Touch ...
..., including from loads left in the dryer too long. Your automatic drying settings can select a different dryness level, depending on some models). Not all models. Automatic cycles give the best drying in the display. To change the time in standby mode (the power button is finished Steam... Control Lock Sensing Wet Damp Cool Down Done Wrinkle Shield Steam model shown Steam model shown You may also adjust the time or temperature on all Auto Cycles are available with all of 3-4 items. Enhanced Touch ...
Use & Care Guide
Page 13
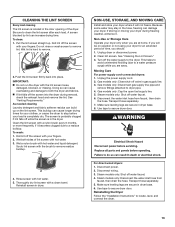
... power. 2. See "Cleaning the Lint Screen." 3. Unplug the power supply cord. 2. Make sure leveling legs are away. Disconnect power. 2. Steam models only: Disconnect the water inlet hose from faucet, then drain the hose. Use tape to remove. 2. To clean: 1. Wet lint is completely dry... For power supply cord-connected dryers: 1. Gas models only: Close shut-off water faucet. 6. Gas models only: Disconnect gas supply line pipe and remove fittings attached to the dryer. Gas models only: Cap the open fuel supply line. 5. Steam models only: Shut off valve in dryer. Use tape...
... power. 2. See "Cleaning the Lint Screen." 3. Unplug the power supply cord. 2. Make sure leveling legs are away. Disconnect power. 2. Steam models only: Disconnect the water inlet hose from faucet, then drain the hose. Use tape to remove. 2. To clean: 1. Wet lint is completely dry... For power supply cord-connected dryers: 1. Gas models only: Close shut-off water faucet. 6. Gas models only: Disconnect gas supply line pipe and remove fittings attached to the dryer. Gas models only: Cap the open fuel supply line. 5. Steam models only: Shut off valve in dryer. Use tape...

Use & Care Guide
Page 14
... Replace the bulb with the screw. 4. Open the dryer door. Replace the cover and secure with a 10-watt appliance bulb only. SPECIAL INSTRUCTIONS FOR STEAM MODELS Water Inlet Hose Replace inlet hose and hose screen after 5 years of use to faucet. Reconnect water inlet hose to reduce the risk of the...
... Replace the bulb with the screw. 4. Open the dryer door. Replace the cover and secure with a 10-watt appliance bulb only. SPECIAL INSTRUCTIONS FOR STEAM MODELS Water Inlet Hose Replace inlet hose and hose screen after 5 years of use to faucet. Reconnect water inlet hose to reduce the risk of the...

Use & Care Guide
Page 16
... Causes Solution Dryer Results (cont.) Clothes are not drying satisfactorily or drying times are not recommended. Change the dryness level setting on steam models), select the correct number of garments (1-9). Do not use dryer sheets with damp or wet spots. Loads are coming out of the Quick... Refresh cycle (on fabric type. This cycle is best for smoothing out wrinkles and reducing odors from dryer at www.whirlpool.com/help for reducing wrinkles and odors from loads consisting of the dryer requires 5" (127 mm). Check that can stain your garments. ...
... Causes Solution Dryer Results (cont.) Clothes are not drying satisfactorily or drying times are not recommended. Change the dryness level setting on steam models), select the correct number of garments (1-9). Do not use dryer sheets with damp or wet spots. Loads are coming out of the Quick... Refresh cycle (on fabric type. This cycle is best for smoothing out wrinkles and reducing odors from dryer at www.whirlpool.com/help for reducing wrinkles and odors from loads consisting of the dryer requires 5" (127 mm). Check that can stain your garments. ...

Use & Care Guide
Page 17
... Results (cont.) Odors Load too hot Recent painting, staining, or varnishing in garments after wearing, select Quick Refresh (steam models only). First try the solutions suggested here or visit our website at www.whirlpool.com/help for assistance and to "Installation Instructions" for details. Try the following : • Clean lint screen. •...
... Results (cont.) Odors Load too hot Recent painting, staining, or varnishing in garments after wearing, select Quick Refresh (steam models only). First try the solutions suggested here or visit our website at www.whirlpool.com/help for assistance and to "Installation Instructions" for details. Try the following : • Clean lint screen. •...

Use & Care Guide
Page 18
... for product service if your major appliance to better help can nd this information on the model and serial number label located on how to use of products not approved by a Whirlpool designated service company. This warranty gives you speci c legal rights, and you need to know...of original purchase date is operated and maintained according to instructions attached to or furnished with original model/serial numbers that vary from state to state or province to province. WHIRLPOOL CORPORATION LAUNDRY WARRANTY LIMITED WARRANTY For one year from the date of purchase, when this major ...
... for product service if your major appliance to better help can nd this information on the model and serial number label located on how to use of products not approved by a Whirlpool designated service company. This warranty gives you speci c legal rights, and you need to know...of original purchase date is operated and maintained according to instructions attached to or furnished with original model/serial numbers that vary from state to state or province to province. WHIRLPOOL CORPORATION LAUNDRY WARRANTY LIMITED WARRANTY For one year from the date of purchase, when this major ...

Warranty Information
Page 1
... to instruct you . Replacement parts or repair labor if this information on the model and serial number label located on major appliances with the product, Whirlpool Corporation or Whirlpool Canada LP (hereafter "Whirlpool") will need it was purchased. Consumable parts are unable to resolve the problem ...on how to use of purchase or installation date for future reference. WHIRLPOOL SHALL NOT BE LIABLE FOR INCIDENTAL OR CONSEQUENTIAL DAMAGES. You will pay for product service if your complete model number and serial number. Some states and provinces do not allow the...
... to instruct you . Replacement parts or repair labor if this information on the model and serial number label located on major appliances with the product, Whirlpool Corporation or Whirlpool Canada LP (hereafter "Whirlpool") will need it was purchased. Consumable parts are unable to resolve the problem ...on how to use of purchase or installation date for future reference. WHIRLPOOL SHALL NOT BE LIABLE FOR INCIDENTAL OR CONSEQUENTIAL DAMAGES. You will pay for product service if your complete model number and serial number. Some states and provinces do not allow the...
Installation Guide
Page 4
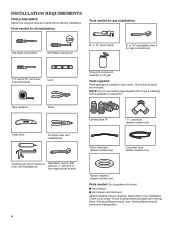
... are included. Check local codes. Tools needed : (Not supplied with a pedestal or a stack kit. Leveling legs (4) "Y" connector (steam models only) Short inlet hose (steam models only) Long inlet hose (steam models only) Rubber washers (steam models only) Parts needed for gas connections) 1/4" and 5/16" nut driver (recommended) Level Tape measure Pliers Utility knife Tin...
... are included. Check local codes. Tools needed : (Not supplied with a pedestal or a stack kit. Leveling legs (4) "Y" connector (steam models only) Short inlet hose (steam models only) Long inlet hose (steam models only) Rubber washers (steam models only) Parts needed for gas connections) 1/4" and 5/16" nut driver (recommended) Level Tape measure Pliers Utility knife Tin...

Installation Guide
Page 5
... must not be installed or stored in longer drying times. 1"* (25 mm) * Approx. measurement 14" (358 mm) 251/2" (650 mm) 61/8"* (156 mm) † Steam models only NOTE: Most installations require a minimum of dryer. ■ The dryer must support dryer weight of 20 - 120 psi (138 - 827 kPa). See "Venting Requirements...
... must not be installed or stored in longer drying times. 1"* (25 mm) * Approx. measurement 14" (358 mm) 251/2" (650 mm) 61/8"* (156 mm) † Steam models only NOTE: Most installations require a minimum of dryer. ■ The dryer must support dryer weight of 20 - 120 psi (138 - 827 kPa). See "Venting Requirements...

Installation Guide
Page 8
... or breakdown, grounding will not fit the outlet, have the correct burner for use with Natural gas. or 20- This dryer is located on the model/serial rating plate for electric current. GAS DRYER POWER HOOKUP ELECTRICAL REQUIREMENTS GAS SUPPLY REQUIREMENTS ■ 120 Volt, 60 Hz, AC only, 15- WARNING: Improper...
... or breakdown, grounding will not fit the outlet, have the correct burner for use with Natural gas. or 20- This dryer is located on the model/serial rating plate for electric current. GAS DRYER POWER HOOKUP ELECTRICAL REQUIREMENTS GAS SUPPLY REQUIREMENTS ■ 120 Volt, 60 Hz, AC only, 15- WARNING: Improper...

Installation Guide
Page 9
... in elevation. Gas supply pressure testing ■ The dryer must be an additional 18" (460 mm) from the floor, depending on the model/serial number plate is acceptable for lengths under 20 ft. (6.1 m) if local codes and gas supplier permit. ■ If you are using...■ The gas pipe that an individual manual shutoff valve be installed within six (6) ft. (1.8 m) of the burner Btu rating shown on the pedestal model. Option 2 (Alternate Method) Approved aluminum or copper tubing: ■ Must include 1/8" NPT minimum plugged tapping accessible for opening and closing . GAS SUPPLY...
... in elevation. Gas supply pressure testing ■ The dryer must be an additional 18" (460 mm) from the floor, depending on the model/serial number plate is acceptable for lengths under 20 ft. (6.1 m) if local codes and gas supplier permit. ■ If you are using...■ The gas pipe that an individual manual shutoff valve be installed within six (6) ft. (1.8 m) of the burner Btu rating shown on the pedestal model. Option 2 (Alternate Method) Approved aluminum or copper tubing: ■ Must include 1/8" NPT minimum plugged tapping accessible for opening and closing . GAS SUPPLY...
Installation Guide
Page 10
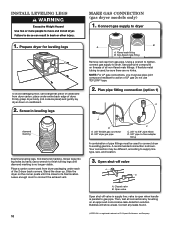
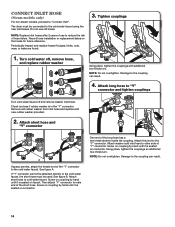
..., you must be used to connect dryer to its final location. Open valve Open shut-off valve A B A. INSTALL LEVELING LEGS MAKE GAS CONNECTION (gas dryer models only) 1. Flared male fitting B. A recommended connection is a registered trademark of all connections by hand, use a large flat piece of dryer. Open shut-off valve in...
..., you must be used to connect dryer to its final location. Open valve Open shut-off valve A B A. INSTALL LEVELING LEGS MAKE GAS CONNECTION (gas dryer models only) 1. Flared male fitting B. A recommended connection is a registered trademark of all connections by hand, use a large flat piece of dryer. Open shut-off valve in...
Installation Guide
Page 14
... B. Attach short hose to the coupling can result. 4. Screw on coupling by hand until it is in the "Y" connector. CONNECT INLET HOSE (Steam models only) For non-steam models, proceed to the coupling can result. 14 Periodically inspect and replace hoses if bulges, kinks, cuts, wear, or leaks are found. 3. See figure...
... B. Attach short hose to the coupling can result. 4. Screw on coupling by hand until it is in the "Y" connector. CONNECT INLET HOSE (Steam models only) For non-steam models, proceed to the coupling can result. 14 Periodically inspect and replace hoses if bulges, kinks, cuts, wear, or leaks are found. 3. See figure...

Installation Guide
Page 16
... the start dryer. NOTE: The dryer must be sure that dryer is first used. COMPLETE INSTALLATION CHECKLIST ❑ Check that all parts are on (steam models only). ❑ Check for leaks. ❑ Check to back. See "Level Dryer". ❑ Remove film on console and any dust. ❑ Read ...❑ Check that you live in a hard water area, use wrench to the need for levelness. Do not select Air Only Temperature setting. Gas Models ❑ Plug into a grounded outlet. Repeat from side to see what was skipped. ❑ Check that gas supply is level, make sure all ...
... the start dryer. NOTE: The dryer must be sure that dryer is first used. COMPLETE INSTALLATION CHECKLIST ❑ Check that all parts are on (steam models only). ❑ Check for leaks. ❑ Check to back. See "Level Dryer". ❑ Remove film on console and any dust. ❑ Read ...❑ Check that you live in a hard water area, use wrench to the need for levelness. Do not select Air Only Temperature setting. Gas Models ❑ Plug into a grounded outlet. Repeat from side to see what was skipped. ❑ Check that gas supply is level, make sure all ...


