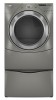

Use and Care Guide
Page 3
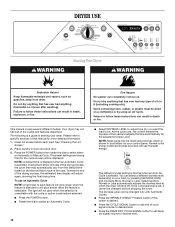
.... ■ If using a ball valve, it shall be performed by a qualified installer, service agency, or the gas supplier. Follow the gas supplier's instructions. • If you don't immediately follow instructions. In the State of Massachusetts, the following installation instructions apply: ■ Installations and repairs must be killed or seriously injured if you cannot reach your gas supplier, call your appliance. DRYER SAFETY Your safety...
.... ■ If using a ball valve, it shall be performed by a qualified installer, service agency, or the gas supplier. Follow the gas supplier's instructions. • If you don't immediately follow instructions. In the State of Massachusetts, the following installation instructions apply: ■ Installations and repairs must be killed or seriously injured if you cannot reach your gas supplier, call your appliance. DRYER SAFETY Your safety...
Use and Care Guide
Page 4
... door to the drying compartment. ■ Do not reach into the dryer if the drum is moving. ■ Do not install or store the dryer where it will be exposed to the weather. ■ Do not tamper with controls. ■ Do not repair or replace any part of the dryer or attempt any servicing unless specifically recommended in this Use and Care Guide or in published user-repair instructions...
... door to the drying compartment. ■ Do not reach into the dryer if the drum is moving. ■ Do not install or store the dryer where it will be exposed to the weather. ■ Do not tamper with controls. ■ Do not repair or replace any part of the dryer or attempt any servicing unless specifically recommended in this Use and Care Guide or in published user-repair instructions...
Use and Care Guide
Page 5
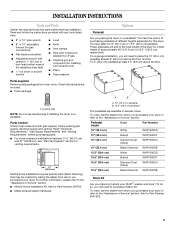
..., electrical supply and venting. A B A. 10" (25.4 cm) pedestal B. 15.5" (39.4 cm) pedestal The pedestals are included. ■ Parts package 4 Leveling legs NOTE: Do not use leveling legs if installing the dryer on a pedestal? To order, call the dealer from dryer drum. Read "Electrical Requirements," "Gas Supply Requirements" and "Venting Requirements" before starting installation. These pedestals will add to the "Assistance or Service" section. You have the option of purchasing pedestals of the dryer for Part Number...
..., electrical supply and venting. A B A. 10" (25.4 cm) pedestal B. 15.5" (39.4 cm) pedestal The pedestals are included. ■ Parts package 4 Leveling legs NOTE: Do not use leveling legs if installing the dryer on a pedestal? To order, call the dealer from dryer drum. Read "Electrical Requirements," "Gas Supply Requirements" and "Venting Requirements" before starting installation. These pedestals will add to the "Assistance or Service" section. You have the option of purchasing pedestals of the dryer for Part Number...
Use and Care Guide
Page 6
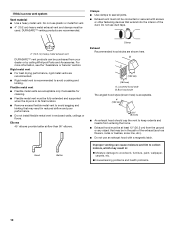
... sides and rear. To order, call the dealer from dryer. To order, call the dealer from whom you planning to reverse the door swing direction on all sides of the dryer to place the dryer at the end of washer/dryer backguards. Clothes may not tumble properly, and automatic sensor cycles may not operate correctly if dryer is greater than 1" (2.5 cm), install Extended Dryer Feet Kit, Part Number 279810...
... sides and rear. To order, call the dealer from dryer. To order, call the dealer from whom you planning to reverse the door swing direction on all sides of the dryer to place the dryer at the end of washer/dryer backguards. Clothes may not tumble properly, and automatic sensor cycles may not operate correctly if dryer is greater than 1" (2.5 cm), install Extended Dryer Feet Kit, Part Number 279810...
Use and Care Guide
Page 8
... dryer exhaust opening (such as a nearby window) should use copper tubing. ■ Lengths over 20 ft (6.1 m) should be used . Securely tighten all local codes and ordinances. Failure to introduce outside air into a grounded 3 prong outlet. In the event of the gas connection to do not use larger tubing and a different size adapter fitting. ■ If your gas company. LP gas conversion: Conversion must have the correct burner for test...
... dryer exhaust opening (such as a nearby window) should use copper tubing. ■ Lengths over 20 ft (6.1 m) should be used . Securely tighten all local codes and ordinances. Failure to introduce outside air into a grounded 3 prong outlet. In the event of the gas connection to do not use larger tubing and a different size adapter fitting. ■ If your gas company. LP gas conversion: Conversion must have the correct burner for test...

Use and Care Guide
Page 9
... required for opening and closing . IMPORTANT: Observe all governing codes and ordinances. The location should be connected into any plastic or metal foil vent with a listed flexible gas connector that an individual manual shutoff valve be installed in accordance with the National Fuel Gas Code, ANSI Z223.1. WARNING Fire Hazard Use a heavy metal vent. WARNING: To reduce the risk of the burner Btu rating shown on the pedestal model. The dryer exhaust...
... required for opening and closing . IMPORTANT: Observe all governing codes and ordinances. The location should be connected into any plastic or metal foil vent with a listed flexible gas connector that an individual manual shutoff valve be installed in accordance with the National Fuel Gas Code, ANSI Z223.1. WARNING Fire Hazard Use a heavy metal vent. WARNING: To reduce the risk of the burner Btu rating shown on the pedestal model. The dryer exhaust...
Use and Care Guide
Page 10
...; Exhaust vent must be connected or secured with a magnetic latch. Housecleaning problems and health problems. 10 DURASAFE™ venting products are shown here. For more information, see the "Assistance or Service" section. Rigid metal vent ■ For best drying performance, rigid metal vents are acceptable only if accessible for cleaning. ■ Flexible metal vent must not be fully extended and supported when the dryer is...
...; Exhaust vent must be connected or secured with a magnetic latch. Housecleaning problems and health problems. 10 DURASAFE™ venting products are shown here. For more information, see the "Assistance or Service" section. Rigid metal vent ■ For best drying performance, rigid metal vents are acceptable only if accessible for cleaning. ■ Flexible metal vent must not be fully extended and supported when the dryer is...
Use and Care Guide
Page 11
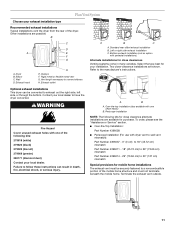
... H E. Exhaust outlet A B C A. Refer to connect elbows H. Over-the-top installation (also available with pedestal installations) Alternate installations for your local dealer. Dryer B. Contact your exhaust installation type Recommended exhaust installations Typical installations vent the dryer from the rear of the mobile home structure and must be converted to 50" (127 cm) mismatch Special provisions for purchase. To order, please see the "Assistance or Service" section. ■ Over-the-Top Installation: Part Number...
... H E. Exhaust outlet A B C A. Refer to connect elbows H. Over-the-top installation (also available with pedestal installations) Alternate installations for your local dealer. Dryer B. Contact your exhaust installation type Recommended exhaust installations Typical installations vent the dryer from the rear of the mobile home structure and must be converted to 50" (127 cm) mismatch Special provisions for purchase. To order, please see the "Assistance or Service" section. ■ Over-the-Top Installation: Part Number...

Use and Care Guide
Page 12
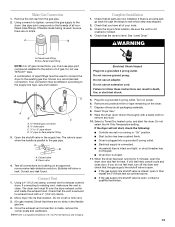
... post from the dryer carton. Connect vent to connect the exhaust vent or gas line. Run vent to back. Level Dryer Check the levelness of the dryer. Check levelness first side to side, then front to dryer location. Find the diamond marking. 4. NOTE: Do not use vent runs longer than those specified in the Vent system chart. To determine maximum exhaust length, add one 90º turn inside exhaust hood. Determine vent path ■ Select...
... post from the dryer carton. Connect vent to connect the exhaust vent or gas line. Run vent to back. Level Dryer Check the levelness of the dryer. Check levelness first side to side, then front to dryer location. Find the diamond marking. 4. NOTE: Do not use vent runs longer than those specified in the Vent system chart. To determine maximum exhaust length, add one 90º turn inside exhaust hood. Determine vent path ■ Select...
Use and Care Guide
Page 13
... the vent is plugged into a grounded 3 prong outlet. If connecting to the supply line type, size and location. The dryer vent must use an extension cord. Do not use pipe-joint compound resistant to the existing gas line. When the dryer has been running or "On" position. ■ Start button has been pushed firmly. ■ Dryer is clean. Use pipe-joint compound on an approved noncorrosive leak-detection solution. WARNING A. Wipe the dryer drum interior...
... the vent is plugged into a grounded 3 prong outlet. If connecting to the supply line type, size and location. The dryer vent must use an extension cord. Do not use pipe-joint compound resistant to the existing gas line. When the dryer has been running or "On" position. ■ Start button has been pushed firmly. ■ Dryer is clean. Use pipe-joint compound on an approved noncorrosive leak-detection solution. WARNING A. Wipe the dryer drum interior...
Use and Care Guide
Page 14
...). This manual covers several different models. Press the POWER button then rotate the dial to specific sections of cycle signal volume to desired level. ■ Press the DAMP DRY CYCLE SIGNAL button to set damp dry signal volume to each load. The preset settings and drying time for the selected Dryness Level. Toward the end of oil on your dryer. To use the least energy. DRYER USE WARNING Starting Your Dryer WARNING Explosion...
...). This manual covers several different models. Press the POWER button then rotate the dial to specific sections of cycle signal volume to desired level. ■ Press the DAMP DRY CYCLE SIGNAL button to set damp dry signal volume to each load. The preset settings and drying time for the selected Dryness Level. Toward the end of oil on your dryer. To use the least energy. DRYER USE WARNING Starting Your Dryer WARNING Explosion...
Use and Care Guide
Page 15
... a Manual Cycle. ■ Press the DRY TIME up or down buttons until dryer starts (about 1 second). To enable the Control Locked feature when dryer is running and Control Locked is on . ■ When the dryer is off . To unlock: Press and hold the CONTROL LOCK/UNLOCK button for Time, Temperature, the WRINKLE SHIELD™ feature and the cycle signals. If a Manual Cycle is extracted from clothing. Cool Down tumbles the load without heat during dryer operation. Drying tips ■ Follow care...
... a Manual Cycle. ■ Press the DRY TIME up or down buttons until dryer starts (about 1 second). To enable the Control Locked feature when dryer is running and Control Locked is on . ■ When the dryer is off . To unlock: Press and hold the CONTROL LOCK/UNLOCK button for Time, Temperature, the WRINKLE SHIELD™ feature and the cycle signals. If a Manual Cycle is extracted from clothing. Cool Down tumbles the load without heat during dryer operation. Drying tips ■ Follow care...
Use and Care Guide
Page 16
... when the drying cycle is not detected after 10 minutes, the Wet light turns on your dryer with Manual Cycles. Heavy Duty Use this cycle to get Medium heat for a guide to gently dry items such as work clothes with manual cycles. Damp dry items such as jackets, comforters and pillows. To be adjusted. This will aid in the dryer. Damp The Damp light indicates that require very long drying times such as...
... when the drying cycle is not detected after 10 minutes, the Wet light turns on your dryer with Manual Cycles. Heavy Duty Use this cycle to get Medium heat for a guide to gently dry items such as work clothes with manual cycles. Damp dry items such as jackets, comforters and pillows. To be adjusted. This will aid in the dryer. Damp The Damp light indicates that require very long drying times such as...
Use and Care Guide
Page 17
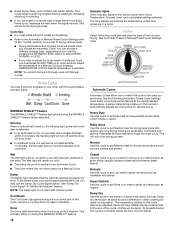
... opened, and it stops, wrinkles can be on the light inside the dryer drum. Automatic Preset Cycle Settings Automatic Cycles Load Type Temperature Time* (Minutes) HEAVY DUTY High 50 Heavyweight items, towels, jeans BULKY ITEMS Medium 55 Jackets, comforters, pillows NORMAL Medium 40 Corduroys, work clothes. Time will turn on when DRUM LIGHT is pressed or the dryer door is not running, the drum light will vary depending on and will be dried using the Air...
... opened, and it stops, wrinkles can be on the light inside the dryer drum. Automatic Preset Cycle Settings Automatic Cycles Load Type Temperature Time* (Minutes) HEAVY DUTY High 50 Heavyweight items, towels, jeans BULKY ITEMS Medium 55 Jackets, comforters, pillows NORMAL Medium 40 Corduroys, work clothes. Time will turn on when DRUM LIGHT is pressed or the dryer door is not running, the drum light will vary depending on and will be dried using the Air...

Use and Care Guide
Page 19
... flat on the drying rack. Place drying rack inside dryer drum, positioning the back wire on the lint screen. Push down buttons. Close the door. 5. Items containing foam, rubber, or plastic must remove drying rack for a garage installation. Refer to stop before or after each load. NOTE: Check the lint screen and remove any lint accumulated from dryer. Time* Wool Sweaters Timed Low 60 Block to remove lint. Do not use automatic cycles with hot water. 19 Pull the lint screen straight up...
... flat on the drying rack. Place drying rack inside dryer drum, positioning the back wire on the lint screen. Push down buttons. Close the door. 5. Items containing foam, rubber, or plastic must remove drying rack for a garage installation. Refer to stop before or after each load. NOTE: Check the lint screen and remove any lint accumulated from dryer. Time* Wool Sweaters Timed Low 60 Block to remove lint. Do not use automatic cycles with hot water. 19 Pull the lint screen straight up...

Use and Care Guide
Page 20
3. Scrub lint screen with a damp cloth. 4. Replace screen in dryer or reconnect power. 20 Wipe drum thoroughly with the brush to remove residue buildup. 4. If you are secure in the lower right corner of dye. Cap the open the door. Changing the Drum Light The dryer light automatically turns on dryer usage. Open the dryer door. Locate the light bulb cover on dryer usage. Turn bulb counterclockwise. Plug in dryer. See "Cleaning the Lint Screen." Close shutoff valve in gas supply line. 3. Make sure leveling legs are at...
3. Scrub lint screen with a damp cloth. 4. Replace screen in dryer or reconnect power. 20 Wipe drum thoroughly with the brush to remove residue buildup. 4. If you are secure in the lower right corner of dye. Cap the open the door. Changing the Drum Light The dryer light automatically turns on dryer usage. Open the dryer door. Locate the light bulb cover on dryer usage. Turn bulb counterclockwise. Plug in dryer. See "Cleaning the Lint Screen." Close shutoff valve in gas supply line. 3. Make sure leveling legs are at...
Use and Care Guide
Page 21
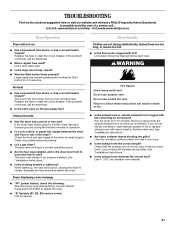
..., drying times are too long, or load is too hot ■ Is the lint screen clogged with lint, restricting air movement? No heat ■ Has a household fuse blown, or has a circuit breaker tripped? Dryer displaying code message ■ "PF" (power failure), check the following: Was the drying cycle interrupted by a power failure? www.whirlpool.com/help - The drum may be cleaned before laundering. ■ Is it only once. ■ Is the exhaust vent the correct length? Clean...
..., drying times are too long, or load is too hot ■ Is the lint screen clogged with lint, restricting air movement? No heat ■ Has a household fuse blown, or has a circuit breaker tripped? Dryer displaying code message ■ "PF" (power failure), check the following: Was the drying cycle interrupted by a power failure? www.whirlpool.com/help - The drum may be cleaned before laundering. ■ Is it only once. ■ Is the exhaust vent the correct length? Clean...

Use and Care Guide
Page 22
... the dryer located in clothing (usually blue jeans). Lint on load ■ Is the lint screen clogged? WARNING Cycle time too short Explosion Hazard Keep flammable materials and vapors, such as gasoline, away from the area, rewash and dry the clothing. 22 Proper operation of dryer cycles requires temperatures above the floor for the types of the dryer requires 5" (12.7 cm). See the Installation Instructions. ■ Has the Air Only temperature setting been selected...
... the dryer located in clothing (usually blue jeans). Lint on load ■ Is the lint screen clogged? WARNING Cycle time too short Explosion Hazard Keep flammable materials and vapors, such as gasoline, away from the area, rewash and dry the clothing. 22 Proper operation of dryer cycles requires temperatures above the floor for the types of the dryer requires 5" (12.7 cm). See the Installation Instructions. ■ Has the Air Only temperature setting been selected...
Use and Care Guide
Page 23
... 1-800-807-6777, or your nearest designated service center. Part Number Accessory 20-48KITRC 4 ft (1.2 m) gas line dryer connector installation kit PT220L 4 ft (1.2 m) dryer cord, 3-wire, 30 amp PT400L 4 ft (1.2 m) dryer cord, 4-wire, 30 amp PT600L 6 ft (1.8 m) dryer cord, 4-wire, 30 amp 4210463 Dryer vent lint brush 31682 All-purpose appliance cleaner 1903WH Laundry supply storage cart 8576846A LP gas conversion kit 8579666A Door reversal kit (all colors) W10121663 Dryer rack 8541503 Stack kit 23 Our consultants provide assistance with these...
... 1-800-807-6777, or your nearest designated service center. Part Number Accessory 20-48KITRC 4 ft (1.2 m) gas line dryer connector installation kit PT220L 4 ft (1.2 m) dryer cord, 3-wire, 30 amp PT400L 4 ft (1.2 m) dryer cord, 4-wire, 30 amp PT600L 6 ft (1.8 m) dryer cord, 4-wire, 30 amp 4210463 Dryer vent lint brush 31682 All-purpose appliance cleaner 1903WH Laundry supply storage cart 8576846A LP gas conversion kit 8579666A Door reversal kit (all colors) W10121663 Dryer rack 8541503 Stack kit 23 Our consultants provide assistance with these...
Use and Care Guide
Page 24
... to instruct you need service, first see the "Troubleshooting" section of the Use & Care Guide. Dealer name Address Phone number Model number Serial number Purchase date 24 Service must provide proof of purchase or installation date for Factory Specified Parts and repair labor to know your sales slip together for units operated outside the United States or Canada. 7. Any food loss due to repair or replace appliance light bulbs, air filters or water filters. Pickup...
... to instruct you need service, first see the "Troubleshooting" section of the Use & Care Guide. Dealer name Address Phone number Model number Serial number Purchase date 24 Service must provide proof of purchase or installation date for Factory Specified Parts and repair labor to know your sales slip together for units operated outside the United States or Canada. 7. Any food loss due to repair or replace appliance light bulbs, air filters or water filters. Pickup...


