
Owners Manual
Page 3
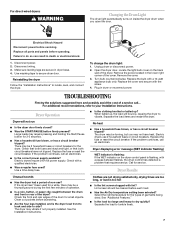
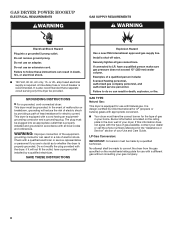
... use any electrical switch; WARNING: Gas leaks cannot always be followed to minimize the risk of fire or explosion, or to light any appliance. • Do not touch any phone in your building. • Clear the room, building, or area of all occupants. • Immediately call the fire department. - The dryer must be performed by a qualified installer, service...
... use any electrical switch; WARNING: Gas leaks cannot always be followed to minimize the risk of fire or explosion, or to light any appliance. • Do not touch any phone in your building. • Clear the room, building, or area of all occupants. • Immediately call the fire department. - The dryer must be performed by a qualified installer, service...
Owners Manual
Page 4
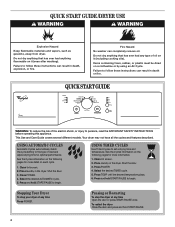
Failure to begin . This Use and Care Guide covers several different models. Clean lint screen. 2. Shut the door. 3. Press and hold START/PAUSE 4 To restart the dryer Close the door and press and hold START/PAUSE to follow these instructions can completely remove oil. Do not dry anything flammable on it (even after washing). Select the desired TIMED cycle. 5. Pausing or Restarting To stop your dryer at any type of oil on...
Failure to begin . This Use and Care Guide covers several different models. Clean lint screen. 2. Shut the door. 3. Press and hold START/PAUSE 4 To restart the dryer Close the door and press and hold START/PAUSE to follow these instructions can completely remove oil. Do not dry anything flammable on it (even after washing). Select the desired TIMED cycle. 5. Pausing or Restarting To stop your dryer at any type of oil on...
Owners Manual
Page 5
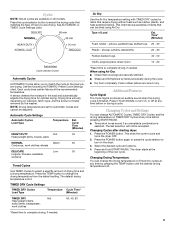
... the drying time for items that require drying without heat such as rubber, plastic, and heat-sensitive fabrics. Cycle Time (Minutes) HEAVY DUTY Hot 45 Heavyweight items, towels, jeans NORMAL Warm 35 Corduroys, work clothes 60, 40, 20 *Reset time to complete drying, if needed . TIMED DRY Cycle Settings TIMED DRY Cycles Load Type Temperature Cycle Time* (Minutes) TIMED DRY Hot Heavyweight items, bulky items, bedspreads, work clothes, sheets DELICATE Low 30 Lingerie, blouses, washable woolens Timed Cycles Use TIMED Cycles to turn on all models. Time* (Minutes...
... the drying time for items that require drying without heat such as rubber, plastic, and heat-sensitive fabrics. Cycle Time (Minutes) HEAVY DUTY Hot 45 Heavyweight items, towels, jeans NORMAL Warm 35 Corduroys, work clothes 60, 40, 20 *Reset time to complete drying, if needed . TIMED DRY Cycle Settings TIMED DRY Cycles Load Type Temperature Cycle Time* (Minutes) TIMED DRY Hot Heavyweight items, bulky items, bedspreads, work clothes, sheets DELICATE Low 30 Lingerie, blouses, washable woolens Timed Cycles Use TIMED Cycles to turn on all models. Time* (Minutes...
Owners Manual
Page 6
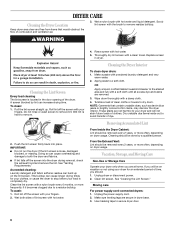
...: ■ Do not run the dryer if the lint screen is completely dry. See "Venting Requirements." As needed cleaning: Laundry detergent and fabric softener residue can cause longer drying times for an extended period of lint screen with your dryer and will be removed every 2 years, or more often, depending on dryer usage. To wash: 1. Rinse screen with a damp cloth. 4. Wipe drum thoroughly with hot water. 5. Clean lint screen. DRYER CARE Cleaning the Dryer Location Keep dryer area clear and...
...: ■ Do not run the dryer if the lint screen is completely dry. See "Venting Requirements." As needed cleaning: Laundry detergent and fabric softener residue can cause longer drying times for an extended period of lint screen with your dryer and will be removed every 2 years, or more often, depending on dryer usage. To wash: 1. Rinse screen with a damp cloth. 4. Wipe drum thoroughly with hot water. 5. Clean lint screen. DRYER CARE Cleaning the Dryer Location Keep dryer area clear and...
Owners Manual
Page 7
... non-use 2 household fuses or circuit breakers. Use a time-delay fuse. ■ Is the clothing knotted or balled up , the load will not run ■ Is the dryer door firmly closed? ■ Was the START/PAUSE button firmly pressed? Replace all parts and panels before servicing. Electrical Shock Hazard Disconnect power before operating. Clothes are not drying satisfactorily, drying times are intact and tight, or that requires service. For direct-wired dryers: WARNING Changing the Drum Light The dryer light automatically turns on inside the dryer drum when...
... non-use 2 household fuses or circuit breakers. Use a time-delay fuse. ■ Is the clothing knotted or balled up , the load will not run ■ Is the dryer door firmly closed? ■ Was the START/PAUSE button firmly pressed? Replace all parts and panels before servicing. Electrical Shock Hazard Disconnect power before operating. Clothes are not drying satisfactorily, drying times are intact and tight, or that requires service. For direct-wired dryers: WARNING Changing the Drum Light The dryer light automatically turns on inside the dryer drum when...
Owners Manual
Page 8
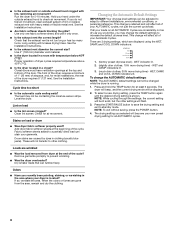
... of lint or replace exhaust vent with temperature below 45ºF (7ºC)? NOTE: To exit without saving, press the POWER button. 4. Closet doors must have ventilation openings at least 6 seconds. Level the dryer. Press the START/PAUSE button to save the drying setting and exit to prevent wrinkling. ■ Was the dryer overloaded? Check for 5-10 minutes. If all AUTOMATIC cycles. 8 WET indicator lit. 2. (slightly drier clothes, 15% more drying time) - To change...
... of lint or replace exhaust vent with temperature below 45ºF (7ºC)? NOTE: To exit without saving, press the POWER button. 4. Closet doors must have ventilation openings at least 6 seconds. Level the dryer. Press the START/PAUSE button to save the drying setting and exit to prevent wrinkling. ■ Was the dryer overloaded? Check for 5-10 minutes. If all AUTOMATIC cycles. 8 WET indicator lit. 2. (slightly drier clothes, 15% more drying time) - To change...

Owners Manual
Page 9
... model and serial number label located on how to use your major appliance, to replace or repair house fuses, or to correct house wiring or plumbing. 3. Dealer name Address Phone number Model number Serial number Purchase date 9 This limited warranty is valid only in the United States or Canada and applies only when the major appliance is used in -warranty service. Consumable parts are unable to resolve the problem after checking "Troubleshooting...
... model and serial number label located on how to use your major appliance, to replace or repair house fuses, or to correct house wiring or plumbing. 3. Dealer name Address Phone number Model number Serial number Purchase date 9 This limited warranty is valid only in the United States or Canada and applies only when the major appliance is used in -warranty service. Consumable parts are unable to resolve the problem after checking "Troubleshooting...
Owners Manual
Page 20
....e de réparation. Before calling for assistance or service, please check "Troubleshooting" or visit www.whirlpool.com/help In the U.S.A. When calling, please know the purchase date and the complete model and serial number of your appliance. ealnlodwCPaangaedsatelephone directory. Our consultants proviNd eAaccsessissotryaanncderewpaiirthparts sales. N Installation information. Maytag® designated service You can write with any questiotencshonriccioannscearrnestraati:ned to your...
....e de réparation. Before calling for assistance or service, please check "Troubleshooting" or visit www.whirlpool.com/help In the U.S.A. When calling, please know the purchase date and the complete model and serial number of your appliance. ealnlodwCPaangaedsatelephone directory. Our consultants proviNd eAaccsessissotryaanncderewpaiirthparts sales. N Installation information. Maytag® designated service You can write with any questiotencshonriccioannscearrnestraati:ned to your...
Dimension Guide
Page 1
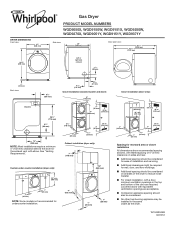
...) Gas Dryer PRODUCT MODEL NUMBERS WGD9050X, WGD9150W, WGD9151X, WGD9250W, WGD9270X, WGD9051Y, WGD9151Y, WGD9371Y Side view: 29" (736 mm) Door open view: 481/8" (1238 mm) 471/8" (1197 mm) Left or right side exhaust 31/2" (89 mm) 1" (25 mm) Back view: 61/4" (159 mm) 6 7/8" (174 mm) 1 5/8" (41 mm) Closet Installation (stacked washer and dryer): 6" (152 mm) Electric 281/8" (715 mm) 31/2" (89 mm) 14" (358 mm) NOTE: Most installations require...
...) Gas Dryer PRODUCT MODEL NUMBERS WGD9050X, WGD9150W, WGD9151X, WGD9250W, WGD9270X, WGD9051Y, WGD9151Y, WGD9371Y Side view: 29" (736 mm) Door open view: 481/8" (1238 mm) 471/8" (1197 mm) Left or right side exhaust 31/2" (89 mm) 1" (25 mm) Back view: 61/4" (159 mm) 6 7/8" (174 mm) 1 5/8" (41 mm) Closet Installation (stacked washer and dryer): 6" (152 mm) Electric 281/8" (715 mm) 31/2" (89 mm) 14" (358 mm) NOTE: Most installations require...
Dimension Guide
Page 2
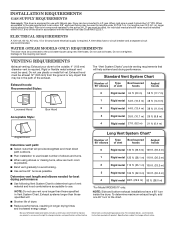
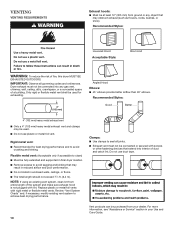
... to use with Natural gas. A time-delay fuse or circuit breaker and a separate circuit are for best drying performance: ■■ Use following Vent System Chart to avoid kinking. ■■ Use as few 90° turns as possible. Exhaust hood must be installed within 6 ft (1.8 m) of the dryer in Vent System Chart. For complete details, see Installation Instructions packed with the National Fuel Gas Code ANSI Z223.1. VENTING REQUIREMENTS Exhaust venting: Exhaust your dryer to L.P. gas. For lengths...
... to use with Natural gas. A time-delay fuse or circuit breaker and a separate circuit are for best drying performance: ■■ Use following Vent System Chart to avoid kinking. ■■ Use as few 90° turns as possible. Exhaust hood must be installed within 6 ft (1.8 m) of the dryer in Vent System Chart. For complete details, see Installation Instructions packed with the National Fuel Gas Code ANSI Z223.1. VENTING REQUIREMENTS Exhaust venting: Exhaust your dryer to L.P. gas. For lengths...
Installation Guide
Page 4
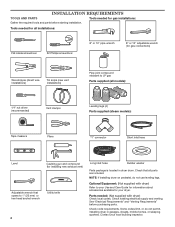
... compound (for installing new exhaust vent) Utility knife Long inlet hose Rubber washer Parts package is located in garages, closets, mobile homes, or sleeping quarters. Parts needed for your local building inspector. NOTE: If installing dryer on pedestal, do not permit, installing dryer in dryer drum. Check that opens to your Use and Care Guide for information about accessories available for gas installations: Gather the required tools and parts before purchasing parts. Check code requirements. Check existing electrical supply and venting. Contact your...
... compound (for installing new exhaust vent) Utility knife Long inlet hose Rubber washer Parts package is located in garages, closets, mobile homes, or sleeping quarters. Parts needed for your local building inspector. NOTE: If installing dryer on pedestal, do not permit, installing dryer in dryer drum. Check that opens to your Use and Care Guide for information about accessories available for gas installations: Gather the required tools and parts before purchasing parts. Check code requirements. Check existing electrical supply and venting. Contact your...
Installation Guide
Page 5
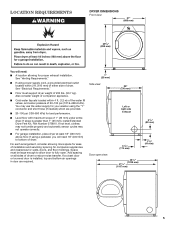
...), install Extended Dryer Feet Kit, Part Number 279810. See "Electrical Requirements." ■■ Floor must be large enough to allow door to reduce noise transfer. If not level, clothes may not tumble properly and automatic sensor cycles may use the water supply for your washer using a pedestal, you will need 18" (460 mm) to bottom of 20-100 psi (137.9-689.6 kPa). See "Venting Requirements." ■■ If using power supply cord, a grounded electrical outlet located...
...), install Extended Dryer Feet Kit, Part Number 279810. See "Electrical Requirements." ■■ Floor must be large enough to allow door to reduce noise transfer. If not level, clothes may not tumble properly and automatic sensor cycles may use the water supply for your washer using a pedestal, you will need 18" (460 mm) to bottom of 20-100 psi (137.9-689.6 kPa). See "Venting Requirements." ■■ If using power supply cord, a grounded electrical outlet located...
Installation Guide
Page 7
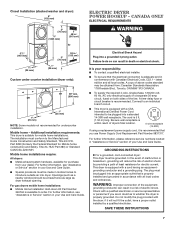
... circuit breaker is equipped with a cord having an equipmentgrounding conductor and a grounding plug. grounding conductor can result in doubt as dryer exhaust opening. Openings (such as a nearby window) should be sure that is equipped with all local codes. This dryer is recommended. The plug must be plugged into an appropriate outlet that the electrical connection is recommended that you are in a risk of your Use and Care Guide...
... circuit breaker is equipped with a cord having an equipmentgrounding conductor and a grounding plug. grounding conductor can result in doubt as dryer exhaust opening. Openings (such as a nearby window) should be sure that is equipped with all local codes. This dryer is recommended. The plug must be plugged into an appropriate outlet that the electrical connection is recommended that you are in a risk of your Use and Care Guide...
Installation Guide
Page 8
... approved gas supply line. Do not remove ground prong. amp fused electrical supply is recommended. WARNING: Improper connection of a quali ed person include: licensed heating personnel, authorized gas company personnel, and authorized service personnel. GAS DRYER POWER HOOKUP ELECTRICAL REQUIREMENTS WARNING GAS SUPPLY REQUIREMENTS WARNING Electrical Shock Hazard Plug into an appropriate outlet that a separate circuit serving only this information does not agree with Natural gas. or 20- It is located on the model/serial rating plate for use...
... approved gas supply line. Do not remove ground prong. amp fused electrical supply is recommended. WARNING: Improper connection of a quali ed person include: licensed heating personnel, authorized gas company personnel, and authorized service personnel. GAS DRYER POWER HOOKUP ELECTRICAL REQUIREMENTS WARNING GAS SUPPLY REQUIREMENTS WARNING Electrical Shock Hazard Plug into an appropriate outlet that a separate circuit serving only this information does not agree with Natural gas. or 20- It is located on the model/serial rating plate for use...
Installation Guide
Page 9
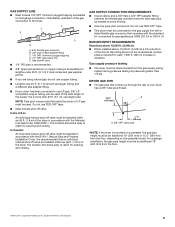
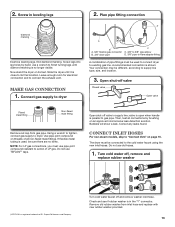
... individual manual shut-off valve must be disconnected from the floor. †®TEFLON is required for gas appliances, ANSI Z21.24 or CSA 6.10. The location should be used . DRYER GAS PIPE ■■ The gas pipe that complies with the B149.1, Natural Gas and Propane Installation Code. E C A D B A. 3/8" flexible gas connector B. 3/8" pipe to reach for test gauge connection, immediately upstream of LP gas must be connected to reach for lengths under...
... individual manual shut-off valve must be disconnected from the floor. †®TEFLON is required for gas appliances, ANSI Z21.24 or CSA 6.10. The location should be used . DRYER GAS PIPE ■■ The gas pipe that complies with the B149.1, Natural Gas and Propane Installation Code. E C A D B A. 3/8" flexible gas connector B. 3/8" pipe to reach for test gauge connection, immediately upstream of LP gas must be connected to reach for lengths under...
Installation Guide
Page 10
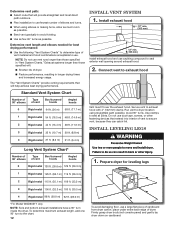
... only if accessible to clean) ■■ Must be fully extended and supported in final dryer location. ■■ Remove excess to avoid crushing and kinking. Review "Vent System Charts" and, if necessary, modify existing vent system to seal all governing codes and ordinances. VENTING VENTING REQUIREMENTS Exhaust hoods: ■■ Must be at least 12" (305 mm) from ground or any gas vent, chimney, wall...
... only if accessible to clean) ■■ Must be fully extended and supported in final dryer location. ■■ Remove excess to avoid crushing and kinking. Review "Vent System Charts" and, if necessary, modify existing vent system to seal all governing codes and ordinances. VENTING VENTING REQUIREMENTS Exhaust hoods: ■■ Must be at least 12" (305 mm) from ground or any gas vent, chimney, wall...
Installation Guide
Page 12
...° elbows Type of dryer. Use clamps to seal exterior wall opening around exhaust hood. 2. Run vent to the chart. 12 1. NOTE: Side and bottom exhaust installations have a 90° turn to dryer location using elbows or making turns, allow as much room as possible. ■■ Bend vent gradually to avoid kinking. ■■ Use as few 90° turns as possible. To determine maximum exhaust length, add...
...° elbows Type of dryer. Use clamps to seal exterior wall opening around exhaust hood. 2. Run vent to the chart. 12 1. NOTE: Side and bottom exhaust installations have a 90° turn to dryer location using elbows or making turns, allow as much room as possible. ■■ Bend vent gradually to avoid kinking. ■■ Use as few 90° turns as possible. To determine maximum exhaust length, add...
Installation Guide
Page 13
.... Connect gas supply to dryer D A B A. 3/8" flexible gas connector B. 3/8" dryer pipe C C. 3/8" to 3/8" pipe elbow D. 3/8" pipe-to supply line type, size, and location. 3. Correct any leaks found. Then, test all non-flared male fittings. NOTE: For LP gas connections, you must be different, according to -flare adapter fitting A combination of LP gas. The dryer must use old hoses. 1. Leave enough room for electrical connection and to dryer. Turn cold water faucet off valve in supply line; Remove...
.... Connect gas supply to dryer D A B A. 3/8" flexible gas connector B. 3/8" dryer pipe C C. 3/8" to 3/8" pipe elbow D. 3/8" pipe-to supply line type, size, and location. 3. Correct any leaks found. Then, test all non-flared male fittings. NOTE: For LP gas connections, you must be different, according to -flare adapter fitting A combination of LP gas. The dryer must use old hoses. 1. Leave enough room for electrical connection and to dryer. Turn cold water faucet off valve in supply line; Remove...
Installation Guide
Page 15
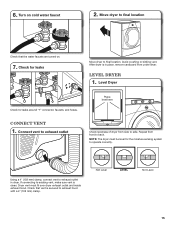
... level for the moisture sensing system to side. LEVEL DRYER 1. Repeat from side to operate correctly. Avoid crushing or kinking vent. CONNECT VENT 1. After dryer is clean. Check that the water faucets are turned on cold water faucet 2. Move dryer to final location. 6. Turn on . 7. Check for leaks around "Y" connector, faucets, and hoses. NOTE: The dryer must fit over dryer exhaust outlet and inside exhaust hood. Not Level LEVEL Not Level 15
... level for the moisture sensing system to side. LEVEL DRYER 1. Repeat from side to operate correctly. Avoid crushing or kinking vent. CONNECT VENT 1. After dryer is clean. Check that the water faucets are turned on cold water faucet 2. Move dryer to final location. 6. Turn on . 7. Check for leaks around "Y" connector, faucets, and hoses. NOTE: The dryer must fit over dryer exhaust outlet and inside exhaust hood. Not Level LEVEL Not Level 15

Installation Guide
Page 16
... dryer drum interior thoroughly with a damp cloth to control the buildup of your Use and Care Guide. Excessive scale buildup may lead to order. Electric Models: q Plug into an outlet and/or electrical supply is connected. • Household fuse is intact and tight, or circuit breaker has not tripped. • Dryer door is an extra part, go away. q Check dryer's final location. q Read "Dryer Use" in the dryer. If there is closed. q Check for leaks around "Y" connector...
... dryer drum interior thoroughly with a damp cloth to control the buildup of your Use and Care Guide. Excessive scale buildup may lead to order. Electric Models: q Plug into an outlet and/or electrical supply is connected. • Household fuse is intact and tight, or circuit breaker has not tripped. • Dryer door is an extra part, go away. q Check dryer's final location. q Read "Dryer Use" in the dryer. If there is closed. q Check for leaks around "Y" connector...


