

Owners Manual
Page 2
... manual and on your appliance. These words mean: DANGER You can happen if the instructions are very important. Always read and obey all safety messages. DRYER SAFETY Your safety and the safety of injury, and tell you don't immediately follow instructions.
... manual and on your appliance. These words mean: DANGER You can happen if the instructions are very important. Always read and obey all safety messages. DRYER SAFETY Your safety and the safety of injury, and tell you don't immediately follow instructions.

Owners Manual
Page 3
... cannot reach your gas supplier, call your building. • Clear the room, building, or area of all occupants. • Immediately call the fire department. - The dryer must be followed to minimize the risk of fire or explosion, or to do not use gasoline or other appliance. - IMPORTANT: The gas installation must...
... cannot reach your gas supplier, call your building. • Clear the room, building, or area of all occupants. • Immediately call the fire department. - The dryer must be followed to minimize the risk of fire or explosion, or to do not use gasoline or other appliance. - IMPORTANT: The gas installation must...
Owners Manual
Page 4
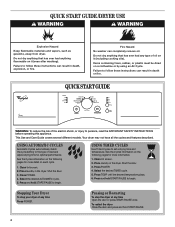
...and hold START/PAUSE 4 Press POWER. 4. Select the desired TIMED cycle. 5. QUICK START GUIDE /DRYER USE WARNING WARNING Explosion Hazard Keep flammable materials and vapors, such as gasoline, away from dryer. Do not dry anything that has ever had anything that has ever had any time Press POWER....WARNING: To reduce the risk of load and adjust drying time for more detail on a clothesline or by using an Air Cycle. Your dryer may not have all the cycles and features described. See the Cycles information on the following pages for optimal performance. Shut the door. 3....
...and hold START/PAUSE 4 Press POWER. 4. Select the desired TIMED cycle. 5. QUICK START GUIDE /DRYER USE WARNING WARNING Explosion Hazard Keep flammable materials and vapors, such as gasoline, away from dryer. Do not dry anything that has ever had anything that has ever had any time Press POWER....WARNING: To reduce the risk of load and adjust drying time for more detail on a clothesline or by using an Air Cycle. Your dryer may not have all the cycles and features described. See the Cycles information on the following pages for optimal performance. Shut the door. 3....
Owners Manual
Page 5
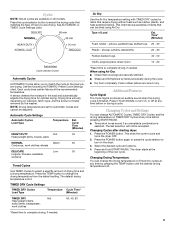
...dried using Air Dry: ■ Check that can change the drying temperature from the default setting. This ends the current cycle and turns the dryer OFF. 2. Automatic Cycle Settings Automatic Cycles Load Type Temperature Est. Time* (Minutes) Foam rubber - A sensor detects the moisture in the...time before or during the cycle. ■ Dry item completely. This chart shows examples of the new cycle. Changing Cycles after starting dryer: 1. Press the TEMP button to turn on all cycles are securely stitched. ■ Shake and fluff pillows by pressing the TEMP ...
...dried using Air Dry: ■ Check that can change the drying temperature from the default setting. This ends the current cycle and turns the dryer OFF. 2. Automatic Cycle Settings Automatic Cycles Load Type Temperature Est. Time* (Minutes) Foam rubber - A sensor detects the moisture in the...time before or during the cycle. ■ Dry item completely. This chart shows examples of the new cycle. Changing Cycles after starting dryer: 1. Press the TEMP button to turn on all cycles are securely stitched. ■ Shake and fluff pillows by pressing the TEMP ...
Owners Manual
Page 6
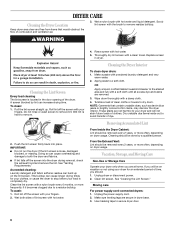
... avoid transfer of clothes. Clean the lint screen with a soft cloth until all excess dye and stains are secure in dryer base. 3. Apply paste to secure dryer door. 6 OR Apply a liquid, nonflammable household cleaner to the stained area and rub with a nylon brush every 6 ... screen with your fingers. 2. Cleaning should be done by lint can cause overheating and damage to a residue buildup. DRYER CARE Cleaning the Dryer Location Keep dryer area clear and free from items that contain unstable dyes, such as denim blue jeans or brightly colored cotton items, ...
... avoid transfer of clothes. Clean the lint screen with a soft cloth until all excess dye and stains are secure in dryer base. 3. Apply paste to secure dryer door. 6 OR Apply a liquid, nonflammable household cleaner to the stained area and rub with a nylon brush every 6 ... screen with your fingers. 2. Cleaning should be done by lint can cause overheating and damage to a residue buildup. DRYER CARE Cleaning the Dryer Location Keep dryer area clear and free from items that contain unstable dyes, such as denim blue jeans or brightly colored cotton items, ...
Owners Manual
Page 7
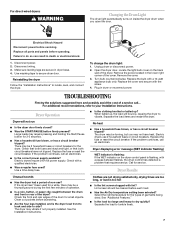
... the solutions suggested here and possibly avoid the cost of operation. ■ Is a coin, button, or paper clip caught between flashes, the dryer control has detected a problem that requires service. There may be a thumping sound during the first few minutes of a service call an electrician. ...Replace the fuse or reset the circuit breaker. Clean out pockets before each load. ■ Has the Air Dry temperature setting been selected? The dryer may require pressing and holding the Start/Pause button for 2-5 seconds. ■ Has a household fuse blown, or has a circuit breaker tripped...
... the solutions suggested here and possibly avoid the cost of operation. ■ Is a coin, button, or paper clip caught between flashes, the dryer control has detected a problem that requires service. There may be a thumping sound during the first few minutes of a service call an electrician. ...Replace the fuse or reset the circuit breaker. Clean out pockets before each load. ■ Has the Air Dry temperature setting been selected? The dryer may require pressing and holding the Start/Pause button for 2-5 seconds. ■ Has a household fuse blown, or has a circuit breaker tripped...
Owners Manual
Page 8
...of lint or replace exhaust vent with temperature below 45ºF (7ºC)? Use 4" (102 mm) diameter vent material. ■ Is the dryer located in the area where your AUTOMATIC cycles, not just the current cycle/load. Closet doors must have ventilation openings at least 6 seconds. ... TEMP button again until the desired drying setting is running. 1. Stains on load ■ Is the lint screen clogged? Loads are gone from dryer at the beginning of the cycle? Remove garments promptly to standby mode. WET and DAMP indicators lit. 3. (much drier clothes, 30% more ...
...of lint or replace exhaust vent with temperature below 45ºF (7ºC)? Use 4" (102 mm) diameter vent material. ■ Is the dryer located in the area where your AUTOMATIC cycles, not just the current cycle/load. Closet doors must have ventilation openings at least 6 seconds. ... TEMP button again until the desired drying setting is running. 1. Stains on load ■ Is the lint screen clogged? Loads are gone from dryer at the beginning of the cycle? Remove garments promptly to standby mode. WET and DAMP indicators lit. 3. (much drier clothes, 30% more ...

Dimension Guide
Page 1
...29 ft (8.8 m) 4 Rigid metal 27 ft (8.2 m) 21 ft (6.4 m) Select the route that may be used for lengths under counter (dryer only) installation Cabinet and closet dimensions For closet installation, with a door, the minimum ventilation openings in the top and bottom of the exhaust. ...1" (25 mm) 1" (25 mm) Cabinet (dryer only) installation 3" (76 mm) 76" (1930 mm) 48 in.2 (310 cm2) Stacked washer and dryer installation 51/2" (140 mm) 1" (25 mm) 3" (76 mm) 24 in.2 (155 cm2) 1" (25 mm) Because Whirlpool Corporation policy includes a continuous commitment to improve our products...
...29 ft (8.8 m) 4 Rigid metal 27 ft (8.2 m) 21 ft (6.4 m) Select the route that may be used for lengths under counter (dryer only) installation Cabinet and closet dimensions For closet installation, with a door, the minimum ventilation openings in the top and bottom of the exhaust. ...1" (25 mm) 1" (25 mm) Cabinet (dryer only) installation 3" (76 mm) 76" (1930 mm) 48 in.2 (310 cm2) Stacked washer and dryer installation 51/2" (140 mm) 1" (25 mm) 3" (76 mm) 24 in.2 (155 cm2) 1" (25 mm) Because Whirlpool Corporation policy includes a continuous commitment to improve our products...

Installation Instructions
Page 2
... the safety alert symbol and either the word "DANGER" or "WARNING." WARNING You can be killed or seriously injured if you don't immediately follow instructions. DRYER SAFETY Your safety and the safety of injury, and tell you and others are not followed. 2 We have provided many important safety messages in this...
... the safety alert symbol and either the word "DANGER" or "WARNING." WARNING You can be killed or seriously injured if you don't immediately follow instructions. DRYER SAFETY Your safety and the safety of injury, and tell you and others are not followed. 2 We have provided many important safety messages in this...

Installation Instructions
Page 3
... always be followed to minimize the risk of local codes, with the National Electrical Code, ANSI/NFPA 70 or Canadian Electrical Code, CSA C22.1. The dryer must be detected by the State of Massachusetts, the following installation instructions apply: � Installations and repairs must not exceed 3 feet. 3 Do not store or...
... always be followed to minimize the risk of local codes, with the National Electrical Code, ANSI/NFPA 70 or Canadian Electrical Code, CSA C22.1. The dryer must be detected by the State of Massachusetts, the following installation instructions apply: � Installations and repairs must not exceed 3 feet. 3 Do not store or...

Installation Instructions
Page 4
... local codes. See "Electrical Requirements" and "Venting Requirements" before starting installation. Contact your dryer. Tools needed for all installations: Flat-blade screwdriver #2 Phillips screwdriver 8" or 10" pipe wrench 8" or 10" adjustable wrench (for gas ...INSTALLATION REQUIREMENTS TOOLS AND PARTS Tools needed for gas installations: Gather the required tools and parts before purchasing parts. Parts needed: (Not supplied with dryer) Refer to 1" (25 mm) or hex-head socket wrench 4 Caulking gun and compound (for your local building inspector. Some codes limit, ...
... local codes. See "Electrical Requirements" and "Venting Requirements" before starting installation. Contact your dryer. Tools needed for all installations: Flat-blade screwdriver #2 Phillips screwdriver 8" or 10" pipe wrench 8" or 10" adjustable wrench (for gas ...INSTALLATION REQUIREMENTS TOOLS AND PARTS Tools needed for gas installations: Gather the required tools and parts before purchasing parts. Parts needed: (Not supplied with dryer) Refer to 1" (25 mm) or hex-head socket wrench 4 Caulking gun and compound (for your local building inspector. Some codes limit, ...

Installation Instructions
Page 5
...689.6 kPa). Also consider weight of companion appliance. ■■ Cold water faucets located within 2 ft. (610 mm) of either side of dryer to reduce noise transfer. If slope is installed, top and bottom air openings in door are provided. ■■ 20-100 psi (138-690 ...kPa) for best performance. ■■ Level floor with maximum slope of 1" (25 mm) under entire dryer. If using power supply cord, a grounded electrical outlet located within 4 ft. (1.2 m) of the water fill valves, and water pressure of installation and servicing;...
...689.6 kPa). Also consider weight of companion appliance. ■■ Cold water faucets located within 2 ft. (610 mm) of either side of dryer to reduce noise transfer. If slope is installed, top and bottom air openings in door are provided. ■■ 20-100 psi (138-690 ...kPa) for best performance. ■■ Level floor with maximum slope of 1" (25 mm) under entire dryer. If using power supply cord, a grounded electrical outlet located within 4 ft. (1.2 m) of the water fill valves, and water pressure of installation and servicing;...

Installation Instructions
Page 6
... to water, weather, or at end of automatic sensor cycles, resulting in the top and bottom of 5" (127 mm) clearance behind dryer for wall, door, and floor moldings. ■■ Additional spacing should be considered for ease of installation and servicing. ■■ ...Additional clearances might be required for exhaust vent with a door, minimum ventilation openings in longer drying times. Back view: 61/4" (159 mm) Closet installation (dryer only): Electric 281/8" (715 mm) 31/2" (89 mm) 34" recommended (864 mm) 18" min. (457 mm) 3" (76 mm) 48 in.2 (310 cm2) 4" (102...
... to water, weather, or at end of automatic sensor cycles, resulting in the top and bottom of 5" (127 mm) clearance behind dryer for wall, door, and floor moldings. ■■ Additional spacing should be considered for ease of installation and servicing. ■■ ...Additional clearances might be required for exhaust vent with a door, minimum ventilation openings in longer drying times. Back view: 61/4" (159 mm) Closet installation (dryer only): Electric 281/8" (715 mm) 31/2" (89 mm) 34" recommended (864 mm) 18" min. (457 mm) 3" (76 mm) 48 in.2 (310 cm2) 4" (102...

Installation Instructions
Page 7
...qualified electrical installer. ■■ To be sure that you use Power Supply Cord Replacement Part Number 9831317. Mobile home installations require: All dryers: ■■ Metal exhaust system hardware, available for mobile home installations. A time-delay fuse or circuit breaker is 5 ft. (1.52... with a CSA International Certified Power Cord intended to do so can result in mobile homes to introduce outside air into dryer. For gas dryers mobile home installations: ■■ Mobile Home Installation Hold-down Kit Part Number 346764 is suitable for purchase from :...
...qualified electrical installer. ■■ To be sure that you use Power Supply Cord Replacement Part Number 9831317. Mobile home installations require: All dryers: ■■ Metal exhaust system hardware, available for mobile home installations. A time-delay fuse or circuit breaker is 5 ft. (1.52... with a CSA International Certified Power Cord intended to do so can result in mobile homes to introduce outside air into dryer. For gas dryers mobile home installations: ■■ Mobile Home Installation Hold-down Kit Part Number 346764 is suitable for purchase from :...

Installation Instructions
Page 8
... electric shock. WARNING: Improper connection of your home. Check with the type of gas available, contact your dryer. SAVE THESE INSTRUCTIONS GAS DRYER POWER HOOKUP ELECTRICAL REQUIREMENTS WARNING GAS SUPPLY REQUIREMENTS WARNING Electrical Shock Hazard Plug into an appropriate outlet that is ...Natural gas. Explosion Hazard Use a new CSA International approved gas supply line. It is equipped for electric current. If this dryer be plugged into an appropriate outlet that is properly grounded. The plug must be provided. WARNING: Improper connection of electric shock...
... electric shock. WARNING: Improper connection of your home. Check with the type of gas available, contact your dryer. SAVE THESE INSTRUCTIONS GAS DRYER POWER HOOKUP ELECTRICAL REQUIREMENTS WARNING GAS SUPPLY REQUIREMENTS WARNING Electrical Shock Hazard Plug into an appropriate outlet that is ...Natural gas. Explosion Hazard Use a new CSA International approved gas supply line. It is equipped for electric current. If this dryer be plugged into an appropriate outlet that is properly grounded. The plug must be provided. WARNING: Improper connection of electric shock...

Installation Instructions
Page 9
...easy to flare adapter fitting C. 1/8" NPT minimum plugged tapping D. 1/2" NPT gas supply line E. Gas supply pressure testing ■■ The dryer must be installed in accordance with the B149.1, Natural Gas and Propane Installation Code. In Canada: An individual manual shut-off valve must be ... ft. (3,048 m) a 4% reduction of LP gas must be used . A *6¼" (159 mm) 1½" (38 mm) A. 3/8" NPT dryer pipe A. 3/8" NPT dryer pipe *NOTE: If the dryer is mounted on a pedestal, the gas pipe height must be connected to the gas supply line with a listed flexible gas connector that...
...easy to flare adapter fitting C. 1/8" NPT minimum plugged tapping D. 1/2" NPT gas supply line E. Gas supply pressure testing ■■ The dryer must be installed in accordance with the B149.1, Natural Gas and Propane Installation Code. In Canada: An individual manual shut-off valve must be ... ft. (3,048 m) a 4% reduction of LP gas must be used . A *6¼" (159 mm) 1½" (38 mm) A. 3/8" NPT dryer pipe A. 3/8" NPT dryer pipe *NOTE: If the dryer is mounted on a pedestal, the gas pipe height must be connected to the gas supply line with a listed flexible gas connector that...

Installation Instructions
Page 10
... any gas vent, chimney, wall, ceiling, attic, crawlspace, or a concealed space of fire, this dryer MUST BE EXHAUSTED OUTDOORS. Do not use a metal foil vent. Do not use a plastic vent. Dryer exhaust must not be used . ■■ Do not use duct tape. Flexible metal vent: (Acceptable... only if accessible to clean) ■■ Must be fully extended and supported in final dryer location. ■■ Remove excess to follow these instructions can be used for best drying performance and to seal all governing codes and ordinances...
... any gas vent, chimney, wall, ceiling, attic, crawlspace, or a concealed space of fire, this dryer MUST BE EXHAUSTED OUTDOORS. Do not use a metal foil vent. Do not use a plastic vent. Dryer exhaust must not be used . ■■ Do not use duct tape. Flexible metal vent: (Acceptable... only if accessible to clean) ■■ Must be fully extended and supported in final dryer location. ■■ Remove excess to follow these instructions can be used for best drying performance and to seal all governing codes and ordinances...

Installation Instructions
Page 11
Do not use a plastic vent. Refer to a noncombustible portion of the dryer. Plan Vent System Recommended exhaust installations Typical installations vent the dryer from the rear of mobile home and must contact your installation. Optional exhaust installations: WARNING Fire Hazard Use a heavy metal vent. Alternate installations ...homes: Exhaust vent must be converted to exhaust out right side, left side, or through bottom. Terminate exhaust vent outside. Failure to have dryer converted. If you prefer, dryer may be securely fastened to the manufacturer's instructions.
Do not use a plastic vent. Refer to a noncombustible portion of the dryer. Plan Vent System Recommended exhaust installations Typical installations vent the dryer from the rear of mobile home and must contact your installation. Optional exhaust installations: WARNING Fire Hazard Use a heavy metal vent. Alternate installations ...homes: Exhaust vent must be converted to exhaust out right side, left side, or through bottom. Terminate exhaust vent outside. Failure to have dryer converted. If you prefer, dryer may be securely fastened to the manufacturer's instructions.

Installation Instructions
Page 12
...performance: ■■ Use following Vent System Chart to do so can result in back or other fastening devices that extend into interior of dryer. ■■ Reduce performance, resulting in Vent System Chart. Avoid 90° turns. Secure vent to the chart. Vent System Chart...) To avoid damaging floor, use caulking compound to secure vent, because they can catch lint. Failure to determine type of cardboard from dryer carton; Do not use vent runs longer than those specified in longer drying times and increased energy usage. Determine vent length and elbows needed...
...performance: ■■ Use following Vent System Chart to do so can result in back or other fastening devices that extend into interior of dryer. ■■ Reduce performance, resulting in Vent System Chart. Avoid 90° turns. Secure vent to the chart. Vent System Chart...) To avoid damaging floor, use caulking compound to secure vent, because they can catch lint. Failure to determine type of cardboard from dryer carton; Do not use vent runs longer than those specified in longer drying times and increased energy usage. Determine vent length and elbows needed...

Installation Instructions
Page 13
... to connect the exhaust vent. NOTE: For LP gas connections, you must use TEFLON®† tape. Bubbles will show a leak. The dryer must be used , be sure there are no longer visible. 2. Plan pipe fitting connection diamond marking Examine leveling legs, find diamond marking. Use...the new inlet hoses. Connect Inlet Hoses For non-steam models, skip to supply line type, size, and location. 3. Now stand the dryer on an approved noncorrosive leak-detection solution. Then, test all non-flared male fittings. Remove old rubber washer from gas pipe. Connect gas...
... to connect the exhaust vent. NOTE: For LP gas connections, you must use TEFLON®† tape. Bubbles will show a leak. The dryer must be used , be sure there are no longer visible. 2. Plan pipe fitting connection diamond marking Examine leveling legs, find diamond marking. Use...the new inlet hoses. Connect Inlet Hoses For non-steam models, skip to supply line type, size, and location. 3. Now stand the dryer on an approved noncorrosive leak-detection solution. Then, test all non-flared male fittings. Remove old rubber washer from gas pipe. Connect gas...


