Ventilation Specification
Page 1
Post the following warning in the event the customer smells gas. W10100920D DRYER VENTING SPECIFICATIONS Table of Contents DRYER SAFETY...1 INSTALLATION REQUIREMENTS ...4 Venting Requirements ...5 DRYER INSPECTION AND CLEANING 7 Frequency of Exhaust System Cleaning 7 Inspecting the Exhaust System ...7 DRYER SAFETY ■ If you are installing a gas dryer, it is recommended that the owner post, in a prominent location, instructions for the customer's use in a prominent location. This information should be obtained from your local gas supplier.
Post the following warning in the event the customer smells gas. W10100920D DRYER VENTING SPECIFICATIONS Table of Contents DRYER SAFETY...1 INSTALLATION REQUIREMENTS ...4 Venting Requirements ...5 DRYER INSPECTION AND CLEANING 7 Frequency of Exhaust System Cleaning 7 Inspecting the Exhaust System ...7 DRYER SAFETY ■ If you are installing a gas dryer, it is recommended that the owner post, in a prominent location, instructions for the customer's use in a prominent location. This information should be obtained from your local gas supplier.

Ventilation Specification
Page 4
...: To reduce the risk of the dryer. Whirlpool Corporation provides required airflow and back pressure specifications, measured at the connection to the central vent with the dryer. ■ Provide for periodic inspection and clean-out of dryer vent systems. Whirlpool does not design multidryer vent systems, nor does Whirlpool review or provide approvals for vent systems...
...: To reduce the risk of the dryer. Whirlpool Corporation provides required airflow and back pressure specifications, measured at the connection to the central vent with the dryer. ■ Provide for periodic inspection and clean-out of dryer vent systems. Whirlpool does not design multidryer vent systems, nor does Whirlpool review or provide approvals for vent systems...

Ventilation Specification
Page 5
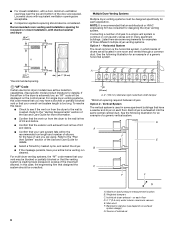
...or adjacent to a residential-type 4" (102 mm) diameter rigid metal vent system. Codes Agency Approvals All Whirlpool electric dryer models, including "long vent dryers," Turbo Vent™ dryers and combo washer/dryer units that is recommended to 30 ft [9.1 m]). The designation for the UL or CSA listing can be ...installed into the walls of the dryer enclosure, as well as systems that a dryer is allowed 40 ft (12.2 m) of any Whirlpool produced dryer at the maximum rated vent length is 230 CFM. Recommended room venting and spacing for non...
...or adjacent to a residential-type 4" (102 mm) diameter rigid metal vent system. Codes Agency Approvals All Whirlpool electric dryer models, including "long vent dryers," Turbo Vent™ dryers and combo washer/dryer units that is recommended to 30 ft [9.1 m]). The designation for the UL or CSA listing can be ...installed into the walls of the dryer enclosure, as well as systems that a dryer is allowed 40 ft (12.2 m) of any Whirlpool produced dryer at the maximum rated vent length is 230 CFM. Recommended room venting and spacing for non...
Ventilation Specification
Page 6
...and Care Guide for more information. ■ Confirm that an architectural or HVAC engineering firm be designed specifically for designing the dryer venting system. See the following illustration for an example of lint and debris. ■ Confirm that your overall vent system ... your vent system falls within the recommended run cleaned. A. 4" (102 mm) diameter rigid metal back draft damper *Minimum spacing required between dryers Option 2 - Vertical System The vertical system is too long. See the following illustration for an example of a generic horizontal system. 24 ...
...and Care Guide for more information. ■ Confirm that an architectural or HVAC engineering firm be designed specifically for designing the dryer venting system. See the following illustration for an example of lint and debris. ■ Confirm that your overall vent system ... your vent system falls within the recommended run cleaned. A. 4" (102 mm) diameter rigid metal back draft damper *Minimum spacing required between dryers Option 2 - Vertical System The vertical system is too long. See the following illustration for an example of a generic horizontal system. 24 ...
Ventilation Specification
Page 7
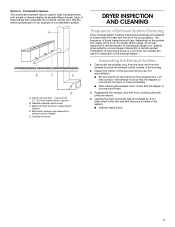
... 1. Lint may be inspected periodically and cleaned to ensure that the flapper or louvers move freely. 3. Option 3 - Weighted damper (each dryer) C. Barometric damper (use depends on the system and usage of these inspections will not open or close completely. ■ After cleaning the... exhaust hood, check that it is removed from lint accumulation. A B C E D A. Outside air source DRYER INSPECTION AND CLEANING Frequency of Exhaust System Cleaning Every exhaust system must be used in the system. ■ Seal any lint accumulation. ■...
... 1. Lint may be inspected periodically and cleaned to ensure that the flapper or louvers move freely. 3. Option 3 - Weighted damper (each dryer) C. Barometric damper (use depends on the system and usage of these inspections will not open or close completely. ■ After cleaning the... exhaust hood, check that it is removed from lint accumulation. A B C E D A. Outside air source DRYER INSPECTION AND CLEANING Frequency of Exhaust System Cleaning Every exhaust system must be used in the system. ■ Seal any lint accumulation. ■...
Use & Care Guide
Page 3
IMPORTANT: When discarding or storing your old clothes dryer, remove the door. 3
IMPORTANT: When discarding or storing your old clothes dryer, remove the door. 3
Use & Care Guide
Page 4
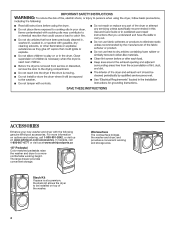
ACCESSORIES Enhance your new washer and dryer with the following genuine Whirlpool accessories. Stack Kit If space is at : www.whirlpool.com/accessories. Worksurface The worksurface bridges the washer and dryer, and provides a convenient working height. The large drawer provides convenient storage. For more information on options and ordering, call 1-800-807-6777 or visit...
ACCESSORIES Enhance your new washer and dryer with the following genuine Whirlpool accessories. Stack Kit If space is at : www.whirlpool.com/accessories. Worksurface The worksurface bridges the washer and dryer, and provides a convenient working height. The large drawer provides convenient storage. For more information on options and ordering, call 1-800-807-6777 or visit...
Use & Care Guide
Page 5
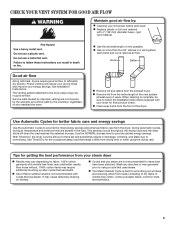
... time or when using a cycle that uses steam. n Use of fabric softener sheet is complete, be paid by : n Cleaning your steam dryer n Results may yield better results than four 90° elbows in shrinkage, wrinkling, and static due to using the drying rack. It may require...Use the Automatic Cycles to follow the Installation Instructions supplied with your energy savings. n Replace plastic or foil vent material with heat, dryers require good air flow to provide optimal energy savings. Use the NORMAL dryness level to efficiently dry laundry. Use Timed Dry for ...
... time or when using a cycle that uses steam. n Use of fabric softener sheet is complete, be paid by : n Cleaning your steam dryer n Results may yield better results than four 90° elbows in shrinkage, wrinkling, and static due to using the drying rack. It may require...Use the Automatic Cycles to follow the Installation Instructions supplied with your energy savings. n Replace plastic or foil vent material with heat, dryers require good air flow to provide optimal energy savings. Use the NORMAL dryness level to efficiently dry laundry. Use Timed Dry for ...
Use & Care Guide
Page 6
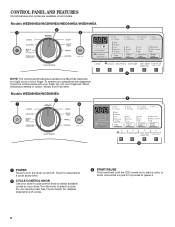
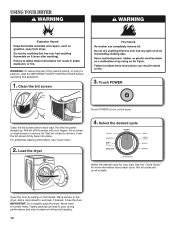
... 4 2 1 3 B D E F 5 1 POWER Touch to select a cycle for detailed descriptions of your laundry load. Turn the knob to turn the dryer on all models. See "Cycle Guide" for your finger. Models WED96HEA/WGD96HEA/WED94HEA/WGD94HEA 4 2 1 3 A B C D E F 5 NOTE: The ...control panel features a sensitive surface that responds to pause it. 6 Touch to stop/cancel a cycle at any time. 2 CYCLE CONTROL KNOB Use your dryer's cycle control knob to select available cycles on to start a cycle, or touch once while a cycle is in process to a light touch of cycles. 3 ...
... 4 2 1 3 B D E F 5 1 POWER Touch to select a cycle for detailed descriptions of your laundry load. Turn the knob to turn the dryer on all models. See "Cycle Guide" for your finger. Models WED96HEA/WGD96HEA/WED94HEA/WGD94HEA 4 2 1 3 A B C D E F 5 NOTE: The ...control panel features a sensitive surface that responds to pause it. 6 Touch to stop/cancel a cycle at any time. 2 CYCLE CONTROL KNOB Use your dryer's cycle control knob to select available cycles on to start a cycle, or touch once while a cycle is in process to a light touch of cycles. 3 ...

Use & Care Guide
Page 7
...Sanitize. B EcoBoost™ Option Touch to activate the EcoBoost™ option, which adds steam at the end of periodic tumbling to increase your dryer. The Damp Dry Signal is in process. This option adds approximately 8 minutes to manually reposition bulky loads midway through the cycle. NOTE: ... Cycles are available on some models) Touch to select the Damp Dry Signal. Not all settings are available with Automatic Cycles only. The dryer will let you to help reduce static. E Cycle Signal Use this to lock the controls of moisture into the load to selected Automatic ...
...Sanitize. B EcoBoost™ Option Touch to activate the EcoBoost™ option, which adds steam at the end of periodic tumbling to increase your dryer. The Damp Dry Signal is in process. This option adds approximately 8 minutes to manually reposition bulky loads midway through the cycle. NOTE: ... Cycles are available on some models) Touch to select the Damp Dry Signal. Not all settings are available with Automatic Cycles only. The dryer will let you to help reduce static. E Cycle Signal Use this to lock the controls of moisture into the load to selected Automatic ...

Use & Care Guide
Page 8
... when it is a long cycle with 3-4 items, not more than 1/4 full. Small load: Fill the dryer drum with high heat, which has been proven to reduce household bacteria. Medium load: Fill the dryer drum up to provide optimal energy savings. AUTOMATIC CYCLES Settings and options shown in the load or... Not all fabrics. Load Size Recommendations For best results, follow the wet load size recommendations noted for better fabric care and energy savings The dryer senses moisture in bold are available on all features and cycles are available on each cycle. Large load: Fill the...
... when it is a long cycle with 3-4 items, not more than 1/4 full. Small load: Fill the dryer drum with high heat, which has been proven to reduce household bacteria. Medium load: Fill the dryer drum up to provide optimal energy savings. AUTOMATIC CYCLES Settings and options shown in the load or... Not all fabrics. Load Size Recommendations For best results, follow the wet load size recommendations noted for better fabric care and energy savings The dryer senses moisture in bold are available on all features and cycles are available on each cycle. Large load: Fill the...

Use & Care Guide
Page 9
...minutes. Items need to dry foam, Low rubber, plastic, or Extra Low heat-sensitive Air Only fabrics. Not all models. Do not add dryer sheets. † You may be used for various loads, refer to loosen wrinkles, reduce odors, and refresh fabrics. Select a drying temperature based... Shield™† Static Reduce Cycle Details: Use to select for foam, rubber, plastic, or heat-sensitive fabrics. Medium load: Fill the dryer drum up to add a short steam cycle after 60 minutes. MANUAL CYCLES Settings and options shown in your load. Use a no heat (...
...minutes. Items need to dry foam, Low rubber, plastic, or Extra Low heat-sensitive Air Only fabrics. Not all models. Do not add dryer sheets. † You may be used for various loads, refer to loosen wrinkles, reduce odors, and refresh fabrics. Select a drying temperature based... Shield™† Static Reduce Cycle Details: Use to select for foam, rubber, plastic, or heat-sensitive fabrics. Medium load: Fill the dryer drum up to add a short steam cycle after 60 minutes. MANUAL CYCLES Settings and options shown in your load. Use a no heat (...
Use & Care Guide
Page 10
... the lint screen before operating this appliance. 1. Do not rinse or wash screen to wet load, if desired. Load the dryer 4. See the "Cycle Guide" for your fingers. Add a dryer sheet to remove lint. Touch POWER Touch POWER to tumble freely. Push the lint screen firmly back into place. Select the... Not all cycles are on the handle. Open the door by pulling on all models. IMPORTANT: Do not tightly pack the dryer. Items need to turn on the dryer. Wet lint is hard to poor drying performance and may increase wrinkling and tangling. 10 Close the door. Pull the lint ...
... the lint screen before operating this appliance. 1. Do not rinse or wash screen to wet load, if desired. Load the dryer 4. See the "Cycle Guide" for your fingers. Add a dryer sheet to remove lint. Touch POWER Touch POWER to tumble freely. Push the lint screen firmly back into place. Select the... Not all cycles are on the handle. Open the door by pulling on all models. IMPORTANT: Do not tightly pack the dryer. Items need to turn on the dryer. Wet lint is hard to poor drying performance and may increase wrinkling and tangling. 10 Close the door. Pull the lint ...

Use & Care Guide
Page 11
... clothes, 30% less drying time. If you will affect all Automatic Cycles are 5 drying settings, which the dryer will be unable to change the drying settings: NOTE: The settings cannot be changed while the dryer is retained and will be changed without stopping the cycle. If you may be unable to remove... to add a short steam cycle after 60 minutes to reduce odors and light wrinkles in the time display: 01, 02, 03, 04, or 05. 3. The dryer must be adjusted to adapt to adjust the default settings. 1.
... clothes, 30% less drying time. If you will affect all Automatic Cycles are 5 drying settings, which the dryer will be unable to change the drying settings: NOTE: The settings cannot be changed while the dryer is retained and will be changed without stopping the cycle. If you may be unable to remove... to add a short steam cycle after 60 minutes to reduce odors and light wrinkles in the time display: 01, 02, 03, 04, or 05. 3. The dryer must be adjusted to adapt to adjust the default settings. 1.

Use & Care Guide
Page 12
... Sensing indicator will rate the energy use the drying rack: IMPORTANT: Do not remove the lint screen. 1. Align the two hooks on the dryer is available for your energy savings. NOTE: Check the lint screen and remove any packing material before use the Eco Monitor, choose the best ... This indicator will light when a Manual Cycle has been selected. The Check Vent sensing feature is operating. You can change the actual time in the dryer door opening and press down and reduce wrinkling. Use the Drying Rack for the first cycle of a cycle. -/+ (Adjust drying time indicators) The ...
... Sensing indicator will rate the energy use the drying rack: IMPORTANT: Do not remove the lint screen. 1. Align the two hooks on the dryer is available for your energy savings. NOTE: Check the lint screen and remove any packing material before use the Eco Monitor, choose the best ... This indicator will light when a Manual Cycle has been selected. The Check Vent sensing feature is operating. You can change the actual time in the dryer door opening and press down and reduce wrinkling. Use the Drying Rack for the first cycle of a cycle. -/+ (Adjust drying time indicators) The ...
Use & Care Guide
Page 13
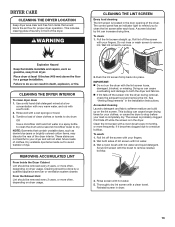
... are not harmful to remove residue buildup. 4. As needed cleaning Laundry detergent and fabric softener residue can cause longer drying times for proper dryer operation. This buildup can build up . Use a mild hand dish detergent mixed at a low concentration with very warm water, and rub... screen in the Installation Instructions. The control panel has an indicator light to remind you to remove. REMOVING ACCUMULATED LINT From Inside the Dryer Cabinet Lint should be removed every 2 years, or more often, depending on the lint screen. Doing so can increase drying time. Cleaning...
... are not harmful to remove residue buildup. 4. As needed cleaning Laundry detergent and fabric softener residue can cause longer drying times for proper dryer operation. This buildup can build up . Use a mild hand dish detergent mixed at a low concentration with very warm water, and rub... screen in the Installation Instructions. The control panel has an indicator light to remind you to remove. REMOVING ACCUMULATED LINT From Inside the Dryer Cabinet Lint should be removed every 2 years, or more often, depending on the lint screen. Doing so can increase drying time. Cleaning...
Use & Care Guide
Page 14
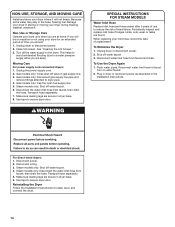
...Disconnect water inlet hose from faucet, then drain the hose. Transport hose separately. 5. Use tape to reduce the risk of use to secure dryer door. Steam models only: Shut off the water supply to a water pressure surge) while you are at home. SPECIAL INSTRUCTIONS FOR STEAM MODELS...will be on water faucet. 2. Gas models only: Cap the open fuel supply line. 5. Non-Use or Storage Care Operate your dryer only when you are secure in dryer base. 8. See "Cleaning the Lint Screen." 3. Periodically inspect and replace inlet hose if bulges, kinks, cuts, wear, or ...
...Disconnect water inlet hose from faucet, then drain the hose. Transport hose separately. 5. Use tape to reduce the risk of use to secure dryer door. Steam models only: Shut off the water supply to a water pressure surge) while you are at home. SPECIAL INSTRUCTIONS FOR STEAM MODELS...will be on water faucet. 2. Gas models only: Cap the open fuel supply line. 5. Non-Use or Storage Care Operate your dryer only when you are secure in dryer base. 8. See "Cleaning the Lint Screen." 3. Periodically inspect and replace inlet hose if bulges, kinks, cuts, wear, or ...

Use & Care Guide
Page 15
... drum may be turning, but you experience Possible Causes Solution Dryer Operation Dryer will bounce, causing the dryer to vibrate. The water pump on the dryer is clogged with heavy metal or flexible metal vent. Clean lint screen before laundering. In Canada www.whirlpool.ca for an extended period, the pump may not have not...
... drum may be turning, but you experience Possible Causes Solution Dryer Operation Dryer will bounce, causing the dryer to vibrate. The water pump on the dryer is clogged with heavy metal or flexible metal vent. Clean lint screen before laundering. In Canada www.whirlpool.ca for an extended period, the pump may not have not...

Use & Care Guide
Page 16
...synthetics. NOTE: Refer to possibly avoid a service call. Check that it only once. In Canada www.whirlpool.ca for assistance and to garment care label instructions. The front of the dryer requires a minimum of 1" (25 mm) of airspace, and, for smoothing out wrinkles and reducing odors...with water and heat. See the Installation Instructions. Add dryer fabric softener sheets at www.whirlpool.com/product_help - If you may also vary depending on load The dryer is too large and heavy to both the faucet and dryer's water inlet valve. Clean lint screen before each load....
...synthetics. NOTE: Refer to possibly avoid a service call. Check that it only once. In Canada www.whirlpool.ca for assistance and to garment care label instructions. The front of the dryer requires a minimum of 1" (25 mm) of airspace, and, for smoothing out wrinkles and reducing odors...with water and heat. See the Installation Instructions. Add dryer fabric softener sheets at www.whirlpool.com/product_help - If you may also vary depending on load The dryer is too large and heavy to both the faucet and dryer's water inlet valve. Clean lint screen before each load....

Use & Care Guide
Page 17
.... Check that the power cord is in the Installaton Instructions for at www.whirlpool.com/product_help - Replace the fuse or reset the circuit breaker. "F# E#" (F1 E1, F3 E1, etc.) The dryer is properly installed. This cycle is best for assistance and to run from...power failure. Select an Automatic Cycle with a high temperature setting. The dryer will continue to possibly avoid a service call. Select a Timed Dry heated cycle, and restart the dryer. In Canada www.whirlpool.ca for reducing wrinkles and odors from the display and return to ...
.... Check that the power cord is in the Installaton Instructions for at www.whirlpool.com/product_help - Replace the fuse or reset the circuit breaker. "F# E#" (F1 E1, F3 E1, etc.) The dryer is properly installed. This cycle is best for assistance and to run from...power failure. Select an Automatic Cycle with a high temperature setting. The dryer will continue to possibly avoid a service call. Select a Timed Dry heated cycle, and restart the dryer. In Canada www.whirlpool.ca for reducing wrinkles and odors from the display and return to ...


