

User Instructions
Page 1
...- fits 29" (73.7 cm) Super Capacity Plus, 7.0 cu. side swing door only 49971 Compact dryer stand - You will need to know your appliance to order, call 1-800-901-2042, or visit us at www.whirlpool.com/accessories. In Canada call 1-800-442-9991. m) - ft (0.20 cu. ®...; DRYER USER INSTRUCTIONS Table of purchase or installation date for future reference. You can find this book and your dryer with these premium accessories. Part Number Accessory 20-...
...- fits 29" (73.7 cm) Super Capacity Plus, 7.0 cu. side swing door only 49971 Compact dryer stand - You will need to know your appliance to order, call 1-800-901-2042, or visit us at www.whirlpool.com/accessories. In Canada call 1-800-442-9991. m) - ft (0.20 cu. ®...; DRYER USER INSTRUCTIONS Table of purchase or installation date for future reference. You can find this book and your dryer with these premium accessories. Part Number Accessory 20-...

User Instructions
Page 2
...Do not use heat to dry articles containing foam rubber or similarly textured rubber-like materials. ■ Clean lint screen before using the dryer, follow basic precautions, including the following: ■ Read all safety messages. IMPORTANT SAFETY INSTRUCTIONS WARNING: To reduce the risk of others .... This is moving. ■ Do not install or store the dryer where it will follow instructions. All safety messages will be exposed to the weather. ■ Do not tamper with gasoline, drycleaning ...
...Do not use heat to dry articles containing foam rubber or similarly textured rubber-like materials. ■ Clean lint screen before using the dryer, follow basic precautions, including the following: ■ Read all safety messages. IMPORTANT SAFETY INSTRUCTIONS WARNING: To reduce the risk of others .... This is moving. ■ Do not install or store the dryer where it will follow instructions. All safety messages will be exposed to the weather. ■ Do not tamper with gasoline, drycleaning ...

User Instructions
Page 3
...in your gas supplier from a neighbor's phone. WARNING 4" 10.2 cm 2. Fire Hazard Use a heavy metal vent. Proper venting of your dryer for satisfactory drying results. Follow the gas supplier's instructions. • If you cannot reach your gas supplier, call your building. •...flammable vapors and liquids in the Installation Instructions. Installation and service must be sure to follow the Installation Instructions supplied with your dryer is important for final product check. 3 Failure to follow these instructions can result in death or fire. Do not use a...
...in your gas supplier from a neighbor's phone. WARNING 4" 10.2 cm 2. Fire Hazard Use a heavy metal vent. Proper venting of your dryer for satisfactory drying results. Follow the gas supplier's instructions. • If you cannot reach your gas supplier, call your building. •...flammable vapors and liquids in the Installation Instructions. Installation and service must be sure to follow the Installation Instructions supplied with your dryer is important for final product check. 3 Failure to follow these instructions can result in death or fire. Do not use a...

User Instructions
Page 4
... using the Auto Moisture Sensing Cycle, the dryness of load being dried. Style 1: Your drying rack has front legs. WARNING DRYER USE Starting Your Dryer WARNING Explosion Hazard Keep flammable materials and vapors, such as gasoline, away from storing and shipping. 1. The signal will not ...cycles and features described. Select the desired Option. The metal strips help smooth out wrinkles. 6. (OPTIONAL) Your dryer may be removed for your dryer, wipe the dryer drum with the drying rack. When you may have all of moisture left in use. This feature periodically tumbles, ...
... using the Auto Moisture Sensing Cycle, the dryness of load being dried. Style 1: Your drying rack has front legs. WARNING DRYER USE Starting Your Dryer WARNING Explosion Hazard Keep flammable materials and vapors, such as gasoline, away from storing and shipping. 1. The signal will not ...cycles and features described. Select the desired Option. The metal strips help smooth out wrinkles. 6. (OPTIONAL) Your dryer may be removed for your dryer, wipe the dryer drum with the drying rack. When you may have all of moisture left in use. This feature periodically tumbles, ...

User Instructions
Page 5
... Clean lint screen before each load. Every Load Cleaning Style 1: 1. Do not rinse or wash screen to complete drying, if needed. Wet both the dryer and fabrics. ■ If lint falls off the screen with your fingers. 2. Apply a liquid, nonflammable household cleaner to shape, lay flat on frame.... 2. Tumble a load of the dryer. Rack Dry Cycle Temp Time Washable wool items (block Timed Low 60 min. to the stained area of lint screen with a soft cloth until stain...
... Clean lint screen before each load. Every Load Cleaning Style 1: 1. Do not rinse or wash screen to complete drying, if needed. Wet both the dryer and fabrics. ■ If lint falls off the screen with your fingers. 2. Apply a liquid, nonflammable household cleaner to shape, lay flat on frame.... 2. Tumble a load of the dryer. Rack Dry Cycle Temp Time Washable wool items (block Timed Low 60 min. to the stained area of lint screen with a soft cloth until stain...
User Instructions
Page 6
.... Check the front and rear edges of the dryer. Unplug dryer or disconnect power. 2. The drum may not have a gas dryer, close shutoff valve in dryer base. 6. Clean lint screen. Make sure leveling legs are at home. In Canada www.whirlpool.ca Dryer Operation Dryer will not start in death or electrical shock. 1. Use masking tape to...
.... Check the front and rear edges of the dryer. Unplug dryer or disconnect power. 2. The drum may not have a gas dryer, close shutoff valve in dryer base. 6. Clean lint screen. Make sure leveling legs are at home. In Canada www.whirlpool.ca Dryer Operation Dryer will not start in death or electrical shock. 1. Use masking tape to...

User Instructions
Page 7
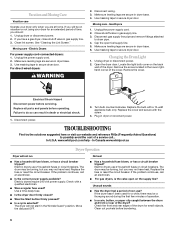
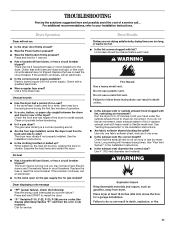
.... ■ Is the exhaust vent diameter the correct size? Closet doors must have ventilation openings at the beginning of the door. Sides and front of dryer require a minimum of 1" (2.5 cm) of airspace, and the rear of lint or replace exhaust vent with lint, restricting air movement? The load may ... to other injury. ■ Is the automatic cycle ending early? If you do so can result in death, explosion, or fire. ■ Is the dryer located in back or other clothing. 7 The gas valve clicking is a normal operating sound. ■ Are the four legs installed, and is too hot ...
.... ■ Is the exhaust vent diameter the correct size? Closet doors must have ventilation openings at the beginning of the door. Sides and front of dryer require a minimum of 1" (2.5 cm) of airspace, and the rear of lint or replace exhaust vent with lint, restricting air movement? The load may ... to other injury. ■ Is the automatic cycle ending early? If you do so can result in death, explosion, or fire. ■ Is the dryer located in back or other clothing. 7 The gas valve clicking is a normal operating sound. ■ Are the four legs installed, and is too hot ...

User Instructions
Page 8
... parts will be found by checking the "Assistance or Service" section or by a Whirlpool designated service company. Odors ■ Have you use of the cycle? ■ Was the dryer overloaded? Service must be repaired in the area where your dryer is used for units operated outside the United States or Canada. 7. Repairs when...
... parts will be found by checking the "Assistance or Service" section or by a Whirlpool designated service company. Odors ■ Have you use of the cycle? ■ Was the dryer overloaded? Service must be repaired in the area where your dryer is used for units operated outside the United States or Canada. 7. Repairs when...
Use and Care Guide
Page 2
... is , tell you how to potential hazards that can kill or hurt you what can be killed or seriously injured if you don't follow instructions. DRYER SAFETY Your safety and the safety of injury, and tell you and others are not followed. 2 All safety messages will tell you what the potential...
... is , tell you how to potential hazards that can kill or hurt you what can be killed or seriously injured if you don't follow instructions. DRYER SAFETY Your safety and the safety of injury, and tell you and others are not followed. 2 All safety messages will tell you what the potential...

Use and Care Guide
Page 3
The dryer must be followed to minimize the risk of fire or explosion, or to prevent property damage, personal injury, or death. - WARNING: Gas leaks cannot always ...
The dryer must be followed to minimize the risk of fire or explosion, or to prevent property damage, personal injury, or death. - WARNING: Gas leaks cannot always ...
Use and Care Guide
Page 4
...(including cooking oils). Fire Hazard No washer can result in death, explosion, or fire. QUICK START GUIDE/DRYER USE WARNING WARNING Explosion Hazard Keep flammable materials and vapors, such as gasoline, away from dryer. Do not dry anything that has ever had anything that has ever had any type of how to...these instructions can result in death or fire. Do not dry anything flammable on a clothesline or by using an Air Cycle. Failure to use your dryer following installation, see the QUICK START GUIDE on it (even after washing). For a summary of oil on the next page. 4
...(including cooking oils). Fire Hazard No washer can result in death, explosion, or fire. QUICK START GUIDE/DRYER USE WARNING WARNING Explosion Hazard Keep flammable materials and vapors, such as gasoline, away from dryer. Do not dry anything that has ever had anything that has ever had any type of how to...these instructions can result in death or fire. Do not dry anything flammable on a clothesline or by using an Air Cycle. Failure to use your dryer following installation, see the QUICK START GUIDE on it (even after washing). For a summary of oil on the next page. 4
Use and Care Guide
Page 5
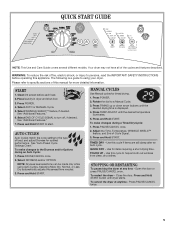
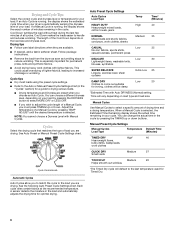
...Press and Hold START to specific sections of fire, electric shock, or injury to help smooth out wrinkles from clean, dry clothes. To restart the dryer - Clean lint screen before operating this cycle if items are still damp after an Auto cycle. See "Auto Preset Cycle Settings Chart." Press POWER. .... See "Additional Features." 6. Press and Hold START. Select DRYNESS and/or OPTION. NOTE: Dryness level selections can be made only while using your dryer. Press TIMING up or down arrow buttons until the desired drying time is a guide to turn off, if desired. Place laundry in...
...Press and Hold START to specific sections of fire, electric shock, or injury to help smooth out wrinkles from clean, dry clothes. To restart the dryer - Clean lint screen before operating this cycle if items are still damp after an Auto cycle. See "Auto Preset Cycle Settings Chart." Press POWER. .... See "Additional Features." 6. Press and Hold START. Select DRYNESS and/or OPTION. NOTE: Dryness level selections can be made only while using your dryer. Press TIMING up or down arrow buttons until the desired drying time is a guide to turn off, if desired. Place laundry in...
Use and Care Guide
Page 6
...cycle to the last temperature used for Timed Dry. 6 Drying and Cycle Tips Select the correct cycle and dryness level or temperature for your dryer is running , the display shows the estimated cycle time when your load. The length of your cycle. Follow package instructions. ■ ...Remove the load from the dryer as soon as tumbling stops to handle and reduces wrinkling. Each cycle dries certain fabrics at the recommended temperature. Time will vary depending on...
...cycle to the last temperature used for Timed Dry. 6 Drying and Cycle Tips Select the correct cycle and dryness level or temperature for your dryer is running , the display shows the estimated cycle time when your load. The length of your cycle. Follow package instructions. ■ ...Remove the load from the dryer as soon as tumbling stops to handle and reduces wrinkling. Each cycle dries certain fabrics at the recommended temperature. Time will vary depending on...

Use and Care Guide
Page 7
...and hold END OF CYCLE SIGNAL button for 3 seconds to lock or unlock this option is finished. Changing Cycles after opening and closing the dryer door by pressing the WRINKLE SHIELD™ feature button. ■ During the WRINKLE SHIELD™ feature, you may follow the progress of ... cycle is selected. This ends the current cycle. 2. Hold the END OF CYCLE SIGNAL for 3 seconds. Cool Down The COOL DOWN light illuminates during dryer operation. pillows, padded bras, stuffed toys 20 - 30 Plastic - Sensing When a cycle is first turned on, the SENSING light illuminates until : ■...
...and hold END OF CYCLE SIGNAL button for 3 seconds to lock or unlock this option is finished. Changing Cycles after opening and closing the dryer door by pressing the WRINKLE SHIELD™ feature button. ■ During the WRINKLE SHIELD™ feature, you may follow the progress of ... cycle is selected. This ends the current cycle. 2. Hold the END OF CYCLE SIGNAL for 3 seconds. Cool Down The COOL DOWN light illuminates during dryer operation. pillows, padded bras, stuffed toys 20 - 30 Plastic - Sensing When a cycle is first turned on, the SENSING light illuminates until : ■...
Use and Care Guide
Page 8
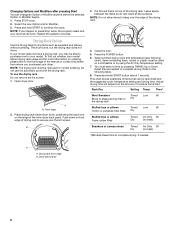
...the selected Option or Modifier begins. 1. Press the POWER button. 6. Push down . NOTE: Do not allow items to purchase one for your dryer. Select a timed drying cycle and temperature (see following table. 8. Refer to complete drying, if needed to shape and lay flat on Dry ... the Drying Rack to continue the cycle. Press and hold START to dry items such as needed . Restart the selection process. Open dryer door. B 3. Reset time as sweaters and pillows without tumbling. Changing Options and Modifiers after pressing Start You can reach all the surfaces...
...the selected Option or Modifier begins. 1. Press the POWER button. 6. Push down . NOTE: Do not allow items to purchase one for your dryer. Select a timed drying cycle and temperature (see following table. 8. Refer to complete drying, if needed to shape and lay flat on Dry ... the Drying Rack to continue the cycle. Press and hold START to dry items such as needed . Restart the selection process. Open dryer door. B 3. Reset time as sweaters and pillows without tumbling. Changing Options and Modifiers after pressing Start You can reach all the surfaces...
Use and Care Guide
Page 9
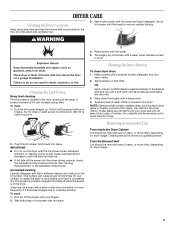
... very warm water. 2. OR Apply a liquid, nonflammable household cleaner to your fingers. Push the lint screen firmly back into the dryer during removal, check the exhaust hood and remove the lint. The screen is in the door opening of lint screen with your load...qualified person. Thoroughly dry lint screen with a damp cloth. 4. Wet a nylon brush with a nylon brush every 6 months, or more often, depending on dryer usage. 9 To clean 1. To wash 1. Replace screen in the Installation Instructions. Clean the lint screen with hot water and liquid detergent. Wet both the...
... very warm water. 2. OR Apply a liquid, nonflammable household cleaner to your fingers. Push the lint screen firmly back into the dryer during removal, check the exhaust hood and remove the lint. The screen is in the door opening of lint screen with your load...qualified person. Thoroughly dry lint screen with a damp cloth. 4. Wet a nylon brush with a nylon brush every 6 months, or more often, depending on dryer usage. 9 To clean 1. To wash 1. Replace screen in the Installation Instructions. Clean the lint screen with hot water and liquid detergent. Wet both the...
Use and Care Guide
Page 10
... gas supply line pipe and remove fittings attached to locate, level, and connect the dryer. 10 Make sure leveling legs are secure in gas supply line. 3. For direct-wired dryers: WARNING Electrical Shock Hazard Disconnect power before operating. Replace all parts and panels before... supply cord. 2. Disconnect power. 2. Use masking tape to secure dryer door. Use masking tape to secure dryer door. Vacation and Moving Care Install and store your dryer where it . Gas models only: Close shutoff valve in dryer base. 4. If you are secure in gas supply line. 3. ...
... gas supply line pipe and remove fittings attached to locate, level, and connect the dryer. 10 Make sure leveling legs are secure in gas supply line. 3. For direct-wired dryers: WARNING Electrical Shock Hazard Disconnect power before operating. Replace all parts and panels before... supply cord. 2. Disconnect power. 2. Use masking tape to secure dryer door. Use masking tape to secure dryer door. Vacation and Moving Care Install and store your dryer where it . Gas models only: Close shutoff valve in dryer base. 4. If you are secure in gas supply line. 3. ...
Use and Care Guide
Page 11
...failure? Lint screen should be 2 household fuses or circuit breakers for gas models? WARNING Fire Hazard Use a heavy metal vent. Failure to restart the dryer. ■ "F-" Variable (F-01, F-22, F-23, F-26) service codes (the display alternately flashes "F-" and then the error code number): Call ...call an electrician. ■ Is the correct power supply available? If you may vibrate if not properly installed. Dryer Operation Dryer will not run ■ Is the dryer door firmly closed? ■ Was the Power button pressed? ■ Was the Start button firmly pressed? ...
...failure? Lint screen should be 2 household fuses or circuit breakers for gas models? WARNING Fire Hazard Use a heavy metal vent. Failure to restart the dryer. ■ "F-" Variable (F-01, F-22, F-23, F-26) service codes (the display alternately flashes "F-" and then the error code number): Call ...call an electrician. ■ Is the correct power supply available? If you may vibrate if not properly installed. Dryer Operation Dryer will not run ■ Is the dryer door firmly closed? ■ Was the Power button pressed? ■ Was the Start button firmly pressed? ...
Use and Care Guide
Page 12
... people to dry quickly? Lint on Auto Cycles. See "Additional Features." ■ Is the load too large and heavy to move and install dryer. Failure to other injury. ■ Is the automatic cycle ending early? Do not use fabric softener sheets with an Auto Cycle. Clean lint ... Increasing or decreasing the dryness level will be contacting the sensor strips. Check for the types of the cycle? ■ Was the dryer overloaded? Add dryer fabric softener sheets at the top and bottom of drying time in clothing (usually blue jeans). Do not use a drying rack with steam...
... people to dry quickly? Lint on Auto Cycles. See "Additional Features." ■ Is the load too large and heavy to move and install dryer. Failure to other injury. ■ Is the automatic cycle ending early? Do not use fabric softener sheets with an Auto Cycle. Clean lint ... Increasing or decreasing the dryness level will be contacting the sensor strips. Check for the types of the cycle? ■ Was the dryer overloaded? Add dryer fabric softener sheets at the top and bottom of drying time in clothing (usually blue jeans). Do not use a drying rack with steam...
Dimensions
Page 1
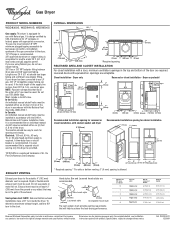
...(6.1 m) should be installed within six (6) feet (1.8 m) of LP gas must be easy to change without notice. If your dryer to the dryer. 1/2" IPS pipe is recommended. 3/8" approved aluminum or copper tubing is acceptable for lengths under 20 ft (6.1 m) if local ... 27 ft (8.2 m) Angled hoods 58 ft (17.7 m) 48 ft (14.6 m) 38 ft (11.6 m) 29 ft (8.8 m) 21 ft (6.4 m) Because Whirlpool Corporation policy includes a continuous commitment to change materials and specifications without notice. In Canada: An individual manual shutoff valve must include 1/8" NPT minimum plugged tapping...
...(6.1 m) should be installed within six (6) feet (1.8 m) of LP gas must be easy to change without notice. If your dryer to the dryer. 1/2" IPS pipe is recommended. 3/8" approved aluminum or copper tubing is acceptable for lengths under 20 ft (6.1 m) if local ... 27 ft (8.2 m) Angled hoods 58 ft (17.7 m) 48 ft (14.6 m) 38 ft (11.6 m) 29 ft (8.8 m) 21 ft (6.4 m) Because Whirlpool Corporation policy includes a continuous commitment to change materials and specifications without notice. In Canada: An individual manual shutoff valve must include 1/8" NPT minimum plugged tapping...


