Whirlpool WGD8127LW Support and Manuals
Get Help and Manuals for this Whirlpool item

View All Support Options Below
Free Whirlpool WGD8127LW manuals!
Problems with Whirlpool WGD8127LW?
Ask a Question
Free Whirlpool WGD8127LW manuals!
Problems with Whirlpool WGD8127LW?
Ask a Question
Popular Whirlpool WGD8127LW Manual Pages
Owners Manual - Page 2

...:
DANGER
You can be electrically grounded in accordance with local codes, or in the absence of local codes, with the National Electrical Code, ANSI/NFPA 70, or the Canadian Electrical Code, Part 1, CSA C22.1.
2
This is , tell you don't immediately follow instructions. IMPORTANT: The gas installation must be killed or seriously injured if you what the potential...
Owners Manual - Page 4
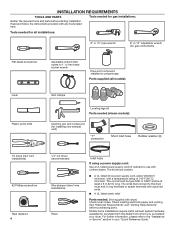
... with a temperature rating of 140°F (60°C) minimum. Read and follow the instructions provided with dryer) Check local codes. The wires that opens to 1" or hex-head socket wrench
Pipe-joint compound resistant to propane gas
Parts supplied (all installations:
8" or 10" pipe wrench
8" or 10" adjustable wrench (for gas connections)
Flat-blade...
Owners Manual - Page 5
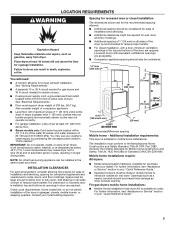
... least 18 inches (46 cm) above floor.
■ Steam models only: Cold water faucets located within 2 ft (610 mm) of either side of dryer. Contact your "Quick Reference Guide."
5 For further information, see "Assistance or Service" section in the top and bottom of installation and servicing, spacing for companion appliances and clearances for mobile home...
Owners Manual - Page 7

...service...Service" section of your responsibility:
■ To contact a qualified electrical installer....
■ To be obtained from: Canadian Standards Association,
178 Rexdale Blvd., Toronto, ON M9W 1R3 CANADA.
■ To supply the required 4-wire, single phase, 120/240 V,
60 Hz, AC only electrical supply on a separate 30 A circuit,
fused on both sides of above codes... instructions ...
Owners Manual - Page 8
...an individual manual shutoff valve be installed within six (6) ft (1.8 m) of the dryer in the "Assistance or Service" section...model/serial number plate is a registered trademark of propane gas must be installed within six (6) ft (1.8 m) of gas available, contact your "Quick Reference Guide... the B149.1, Natural Gas and Propane Installation Code. The location should use larger tubing and...
Owners Manual - Page 15

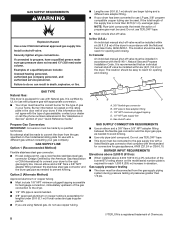
... threads of a qualified person include: licensed heating personnel, authorized gas company personnel, and authorized service personnel. Examples of all non-flared male fittings. Connect gas supply to propane, have a ...off valve
Closed valvAe
BOpen valve
Open shut-off valve. Correct any leaks found.
15 Install a shut-off valve in death, explosion, or fire.
1. If flexible metal tubing ...
Owners Manual - Page 16
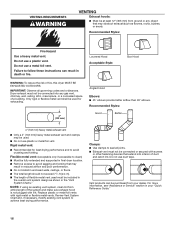
...Replace plastic or metal foil vents with screws
or other fastening devices that extend into any object that may result in reduced airflow and poor performance.
■ Do not install...more information, see "Assistance or Service" section in your dealer. ... your "Quick Reference Guide."
16
Do not...supported in final dryer location.
■ Remove excess to seal all governing codes...
Owners Manual - Page 21
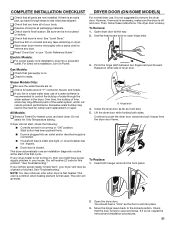
...problem. Then, follow these instructions. Lift the dryer door while holding both hanger arms into a grounded
outlet. q Remove film on console and any dust. For direct wire installation, turn on dryer. Gas Models...system, which will receive L2 code for certain part replacement or repair.
You will reduce product performance. NOTE: You may clog different parts of lime scale may notice...
Owners Manual - Page 22
Install 2 plastic plugs (A) into...® screwdriver
#2 Phillips screwdriver
You can change your door swing from where they were removed. Set the hinge screws off the cabinet. Reverse the strike: 1. Door strike B.
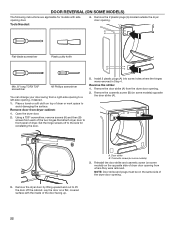
Remove the 2 ...door to avoid damaging the surface. DOOR REVERSAL (ON SOME MODELS)
The following instructions are applicable for reinstalling the door.
5. Place a towel ...
Owners Manual - Page 25

Using a T20® screwdriver, install (A) screws and then (B) screws.
Install hinge covers and plugs. Hang door by sliding the top into the dryer door by placing set pin in sideways to snap into place.
11. Tighten all hinge screws. Hinge covers will ...176; and snap into place with the hinges lined up with the hinge holes.
12. Install 6 hinge screws and the other 2 screws.
13.
Owners Manual - Page 26
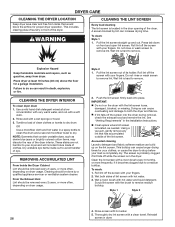
...not run the dryer with a wet sponge or towel. 3. See "Venting Requirements" in the Installation Instructions.
■ Clean space where lint screen is completely dry. This buildup can cause overheating and damage...not stain future loads of the dryer. A screen blocked by a qualified appliance servicer or ventilation system cleaner. Failure to your load is located, as needed cleaning
...
Owners Manual - Page 27
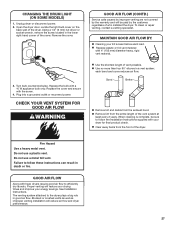
... than four 90° elbows in death or fire. Using a 1/4" (6 mm) nut driver or socket wrench, remove the screw located in good air flow.
Open the dryer door. Plug into a grounded outlet or reconnect power. See Installation Instructions. Turn bulb counterclockwise. Replace the bulb with heat, dryers require good air flow to follow the...
Owners Manual - Page 28
... On models with base trim: Remove base trim before servicing.
To... should:
1.
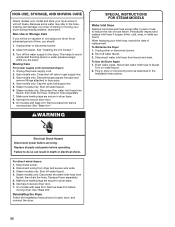
Replace all parts and panels before...INSTRUCTIONS FOR STEAM MODELS
Water Inlet Hose Replace inlet hose and hose screen after 5 years of use to dryer pipe. 4. Disconnect wiring from
faucet; Non-Use or Storage Care
If you are found. NON-USE, STORAGE, AND MOVING CARE
Steam models only: Install...
Dimension Guide - Page 2

... DIMENSIONS
WARNING: To reduce the risk of fire, electric shock, or injury to persons, read the IMPORTANT SAFETY INSTRUCTIONS and INSTALLATION INSTRUCTIONS, located in (max) 433/4 405∕8 71/4 - mm (max) 1111 1031 184 -
2 Electrical Requirements...61/4 103∕8
mm (min) 1086 686 1006 759 158 264
in your appliance's Owner's Manual, before installing and operating this appliance.
Dimension Guide - Page 4
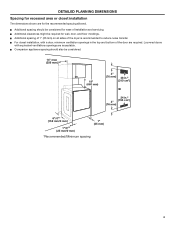
...) 48 in. (310 cm2)
24 in the top and bottom of the door are acceptable. Ƀ Companion appliance spacing should be considered for ease of installation and servicing. Ƀ Additional clearances might be required for wall, door, and floor moldings. Ƀ Additional spacing of 1" (25 mm) on all sides of the dryer...
Whirlpool WGD8127LW Reviews
We have not received any reviews for Whirlpool yet.