Owners Manual
Page 6
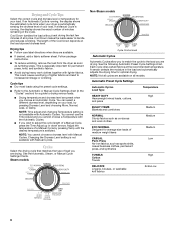
... corduroys and work clothes together with Manual Cycles. Cycle tips ■ Dry most loads using the preset cycle settings. ■ Refer to handle and reduces wrinkling. If a Manual Cycle is especially important for optimal drying. Drying tips ■ Follow care label directions when they are drying. NOTE: Time adjust and changing Temperature setting is not available with Automatic Cycles. Changing the Dryness Level setting is not available with Manual Cycles. Cycles Select the drying cycle that matches the type of load you...
... corduroys and work clothes together with Manual Cycles. Cycle tips ■ Dry most loads using the preset cycle settings. ■ Refer to handle and reduces wrinkling. If a Manual Cycle is especially important for optimal drying. Drying tips ■ Follow care label directions when they are drying. NOTE: Time adjust and changing Temperature setting is not available with Automatic Cycles. Changing the Dryness Level setting is not available with Manual Cycles. Cycles Select the drying cycle that matches the type of load you...
Owners Manual
Page 9
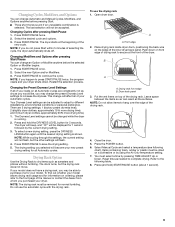
... dryer back panel. The last selection will flash. 4. Changing Cycles after pressing Start/Pause You can be removed for 1 second followed by pressing TIME ADJUST Up or Down. Press START/PAUSE once. 2. B A A. Press and hold ) START/PAUSE button (about 1 second). 9 Press START/PAUSE to complete drying. NOTE: If you purchased your model. The Dryness Level settings cannot be accepted. Open dryer door. Dryer back panel 3. Press START/PAUSE. Do not use the drying rack...
... dryer back panel. The last selection will flash. 4. Changing Cycles after pressing Start/Pause You can be removed for 1 second followed by pressing TIME ADJUST Up or Down. Press START/PAUSE once. 2. B A A. Press and hold ) START/PAUSE button (about 1 second). 9 Press START/PAUSE to complete drying. NOTE: If you purchased your model. The Dryness Level settings cannot be accepted. Open dryer door. Dryer back panel 3. Press START/PAUSE. Do not use the drying rack...
Owners Manual
Page 10
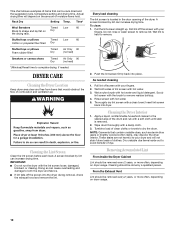
... Timed Dry Air Only 90 (no heat) *(Minutes) Reset time to avoid transfer of dye. Push the lint screen firmly back into dryer. Dry unstable dye items inside out to complete drying, if needed cleaning 1. IMPORTANT: ■ Do not run the dryer with hot water. 3. A screen blocked by lint can increase drying time. Time* Wool Sweaters Timed Low 60 Block to remove. 2. A screen blocked by lint can increase drying time. Pull the lint screen straight up. Cleaning the Dryer Interior 1. DRYER CARE Cleaning the Dryer Location Keep dryer area clear and free...
... Timed Dry Air Only 90 (no heat) *(Minutes) Reset time to avoid transfer of dye. Push the lint screen firmly back into dryer. Dry unstable dye items inside out to complete drying, if needed cleaning 1. IMPORTANT: ■ Do not run the dryer with hot water. 3. A screen blocked by lint can increase drying time. Time* Wool Sweaters Timed Low 60 Block to remove. 2. A screen blocked by lint can increase drying time. Pull the lint screen straight up. Cleaning the Dryer Interior 1. DRYER CARE Cleaning the Dryer Location Keep dryer area clear and free...

Owners Manual
Page 11
.... 4. Plug in dryer or reconnect power. Vacation or Storage Care Operate your dryer only when you open the door. Unplug dryer or disconnect power. 2. Unplug the power supply cord. 2. To winterize dryer 1. Flush water pipes. Changing the Drum Light The dryer light automatically turns on the back wall of time, you should not require changing; Replace all parts and panels before servicing. Steam models only: Shut off water faucet. 3. Replace the cover and secure with a 10-watt appliance bulb only. Steam Models Only: Turn off water faucet. 3. Transport hose...
.... 4. Plug in dryer or reconnect power. Vacation or Storage Care Operate your dryer only when you open the door. Unplug dryer or disconnect power. 2. Unplug the power supply cord. 2. To winterize dryer 1. Flush water pipes. Changing the Drum Light The dryer light automatically turns on the back wall of time, you should not require changing; Replace all parts and panels before servicing. Steam models only: Shut off water faucet. 3. Replace the cover and secure with a 10-watt appliance bulb only. Steam Models Only: Turn off water faucet. 3. Transport hose...

Owners Manual
Page 12
... dryer's heater from turning on gas models? Unusual sounds ■ Has the dryer had a period of non-use 2 household fuses or circuit breakers. The dryer may require pressing and holding the Start/Pause button for 2-5 seconds. ■ Has a household fuse blown, or has a circuit breaker tripped? Separate the load items and restart the dryer. Electric dryers use ? Try the following : Clean lint screen. If the message persists, have your vent system falls withing the recommended run length and number...
... dryer's heater from turning on gas models? Unusual sounds ■ Has the dryer had a period of non-use 2 household fuses or circuit breakers. The dryer may require pressing and holding the Start/Pause button for 2-5 seconds. ■ Has a household fuse blown, or has a circuit breaker tripped? Separate the load items and restart the dryer. Electric dryers use ? Try the following : Clean lint screen. If the message persists, have your vent system falls withing the recommended run length and number...
Owners Manual
Page 13
... vent. Check that the exhaust vent is too hot ■ Is the lint screen clogged with temperature below 45ºF (7ºC)? See the Installation Instructions. ■ Are fabric softener sheets blocking the grille? default time), which can result in a closet? Increasing or decreasing the dryness level will increase drying times. Proper operation of 1" (25 mm). Closet doors must have ventilation openings at the top and bottom of lint or replace exhaust vent...
... vent. Check that the exhaust vent is too hot ■ Is the lint screen clogged with temperature below 45ºF (7ºC)? See the Installation Instructions. ■ Are fabric softener sheets blocking the grille? default time), which can result in a closet? Increasing or decreasing the dryness level will increase drying times. Proper operation of 1" (25 mm). Closet doors must have ventilation openings at the top and bottom of lint or replace exhaust vent...
Owners Manual
Page 14
... first time? The odor will not transfer to a partially dried load can tumble freely. Stains on . Fabric softener sheets added to other clothing. Check that water inlet hose is connected to tumble the load with Quick Refresh Cycle. For Steam Dryers select Enhanced Touch Up Cycle to the dryer. Drum stains are wrinkled ■ Was the load removed from loads consisting of the cycle. This cycle is connected to garment care label instructions. The new electric heating element...
... first time? The odor will not transfer to a partially dried load can tumble freely. Stains on . Fabric softener sheets added to other clothing. Check that water inlet hose is connected to tumble the load with Quick Refresh Cycle. For Steam Dryers select Enhanced Touch Up Cycle to the dryer. Drum stains are wrinkled ■ Was the load removed from loads consisting of the cycle. This cycle is connected to garment care label instructions. The new electric heating element...
Owners Manual
Page 15
.... 3. This warranty gives you specific legal rights, and you also may not apply to you need to know your authorized Whirlpool dealer to determine if another warranty applies. Write down the following information about your major appliance to better help can find this information on the model and serial number label located on how to use or when it . Replacement parts or repair labor...
.... 3. This warranty gives you specific legal rights, and you also may not apply to you need to know your authorized Whirlpool dealer to determine if another warranty applies. Write down the following information about your major appliance to better help can find this information on the model and serial number label located on how to use or when it . Replacement parts or repair labor...

Warranty
Page 1
... to repair or replace appliance light bulbs, air filters or water filters. Consumable parts are unable to resolve the problem after checking "Troubleshooting," additional help you obtain assistance or service if you are excluded from warranty coverage. 4. Replacement parts or repair labor on how to use or when it . This warranty gives you specific legal rights, and you on major appliances with electrical or plumbing codes, or use of products not approved by a Whirlpool designated service...
... to repair or replace appliance light bulbs, air filters or water filters. Consumable parts are unable to resolve the problem after checking "Troubleshooting," additional help you obtain assistance or service if you are excluded from warranty coverage. 4. Replacement parts or repair labor on how to use or when it . This warranty gives you specific legal rights, and you on major appliances with electrical or plumbing codes, or use of products not approved by a Whirlpool designated service...
Dimension Guide
Page 1
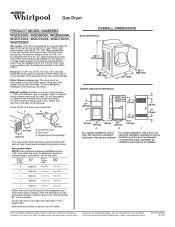
... details, see Installation Instructions packed with a door, the minimum ventilation openings in the top are required. Specifications subject to change without notice. Dryer can result. To determine maximum exhaust length, add one 90° turn inside the dryer. Use the fewest 90° turns possible. Because Whirlpool Corporation policy includes a continuous commitment to improve our products, we reserve the right to change materials and specifications without notice. When...
... details, see Installation Instructions packed with a door, the minimum ventilation openings in the top are required. Specifications subject to change without notice. Dryer can result. To determine maximum exhaust length, add one 90° turn inside the dryer. Use the fewest 90° turns possible. Because Whirlpool Corporation policy includes a continuous commitment to improve our products, we reserve the right to change materials and specifications without notice. When...
Installation Instructions
Page 4
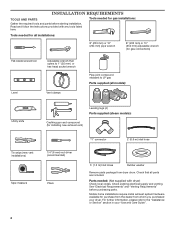
... legs (4) Parts supplied (steam models): Caulking gun and compound (for installing new exhaust vent) 1/4"( 6 mm) nut driver (recommended) Pliers "Y" connector 2' (0.6 m) inlet hose 5' (1.5 m) Inlet Hose Rubber washer Remove parts package from whom you purchased your "Use and Care Guide". 4 See "Electrical Requirements" and "Venting Requirements" before starting installation. Mobile home installations require metal exhaust system hardware available for purchase from the dealer from dryer drum. INSTALLATION REQUIREMENTS TOOLS AND PARTS Tools needed for gas installations: Gather...
... legs (4) Parts supplied (steam models): Caulking gun and compound (for installing new exhaust vent) 1/4"( 6 mm) nut driver (recommended) Pliers "Y" connector 2' (0.6 m) inlet hose 5' (1.5 m) Inlet Hose Rubber washer Remove parts package from whom you purchased your "Use and Care Guide". 4 See "Electrical Requirements" and "Venting Requirements" before starting installation. Mobile home installations require metal exhaust system hardware available for purchase from the dealer from dryer drum. INSTALLATION REQUIREMENTS TOOLS AND PARTS Tools needed for gas installations: Gather...
Installation Instructions
Page 5
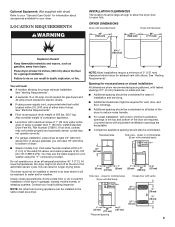
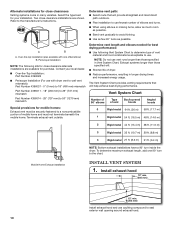
...) 431/2" (783 mm) NOTE: Most installations require a minimum of 5" (127 mm) clearance behind dryer for exhaust vent with maximum slope of 1" (25 mm) under entire dryer. See "Venting Requirements". ■■ A separate 15 or 20-amp circuit needed for gas dryers and 30-amp circuit needed for electric dryers. ■■ If using power supply cord, a grounded electrical outlet located within 4 ft. (1.2 m) of the water fill valves, and water pressure of companion appliance. ■■...
...) 431/2" (783 mm) NOTE: Most installations require a minimum of 5" (127 mm) clearance behind dryer for exhaust vent with maximum slope of 1" (25 mm) under entire dryer. See "Venting Requirements". ■■ A separate 15 or 20-amp circuit needed for gas dryers and 30-amp circuit needed for electric dryers. ■■ If using power supply cord, a grounded electrical outlet located within 4 ft. (1.2 m) of the water fill valves, and water pressure of companion appliance. ■■...
Installation Instructions
Page 6
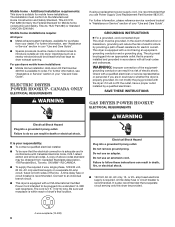
... fuse or circuit breaker is required. For further information, please reference service numbers located in your "Use and Care Guide". grounding conductor can result in accordance with a CSA International Certified Power Cord intended to introduce outside air into an appropriate outlet that a separate circuit serving only this dryer be plugged into dryer. Do not use an extension cord. amp fused electrical supply is recommended. GROUNDING INSTRUCTIONS � For a grounded, cord-connected dryer: This dryer must be provided. 4-wire...
... fuse or circuit breaker is required. For further information, please reference service numbers located in your "Use and Care Guide". grounding conductor can result in accordance with a CSA International Certified Power Cord intended to introduce outside air into an appropriate outlet that a separate circuit serving only this dryer be plugged into dryer. Do not use an extension cord. amp fused electrical supply is recommended. GROUNDING INSTRUCTIONS � For a grounded, cord-connected dryer: This dryer must be provided. 4-wire...
Installation Instructions
Page 7
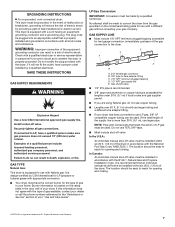
... for lengths under 20 ft. (6.1 m) if local codes and gas supplier permit. ■■ If you are using Natural gas, do so can result in accordance with the B149.1, Natural Gas and Propane Installation Code. grounding conductor can be made by a qualified electrician. In Canada: An individual manual shut-off valve must be plugged into an appropriate outlet that is located on the model/serial rating plate for use LP gas, 3/8" LP...
... for lengths under 20 ft. (6.1 m) if local codes and gas supplier permit. ■■ If you are using Natural gas, do so can result in accordance with the B149.1, Natural Gas and Propane Installation Code. grounding conductor can be made by a qualified electrician. In Canada: An individual manual shut-off valve must be plugged into an appropriate outlet that is located on the model/serial rating plate for use LP gas, 3/8" LP...

Installation Instructions
Page 8
...; Do not install in final dryer location. ■■ Remove excess to achieve best drying performance. †®TEFLON is not plugged with rigid metal or flexible metal vents. GAS SUPPLY CONNECTION REQUIREMENTS ■■ Use an elbow and a 3/8" flare x 3/8" NPT adapter fitting between the flexible gas connector and the dryer gas pipe, as needed to avoid crushing and kinking. VENTING Venting REQUiREMENTS WARNING BURNER INPUT REQUIREMENTS Elevations above 10...
...; Do not install in final dryer location. ■■ Remove excess to achieve best drying performance. †®TEFLON is not plugged with rigid metal or flexible metal vents. GAS SUPPLY CONNECTION REQUIREMENTS ■■ Use an elbow and a 3/8" flare x 3/8" NPT adapter fitting between the flexible gas connector and the dryer gas pipe, as needed to avoid crushing and kinking. VENTING Venting REQUiREMENTS WARNING BURNER INPUT REQUIREMENTS Elevations above 10...
Installation Instructions
Page 10
... Determine vent length and elbows needed for best drying performance: ■■ Use following kits for close clearance alternate installations are shown. Vent System Chart Number of 90° elbows Type of vent Box/louvered hoods Angled hoods Special provisions for your local dealer. ■■ Over-the-Top Installation: Part Number 4396028 ■■ Periscope Installation (For use with one 90° turn inside the dryer. Terminate exhaust vent outside...
... Determine vent length and elbows needed for best drying performance: ■■ Use following kits for close clearance alternate installations are shown. Vent System Chart Number of 90° elbows Type of vent Box/louvered hoods Angled hoods Special provisions for your local dealer. ■■ Over-the-Top Installation: Part Number 4396028 ■■ Periscope Installation (For use with one 90° turn inside the dryer. Terminate exhaust vent outside...
Installation Instructions
Page 11
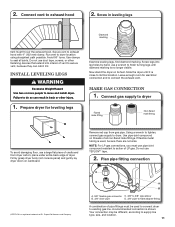
... exhaust vent. Avoid 90° turns. MAKE GAS CONNECTION 1. Install Leveling Legs WARNING Excessive Weight Hazard Use two or more people to supply line type, size, and location. 11 Firmly grasp dryer body (not console panel) and gently lay dryer down on threads of cardboard from gas pipe. Connect vent to existing gas line. place under entire back edge of LP gas. Do not use TEFLON®† tape. 2. Prepare dryer for electrical connection...
... exhaust vent. Avoid 90° turns. MAKE GAS CONNECTION 1. Install Leveling Legs WARNING Excessive Weight Hazard Use two or more people to supply line type, size, and location. 11 Firmly grasp dryer body (not console panel) and gently lay dryer down on threads of cardboard from gas pipe. Connect vent to existing gas line. place under entire back edge of LP gas. Do not use TEFLON®† tape. 2. Prepare dryer for electrical connection...

Installation Instructions
Page 13
... long hose to fill valve at bottom of dryer back panel. If connecting to existing vent, make sure vent is secured to exhaust hood with a 4" (102 mm) clamp. 2. Move dryer to final location. Check for leaks Move dryer to final location Check that vent is clean. Connect vent to exhaust outlet 11" (279 mm) 3 3/4" (95 mm) Attach other end of long hose to dryer fill valve and tighten coupling Connect vent 1. Turn on cold water faucet Using a 4" (102 mm) clamp, connect vent...
... long hose to fill valve at bottom of dryer back panel. If connecting to existing vent, make sure vent is secured to exhaust hood with a 4" (102 mm) clamp. 2. Move dryer to final location. Check for leaks Move dryer to final location Check that vent is clean. Connect vent to exhaust outlet 11" (279 mm) 3 3/4" (95 mm) Attach other end of long hose to dryer fill valve and tighten coupling Connect vent 1. Turn on cold water faucet Using a 4" (102 mm) clamp, connect vent...
Installation Instructions
Page 14
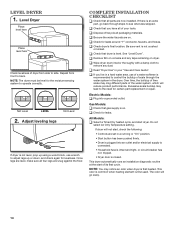
... there is an extra part, go away. 14 Be sure vent is on console and any dust. Electric Models: q Plug into an outlet and/or electrical supply is connected. • Household fuse is intact and tight, or circuit breaker has not tripped. • Dryer door is recommended to side. All Models: q Select a Timed Dry heated cycle, and start , check the following: • Controls are on dryer. NOTE: The dryer must be level for...
... there is an extra part, go away. 14 Be sure vent is on console and any dust. Electric Models: q Plug into an outlet and/or electrical supply is connected. • Household fuse is intact and tight, or circuit breaker has not tripped. • Dryer door is recommended to side. All Models: q Select a Timed Dry heated cycle, and start , check the following: • Controls are on dryer. NOTE: The dryer must be level for...

Installation Instructions
Page 17
... air movement, clean exhaust system of the dryer requires 5" (127 mm). See "Installation Instructions". ■■ Are fabric softener sheets blocking the grille? Run the dryer for most installations, the rear of lint or replace exhaust vent with lint, restricting air movement? Use only one fabric softener sheet, and use it only once. ■■ Is the exhaust vent the correct length? Proper operation of the door. Check that the exhaust vent is too hot ■■ Is the lint screen clogged with temperature...
... air movement, clean exhaust system of the dryer requires 5" (127 mm). See "Installation Instructions". ■■ Are fabric softener sheets blocking the grille? Run the dryer for most installations, the rear of lint or replace exhaust vent with lint, restricting air movement? Use only one fabric softener sheet, and use it only once. ■■ Is the exhaust vent the correct length? Proper operation of the door. Check that the exhaust vent is too hot ■■ Is the lint screen clogged with temperature...


