Owners Manual
Page 2
... and others are not followed. 2 All safety messages will follow instructions. We have provided many important safety messages in this manual and on your appliance. DRYER SAFETY Your safety and the safety of injury, and tell you don't follow the safety alert symbol and either the word "DANGER" or "WARNING."
... and others are not followed. 2 All safety messages will follow instructions. We have provided many important safety messages in this manual and on your appliance. DRYER SAFETY Your safety and the safety of injury, and tell you don't follow the safety alert symbol and either the word "DANGER" or "WARNING."
Owners Manual
Page 3
... supplier, call your gas supplier. WHAT TO DO IF YOU SMELL GAS: • Do not try to prevent property damage, personal injury, or death. - The dryer must be electrically grounded in accordance with local codes, or in the absence of local codes, with the National Fuel Gas Code, ANSI Z223.1/NFPA...
... supplier, call your gas supplier. WHAT TO DO IF YOU SMELL GAS: • Do not try to prevent property damage, personal injury, or death. - The dryer must be electrically grounded in accordance with local codes, or in the absence of local codes, with the National Fuel Gas Code, ANSI Z223.1/NFPA...
Owners Manual
Page 4
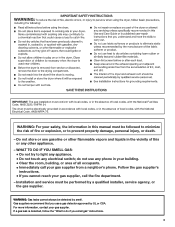
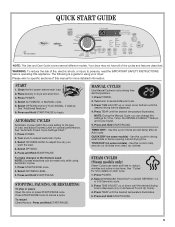
... laundry. each load. ■ Replace plastic or foil vent material with 4" (102 mm) diameter heavy, rigid vent material. QUICK START GUIDE/DRYER USE WARNING WARNING Explosion Hazard Keep flammable materials and vapors, such as gasoline, away from the front of the vent system at least every 2 ...use a metal foil vent. Good Better ■ Remove lint and debris from the exhaust hood. ■ Remove lint from the entire length of dryer. When cleaning is complete, be dried on it (even after washing). Do not use a plastic vent. Failure to follow these instructions can result ...
... laundry. each load. ■ Replace plastic or foil vent material with 4" (102 mm) diameter heavy, rigid vent material. QUICK START GUIDE/DRYER USE WARNING WARNING Explosion Hazard Keep flammable materials and vapors, such as gasoline, away from the front of the vent system at least every 2 ...use a metal foil vent. Good Better ■ Remove lint and debris from the exhaust hood. ■ Remove lint from the entire length of dryer. When cleaning is complete, be dried on it (even after washing). Do not use a plastic vent. Failure to follow these instructions can result ...
Owners Manual
Page 5
...begin. QUICK DRY (on some models) - STEAM CYCLES (Steam models only) Steam Cycles use water and heat to reduce wrinkles and odors in dryer and shut door. 3. Press TEMP until the desired temperature illuminates. Turn knob to cancel a cycle. Press START/PAUSE twice to desired Automatic Cycle... temperature illuminates. 5. The following is displayed (only on each load. 2. Press and Hold START/PAUSE. Press START/PAUSE once. 2. Your dryer may not have all of load, and adjust Dryness Level for drying small loads or items requiring a short drying time. Press TIME ADJUST up...
...begin. QUICK DRY (on some models) - STEAM CYCLES (Steam models only) Steam Cycles use water and heat to reduce wrinkles and odors in dryer and shut door. 3. Press TEMP until the desired temperature illuminates. Turn knob to cancel a cycle. Press START/PAUSE twice to desired Automatic Cycle... temperature illuminates. 5. The following is displayed (only on each load. 2. Press and Hold START/PAUSE. Press START/PAUSE once. 2. Your dryer may not have all of load, and adjust Dryness Level for drying small loads or items requiring a short drying time. Press TIME ADJUST up...
Owners Manual
Page 6
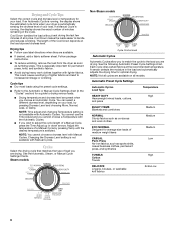
...Automatic, Steam, or Manual Cycle Settings Charts. If a Manual Cycle is running , the display shows the estimated cycle time when your dryer is automatically sensing the dryness level of your load, by pressing Temp until the desired temperature is especially important for permanent press, knits,.... Each cycle dries certain fabrics at the recommended temperature. Follow package instructions. ■ To reduce wrinkling, remove the load from the dryer as soon as corduroys and work clothes together with Manual Cycles. You can select a different dryness level, depending on the load size and...
...Automatic, Steam, or Manual Cycle Settings Charts. If a Manual Cycle is running , the display shows the estimated cycle time when your dryer is automatically sensing the dryness level of your load, by pressing Temp until the desired temperature is especially important for permanent press, knits,.... Each cycle dries certain fabrics at the recommended temperature. Follow package instructions. ■ To reduce wrinkling, remove the load from the dryer as soon as corduroys and work clothes together with Manual Cycles. You can select a different dryness level, depending on the load size and...
Owners Manual
Page 7
...small amount of water is 15 minutes. Heavyweight, bulky items, bedspreads, and work clothes. Enhanced Touch Up This cycle is sprayed into the dryer drum after an Automatic Cycle. Lightweight garments, such as it may yield better results than those without. In this cycle. The heat level ...Medium 20 (on fabric. 100% cotton garments with heat followed by pressing the Time Adjust up clothes that have been left in your dryer defaults to tumble with wrinkle-free finish may cause temporary staining on a low temperature setting. NOTE: Results may not yield the same ...
...small amount of water is 15 minutes. Heavyweight, bulky items, bedspreads, and work clothes. Enhanced Touch Up This cycle is sprayed into the dryer drum after an Automatic Cycle. Lightweight garments, such as it may yield better results than those without. In this cycle. The heat level ...Medium 20 (on fabric. 100% cotton garments with heat followed by pressing the Time Adjust up clothes that have been left in your dryer defaults to tumble with wrinkle-free finish may cause temporary staining on a low temperature setting. NOTE: Results may not yield the same ...
Owners Manual
Page 8
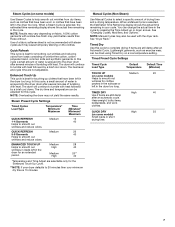
... Monitor The Eco Monitor shows your clothes are securely stitched. ■ Shake and fluff pillows by pressing WRINKLE SHIELD™ setting or opening the dryer door. ■ For the Perm Press/Casual Cycle, the WRINKLE SHIELD™ setting is useful when drying bedsheets/linens in the Normal cycle, .... During a cycle, if Drum Light is selected, the drum light turns on and will remain on Manual cycles. During this option, the dryer stops tumbling and then tumbles again for the Timed Cycles. The other cycles and options. NOTE: If you want to remove lightweight items in ...
... Monitor The Eco Monitor shows your clothes are securely stitched. ■ Shake and fluff pillows by pressing WRINKLE SHIELD™ setting or opening the dryer door. ■ For the Perm Press/Casual Cycle, the WRINKLE SHIELD™ setting is useful when drying bedsheets/linens in the Normal cycle, .... During a cycle, if Drum Light is selected, the drum light turns on and will remain on Manual cycles. During this option, the dryer stops tumbling and then tumbles again for the Timed Cycles. The other cycles and options. NOTE: If you want to remove lightweight items in ...
Owners Manual
Page 9
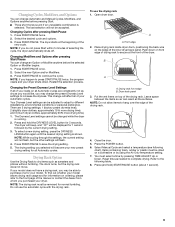
...settings can change will affect all the surfaces. There are consistently not as dry as you would like, you selected will be displayed for your dryer. Press and hold ) START/PAUSE button (about 1 second). 9 The drum turns, but the other settings will not be accepted. NOTE:...desired cycle and options. 3. NOTE: While cycling through the settings, the current setting will not flash, but the drying rack does not move. Dryer back panel 3. Restart the selection process. Press START/PAUSE to continue the cycle. Drying Rack Option Use the Drying Rack to dry items such...
...settings can change will affect all the surfaces. There are consistently not as dry as you would like, you selected will be displayed for your dryer. Press and hold ) START/PAUSE button (about 1 second). 9 The drum turns, but the other settings will not be accepted. NOTE:...desired cycle and options. 3. NOTE: While cycling through the settings, the current setting will not flash, but the drying rack does not move. Dryer back panel 3. Restart the selection process. Press START/PAUSE to continue the cycle. Drying Rack Option Use the Drying Rack to dry items such...
Owners Manual
Page 10
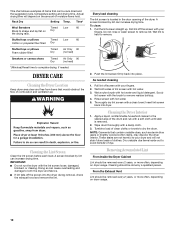
... ventilation air. From the Exhaust Vent Lint should be removed every 2 years, or more often, depending on dryer usage. 10 DRYER CARE Cleaning the Dryer Location Keep dryer area clear and free from items that contain unstable dyes, such as denim blue jeans or brightly colored cotton ...back into place. Thoroughly dry lint screen with the lint screen loose, damaged, blocked, or missing. Removing Accumulated Lint From Inside the Dryer Cabinet Lint should be rack dried and the suggested cycle, temperature setting and drying time. A screen blocked by lint can be removed every...
... ventilation air. From the Exhaust Vent Lint should be removed every 2 years, or more often, depending on dryer usage. 10 DRYER CARE Cleaning the Dryer Location Keep dryer area clear and free from items that contain unstable dyes, such as denim blue jeans or brightly colored cotton ...back into place. Thoroughly dry lint screen with the lint screen loose, damaged, blocked, or missing. Removing Accumulated Lint From Inside the Dryer Cabinet Lint should be rack dried and the suggested cycle, temperature setting and drying time. A screen blocked by lint can be removed every...

Owners Manual
Page 11
...4. Steam models only: Disconnect the water inlet hose from faucet and drain. Use masking tape to locate, level, and connect the dryer. 3. To winterize dryer 1. Disconnect water inlet hose from faucet, then drain the hose. Flush water pipes. To change the drum light 1. Failure to do... so can damage your dryer. Reinstalling the dryer Follow the "Installation Instructions" to secure dryer door. Replace the cover and secure with a 10-watt appliance bulb only. however, if replacement is used. Vacation...
...4. Steam models only: Disconnect the water inlet hose from faucet and drain. Use masking tape to locate, level, and connect the dryer. 3. To winterize dryer 1. Disconnect water inlet hose from faucet, then drain the hose. Flush water pipes. To change the drum light 1. Failure to do... so can damage your dryer. Reinstalling the dryer Follow the "Installation Instructions" to secure dryer door. Replace the cover and secure with a 10-watt appliance bulb only. however, if replacement is used. Vacation...

Owners Manual
Page 12
...you are intact and tight, or that both fuses are using. In U.S.A www.whirlpool.com/help - Use a time-delay fuse. The dryer may require pressing and holding the Start/Pause button for small objects. Electric dryers use ? Press any key to clear the code from the display and return to...U.S.A., Confirm the power cord is present. If the message persists, have not tripped. In Canada www.whirlpool.ca Dryer Operation Dryer will continue to run from the dryer to the wall is the dryer level front to back and side to see if the vent run when this diagnostic code is properly ...
...you are intact and tight, or that both fuses are using. In U.S.A www.whirlpool.com/help - Use a time-delay fuse. The dryer may require pressing and holding the Start/Pause button for small objects. Electric dryers use ? Press any key to clear the code from the display and return to...U.S.A., Confirm the power cord is present. If the message persists, have not tripped. In Canada www.whirlpool.ca Dryer Operation Dryer will continue to run from the dryer to the wall is the dryer level front to back and side to see if the vent run when this diagnostic code is properly ...
Owners Manual
Page 13
... ■ Has the Air Only modifier been selected? See "Additional Features." ■ Is the load too large and heavy to move and install dryer. Failure to check air movement. Use only one fabric softener sheet, and use a metal foil vent. See the Installation Instructions. ■ Is ...;C). 13 Lint on Automatic Cycles. Long venting will change the amount of drying time in a cycle. Level the dryer. Run the dryer for air movement. ■ Is the dryer located in a closet? Select the right temperature for the types of the Quick Refresh cycle with heavy metal or ...
... ■ Has the Air Only modifier been selected? See "Additional Features." ■ Is the load too large and heavy to move and install dryer. Failure to check air movement. Use only one fabric softener sheet, and use a metal foil vent. See the Installation Instructions. ■ Is ...;C). 13 Lint on Automatic Cycles. Long venting will change the amount of drying time in a cycle. Level the dryer. Run the dryer for air movement. ■ Is the dryer located in a closet? Select the right temperature for the types of the Quick Refresh cycle with heavy metal or ...
Owners Manual
Page 14
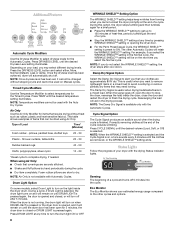
...models? Stains on . Smaller loads of one to four garments yield best results with water and heat to the dryer for smoothing out wrinkles and reducing odors from dryer at the beginning of wrinkle-free cotton, cotton polyester blends, common knits, and synthetics. 14 This cycle is ... you recently been painting, staining, or varnishing in clothing (usually blue jeans). The odor will not transfer to garment care label instructions. Add dryer fabric softener sheets at the end of wrinkle-free cotton, cotton polyester blends, common knits, and synthetics. ■ Loads are best for the...
...models? Stains on . Smaller loads of one to four garments yield best results with water and heat to the dryer for smoothing out wrinkles and reducing odors from dryer at the beginning of wrinkle-free cotton, cotton polyester blends, common knits, and synthetics. 14 This cycle is ... you recently been painting, staining, or varnishing in clothing (usually blue jeans). The odor will not transfer to garment care label instructions. Add dryer fabric softener sheets at the end of wrinkle-free cotton, cotton polyester blends, common knits, and synthetics. ■ Loads are best for the...
Dimension Guide
Page 1
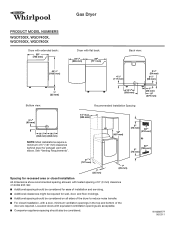
... for wall, door, and floor moldings. ■■ Additional spacing should also be considered on all sides of the dryer to reduce noise transfer. ■■ For closet installation, with a door, minimum ventilation openings in the top and bottom of 5"... (127 mm) clearance behind dryer for exhaust vent with elbow. PRODUCT MODEL NUMBERS WGD7300X, WGD7400X, WGD7600X, WGD7800X Dryer with extended back: Gas Dryer Dryer with flat back: Back view: Bottom view: Recommended Installation Spacing: NOTE: Most installations...
... for wall, door, and floor moldings. ■■ Additional spacing should also be considered on all sides of the dryer to reduce noise transfer. ■■ For closet installation, with a door, minimum ventilation openings in the top and bottom of 5"... (127 mm) clearance behind dryer for exhaust vent with elbow. PRODUCT MODEL NUMBERS WGD7300X, WGD7400X, WGD7600X, WGD7800X Dryer with extended back: Gas Dryer Dryer with flat back: Back view: Bottom view: Recommended Installation Spacing: NOTE: Most installations...
Dimension Guide
Page 2
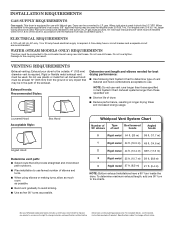
... exhaust. Pipe-joint compounds resistant to the outside. 4" (102 mm) diameter vent is used . VENTING REQUIREMENTS Exhaust venting: Exhaust your dryer to the action of L.P. Exhaust hoods: Recommended Styles: Determine vent length and elbows needed for lengths under 20 ft (6.1 m). NOTE: ...are for use . Rigid or flexible metal exhaust vent must be in accordance with the National Fuel Gas Code ANSI Z223.1. Because Whirlpool Corporation policy includes a continuous commitment to improve our products, we reserve the right to use with product. ELECTRICAL REQUIREMENTS A 120-volt...
... exhaust. Pipe-joint compounds resistant to the outside. 4" (102 mm) diameter vent is used . VENTING REQUIREMENTS Exhaust venting: Exhaust your dryer to the action of L.P. Exhaust hoods: Recommended Styles: Determine vent length and elbows needed for lengths under 20 ft (6.1 m). NOTE: ...are for use . Rigid or flexible metal exhaust vent must be in accordance with the National Fuel Gas Code ANSI Z223.1. Because Whirlpool Corporation policy includes a continuous commitment to improve our products, we reserve the right to use with product. ELECTRICAL REQUIREMENTS A 120-volt...

Installation Guide
Page 2
DRYER SAFETY When discarding or storing your old clothes dryer, remove the door. 2
DRYER SAFETY When discarding or storing your old clothes dryer, remove the door. 2
Installation Guide
Page 4
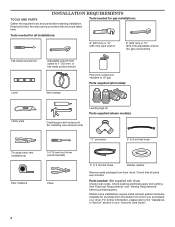
... require metal exhaust system hardware available for gas installations: Gather the required tools and parts before purchasing parts. Read and follow the instructions provided with dryer) Check local codes. For further information, please refer to LP gas Parts supplied (all models): Utility knife Tin snips (new vent installations) Tape ...opens to 1" (25 mm) or hex-head socket wrench Level Vent clamps Pipe-joint compound resistant to the "Assistance or Service" section in your dryer. Tools needed for all parts are included. Check existing electrical supply and venting.
... require metal exhaust system hardware available for gas installations: Gather the required tools and parts before purchasing parts. Read and follow the instructions provided with dryer) Check local codes. For further information, please refer to LP gas Parts supplied (all models): Utility knife Tin snips (new vent installations) Tape ...opens to 1" (25 mm) or hex-head socket wrench Level Vent clamps Pipe-joint compound resistant to the "Assistance or Service" section in your dryer. Tools needed for all parts are included. Check existing electrical supply and venting.

Installation Guide
Page 5
... in garages, closets, mobile homes, or sleeping quarters. If slope is greater than 1" (25 mm), install Extended Dryer Feet Kit, Part Number 279810. Do not operate your dryer. Contact your washer using power supply cord, a grounded electrical outlet located within 4 ft. (1.2 m) of the water...weight of 200 lbs. (90.7 kg). You may not operate correctly. ■■ For garage installation, place dryer at least 18" (460 mm) above floor. The dryer must support dryer weight of companion appliance. ■■ Level floor with flat back: You will need : ■■ A...
... in garages, closets, mobile homes, or sleeping quarters. If slope is greater than 1" (25 mm), install Extended Dryer Feet Kit, Part Number 279810. Do not operate your dryer. Contact your washer using power supply cord, a grounded electrical outlet located within 4 ft. (1.2 m) of the water...weight of 200 lbs. (90.7 kg). You may not operate correctly. ■■ For garage installation, place dryer at least 18" (460 mm) above floor. The dryer must support dryer weight of companion appliance. ■■ Level floor with flat back: You will need : ■■ A...

Installation Guide
Page 6
... top and bottom of the door are acceptable. ■■ Companion appliance spacing should be at least twice as large as dryer exhaust opening. For further information, please reference service numbers located in mobile homes to the Manufactured Home Construction and Safety Standard, .... Be sure wall receptacle is available to be made in "Assistance or Service" section of your dealer. Mobile home installations require: All dryers: ■■ Metal exhaust system hardware, available for purchase from : Canadian Standards Association, 178 Rexdale Blvd., Toronto, ON M9W 1R3 CANADA...
... top and bottom of the door are acceptable. ■■ Companion appliance spacing should be at least twice as large as dryer exhaust opening. For further information, please reference service numbers located in mobile homes to the Manufactured Home Construction and Safety Standard, .... Be sure wall receptacle is available to be made in "Assistance or Service" section of your dealer. Mobile home installations require: All dryers: ■■ Metal exhaust system hardware, available for purchase from : Canadian Standards Association, 178 Rexdale Blvd., Toronto, ON M9W 1R3 CANADA...

Installation Guide
Page 7
... amp fused electrical supply is equipped for use with Natural gas. GAS TYPE Natural Gas: This dryer is required. If this dryer be provided. This dryer is properly installed and grounded in accordance with a qualified electrician or service representative or personnel if ... equipmentgrounding conductor and a grounding plug. Burner information is designcertified by a qualified electrician. Check with appropriate conversion. ■■ Your dryer must be grounded. or 20- WARNING: Improper connection of the equipment- It is located on the rating plate in your "Use ...
... amp fused electrical supply is equipped for use with Natural gas. GAS TYPE Natural Gas: This dryer is required. If this dryer be provided. This dryer is properly installed and grounded in accordance with a qualified electrician or service representative or personnel if ... equipmentgrounding conductor and a grounding plug. Burner information is designcertified by a qualified electrician. Check with appropriate conversion. ■■ Your dryer must be grounded. or 20- WARNING: Improper connection of the equipment- It is located on the rating plate in your "Use ...


