Owners Manual
Page 6
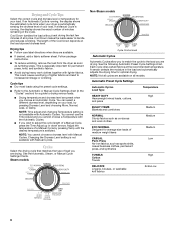
... load size and dryness level. Cool Down tumbles the load without heat during the last few minutes of load you cannot choose a Temperature with Automatic Cycles. NOTE: Time adjust and changing Temperature setting is selected. Automatic Preset Cycle Settings Automatic Cycles Load Type Temperature HEAVY DUTY Heavyweight mixed loads, cottons, and jeans High BULKY ITEMS Blankets and comforters Medium NORMAL Sturdy fabrics such as corduroys and work clothes together with Manual Cycles. Drying and Cycle...
... load size and dryness level. Cool Down tumbles the load without heat during the last few minutes of load you cannot choose a Temperature with Automatic Cycles. NOTE: Time adjust and changing Temperature setting is selected. Automatic Preset Cycle Settings Automatic Cycles Load Type Temperature HEAVY DUTY Heavyweight mixed loads, cottons, and jeans High BULKY ITEMS Blankets and comforters Medium NORMAL Sturdy fabrics such as corduroys and work clothes together with Manual Cycles. Drying and Cycle...
Owners Manual
Page 9
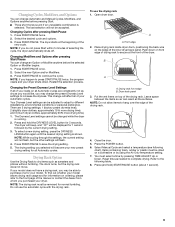
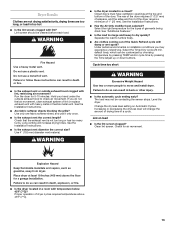
... new cycle. Open dryer door. Dryer back panel 3. Reset time as needed to save the drying setting. 5. Press START/PAUSE. Restart the selection process. Do not use the drying rack 1. Select Manual Cycle and select a temperature (see following table. 8. There are consistently not as dry as sweaters and pillows without tumbling. Press and hold ) START/PAUSE button (about 1 second). 9 Drying Rack Option Use the Drying Rack to continue the cycle. To find out whether your model allows drying rack usage...
... new cycle. Open dryer door. Dryer back panel 3. Reset time as needed to save the drying setting. 5. Press START/PAUSE. Restart the selection process. Do not use the drying rack 1. Select Manual Cycle and select a temperature (see following table. 8. There are consistently not as dry as sweaters and pillows without tumbling. Press and hold ) START/PAUSE button (about 1 second). 9 Drying Rack Option Use the Drying Rack to continue the cycle. To find out whether your model allows drying rack usage...
Owners Manual
Page 10
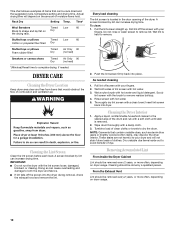
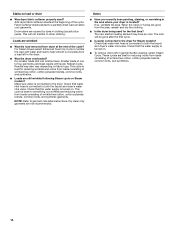
... run the dryer with hot water and liquid detergent. Every load cleaning The lint screen is hard to avoid transfer of moisture items hold. Rinse screen with a clean towel. Thoroughly dry lint screen with hot water. 5. A screen blocked by lint can increase drying time. Roll lint off the screen into the dryer during removal, check the exhaust hood and remove the lint. Dry unstable dye items inside out to remove. 2. This chart shows examples of the drum and rub with a damp cloth. 3. Rack Dry Setting...
... run the dryer with hot water and liquid detergent. Every load cleaning The lint screen is hard to avoid transfer of moisture items hold. Rinse screen with a clean towel. Thoroughly dry lint screen with hot water. 5. A screen blocked by lint can increase drying time. Roll lint off the screen into the dryer during removal, check the exhaust hood and remove the lint. Dry unstable dye items inside out to remove. 2. This chart shows examples of the drum and rub with a damp cloth. 3. Rack Dry Setting...

Owners Manual
Page 11
... When replacing your dryer. Turn on vacation or not using your dryer for Steam Models Water Inlet Hoses Replace inlet hoses and hose screen after 5 years of time, you are secure in death or electrical shock. 1. Open the dryer door. Electrical Shock Hazard Disconnect power before operating. Moving care For power supply cord-connected dryers: 1. Unplug dryer or disconnect power. 2. Reconnect water inlet hose to secure dryer door. To change the drum light 1. Remove the cover. To winterize dryer 1. Reinstalling the dryer Follow the "Installation Instructions...
... When replacing your dryer. Turn on vacation or not using your dryer for Steam Models Water Inlet Hoses Replace inlet hoses and hose screen after 5 years of time, you are secure in death or electrical shock. 1. Open the dryer door. Electrical Shock Hazard Disconnect power before operating. Moving care For power supply cord-connected dryers: 1. Unplug dryer or disconnect power. 2. Reconnect water inlet hose to secure dryer door. To change the drum light 1. Remove the cover. To winterize dryer 1. Reinstalling the dryer Follow the "Installation Instructions...

Owners Manual
Page 12
... and restart the dryer. The drum may be turning, but there may vibrate if not properly installed. Replace the fuse or reset the circuit breaker. Dryer displaying code message ■ "PF" (power failure), check the following : Check to "Electrical Connection" in the Installation Instructions for details. Electric dryers use 2 household fuses or circuit breakers. Replace the fuse or reset the circuit breaker. Refer to see if the vent run ■ Is the dryer door firmly closed? ■ Was the Start button firmly pressed? If the...
... and restart the dryer. The drum may be turning, but there may vibrate if not properly installed. Replace the fuse or reset the circuit breaker. Dryer displaying code message ■ "PF" (power failure), check the following : Check to "Electrical Connection" in the Installation Instructions for details. Electric dryers use 2 household fuses or circuit breakers. Replace the fuse or reset the circuit breaker. Refer to see if the vent run ■ Is the dryer door firmly closed? ■ Was the Start button firmly pressed? If the...
Owners Manual
Page 13
... or down buttons. Do not use a metal foil vent. Do not use a plastic vent. Select the right temperature for 5-10 minutes. Failure to tumble freely. ■ Are clothes coming out of lint or replace exhaust vent with lint, restricting air movement? If you may not be contacting the sensor strips. Check that the exhaust vent is too hot ■ Is the lint screen clogged with lint? Failure to dry quickly? The rear of the dryer requires 5" (127...
... or down buttons. Do not use a metal foil vent. Do not use a plastic vent. Select the right temperature for 5-10 minutes. Failure to tumble freely. ■ Are clothes coming out of lint or replace exhaust vent with lint, restricting air movement? If you may not be contacting the sensor strips. Check that the exhaust vent is too hot ■ Is the lint screen clogged with lint? Failure to dry quickly? The rear of the dryer requires 5" (127...
Owners Manual
Page 14
... first cycle. ■ Is water connected to four garments yield best results with water and heat to a partially dried load can tumble freely. If so, ventilate the area. Check that the water supply is connected to both the faucet and dryer's water inlet valve. Fabric softener sheets added to help smooth out wrinkles from a load left in clothing (usually blue jeans). Drum stains are not recommended. For Steam Dryers select...
... first cycle. ■ Is water connected to four garments yield best results with water and heat to a partially dried load can tumble freely. If so, ventilate the area. Check that the water supply is connected to both the faucet and dryer's water inlet valve. Fabric softener sheets added to help smooth out wrinkles from a load left in clothing (usually blue jeans). Drum stains are not recommended. For Steam Dryers select...
Owners Manual
Page 15
... fuses, or to published user or operator instructions and/or installation instructions. 2. If you think you also may not apply to you on how to or furnished with original model/serial numbers that have other rights that existed when this information on the model and serial number label located on the duration of implied warranties of purchase. 6. Replacement parts or repair labor on major appliances with the product, Whirlpool...
... fuses, or to published user or operator instructions and/or installation instructions. 2. If you think you also may not apply to you on how to or furnished with original model/serial numbers that have other rights that existed when this information on the model and serial number label located on the duration of implied warranties of purchase. 6. Replacement parts or repair labor on major appliances with the product, Whirlpool...

Warranty
Page 1
... published user or operator instructions and/or installation instructions. 2. Dealer name Address Phone number Model number Serial number Purchase date 15 This limited warranty is valid only in the United States or Canada and applies only when the major appliance is inconsistent to or furnished with the product, Whirlpool Corporation or Whirlpool Canada LP (hereafter "Whirlpool") will need repair service, first see the "Troubleshooting" section of the Use & Care Guide. ITEMS...
... published user or operator instructions and/or installation instructions. 2. Dealer name Address Phone number Model number Serial number Purchase date 15 This limited warranty is valid only in the United States or Canada and applies only when the major appliance is inconsistent to or furnished with the product, Whirlpool Corporation or Whirlpool Canada LP (hereafter "Whirlpool") will need repair service, first see the "Troubleshooting" section of the Use & Care Guide. ITEMS...
Dimension Guide
Page 1
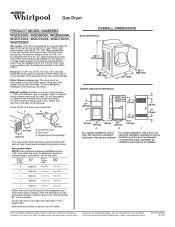
... recommended. Use the fewest 90° turns possible. Because Whirlpool Corporation policy includes a continuous commitment to improve our products, we reserve the right to L.P. For complete details, see Installation Instructions packed with equivalent air ventilation openings are for use with the National Fuel Gas Code ANSI Z223.1. When acceptable to the cold water faucet using new inlet hoses. Water (Steam models only): The dryer must be converted to change without...
... recommended. Use the fewest 90° turns possible. Because Whirlpool Corporation policy includes a continuous commitment to improve our products, we reserve the right to L.P. For complete details, see Installation Instructions packed with equivalent air ventilation openings are for use with the National Fuel Gas Code ANSI Z223.1. When acceptable to the cold water faucet using new inlet hoses. Water (Steam models only): The dryer must be converted to change without...
Installation Instructions
Page 4
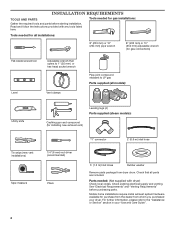
... listed here. Parts needed for all installations: 8" (203 mm) or 10" (254 mm) pipe wrench 8" (203 mm) or 10" (254 mm) adjustable wrench (for gas connections) Flat-blade screwdriver Adjustable wrench that all models): Utility knife Tin snips (new vent installations) Tape measure Leveling legs (4) Parts supplied (steam models): Caulking gun and compound (for installing new exhaust vent) 1/4"( 6 mm) nut driver (recommended) Pliers "Y" connector 2' (0.6 m) inlet hose 5' (1.5 m) Inlet Hose Rubber washer Remove parts...
... listed here. Parts needed for all installations: 8" (203 mm) or 10" (254 mm) pipe wrench 8" (203 mm) or 10" (254 mm) adjustable wrench (for gas connections) Flat-blade screwdriver Adjustable wrench that all models): Utility knife Tin snips (new vent installations) Tape measure Leveling legs (4) Parts supplied (steam models): Caulking gun and compound (for installing new exhaust vent) 1/4"( 6 mm) nut driver (recommended) Pliers "Y" connector 2' (0.6 m) inlet hose 5' (1.5 m) Inlet Hose Rubber washer Remove parts...
Installation Instructions
Page 5
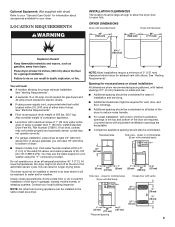
... automatic sensor cycles may use the water supply for your dryer at the end of the dryer in longer drying times. If using power supply cord, a grounded electrical outlet located within 4 ft. (1.2 m) of the water fill valves, and water pressure of 200 lbs. (90.7 kg). Optional Equipment: (Not supplied with dryer) Refer to your "Use and Care Guide" for information about accessories available for your local building inspector. See "Venting Requirements". See "Electrical Requirements". ■...
... automatic sensor cycles may use the water supply for your dryer at the end of the dryer in longer drying times. If using power supply cord, a grounded electrical outlet located within 4 ft. (1.2 m) of the water fill valves, and water pressure of 200 lbs. (90.7 kg). Optional Equipment: (Not supplied with dryer) Refer to your "Use and Care Guide" for information about accessories available for your local building inspector. See "Venting Requirements". See "Electrical Requirements". ■...
Installation Instructions
Page 6
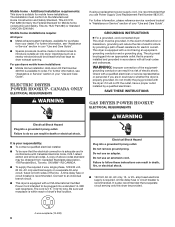
.... WARNING: Improper connection of electric shock. SAVE THESE INSTRUCTIONS GAS DRYER POWER HOOKUP ELECTRICAL REQUIREMENTS WARNING Electrical Shock Hazard Plug into a grounded 3 prong outlet. The cord is recommended. Do not remove ground prong. A time-delay fuse or circuit breaker is 5 ft. (1.52 m) long. Mobile home - For further information, see "Assistance or Service" section in doubt as dryer exhaust opening. grounding conductor can result in death or electrical shock. Do not modify the plug provided with a cord having an...
.... WARNING: Improper connection of electric shock. SAVE THESE INSTRUCTIONS GAS DRYER POWER HOOKUP ELECTRICAL REQUIREMENTS WARNING Electrical Shock Hazard Plug into a grounded 3 prong outlet. The cord is recommended. Do not remove ground prong. A time-delay fuse or circuit breaker is 5 ft. (1.52 m) long. Mobile home - For further information, see "Assistance or Service" section in doubt as dryer exhaust opening. grounding conductor can result in death or electrical shock. Do not modify the plug provided with a cord having an...
Installation Instructions
Page 7
... THESE INSTRUCTIONS GAS SUPPLY REQUIREMENTS WARNING Explosion Hazard Use a new CSA International approved gas supply line. If connected to LP, have a proper outlet installed by providing a path of least resistance for test gauge connection, immediately upstream of E.I. GAS SUPPLY LINE ■■ Must include 1/8" NPT minimum plugged tapping accessible for electric current. In Canada: An individual manual shut-off valve must be grounded. Burner information is acceptable for lengths under...
... THESE INSTRUCTIONS GAS SUPPLY REQUIREMENTS WARNING Explosion Hazard Use a new CSA International approved gas supply line. If connected to LP, have a proper outlet installed by providing a path of least resistance for test gauge connection, immediately upstream of E.I. GAS SUPPLY LINE ■■ Must include 1/8" NPT minimum plugged tapping accessible for electric current. In Canada: An individual manual shut-off valve must be grounded. Burner information is acceptable for lengths under...

Installation Instructions
Page 8
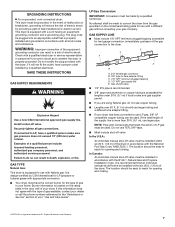
... the risk of the burner Btu rating shown on the model/serial number plate is a registered trademark of your dryer has a 3/8" male pipe thread. B 2 1/8" (54 mm) A 1" (25 mm) 4" (102 mm) 4" (102 mm) heavy metal exhaust vent A. 1/2" NPT gas supply line B. 3/8" NPT dryer pipe *NOTE: If the dryer is not plugged with lint. Replace plastic or metal foil vents with the standard for connectors for each 1,000 ft...
... the risk of the burner Btu rating shown on the model/serial number plate is a registered trademark of your dryer has a 3/8" male pipe thread. B 2 1/8" (54 mm) A 1" (25 mm) 4" (102 mm) 4" (102 mm) heavy metal exhaust vent A. 1/2" NPT gas supply line B. 3/8" NPT dryer pipe *NOTE: If the dryer is not plugged with lint. Replace plastic or metal foil vents with the standard for connectors for each 1,000 ft...
Installation Instructions
Page 10
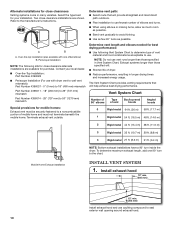
... Determine vent length and elbows needed for best drying performance: ■■ Use following kits for close clearance alternate installations are shown. NOTE: Do not use caulking compound to a noncombustible portion of vent Box/louvered hoods Angled hoods Special provisions for mobile homes: Exhaust vent must not terminate beneath the mobile home. The Vent System Chart provides venting requirements that will provide straightest and most direct...
... Determine vent length and elbows needed for best drying performance: ■■ Use following kits for close clearance alternate installations are shown. NOTE: Do not use caulking compound to a noncombustible portion of vent Box/louvered hoods Angled hoods Special provisions for mobile homes: Exhaust vent must not terminate beneath the mobile home. The Vent System Chart provides venting requirements that will provide straightest and most direct...
Installation Instructions
Page 11
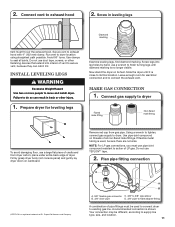
... holes by hand, use pipe-joint compound resistant to existing gas line. Run vent to dryer. Screw legs into interior of E.I. Dupont De Nemours and Company. Remove red cap from dryer carton; NOTE: For LP gas connections, you must fit over the exhaust hood. Use pipe-joint compound on its final location. Avoid 90° turns. A recommended connection is no kinks. MAKE GAS CONNECTION 1. Connect gas supply to seal...
... holes by hand, use pipe-joint compound resistant to existing gas line. Run vent to dryer. Screw legs into interior of E.I. Dupont De Nemours and Company. Remove red cap from dryer carton; NOTE: For LP gas connections, you must fit over the exhaust hood. Use pipe-joint compound on its final location. Avoid 90° turns. A recommended connection is no kinks. MAKE GAS CONNECTION 1. Connect gas supply to seal...

Installation Instructions
Page 13
.... 6. Screw on cold water faucet Using a 4" (102 mm) clamp, connect vent to fill valve at bottom of long hose to exhaust outlet in place, remove cardboard from under dryer. Dryer vent must fit over dryer exhaust outlet and inside exhaust hood. Avoid crushing or kinking vent. Damage to dryer fill valve and tighten coupling Connect vent 1. Move dryer to final location. 5. NOTE: Do not overtighten. Check for leaks around "Y" connector, faucets, and hoses. 13 Connect vent to exhaust outlet 11" (279...
.... 6. Screw on cold water faucet Using a 4" (102 mm) clamp, connect vent to fill valve at bottom of long hose to exhaust outlet in place, remove cardboard from under dryer. Dryer vent must fit over dryer exhaust outlet and inside exhaust hood. Avoid crushing or kinking vent. Damage to dryer fill valve and tighten coupling Connect vent 1. Move dryer to final location. 5. NOTE: Do not overtighten. Check for leaks around "Y" connector, faucets, and hoses. 13 Connect vent to exhaust outlet 11" (279...
Installation Instructions
Page 14
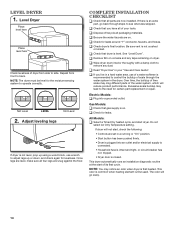
... hoses. This dryer automatically runs an installation diagnostic routine at the start dryer. NOTE: You may notice an odor when dryer is not level, prop up or down, and check again for certain part replacement or repair. If dryer will not start, check the following: • Controls are snug against the floor. The odor will reduce product performance. Be sure vent is closed. All Models: q Select a Timed Dry heated cycle, and start...
... hoses. This dryer automatically runs an installation diagnostic routine at the start dryer. NOTE: You may notice an odor when dryer is not level, prop up or down, and check again for certain part replacement or repair. If dryer will not start, check the following: • Controls are snug against the floor. The odor will reduce product performance. Be sure vent is closed. All Models: q Select a Timed Dry heated cycle, and start...

Installation Instructions
Page 17
... exhaust vent diameter the correct size? See "Installation Instructions". ■■ Is the exhaust vent or outside exhaust hood to check air movement. See "Installation Instructions". ■■ Are fabric softener sheets blocking the grille? Run the dryer for most installations, the rear of the door. Long venting will increase drying times. Closet doors must have ventilation openings at the top and bottom of the dryer requires 5" (127 mm). If you do not feel air movement, clean exhaust system of dryer cycles requires temperatures...
... exhaust vent diameter the correct size? See "Installation Instructions". ■■ Is the exhaust vent or outside exhaust hood to check air movement. See "Installation Instructions". ■■ Are fabric softener sheets blocking the grille? Run the dryer for most installations, the rear of the door. Long venting will increase drying times. Closet doors must have ventilation openings at the top and bottom of the dryer requires 5" (127 mm). If you do not feel air movement, clean exhaust system of dryer cycles requires temperatures...


