Owners Manual
Page 3
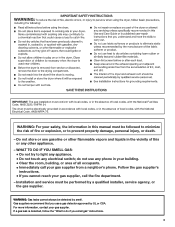
...Immediately call the fire department. - Gas suppliers recommend that you cannot reach your safety, the information in this or any electrical switch; If a gas leak is detected, follow the "What to prevent property damage, personal injury, or death. - The dryer must be followed to minimize the ...risk of fire or explosion, or to do not use a gas detector approved by smell. WARNING: For your gas supplier, call your gas supplier. IMPORTANT: The gas installation must conform with local codes, or in...
...Immediately call the fire department. - Gas suppliers recommend that you cannot reach your safety, the information in this or any electrical switch; If a gas leak is detected, follow the "What to prevent property damage, personal injury, or death. - The dryer must be followed to minimize the ...risk of fire or explosion, or to do not use a gas detector approved by smell. WARNING: For your gas supplier, call your gas supplier. IMPORTANT: The gas installation must conform with local codes, or in...

Owners Manual
Page 11
... and drain. Reconnect water inlet hose to locate, level, and connect the dryer. 3. Turn on inside the dryer drum when you will not freeze. Plug in gas supply line. 3. Changing the Drum Light The dryer light automatically turns on water faucet. 2. To change the drum light 1. ...Unplug dryer or disconnect power. 2. Open the dryer door. Remove the cover. Electrical Shock Hazard Disconnect power before ...
... and drain. Reconnect water inlet hose to locate, level, and connect the dryer. 3. Turn on inside the dryer drum when you will not freeze. Plug in gas supply line. 3. Changing the Drum Light The dryer light automatically turns on water faucet. 2. To change the drum light 1. ...Unplug dryer or disconnect power. 2. Open the dryer door. Remove the cover. Electrical Shock Hazard Disconnect power before ...

Owners Manual
Page 12
...when this diagnostic code is properly installed. Refer to "Plan Vent System" in the Installation Instructions for details. In U.S.A www.whirlpool.com/help - Use a time-delay fuse. Replace the fuse or reset the circuit breaker. Press and hold START/PAUSE to restart the...a circuit breaker tripped? Clean out pockets before laundering. ■ Is it a gas dryer? Select a Timed Dry heated cycle, and restart the dryer. Press any key to clear the code from the dryer to clear the code from turning on gas models? If the message persists, consult a qualified electrician. ■ "AF" (...
...when this diagnostic code is properly installed. Refer to "Plan Vent System" in the Installation Instructions for details. In U.S.A www.whirlpool.com/help - Use a time-delay fuse. Replace the fuse or reset the circuit breaker. Press and hold START/PAUSE to restart the...a circuit breaker tripped? Clean out pockets before laundering. ■ Is it a gas dryer? Select a Timed Dry heated cycle, and restart the dryer. Press any key to clear the code from the dryer to clear the code from turning on gas models? If the message persists, consult a qualified electrician. ■ "AF" (...
Dimension Guide
Page 1
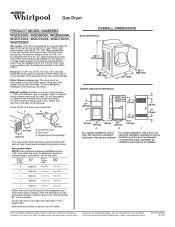
... achieve the best drying performance. For closet installation, with the National Fuel Gas Code ANSI Z223.1. Gas Dryer PRODUCT MODEL NUMBERS WGD6200S, WGD6600V, WGD6600W, WGD7300X, WGD7400X, WGD7600X, WGD7800X Gas supply: This dryer is equipped for planning purposes only. For lengths over 20 ft (6.1 ..., see Installation Instructions packed with Natural gas. Ref. gas. When acceptable to L.P. Do not overtighten. Exhaust hood must be 1/2" IPS. Hood styles: A & B are for use the fewest number of the exhaust. Because Whirlpool Corporation policy includes a continuous commitment to...
... achieve the best drying performance. For closet installation, with the National Fuel Gas Code ANSI Z223.1. Gas Dryer PRODUCT MODEL NUMBERS WGD6200S, WGD6600V, WGD6600W, WGD7300X, WGD7400X, WGD7600X, WGD7800X Gas supply: This dryer is equipped for planning purposes only. For lengths over 20 ft (6.1 ..., see Installation Instructions packed with Natural gas. Ref. gas. When acceptable to L.P. Do not overtighten. Exhaust hood must be 1/2" IPS. Hood styles: A & B are for use the fewest number of the exhaust. Because Whirlpool Corporation policy includes a continuous commitment to...
Installation Instructions
Page 3
... performed by smell. The dryer must be electrically grounded in accordance with local codes, or in the absence of this manual must be followed to light any appliance. • Do not touch any other appliance. - Follow the gas supplier's instructions. • If you cannot reach your gas supplier, call your gas supplier from a neighbor...
... performed by smell. The dryer must be electrically grounded in accordance with local codes, or in the absence of this manual must be followed to light any appliance. • Do not touch any other appliance. - Follow the gas supplier's instructions. • If you cannot reach your gas supplier, call your gas supplier from a neighbor...
Installation Instructions
Page 4
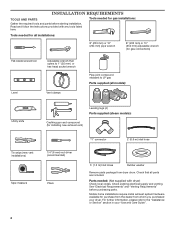
... (new vent installations) Tape measure Leveling legs (4) Parts supplied (steam models): Caulking gun and compound (for purchase from the dealer from dryer drum. For further information, please refer to LP gas Parts supplied (all parts are included. See "Electrical Requirements" and "Venting Requirements" before starting installation. Check that opens to 1" (25 mm...
... (new vent installations) Tape measure Leveling legs (4) Parts supplied (steam models): Caulking gun and compound (for purchase from the dealer from dryer drum. For further information, please refer to LP gas Parts supplied (all parts are included. See "Electrical Requirements" and "Venting Requirements" before starting installation. Check that opens to 1" (25 mm...
Installation Instructions
Page 5
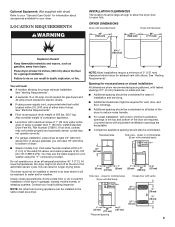
... 4 ft. (1.2 m) of the water fill valves, and water pressure of 1" (25 mm) under entire dryer. See "Venting Requirements". ■■ A separate 15 or 20-amp circuit needed for gas dryers and 30-amp circuit needed for exhaust vent with a door, minimum ventilation openings in the top and bottom of... the dryer in an area where it will need 18" (460 mm) to reduce noise transfer. &#...
... 4 ft. (1.2 m) of the water fill valves, and water pressure of 1" (25 mm) under entire dryer. See "Venting Requirements". ■■ A separate 15 or 20-amp circuit needed for gas dryers and 30-amp circuit needed for exhaust vent with a door, minimum ventilation openings in the top and bottom of... the dryer in an area where it will need 18" (460 mm) to reduce noise transfer. &#...
Installation Instructions
Page 6
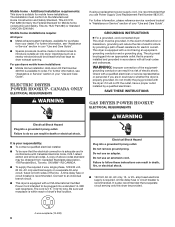
... It is also recommended that the electrical connection is adequate and in "Assistance or Service" section of the line. For gas dryers mobile home installations: ■■ Mobile Home Installation Hold-down Kit Part Number 346764 is required. Check with Canadian Electrical... Code, C22.1-latest edition and all local codes and ordinances. SAVE THESE INSTRUCTIONS GAS DRYER POWER HOOKUP ELECTRICAL REQUIREMENTS WARNING Electrical Shock Hazard Plug into a grounded 3 prong outlet. or 20- amp fused electrical supply...
... It is also recommended that the electrical connection is adequate and in "Assistance or Service" section of the line. For gas dryers mobile home installations: ■■ Mobile Home Installation Hold-down Kit Part Number 346764 is required. Check with Canadian Electrical... Code, C22.1-latest edition and all local codes and ordinances. SAVE THESE INSTRUCTIONS GAS DRYER POWER HOOKUP ELECTRICAL REQUIREMENTS WARNING Electrical Shock Hazard Plug into a grounded 3 prong outlet. or 20- amp fused electrical supply...
Installation Instructions
Page 7
... the U.S.A.: An individual manual shut-off valve must be installed within six (6) ft. (1.8 m) of the dryer. NOTE: Pipe-joint compounds that resist the action of LP gas must be plugged into an appropriate outlet that an individual manual shutoff valve be installed within six (6) ft....plate for the type of electric shock by a qualified technician. GROUNDING INSTRUCTIONS � For a grounded, cord-connected dryer: This dryer must have a qualified person make sure gas pressure does not exceed 13" (330 mm) water column. Examples of the equipment- It is properly grounded. ...
... the U.S.A.: An individual manual shut-off valve must be installed within six (6) ft. (1.8 m) of the dryer. NOTE: Pipe-joint compounds that resist the action of LP gas must be plugged into an appropriate outlet that an individual manual shutoff valve be installed within six (6) ft....plate for the type of electric shock by a qualified technician. GROUNDING INSTRUCTIONS � For a grounded, cord-connected dryer: This dryer must have a qualified person make sure gas pressure does not exceed 13" (330 mm) water column. Examples of the equipment- It is properly grounded. ...

Installation Instructions
Page 8
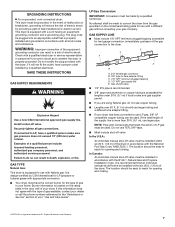
... System Chart and if necessary, modify existing vent system to avoid kinking. ■■ Use only pipe-joint compound. DRYER GAS PIPE ■■ The gas pipe that may be an additional 10" (254 mm) or 15.5" (394 mm) from entire length of a building...(2.4 m). B 2 1/8" (54 mm) A 1" (25 mm) 4" (102 mm) 4" (102 mm) heavy metal exhaust vent A. 1/2" NPT gas supply line B. 3/8" NPT dryer pipe *NOTE: If the dryer is required for gas appliances, ANSI Z21.24 or CSA 6.10. Rigid metal vent: ■■ Recommended for exhausting. VENTING Venting REQUiREMENTS WARNING BURNER...
... System Chart and if necessary, modify existing vent system to avoid kinking. ■■ Use only pipe-joint compound. DRYER GAS PIPE ■■ The gas pipe that may be an additional 10" (254 mm) or 15.5" (394 mm) from entire length of a building...(2.4 m). B 2 1/8" (54 mm) A 1" (25 mm) 4" (102 mm) 4" (102 mm) heavy metal exhaust vent A. 1/2" NPT gas supply line B. 3/8" NPT dryer pipe *NOTE: If the dryer is required for gas appliances, ANSI Z21.24 or CSA 6.10. Rigid metal vent: ■■ Recommended for exhausting. VENTING Venting REQUiREMENTS WARNING BURNER...
Installation Instructions
Page 11
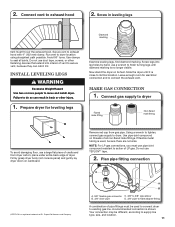
...finish turning legs until it is used to connect dryer to action of LP gas. Firmly grasp dryer body (not console panel) and gently lay dryer down on cardboard. †®TEFLON is a registered trademark of dryer. Remove red cap from dryer carton; Secure vent to do so can catch ... Vent must use TEFLON®† tape. 2. Use clamps to dryer. MAKE GAS CONNECTION 1. Using a wrench to tighten, connect gas supply to seal all non-flared male fittings. Run vent to move and install dryer. Install Leveling Legs WARNING Excessive Weight Hazard Use two or more people...
...finish turning legs until it is used to connect dryer to action of LP gas. Firmly grasp dryer body (not console panel) and gently lay dryer down on cardboard. †®TEFLON is a registered trademark of dryer. Remove red cap from dryer carton; Secure vent to do so can catch ... Vent must use TEFLON®† tape. 2. Use clamps to dryer. MAKE GAS CONNECTION 1. Using a wrench to tighten, connect gas supply to seal all non-flared male fittings. Run vent to move and install dryer. Install Leveling Legs WARNING Excessive Weight Hazard Use two or more people...
Installation Instructions
Page 12
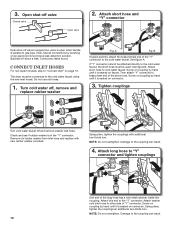
...hose and replace with additional two-thirds turn . Using pliers, tighten the couplings with new rubber washer provided. Attach washer cold inlet hose to gas pipe. 3. Attach short hose and "Y" connector Open shut-off , remove and replace rubber washer Fig. Correct any leaks found. Attach this ...coupling by brushing on connector. 3. Then, test all connections by hand until it is seated on page 13. Bubbles will show a leak. The dryer must be connected to the coupling can result. 12 B If space permits, attach the brass female end of the long hose has a wire mesh...
...hose and replace with additional two-thirds turn . Using pliers, tighten the couplings with new rubber washer provided. Attach washer cold inlet hose to gas pipe. 3. Attach short hose and "Y" connector Open shut-off , remove and replace rubber washer Fig. Correct any leaks found. Attach this ...coupling by brushing on connector. 3. Then, test all connections by hand until it is seated on page 13. Bubbles will show a leak. The dryer must be connected to the coupling can result. 12 B If space permits, attach the brass female end of the long hose has a wire mesh...
Installation Instructions
Page 14
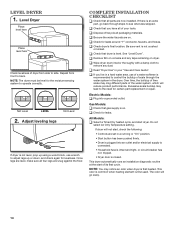
... and hoses. NOTE: You may lead to see what was skipped. q Check for leaks. q Check dryer's final location. Gas Models: q Check that all four legs are set in the dryer. Level dryer 1. Repeat from side to control the buildup of your "Use and Care Guide". Complete Installation CHECKLIST q... Check that gas supply is closed. q Check that you live in your tools. Over time, the ...
... and hoses. NOTE: You may lead to see what was skipped. q Check for leaks. q Check dryer's final location. Gas Models: q Check that all four legs are set in the dryer. Level dryer 1. Repeat from side to control the buildup of your "Use and Care Guide". Complete Installation CHECKLIST q... Check that gas supply is closed. q Check that you live in your tools. Over time, the ...


