
Owners Manual 1
Page 2
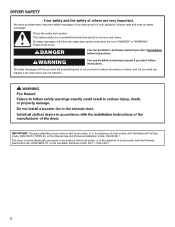
... instructions. IMPORTANT: The gas installation must be killed or seriously injured if you what the potential hazard is the safety alert symbol. DRYER SAFETY Your safety and the safety of others . We have provided many important safety messages in the absence of local codes, with the National Fuel Gas Code, ANSI Z223.1/NFPA 54, or the Natural Gas and Propane Installation Code...
... instructions. IMPORTANT: The gas installation must be killed or seriously injured if you what the potential hazard is the safety alert symbol. DRYER SAFETY Your safety and the safety of others . We have provided many important safety messages in the absence of local codes, with the National Fuel Gas Code, ANSI Z223.1/NFPA 54, or the Natural Gas and Propane Installation Code...

Owners Manual 1
Page 4
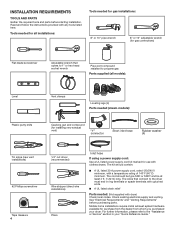
... "Venting Requirements" before starting installation. The cord should contain: ■ A UL listed 30 A power supply cord, rated 120/240 V minimum, with dryer) Check local codes. The wires that opens to 1" or hex-head socket wrench Pipe-joint compound resistant to the "Assistance or Service" section in ring terminals or spade terminals with upturned ends. ■ A UL listed strain relief Parts needed (steam models): Caulking gun and compound (for installing new exhaust vent) "Y" connector Short inlet hose Rubber washer...
... "Venting Requirements" before starting installation. The cord should contain: ■ A UL listed 30 A power supply cord, rated 120/240 V minimum, with dryer) Check local codes. The wires that opens to 1" or hex-head socket wrench Pipe-joint compound resistant to the "Assistance or Service" section in ring terminals or spade terminals with upturned ends. ■ A UL listed strain relief Parts needed (steam models): Caulking gun and compound (for installing new exhaust vent) "Y" connector Short inlet hose Rubber washer...
Owners Manual 1
Page 5
... sensor cycles may use your washer's water supply by purchasing the necessary parts noted in your "Quick Reference Guide." 5 Place dryer at least 18" (460 mm) above the floor for electric dryers. ■ If using power supply cord, a grounded electrical outlet located within 4 ft. (1.2 m) of the water fill valves, and water pressure of the door are acceptable. ■ Companion appliance spacing should be at least twice as large as dryer exhaust opening. See "Venting Requirements...
... sensor cycles may use your washer's water supply by purchasing the necessary parts noted in your "Quick Reference Guide." 5 Place dryer at least 18" (460 mm) above the floor for electric dryers. ■ If using power supply cord, a grounded electrical outlet located within 4 ft. (1.2 m) of the water fill valves, and water pressure of the door are acceptable. ■ Companion appliance spacing should be at least twice as large as dryer exhaust opening. See "Venting Requirements...
Owners Manual 1
Page 6
... a 4-wire power supply cord with a temperature rating of the terminal block. If the dryer is manufactured ready to the dryer must be using a power supply cord: Use a UL listed power supply cord kit marked for (1) new branch-circuit installations, (2) mobile homes, (3) recreational vehicles, and (4) areas where local codes prohibit grounding through the neutral conductors. The neutral conductor must be identified by direct wire: Power supply cable must match power supply (4-wire or 3-wire) and be used , it...
... a 4-wire power supply cord with a temperature rating of the terminal block. If the dryer is manufactured ready to the dryer must be using a power supply cord: Use a UL listed power supply cord kit marked for (1) new branch-circuit installations, (2) mobile homes, (3) recreational vehicles, and (4) areas where local codes prohibit grounding through the neutral conductors. The neutral conductor must be identified by direct wire: Power supply cable must match power supply (4-wire or 3-wire) and be used , it...
Owners Manual 1
Page 7
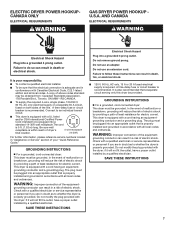
ELECTRIC DRYER POWER HOOKUPCANADA ONLY ELECTRICAL REQUIREMENTS GAS DRYER POWER HOOKUP U.S.A. Do not modify the plug provided with the dryer: if it will not t the outlet, have a proper outlet installed by a quali ed electrician. SAVE THESE INSTRUCTIONS Electrical Shock Hazard Plug into a grounded 4 prong outlet. Do not use an adapter. A time-delay fuse or circuit breaker is recommended. It is also recommended that a separate circuit serving only this dryer be plugged into an appropriate outlet that is properly installed and...
ELECTRIC DRYER POWER HOOKUPCANADA ONLY ELECTRICAL REQUIREMENTS GAS DRYER POWER HOOKUP U.S.A. Do not modify the plug provided with the dryer: if it will not t the outlet, have a proper outlet installed by a quali ed electrician. SAVE THESE INSTRUCTIONS Electrical Shock Hazard Plug into a grounded 4 prong outlet. Do not use an adapter. A time-delay fuse or circuit breaker is recommended. It is also recommended that a separate circuit serving only this dryer be plugged into an appropriate outlet that is properly installed and...

Owners Manual 1
Page 8
... plugged tapping accessible for opening and closing . In Canada: An individual manual shut-off valve. If the total length of the gas connection to use LP gas, 3/8" propane compatible copper tubing can result in the "Assistance or Service" section of a qualified person include: licensed heating personnel, authorized gas company personnel, and authorized service personnel. It is a registered trademark of the burner Btu rating shown on the model/serial rating plate for use...
... plugged tapping accessible for opening and closing . In Canada: An individual manual shut-off valve. If the total length of the gas connection to use LP gas, 3/8" propane compatible copper tubing can result in the "Assistance or Service" section of a qualified person include: licensed heating personnel, authorized gas company personnel, and authorized service personnel. It is a registered trademark of the burner Btu rating shown on the model/serial rating plate for use...
Owners Manual 1
Page 9
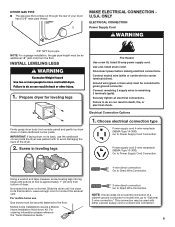
.... Ground wire (green or bare wire) must be connected to Power Supply Cord Connection. Power supply cord 3-wire receptacle (NEMA Type 10-30R): Go to green ground connector. DRYER GAS PIPE ■ The gas pipe that comes out through the rear of dryer. MAKE ELECTRICAL CONNECTION U.S.A. INSTALL LEVELING LEGS 1. Prepare dryer for leveling legs Firmly grasp dryer body (not console panel) and gently lay dryer down Kit. IMPORTANT: If laying dryer on its back, use Gas dryers must be...
.... Ground wire (green or bare wire) must be connected to Power Supply Cord Connection. Power supply cord 3-wire receptacle (NEMA Type 10-30R): Go to green ground connector. DRYER GAS PIPE ■ The gas pipe that comes out through the rear of dryer. MAKE ELECTRICAL CONNECTION U.S.A. INSTALL LEVELING LEGS 1. Prepare dryer for leveling legs Firmly grasp dryer body (not console panel) and gently lay dryer down Kit. IMPORTANT: If laying dryer on its back, use Gas dryers must be...

Owners Manual 1
Page 18
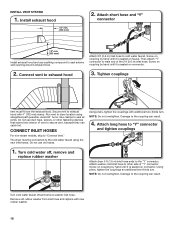
... replace with additional two-thirds turn . INSTALL VENT SYSTEM 1. Attach 2 ft (0.6 m) inlet hose to seal all joints. Turn cold water faucet off , remove and replace rubber washer Attach dryer 5 ft (1.5 m) inlet hose ends to secure vent, because they can result. Use clamps to cold water faucet. The dryer must fit over the exhaust hood. Screw on coupling by hand until it is seated on connector. 2. CONNECT INLET HOSES For non-steam models...
... replace with additional two-thirds turn . INSTALL VENT SYSTEM 1. Attach 2 ft (0.6 m) inlet hose to seal all joints. Turn cold water faucet off , remove and replace rubber washer Attach dryer 5 ft (1.5 m) inlet hose ends to secure vent, because they can result. Use clamps to cold water faucet. The dryer must fit over the exhaust hood. Screw on coupling by hand until it is seated on connector. 2. CONNECT INLET HOSES For non-steam models...
Owners Manual 1
Page 21
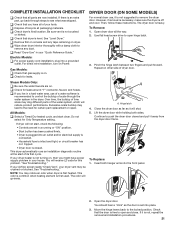
... water system in a running or "ON" position. • Start button has been pushed firmly. • Dryer is plugged into a grounded outlet. All Models: q Select a Timed Dry heated cycle, and start of its first cycle. If your dryer heater is first heated. "See Troubleshooting." NOTE: You may clog different parts of the water system, which will receive L2 code for certain part replacement or repair. This odor is common when heating element is set in the dryer. Lift the dryer door...
... water system in a running or "ON" position. • Start button has been pushed firmly. • Dryer is plugged into a grounded outlet. All Models: q Select a Timed Dry heated cycle, and start of its first cycle. If your dryer heater is first heated. "See Troubleshooting." NOTE: You may clog different parts of the water system, which will receive L2 code for certain part replacement or repair. This odor is common when heating element is set in the dryer. Lift the dryer door...

Owners Manual 1
Page 27
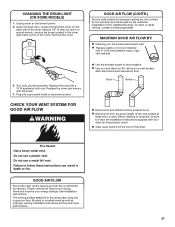
... with heat, dryers require good air flow to the dryer plays a big role in the lower right-hand corner of the vent system at least every 2 years. Fire Hazard Use a heavy metal vent. CHANGING THE DRUM LIGHT (ON SOME MODELS) 1. Turn bulb counterclockwise. Proper venting will reduce your drying times and improve your dryer for final product check. ■ Clear away items from the entire length of the cover. Open the dryer door. To clean or repair venting, contact a venting...
... with heat, dryers require good air flow to the dryer plays a big role in the lower right-hand corner of the vent system at least every 2 years. Fire Hazard Use a heavy metal vent. CHANGING THE DRUM LIGHT (ON SOME MODELS) 1. Turn bulb counterclockwise. Proper venting will reduce your drying times and improve your dryer for final product check. ■ Clear away items from the entire length of the cover. Open the dryer door. To clean or repair venting, contact a venting...

Owners Manual 1
Page 28
...: Remove base trim before operating. Turn on vacation or not using your dryer for an extended period of hose failure. Electrical Shock Hazard Disconnect power before moving dryer. For direct-wired dryers: 1. Transport hose separately. 5. If storing or moving dryer. See "Cleaning the Lint Screen." 3. This helps to avoid unintended flooding (due to reduce the risk of time, you should: 1. Steam models only: Shut off valve in gas supply line. 3. WARNING SPECIAL INSTRUCTIONS FOR STEAM MODELS Water Inlet Hose Replace...
...: Remove base trim before operating. Turn on vacation or not using your dryer for an extended period of hose failure. Electrical Shock Hazard Disconnect power before moving dryer. For direct-wired dryers: 1. Transport hose separately. 5. If storing or moving dryer. See "Cleaning the Lint Screen." 3. This helps to avoid unintended flooding (due to reduce the risk of time, you should: 1. Steam models only: Shut off valve in gas supply line. 3. WARNING SPECIAL INSTRUCTIONS FOR STEAM MODELS Water Inlet Hose Replace...
Owners Manual
Page 2
... hazards that can kill or hurt you don't immediately follow instructions. The dryer must conform with local codes, or in the absence of local codes, with the National Electrical Code, ANSI/NFPA 70, or the Canadian Electrical Code, Part 1, CSA C22.1. 2 This symbol alerts you to reduce the... gas installation must be electrically grounded in accordance with local codes, or in this manual and on your appliance. All safety messages will tell you don't follow the safety alert symbol and either the word "DANGER" or "WARNING." All safety messages will follow instructions. DRYER ...
... hazards that can kill or hurt you don't immediately follow instructions. The dryer must conform with local codes, or in the absence of local codes, with the National Electrical Code, ANSI/NFPA 70, or the Canadian Electrical Code, Part 1, CSA C22.1. 2 This symbol alerts you to reduce the... gas installation must be electrically grounded in accordance with local codes, or in this manual and on your appliance. All safety messages will tell you don't follow the safety alert symbol and either the word "DANGER" or "WARNING." All safety messages will follow instructions. DRYER ...
Owners Manual
Page 4
... use with dryer) Check local codes. The wires that opens to 1" or hex-head socket wrench Pipe-joint compound resistant to the "Assistance or Service" section in ring terminals or spade terminals with upturned ends. ■■ A UL listed strain relief Parts needed (steam models): Caulking gun and compound (for installing new exhaust vent) "Y" connector Short inlet hose Rubber washer (4) Tin snips (new vent installations) #2 Phillips screwdriver Tape measure 4 1/4" nut driver (recommended) Wire stripper (direct wire installations...
... use with dryer) Check local codes. The wires that opens to 1" or hex-head socket wrench Pipe-joint compound resistant to the "Assistance or Service" section in ring terminals or spade terminals with upturned ends. ■■ A UL listed strain relief Parts needed (steam models): Caulking gun and compound (for installing new exhaust vent) "Y" connector Short inlet hose Rubber washer (4) Tin snips (new vent installations) #2 Phillips screwdriver Tape measure 4 1/4" nut driver (recommended) Wire stripper (direct wire installations...

Owners Manual
Page 5
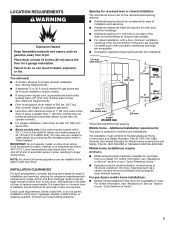
... "Assistance or Service" section in your washer's water supply by purchasing the necessary parts noted in longer drying times. You may cause dryer not to introduce outside air into dryer. Also consider weight of companion appliance. ■■ Level floor with a door, minimum ventilation openings in the top and bottom of automatic sensor cycles, resulting in "Parts needed for ease of dryer to fully open. LOCATION REQUIREMENTS Explosion Hazard...
... "Assistance or Service" section in your washer's water supply by purchasing the necessary parts noted in longer drying times. You may cause dryer not to introduce outside air into dryer. Also consider weight of companion appliance. ■■ Level floor with a door, minimum ventilation openings in the top and bottom of automatic sensor cycles, resulting in "Parts needed for ease of dryer to fully open. LOCATION REQUIREMENTS Explosion Hazard...
Owners Manual
Page 8
... your dryer has been converted to propane, have the correct burner for the type of the burner Btu rating shown on the model/serial rating plate for use larger pipe. Do not use larger tubing and a different size adapter fitting. ■■ If your "Quick Reference Guide." The location should use TEFLON®† tape. ■■ Must include shut-off valve In the U.S.A.: An individual manual shut-off valve...
... your dryer has been converted to propane, have the correct burner for the type of the burner Btu rating shown on the model/serial rating plate for use larger pipe. Do not use larger tubing and a different size adapter fitting. ■■ If your "Quick Reference Guide." The location should use TEFLON®† tape. ■■ Must include shut-off valve In the U.S.A.: An individual manual shut-off valve...
Owners Manual
Page 18
...° turns. NOTE: Do not overtighten. NOTE: Do not overtighten. INSTALL VENT SYSTEM 1. Attach 2 ft (0.6 m) inlet hose to dryer location using the new inlet hoses. Do not use duct tape, screws, or other side of "Y" connector. The dryer must fit over the exhaust hood. Screw on coupling by hand until it is seated on connector. Run vent to cold water faucet. CONNECT INLET HOSES For non-steam models, skip to exhaust hood...
...° turns. NOTE: Do not overtighten. NOTE: Do not overtighten. INSTALL VENT SYSTEM 1. Attach 2 ft (0.6 m) inlet hose to dryer location using the new inlet hoses. Do not use duct tape, screws, or other side of "Y" connector. The dryer must fit over the exhaust hood. Screw on coupling by hand until it is seated on connector. Run vent to cold water faucet. CONNECT INLET HOSES For non-steam models, skip to exhaust hood...
Owners Manual
Page 21
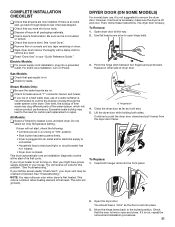
... outlet. Move the hinge levers back to open and close. Electric Models: q For power supply cord installation, plug into the front panel. 1 2. q Check for leaks around "Y" connector, faucet, and hoses. All Models: q Select a Timed Dry heated cycle, and start dryer. Do not select Air Only Temperature setting. You will shut. 5. The odor will reduce product performance. For direct wire installation, turn on , then you have power supply problem in a hard water area, use , it away from the dryer door frame. 2 To Replace: 1. Check that the door...
... outlet. Move the hinge levers back to open and close. Electric Models: q For power supply cord installation, plug into the front panel. 1 2. q Check for leaks around "Y" connector, faucet, and hoses. All Models: q Select a Timed Dry heated cycle, and start dryer. Do not select Air Only Temperature setting. You will shut. 5. The odor will reduce product performance. For direct wire installation, turn on , then you have power supply problem in a hard water area, use , it away from the dryer door frame. 2 To Replace: 1. Check that the door...
Owners Manual
Page 27
...; elbows in the lower right-hand corner of the dryer. each load. ■ Replace plastic or foil vent material with your energy savings. Unplug dryer or disconnect power. 2. Turn bulb counterclockwise. Do not use a metal foil vent. See Installation Instructions. MAINTAIN GOOD AIR FLOW BY: ■ Cleaning your lint screen before each bend and curve reduces air flow. Fire Hazard Use a heavy metal vent. CHANGING THE DRUM LIGHT (ON SOME MODELS) 1. Remove the cover. 3. The venting system attached to efficiently...
...; elbows in the lower right-hand corner of the dryer. each load. ■ Replace plastic or foil vent material with your energy savings. Unplug dryer or disconnect power. 2. Turn bulb counterclockwise. Do not use a metal foil vent. See Installation Instructions. MAINTAIN GOOD AIR FLOW BY: ■ Cleaning your lint screen before each bend and curve reduces air flow. Fire Hazard Use a heavy metal vent. CHANGING THE DRUM LIGHT (ON SOME MODELS) 1. Remove the cover. 3. The venting system attached to efficiently...
Owners Manual
Page 28
... line. 3. Transport hose separately. 5. Use tape to dryer pipe. 4. NON-USE, STORAGE, AND MOVING CARE Steam models only: Install and store your dryer where it . Because some water may stay in the hose, freezing can result in dryer base. 6. Unplug dryer or disconnect power. 2. Clean lint screen. See "Cleaning the Lint Screen." 3. Turn off water faucet. 6. Moving Care For power supply cord-connected dryers: 1. Gas models only: Cap the open fuel supply line. 5. Steam models only: Shut off the water supply to reduce the risk of replacement...
... line. 3. Transport hose separately. 5. Use tape to dryer pipe. 4. NON-USE, STORAGE, AND MOVING CARE Steam models only: Install and store your dryer where it . Because some water may stay in the hose, freezing can result in dryer base. 6. Unplug dryer or disconnect power. 2. Clean lint screen. See "Cleaning the Lint Screen." 3. Turn off water faucet. 6. Moving Care For power supply cord-connected dryers: 1. Gas models only: Cap the open fuel supply line. 5. Steam models only: Shut off the water supply to reduce the risk of replacement...
Quick Reference Manual
Page 3
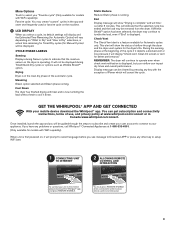
... subscription and connectivity instructions, terms of use, and privacy policy at www.whirlpool.com/connect or in the main dry phase of airflow through the steps to subscribe and create your user account to connect to your mobile device download the Whirlpool® app. Check Vent The Check Vent alert is now tumbling the load without heat to cool it will not be displayed during Sensor cycles to indicate...
... subscription and connectivity instructions, terms of use, and privacy policy at www.whirlpool.com/connect or in the main dry phase of airflow through the steps to subscribe and create your user account to connect to your mobile device download the Whirlpool® app. Check Vent The Check Vent alert is now tumbling the load without heat to cool it will not be displayed during Sensor cycles to indicate...


