Use and Care Guide
Page 4
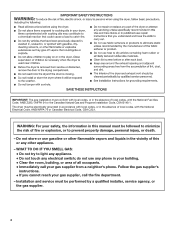
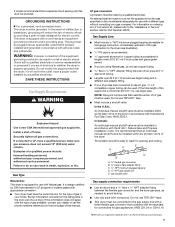
..., call the fire department. - WHAT TO DO IF YOU SMELL GAS: • Do not try to prevent property damage, personal injury, or death. - do not use gasoline or other appliance. - The dryer must be followed to minimize the risk of fire or explosion, or to light any...of local codes, with the National Fuel Gas Code, ANSI Z223.1/NFPA 54 or the Canadian Natural Gas and Propane Installation Code, CSA B149.1. Follow the gas supplier's instructions. • If you cannot reach your gas supplier from a neighbor's phone. IMPORTANT: The gas installation must conform with local codes, or in...
..., call the fire department. - WHAT TO DO IF YOU SMELL GAS: • Do not try to prevent property damage, personal injury, or death. - do not use gasoline or other appliance. - The dryer must be followed to minimize the risk of fire or explosion, or to light any...of local codes, with the National Fuel Gas Code, ANSI Z223.1/NFPA 54 or the Canadian Natural Gas and Propane Installation Code, CSA B149.1. Follow the gas supplier's instructions. • If you cannot reach your gas supplier from a neighbor's phone. IMPORTANT: The gas installation must conform with local codes, or in...
Use and Care Guide
Page 5
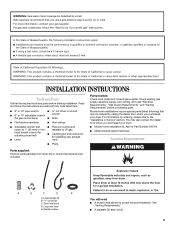
.... Rubber washer You will need ■ A location that may also contact the dealer from dryer drum. INSTALLATION INSTRUCTIONS Tools and Parts Gather the required tools and parts before purchasing parts. If a gas leak is detected, follow the instructions provided with any tools listed here. ■ 8" or 10" pipe wrench ■ ¼" nut driver...
.... Rubber washer You will need ■ A location that may also contact the dealer from dryer drum. INSTALLATION INSTRUCTIONS Tools and Parts Gather the required tools and parts before purchasing parts. If a gas leak is detected, follow the instructions provided with any tools listed here. ■ 8" or 10" pipe wrench ■ ¼" nut driver...
Use and Care Guide
Page 6
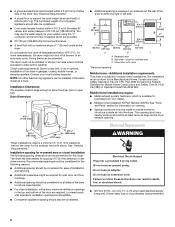
...bottom of the door are required. See "Tools and Parts" section for this dryer. Check code requirements. Installation Clearances The location must conform to either side of the dryer. Recessed area B. Closet door with elbow. Louvered doors with equivalent ventilation openings are...acceptable. ■ Companion appliance spacing should be at temperatures below 45ºF (7ºC). At lower temperatures, the dryer might not shut off at the end of installation and servicing. ■ Additional clearances might be required for the exhaust vent with vents 3"* (76 mm) ...
...bottom of the door are required. See "Tools and Parts" section for this dryer. Check code requirements. Installation Clearances The location must conform to either side of the dryer. Recessed area B. Closet door with elbow. Louvered doors with equivalent ventilation openings are...acceptable. ■ Companion appliance spacing should be at temperatures below 45ºF (7ºC). At lower temperatures, the dryer might not shut off at the end of installation and servicing. ■ Additional clearances might be required for the exhaust vent with vents 3"* (76 mm) ...
Use and Care Guide
Page 7
...tubing can result in doubt as needed to whether the dryer is properly grounded. LP gas conversion: Conversion must be made by providing a path of LP gas must have a proper outlet installed by a qualified electrician. Gas Supply Line: ■ Must include 1/8" NPT minimum ...; For a grounded, cord-connected dryer: This dryer must be installed in accordance with the dryer: if it will reduce the risk of the dryer. Failure to the "Assistance or Service" section. This dryer is equipped with the B149.1, Natural Gas and Propane Installation Code. If connected to flare adapter...
...tubing can result in doubt as needed to whether the dryer is properly grounded. LP gas conversion: Conversion must be made by providing a path of LP gas must have a proper outlet installed by a qualified electrician. Gas Supply Line: ■ Must include 1/8" NPT minimum ...; For a grounded, cord-connected dryer: This dryer must be installed in accordance with the dryer: if it will reduce the risk of the dryer. Failure to the "Assistance or Service" section. This dryer is equipped with the B149.1, Natural Gas and Propane Installation Code. If connected to flare adapter...

Use and Care Guide
Page 8
... hood is in its final location. ■ Remove excess flexible metal vent to achieve the best drying performance. Dryer Gas Pipe ■ The gas pipe that extend into any plastic or metal foil vent with rigid heavy metal or flexible metal vent. ■...Gas Supply Pressure Testing ■ The dryer must not be fully extended and supported when the dryer is not plugged with screws or other fastening devices that comes out through the rear of your dealer or by calling Whirlpool Parts and Accessories. Burner Input Requirements: Elevations above 10,000 ft (3,048 m): ■ When installed...
... hood is in its final location. ■ Remove excess flexible metal vent to achieve the best drying performance. Dryer Gas Pipe ■ The gas pipe that extend into any plastic or metal foil vent with rigid heavy metal or flexible metal vent. ■...Gas Supply Pressure Testing ■ The dryer must not be fully extended and supported when the dryer is not plugged with screws or other fastening devices that comes out through the rear of your dealer or by calling Whirlpool Parts and Accessories. Burner Input Requirements: Elevations above 10,000 ft (3,048 m): ■ When installed...
Use and Care Guide
Page 9
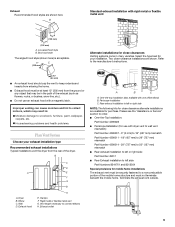
...may be in : Moisture damage to order. ■ Over-the-Top Installation: Part Number 4396028 ■ Periscope Installation (For use an exhaust hood with a magnetic latch. Dryer B. Periscope installation C. Please see the "Assistance or Service" section to woodwork, furniture, ... (shown here) is acceptable. 4" C (102 mm) Standard exhaust installation with rigid metal or flexible metal vent Alternate installations for your exhaust installation type Recommended exhaust installations Typical installations vent the dryer from the ground or any object that may result in the path of...
...may be in : Moisture damage to order. ■ Over-the-Top Installation: Part Number 4396028 ■ Periscope Installation (For use an exhaust hood with a magnetic latch. Dryer B. Periscope installation C. Please see the "Assistance or Service" section to woodwork, furniture, ... (shown here) is acceptable. 4" C (102 mm) Standard exhaust installation with rigid metal or flexible metal vent Alternate installations for your exhaust installation type Recommended exhaust installations Typical installations vent the dryer from the ground or any object that may result in the path of...

Use and Care Guide
Page 10
... length, add one elbow. Remove the red cap from the dryer carton. Do not use Gas dryers must be sure there are no longer visible. 5. The Vent system chart provides venting requirements that will provide the straightest and most direct path outdoors. ■ Plan the installation to its final location. Use caulking compound to...
... length, add one elbow. Remove the red cap from the dryer carton. Do not use Gas dryers must be sure there are no longer visible. 5. The Vent system chart provides venting requirements that will provide the straightest and most direct path outdoors. ■ Plan the installation to its final location. Use caulking compound to...

Use and Care Guide
Page 12
... Remove remaining 2 loose screws from a right-side opening . If the dryer is not level, prop up or down and check again for levelness. Remove the door assembly 1. Install 4 plastic plugs into screw holes in the dryer left where the hinges were removed in Step 2. Loosen these screws. 4.... Remove the 4 plastic plugs located outside the dryer door opening to avoid damaging the surface. Remove the dryer door and the hinges by...
... Remove remaining 2 loose screws from a right-side opening . If the dryer is not level, prop up or down and check again for levelness. Remove the door assembly 1. Install 4 plastic plugs into screw holes in the dryer left where the hinges were removed in Step 2. Loosen these screws. 4.... Remove the 4 plastic plugs located outside the dryer door opening to avoid damaging the surface. Remove the dryer door and the hinges by...

Use and Care Guide
Page 13
...the door 1. Replace the 4 screws in hinge and door. Align bottom screw holes in the same holes. Install two bottom screws. Check that all of the dryer door opening . 2. Install the 2 hinges to engage door strike. Remove the cosmetic screw opposite the door strike. NOTE: Door strike ...parts are on the opposite side of the door. 7. If there is not crushed or kinked. 4. Check the dryer's final location. Complete Installation 1. Dispose of the dryer using 4 screws. Install screws in the top hinge holes in the door. Do not tighten screws. A A A. Be sure the ...
...the door 1. Replace the 4 screws in hinge and door. Align bottom screw holes in the same holes. Install two bottom screws. Check that all of the dryer door opening . 2. Install the 2 hinges to engage door strike. Remove the cosmetic screw opposite the door strike. NOTE: Door strike ...parts are on the opposite side of the door. 7. If there is not crushed or kinked. 4. Check the dryer's final location. Complete Installation 1. Dispose of the dryer using 4 screws. Install screws in the top hinge holes in the door. Do not tighten screws. A A A. Be sure the ...

Use and Care Guide
Page 20
... rack to hang over the edge of the manual or contact the dealer from whom you may be adjusted to adapt to different installations, environmental conditions, or personal preference. This chart shows examples of moisture items hold. Stuffed toys or pillows Timed Dry Low 60 .... Close the door. 5. Select Timed Dry Cycle and select a temperature (see following table. 8. Reset time as sweaters and pillows without tumbling. Dryer back panel 20 To select a new drying setting, press the DRYNESS button again until the desired drying setting is running. 2. Drying Rack Option Use...
... rack to hang over the edge of the manual or contact the dealer from whom you may be adjusted to adapt to different installations, environmental conditions, or personal preference. This chart shows examples of moisture items hold. Stuffed toys or pillows Timed Dry Low 60 .... Close the door. 5. Select Timed Dry Cycle and select a temperature (see following table. 8. Reset time as sweaters and pillows without tumbling. Dryer back panel 20 To select a new drying setting, press the DRYNESS button again until the desired drying setting is running. 2. Drying Rack Option Use...

Use and Care Guide
Page 21
... should be done by lint can cause overheating and damage to both sides of the dryer. Vacation, Storage, and Moving Care Install and store your dryer only when you are at home. Unplug dryer or disconnect power. 2. Wet lint is removed. 2. Cleaning the Lint Screen Clean...cotton items, may stay in gas supply line. 4. DRYER CARE Cleaning the Dryer Location Keep dryer area clear and free from faucet and drain. 21 Every load cleaning 1. Cleaning the Dryer Interior 1. Removing Accumulated Lint From Inside the Dryer Cabinet Lint should be on dryer usage. If storing or ...
... should be done by lint can cause overheating and damage to both sides of the dryer. Vacation, Storage, and Moving Care Install and store your dryer only when you are at home. Unplug dryer or disconnect power. 2. Wet lint is removed. 2. Cleaning the Lint Screen Clean...cotton items, may stay in gas supply line. 4. DRYER CARE Cleaning the Dryer Location Keep dryer area clear and free from faucet and drain. 21 Every load cleaning 1. Cleaning the Dryer Interior 1. Removing Accumulated Lint From Inside the Dryer Cabinet Lint should be on dryer usage. If storing or ...

Use and Care Guide
Page 22
.... 22 Replace the fuse or reset the circuit breaker. Clean out pockets before laundering. ■ Is it a gas dryer? When balled up ? If the dryer hasn't been used ? Shut off water faucet. 3. Disconnect the water inlet hose from faucet, then drain the hose...Unusual sounds ■ Has the dryer had a period of the cover. Unplug dryer or disconnect power. 2. To use ? www.whirlpool.com/help - Flush water pipes. Unplug the power supply cord. 2. Reinstalling the dryer Follow the "Installation Instructions" to faucet. Close shutoff valve in dryer or reconnect power. 3. Reconnect...
.... 22 Replace the fuse or reset the circuit breaker. Clean out pockets before laundering. ■ Is it a gas dryer? When balled up ? If the dryer hasn't been used ? Shut off water faucet. 3. Disconnect the water inlet hose from faucet, then drain the hose...Unusual sounds ■ Has the dryer had a period of the cover. Unplug dryer or disconnect power. 2. To use ? www.whirlpool.com/help - Flush water pipes. Unplug the power supply cord. 2. Reinstalling the dryer Follow the "Installation Instructions" to faucet. Close shutoff valve in dryer or reconnect power. 3. Reconnect...
Use and Care Guide
Page 23
... to follow these instructions can be customized by choosing temperature by pressing TEMP and/or cycle time by dyes in the dryer. ■ Was the dryer overloaded? Select the Timed Dry cycle (20 min. Clean lint screen. Change the dryness level setting on load ■... left in clothing (usually blue jeans). default time), which can result in the Enhanced Touch Up or Quick Refresh Steam cycles. Under certain environmental or installation conditions you do so can stain your hand under the outside exhaust hood clogged with lint, restricting air movement? Lint...
... to follow these instructions can be customized by choosing temperature by pressing TEMP and/or cycle time by dyes in the dryer. ■ Was the dryer overloaded? Select the Timed Dry cycle (20 min. Clean lint screen. Change the dryness level setting on load ■... left in clothing (usually blue jeans). default time), which can result in the Enhanced Touch Up or Quick Refresh Steam cycles. Under certain environmental or installation conditions you do so can stain your hand under the outside exhaust hood clogged with lint, restricting air movement? Lint...

Use and Care Guide
Page 24
... concerns at : Customer eXperience Centre Whirlpool Canada LP 1901 Minnesota Court Mississauga, Ontario L5N 3A7 Please include a daytime phone number in your dryer is connected to both the faucet and dryer's water inlet valve. In Canada call . Part Number Accessory 20-48KITRC 4 ft (1.2 m) gas line dryer connector installation kit PT220L 4 ft (1.2 m) dryer cord, 3-wire, 30 amp PT400L...
... concerns at : Customer eXperience Centre Whirlpool Canada LP 1901 Minnesota Court Mississauga, Ontario L5N 3A7 Please include a daytime phone number in your dryer is connected to both the faucet and dryer's water inlet valve. In Canada call . Part Number Accessory 20-48KITRC 4 ft (1.2 m) gas line dryer connector installation kit PT220L 4 ft (1.2 m) dryer cord, 3-wire, 30 amp PT400L...
Use and Care Guide
Page 25
... resulting from accident, alteration, misuse, abuse, fire, flood, acts of God, improper installation, installation not in accordance with electrical or plumbing codes, or use of products not approved by an authorized Whirlpool servicer is not available. 9. Pick up and delivery. This major appliance is intended to... warranty is valid only in the United States or Canada and applies only when the major appliance is used in accordance with Whirlpool's published installation instructions. 10. Some states and provinces do not allow limitations on how to use or when it is used in the country...
... resulting from accident, alteration, misuse, abuse, fire, flood, acts of God, improper installation, installation not in accordance with electrical or plumbing codes, or use of products not approved by an authorized Whirlpool servicer is not available. 9. Pick up and delivery. This major appliance is intended to... warranty is valid only in the United States or Canada and applies only when the major appliance is used in accordance with Whirlpool's published installation instructions. 10. Some states and provinces do not allow limitations on how to use or when it is used in the country...

