Use and Care Guide
Page 3
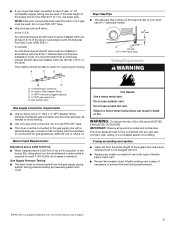
...gas supplier, call the fire department. - This is , tell you to prevent property damage, personal injury, or death. - Follow the gas... supplier's instructions. • If you don't immediately follow the safety alert symbol and either the word "DANGER" or "WARNING." We have provided many important safety messages in this manual... and on your appliance. These words mean: DANGER You can be killed or seriously injured if you cannot reach your gas supplier from a neighbor's phone. WHAT TO DO IF YOU SMELL GAS...this manual ...■ A flexible gas connector, when used,...
...gas supplier, call the fire department. - This is , tell you to prevent property damage, personal injury, or death. - Follow the gas... supplier's instructions. • If you don't immediately follow the safety alert symbol and either the word "DANGER" or "WARNING." We have provided many important safety messages in this manual... and on your appliance. These words mean: DANGER You can be killed or seriously injured if you cannot reach your gas supplier from a neighbor's phone. WHAT TO DO IF YOU SMELL GAS...this manual ...■ A flexible gas connector, when used,...
Use and Care Guide
Page 4
... new exhaust vent) ■ Pliers 4 leveling legs Parts needed: Check local codes and consult gas supplier. Parts supplied: Remove parts package from whom you purchased your dryer. IMPORTANT SAFETY INSTRUCTIONS WARNING: To reduce the risk of this Use and Care Guide or in ...whom you purchased your dryer. ■ Mobile home installation kit. SAVE THESE INSTRUCTIONS IMPORTANT: The gas installation must be electrically grounded in accordance with local codes, or in the absence of local codes, with any servicing unless specifically recommended in this manual. Ask for Part Number...
... new exhaust vent) ■ Pliers 4 leveling legs Parts needed: Check local codes and consult gas supplier. Parts supplied: Remove parts package from whom you purchased your dryer. IMPORTANT SAFETY INSTRUCTIONS WARNING: To reduce the risk of this Use and Care Guide or in ...whom you purchased your dryer. ■ Mobile home installation kit. SAVE THESE INSTRUCTIONS IMPORTANT: The gas installation must be electrically grounded in accordance with local codes, or in the absence of local codes, with any servicing unless specifically recommended in this manual. Ask for Part Number...
Use and Care Guide
Page 6
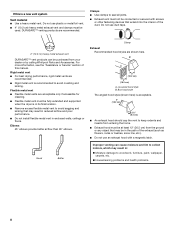
... only this manual. Failure to LP, have a qualified person make sure gas pressure does not exceed 13" (33 cm) water column. Install a shut-off valve. If connected to follow these instructions can result in doubt as to the dryer (see illustration). Gas Type Natural Gas: This dryer is properly grounded... fit the outlet, have the correct burner for the type of the gas connection to whether the dryer is equipped for LP (propane or butane) gases with the type of gas available, contact your dryer. Burner information is designcertified by providing a path of your dealer or ...
... only this manual. Failure to LP, have a qualified person make sure gas pressure does not exceed 13" (33 cm) water column. Install a shut-off valve. If connected to follow these instructions can result in doubt as to the dryer (see illustration). Gas Type Natural Gas: This dryer is properly grounded... fit the outlet, have the correct burner for the type of the gas connection to whether the dryer is equipped for LP (propane or butane) gases with the type of gas available, contact your dryer. Burner information is designcertified by providing a path of your dealer or ...
Use and Care Guide
Page 7
... can result in elevation. It is a registered trademark of your dryer has been converted to reach for opening and closing. A C E Dryer Gas Pipe ■ The gas pipe that an individual manual shutoff valve be installed within six (6) feet (1.8 m) of LP gas must be used . Gas shutoff valve Gas supply connection requirements ■ Use an elbow and a ³⁄...
... can result in elevation. It is a registered trademark of your dryer has been converted to reach for opening and closing. A C E Dryer Gas Pipe ■ The gas pipe that an individual manual shutoff valve be installed within six (6) feet (1.8 m) of LP gas must be used . Gas shutoff valve Gas supply connection requirements ■ Use an elbow and a ³⁄...
Use and Care Guide
Page 8
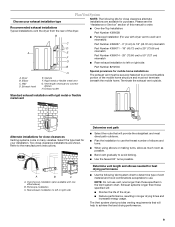
...; Exhaust hood must be at least 12" (30.5 cm) from your dealer or by calling Whirlpool Parts and Accessories. If this is in its final location. ■ Remove excess flexible metal vent...vent must not be purchased from the ground or any object that may be in the path of this manual. Clamps ■ Use clamps to woodwork, furniture, paint, wallpaper, carpets, etc. Rigid metal vent ...only if accessible for cleaning. ■ Flexible metal vent must be fully extended and supported when the dryer is a new vent system Vent material ■ Use a heavy metal vent. Elbows 45° ...
...; Exhaust hood must be at least 12" (30.5 cm) from your dealer or by calling Whirlpool Parts and Accessories. If this is in its final location. ■ Remove excess flexible metal vent...vent must not be purchased from the ground or any object that may be in the path of this manual. Clamps ■ Use clamps to woodwork, furniture, paint, wallpaper, carpets, etc. Rigid metal vent ...only if accessible for cleaning. ■ Flexible metal vent must be fully extended and supported when the dryer is a new vent system Vent material ■ Use a heavy metal vent. Elbows 45° ...
Use and Care Guide
Page 9
... drying performance. 9 Exhaust systems longer than those specified will: ■ Shorten the life of this manual to order. ■ Over-the-Top Installation: Part Number 4396028 ■ Periscope Installation (For use with dryer vent to wall vent mismatch): Part Number 4396037 - 0" (0 cm) to 18" (45.72 ...cm) mismatch D Part Number 4396011 - 18" (45.72 cm) to 29" (73.66 cm) A E mismatch Part Number 4396014 - 29" (73.66 cm) to 50" (127 cm) ...
... drying performance. 9 Exhaust systems longer than those specified will: ■ Shorten the life of this manual to order. ■ Over-the-Top Installation: Part Number 4396028 ■ Periscope Installation (For use with dryer vent to wall vent mismatch): Part Number 4396037 - 0" (0 cm) to 18" (45.72 ...cm) mismatch D Part Number 4396011 - 18" (45.72 cm) to 29" (73.66 cm) A E mismatch Part Number 4396014 - 29" (73.66 cm) to 50" (127 cm) ...
Use and Care Guide
Page 14
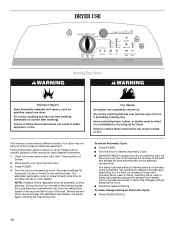
...cooking oils). Fire Hazard No washer can select a different dryness level, depending on your dryer. Failure to follow these basic steps to specific sections of this manual for Automatic Cycles or Timed Cycles will illuminate. Follow these instructions can result in death, ... stopping the cycle. ■ Select the desired Options. This manual covers several different models. Clean lint screen before each load. See "Cleaning the Lint Screen." 2. DRYER USE WARNING Starting Your Dryer WARNING Explosion Hazard Keep flammable materials and vapors, such as gasoline...
...cooking oils). Fire Hazard No washer can select a different dryness level, depending on your dryer. Failure to follow these basic steps to specific sections of this manual for Automatic Cycles or Timed Cycles will illuminate. Follow these instructions can result in death, ... stopping the cycle. ■ Select the desired Options. This manual covers several different models. Clean lint screen before each load. See "Cleaning the Lint Screen." 2. DRYER USE WARNING Starting Your Dryer WARNING Explosion Hazard Keep flammable materials and vapors, such as gasoline...
Use and Care Guide
Page 18
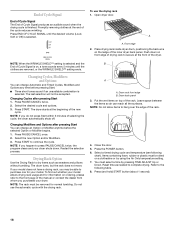
... POWER button. 6. Items containing foam, rubber or plastic must be accepted. Refer to secure at the front of drying rack to the following chart). Open dryer door. Push down . Press PAUSE/CANCEL twice. 2. Press PAUSE/CANCEL once. 2. NOTE: If you do not press Start within 5 minutes of the cycle ..., positioning the back wire on top of the inner dryer back panel. Changing Cycles after pressing Start You can reach all the surfaces. You must be able to hang over the edge of the manual or contact the dealer from whom you may be removed for information on a clothesline or ...
... POWER button. 6. Items containing foam, rubber or plastic must be accepted. Refer to secure at the front of drying rack to the following chart). Open dryer door. Push down . Press PAUSE/CANCEL twice. 2. Press PAUSE/CANCEL once. 2. NOTE: If you do not press Start within 5 minutes of the cycle ..., positioning the back wire on top of the inner dryer back panel. Changing Cycles after pressing Start You can reach all the surfaces. You must be able to hang over the edge of the manual or contact the dealer from whom you may be removed for information on a clothesline or ...


