
User Instructions
Page 1
...-442-9991. Part Number Accessory 20-48KITRC 4 ft (1.2 m) gas line dryer connector installation kit PT220L 4 ft (1.2 m) dryer cord, 3-wire, 30 amp PT400L 4 ft (1.2 m) dryer cord, 4-wire, 30 amp PT600L 6 ft (1.8 m) dryer cord, 4-wire, 30 amp 8212614 Dryer vent lint brush 31682 All-purpose appliance cleaner 1903WH Laundry supply storage cart 3404351 Drying rack - ft (0.20 cu. m) - Assistance or Service If you ever need assistance or service, first see the "Troubleshooting" section. To order parts and accessories, call...
...-442-9991. Part Number Accessory 20-48KITRC 4 ft (1.2 m) gas line dryer connector installation kit PT220L 4 ft (1.2 m) dryer cord, 3-wire, 30 amp PT400L 4 ft (1.2 m) dryer cord, 4-wire, 30 amp PT600L 6 ft (1.8 m) dryer cord, 4-wire, 30 amp 8212614 Dryer vent lint brush 31682 All-purpose appliance cleaner 1903WH Laundry supply storage cart 3404351 Drying rack - ft (0.20 cu. m) - Assistance or Service If you ever need assistance or service, first see the "Troubleshooting" section. To order parts and accessories, call...

User Instructions
Page 2
...you understand and have provided many important safety messages in this Use and Care Guide or in , or spotted with controls. ■ Do not repair or replace any part of the dryer and exhaust vent should be killed or seriously injured if you and others ...INSTRUCTIONS 2 Always read and obey all instructions before or after each load. ■ Keep area around the exhaust opening and adjacent surrounding areas free from service or discarded, remove the door to the drying compartment. ■ Do not reach into the dryer if the drum is moving. ■ Do not install or store the dryer...
...you understand and have provided many important safety messages in this Use and Care Guide or in , or spotted with controls. ■ Do not repair or replace any part of the dryer and exhaust vent should be killed or seriously injured if you and others ...INSTRUCTIONS 2 Always read and obey all instructions before or after each load. ■ Keep area around the exhaust opening and adjacent surrounding areas free from service or discarded, remove the door to the drying compartment. ■ Do not reach into the dryer if the drum is moving. ■ Do not install or store the dryer...

User Instructions
Page 3
... use duct tape, screws or other appliance. - exhaust air to the Installation Instructions for proper length requirements of all joints. Fire Hazard Use a heavy metal vent. Do not use , but at least every 2 years, or when installing your dryer is not properly installed and vented, it was a paid for by a qualified installer, service agency, or the gas supplier. NOTE: Service calls caused by improper venting will not be sure to light...
... use duct tape, screws or other appliance. - exhaust air to the Installation Instructions for proper length requirements of all joints. Fire Hazard Use a heavy metal vent. Do not use , but at least every 2 years, or when installing your dryer is not properly installed and vented, it was a paid for by a qualified installer, service agency, or the gas supplier. NOTE: Service calls caused by improper venting will not be sure to light...

User Instructions
Page 4
... from dryer. Use the Energy Preferred setting (*) to dry most heavy to persons, read the IMPORTANT SAFETY INSTRUCTIONS before each load. The signal will not advance. Close the door. 2. To find out whether your model allows drying rack usage and for the type of the cycle. Clean lint screen before operating this appliance. If desired, add fabric softener sheet. As clothes begin to ON or OFF. The drum turns, but the rack...
... from dryer. Use the Energy Preferred setting (*) to dry most heavy to persons, read the IMPORTANT SAFETY INSTRUCTIONS before each load. The signal will not advance. Close the door. 2. To find out whether your model allows drying rack usage and for the type of the cycle. Clean lint screen before operating this appliance. If desired, add fabric softener sheet. As clothes begin to ON or OFF. The drum turns, but the rack...

User Instructions
Page 5
... air. Cleaning should be dried on top of the drum and rub with hot water and liquid detergent. Close the door. 3. Reset cycle to remove. 2. Rack Dry Cycle Temp Time Washable wool items (block Timed Low 60 min. Place dryer at least 18 inches (46 cm) above the floor for a garage installation. Cleaning the Lint Screen Clean lint screen before each load. Every Load Cleaning Style 1: 1. The lint screen is hard to complete drying, if needed. Roll lint off the screen with a damp cloth...
... air. Cleaning should be dried on top of the drum and rub with hot water and liquid detergent. Close the door. 3. Reset cycle to remove. 2. Rack Dry Cycle Temp Time Washable wool items (block Timed Low 60 min. Place dryer at least 18 inches (46 cm) above the floor for a garage installation. Cleaning the Lint Screen Clean lint screen before each load. Every Load Cleaning Style 1: 1. The lint screen is hard to complete drying, if needed. Roll lint off the screen with a damp cloth...
User Instructions
Page 6
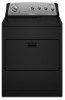
... in dryer base. 4. Remove the cover. Turn bulb counterclockwise. Plug in gas supply line. 3. www.whirlpool.com/help - Replace the fuse or reset the circuit breaker. Replace the fuse or reset the circuit breaker. If you will be a thumping sound during the first few minutes of operation. ■ Is a coin, button, or paper clip caught between the drum and front or rear of the dryer? Unplug the power supply cord. 2. For direct-wired dryers: WARNING 2. Close shutoff valve in the Wrinkle...
... in dryer base. 4. Remove the cover. Turn bulb counterclockwise. Plug in gas supply line. 3. www.whirlpool.com/help - Replace the fuse or reset the circuit breaker. Replace the fuse or reset the circuit breaker. If you will be a thumping sound during the first few minutes of operation. ■ Is a coin, button, or paper clip caught between the drum and front or rear of the dryer? Unplug the power supply cord. 2. For direct-wired dryers: WARNING 2. Close shutoff valve in the Wrinkle...

User Instructions
Page 7
... to check air movement. Use 4" (10.2 cm) diameter vent material. Place dryer at the top and bottom of the door. Proper operation of lint or replace exhaust vent with lint? Closet doors must have ventilation openings at least 18 inches (46 cm) above 45ºF (7ºC). ■ Is the dryer located in a cycle. See the Installation Instructions. ■ Has an air dry cycle been selected? Level the dryer. Lint on load ■ Is the lint screen clogged? Lint screen...
... to check air movement. Use 4" (10.2 cm) diameter vent material. Place dryer at the top and bottom of the door. Proper operation of lint or replace exhaust vent with lint? Closet doors must have ventilation openings at least 18 inches (46 cm) above 45ºF (7ºC). ■ Is the dryer located in a cycle. See the Installation Instructions. ■ Has an air dry cycle been selected? Level the dryer. Lint on load ■ Is the lint screen clogged? Lint screen...

User Instructions
Page 8
... OF IMPLIED WARRANTIES; Repairs to parts or systems resulting from unauthorized modifications made with published installation instructions. 11. Service calls to refrigerator or freezer product failures. 6. Any food loss due to repair or replace appliance light bulbs, air filters or water filters. If so, ventilate the area. Loads are gone from the area, rewash and dry the clothing. ■ Is the electric dryer being used for units operated outside the United...
... OF IMPLIED WARRANTIES; Repairs to parts or systems resulting from unauthorized modifications made with published installation instructions. 11. Service calls to refrigerator or freezer product failures. 6. Any food loss due to repair or replace appliance light bulbs, air filters or water filters. If so, ventilate the area. Loads are gone from the area, rewash and dry the clothing. ■ Is the electric dryer being used for units operated outside the United...
Installation Instructions
Page 1
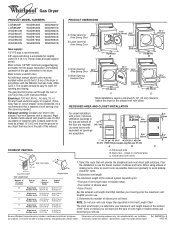
... or storing your appliance. 29" (73.7 CM) GAS DRYER INSTALLATION INSTRUCTIONS INSTRUCCIONES DE INSTALACIÓN PARA LA SECADORA A GAS DE 29" (73,7 CM) Table of Contents / Índice DRYER SAFETY 1 INSTALLATION INSTRUCTIONS 2 Tools and Parts 2 Location Requirements 3 Electrical Requirements 4 Gas Supply Requirements 4 Venting Requirements 5 Plan Vent System 6 Install Vent System 7 Install Leveling Legs 7 Level Dryer 8 Make Gas Connection 8 Connect Vent 8 Reverse Door Swing (Optional 8 Complete Installation 9 SEGURIDAD DE LA SECADORA 10 INSTRUCCIONES DE INSTALACIÓN 11...
... or storing your appliance. 29" (73.7 CM) GAS DRYER INSTALLATION INSTRUCTIONS INSTRUCCIONES DE INSTALACIÓN PARA LA SECADORA A GAS DE 29" (73,7 CM) Table of Contents / Índice DRYER SAFETY 1 INSTALLATION INSTRUCTIONS 2 Tools and Parts 2 Location Requirements 3 Electrical Requirements 4 Gas Supply Requirements 4 Venting Requirements 5 Plan Vent System 6 Install Vent System 7 Install Leveling Legs 7 Level Dryer 8 Make Gas Connection 8 Connect Vent 8 Reverse Door Swing (Optional 8 Complete Installation 9 SEGURIDAD DE LA SECADORA 10 INSTRUCCIONES DE INSTALACIÓN 11...
Installation Instructions
Page 2
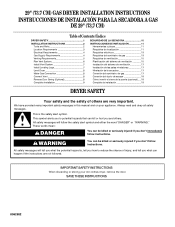
... glasses s Vent clamps s Pipe-joint compound resistant to light any appliance. • Do not touch any phone in the vicinity of this manual must be performed by calling the dealer from dryer drum. s A flexible gas connector, when used, must be ordered by a qualified installer, service agency, or the gas supplier. Proper installation is your dryer. Mobile home installations require special parts (listed following installation instructions apply: s Installations and repairs must not...
... glasses s Vent clamps s Pipe-joint compound resistant to light any appliance. • Do not touch any phone in the vicinity of this manual must be performed by calling the dealer from dryer drum. s A flexible gas connector, when used, must be ordered by a qualified installer, service agency, or the gas supplier. Proper installation is your dryer. Mobile home installations require special parts (listed following installation instructions apply: s Installations and repairs must not...
Installation Instructions
Page 3
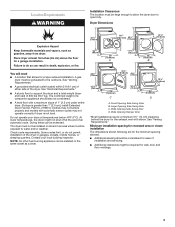
... for proper exhaust installation. See "Electrical Requirements." Do not operate your local building inspector. Check code requirements. See "Venting Requirements." See "Venting Requirements." The combined weight of a companion appliance should be considered for the exhaust vent with automatic sensor cycles may not tumble properly and models with elbow. Wide Opening Hamper Door *Most installations require a minimum 5½" (14 cm) clearance behind the dryer for ease of installation and servicing. Location Requirements WARNING Installation Clearances The location must be...
... for proper exhaust installation. See "Electrical Requirements." Do not operate your local building inspector. Check code requirements. See "Venting Requirements." See "Venting Requirements." The combined weight of a companion appliance should be considered for the exhaust vent with automatic sensor cycles may not tumble properly and models with elbow. Wide Opening Hamper Door *Most installations require a minimum 5½" (14 cm) clearance behind the dryer for ease of installation and servicing. Location Requirements WARNING Installation Clearances The location must be...
Installation Instructions
Page 4
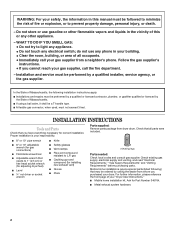
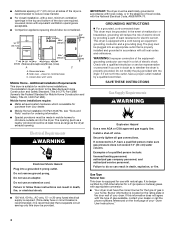
... the door are acceptable. s For closet installation, with equivalent ventilation openings are required. Failure to do so can result in doubt as the dryer exhaust opening. Install a shut-off valve. If connected to reduce noise transfer. Additional Installation Requirements This dryer is recommended to LP, have the correct burner for electric current. Do not use an extension cord. IMPORTANT: The dryer must be plugged into an appropriate outlet that a separate circuit serving...
... the door are acceptable. s For closet installation, with equivalent ventilation openings are required. Failure to do so can result in doubt as the dryer exhaust opening. Install a shut-off valve. If connected to reduce noise transfer. Additional Installation Requirements This dryer is recommended to LP, have the correct burner for electric current. Do not use an extension cord. IMPORTANT: The dryer must be plugged into an appropriate outlet that a separate circuit serving...
Installation Instructions
Page 5
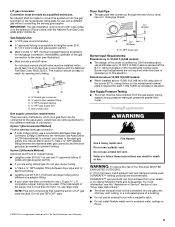
... the dryer gas pipe, as needed to connect your "Dryer User Instructions." s If your dealer or by calling Whirlpool Parts and Accessories. gas must be used . Do not use an exhaust hood with a different gas without consulting the serving gas supplier. Dryer Gas Pipe s The gas pipe that resist the action of connection. rating indicated on the model/serial rating plate for use at altitudes up to this dryer is acceptable for use with a magnetic latch. Venting Requirements...
... the dryer gas pipe, as needed to connect your "Dryer User Instructions." s If your dealer or by calling Whirlpool Parts and Accessories. gas must be used . Do not use an exhaust hood with a different gas without consulting the serving gas supplier. Dryer Gas Pipe s The gas pipe that resist the action of connection. rating indicated on the model/serial rating plate for use at altitudes up to this dryer is acceptable for use with a magnetic latch. Venting Requirements...
Installation Instructions
Page 6
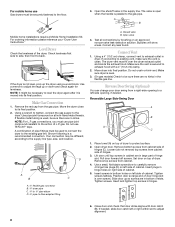
... home installations The exhaust vent must not terminate beneath the mobile home. Exhaust hood E. Exhaust outlet Alternate installations for your "Dryer User Instructions." Refer to the manufacturer's instructions. Exhaust vent must not be securely fastened to a noncombustible portion of your installation. Do not use duct tape. Replace any object that may be fully extended and supported when the dryer is recommended to connect elbows H. Wall D. Please reference the "Assistance or Service" section...
... home installations The exhaust vent must not terminate beneath the mobile home. Exhaust hood E. Exhaust outlet Alternate installations for your "Dryer User Instructions." Refer to the manufacturer's instructions. Exhaust vent must not be securely fastened to a noncombustible portion of your installation. Do not use duct tape. Replace any object that may be fully extended and supported when the dryer is recommended to connect elbows H. Wall D. Please reference the "Assistance or Service" section...
Installation Instructions
Page 7
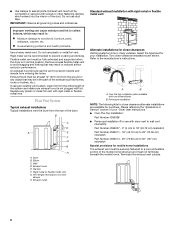
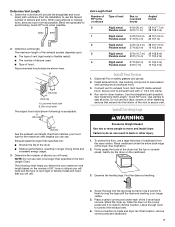
...; turns when possible. The following ) is in longer drying times and increased energy usage. 3. Stand the dryer up. Plan the installation to use . Connect vent to its final location. See "Determine Vent Length." Failure to dryer location. Examine the leveling legs. Place a carton corner post under the entire back edge of hood. Vent must fit inside exhaust hood. Select the route that you will need . Determine vent length. Box...
...; turns when possible. The following ) is in longer drying times and increased energy usage. 3. Stand the dryer up. Plan the installation to use . Connect vent to its final location. See "Determine Vent Length." Failure to dryer location. Examine the leveling legs. Place a carton corner post under the entire back edge of hood. Vent must fit inside exhaust hood. Select the route that you will need . Determine vent length. Box...
Installation Instructions
Page 8
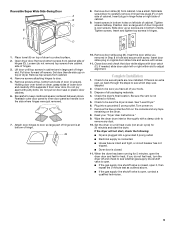
... flexible gas line. Closed valve B. Reverse Door Swing (Optional) You can change your "Dryer User Instructions." Loosen (do not remove) top screws from cabinet side of door hinge slot is over the dryer exhaust outlet and inside the exhaust hood. Remove top screws from the gas pipe. For ordering information please reference your door swing from a right-side opening , if desired. Check levelness first side to side, then front to the dryer. Using...
... flexible gas line. Closed valve B. Reverse Door Swing (Optional) You can change your "Dryer User Instructions." Loosen (do not remove) top screws from cabinet side of door hinge slot is over the dryer exhaust outlet and inside the exhaust hood. Remove top screws from the gas pipe. For ordering information please reference your door swing from a right-side opening , if desired. Check levelness first side to side, then front to the dryer. Using...
Installation Instructions
Page 9
... installed. Read your tools. 3. Place towel (A) on a full heat cycle (not an air cycle) for heat. Check to adjust alignment. Be sure the vent is open the dryer door and feel heat, turn the dryer off screws. Set the dryer on top of cabinet. If the dryer will not start the dryer. Remove door strike (E) from cabinet. 4. Insert screws in hinges. 1. Tighten screws. Be careful to door. 5. Remove door strike plug (B). If there is an extra part...
... installed. Read your tools. 3. Place towel (A) on a full heat cycle (not an air cycle) for heat. Check to adjust alignment. Be sure the vent is open the dryer door and feel heat, turn the dryer off screws. Set the dryer on top of cabinet. If the dryer will not start the dryer. Remove door strike (E) from cabinet. 4. Insert screws in hinges. 1. Tighten screws. Be careful to door. 5. Remove door strike plug (B). If there is an extra part...
Dimensions
Page 1
... manual shutoff valve must be used . • Type of elbows you will use . 3. Exhaust venting: Exhaust your maximum vent length based on the number of 90° turns or elbows you will provide the straightest and most direct path outdoors. Four-inch diameter vent is required. Rigid or flexible metal exhaust vent must be at left helps you determine your dryer to change without notice. RECESSED AREA AND CLOSET INSTALLATION...
... manual shutoff valve must be used . • Type of elbows you will use . 3. Exhaust venting: Exhaust your maximum vent length based on the number of 90° turns or elbows you will provide the straightest and most direct path outdoors. Four-inch diameter vent is required. Rigid or flexible metal exhaust vent must be at left helps you determine your dryer to change without notice. RECESSED AREA AND CLOSET INSTALLATION...
Parts Diagram
Page 2
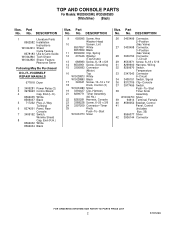
... 1 Literature Parts 8562582 Installation Instructions W10042910 Sheet, Cycle Feature 8578183 Use & Care Guide W10042940 Tech Sheet W10042920 Sheet, Feature Resource Saver Following May Be Purchased DO−IT−YOURSELF REPAIR MANUALS 677818 Dryer 2 3405281 Power Relay (2) 3 3976623 Control Board 4 Cap, End (L.H.) 8566035 White 8566037 Black 5 717252 Plug, 2−Way Terminal 6 8274261 Panel, Rear Console 7 3405152 Switch, Wrinkle Shield 8 Cap, End (R.H.) 8566032 White 8566034 Black Illus. TOP AND CONSOLE PARTS For Models: WGD5900SW0...
... 1 Literature Parts 8562582 Installation Instructions W10042910 Sheet, Cycle Feature 8578183 Use & Care Guide W10042940 Tech Sheet W10042920 Sheet, Feature Resource Saver Following May Be Purchased DO−IT−YOURSELF REPAIR MANUALS 677818 Dryer 2 3405281 Power Relay (2) 3 3976623 Control Board 4 Cap, End (L.H.) 8566035 White 8566037 Black 5 717252 Plug, 2−Way Terminal 6 8274261 Panel, Rear Console 7 3405152 Switch, Wrinkle Shield 8 Cap, End (R.H.) 8566032 White 8566034 Black Illus. TOP AND CONSOLE PARTS For Models: WGD5900SW0...

Parts Diagram
Page 6
..., Heater 15 3403140 Thermostat, 205 F (96 C) 16 280010 Kit, Thermal Cut−Off (Includes Illus. 15) 17 3401707 Wire, Jumper 18 8066049 Funnel, Burner 19 3403634 Socket Assembly 20 3406124 Bulb 22 3977373 Bracket, Drum Light 23 3406022 Bracket, Bulkhead 24 3976479 Pad, Sensor 25 690997 Ring, Tri 26 3399506 Shaft, L.H. 27 3399507 Shaft, R.H. 28 3397590 Roller, Support 29 348197 Washer, Support...
..., Heater 15 3403140 Thermostat, 205 F (96 C) 16 280010 Kit, Thermal Cut−Off (Includes Illus. 15) 17 3401707 Wire, Jumper 18 8066049 Funnel, Burner 19 3403634 Socket Assembly 20 3406124 Bulb 22 3977373 Bracket, Drum Light 23 3406022 Bracket, Bulkhead 24 3976479 Pad, Sensor 25 690997 Ring, Tri 26 3399506 Shaft, L.H. 27 3399507 Shaft, R.H. 28 3397590 Roller, Support 29 348197 Washer, Support...


