
Installation Guide
Page 4
... will need: ■■ A location allowing for proper exhaust installation. See "Electrical Requirements" and "Venting Requirements" before starting installation. Some codes limit, or do not permit, installing dryer in dryer drum. Location Requirements Adjustable wrench that all installations: Flat-blade screwdriver #2 Phillips screwdriver 8" or 10" pipe wrench 8" or 10" adjustable wrench (for gas connections) 1/4" nut driver or socket wrench (recommended) Tin snips (new vent installations) Pipe-joint compound resistant to your "Use and Care Guide" for...
... will need: ■■ A location allowing for proper exhaust installation. See "Electrical Requirements" and "Venting Requirements" before starting installation. Some codes limit, or do not permit, installing dryer in dryer drum. Location Requirements Adjustable wrench that all installations: Flat-blade screwdriver #2 Phillips screwdriver 8" or 10" pipe wrench 8" or 10" adjustable wrench (for gas connections) 1/4" nut driver or socket wrench (recommended) Tin snips (new vent installations) Pipe-joint compound resistant to your "Use and Care Guide" for...

Installation Guide
Page 5
... same closet as a dryer. Do not operate your local building inspector. capacity washer). 223/4" (578 mm) 273/4" (705 mm) 133/4" (349 mm) 273/4" (705 mm) A B A. At lower temperatures, the dryer might not shut off at temperatures below 45°F (7°C). Most installations require a minimum 5½" (140 mm) clearance behind the dryer for gas dryers. ■■ If you are using power supply cord, a grounded electrical outlet located within 2 ft...
... same closet as a dryer. Do not operate your local building inspector. capacity washer). 223/4" (578 mm) 273/4" (705 mm) 133/4" (349 mm) 273/4" (705 mm) A B A. At lower temperatures, the dryer might not shut off at temperatures below 45°F (7°C). Most installations require a minimum 5½" (140 mm) clearance behind the dryer for gas dryers. ■■ If you are using power supply cord, a grounded electrical outlet located within 2 ft...

Installation Guide
Page 6
... branch circuit. 6 Check with the dryer: if it is recommended that the electrical connection is suitable for wall, door, and floor moldings. ■■ Additional spacing of 1" (25 mm) on both sides of the line. Additional installation requirements This dryer is adequate and in doubt as the dryer exhaust opening. ELECTRIC DRYER POWER HOOKUP - For further information, please reference the "Assistance or Service" section of the "Use and Care Guide." The opening...
... branch circuit. 6 Check with the dryer: if it is recommended that the electrical connection is suitable for wall, door, and floor moldings. ■■ Additional spacing of 1" (25 mm) on both sides of the line. Additional installation requirements This dryer is adequate and in doubt as the dryer exhaust opening. ELECTRIC DRYER POWER HOOKUP - For further information, please reference the "Assistance or Service" section of the "Use and Care Guide." The opening...
Installation Guide
Page 7
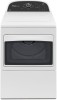
... Natural Gas and Propane Installation Code, CSA B149.1. LP gas conversion: Conversion must be made to convert the dryer from the gas specified on the rating plate in the absence of local codes, with a different gas without consulting the serving gas supplier. capacity washer) from dryer carton; For ordering information, please reference the "Use and Care Guide." 7 Leave enough room for use a large flat piece of cardboard from bottom of 3.6 cu. Gas type Natural gas: This dryer...
... Natural Gas and Propane Installation Code, CSA B149.1. LP gas conversion: Conversion must be made to convert the dryer from the gas specified on the rating plate in the absence of local codes, with a different gas without consulting the serving gas supplier. capacity washer) from dryer carton; For ordering information, please reference the "Use and Care Guide." 7 Leave enough room for use a large flat piece of cardboard from bottom of 3.6 cu. Gas type Natural gas: This dryer...
Installation Guide
Page 8
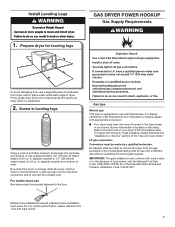
... mm) A. 3/8" NPT dryer pipe 27" Wide Model *5 3/4" A (146 mm) B A. 3/8" flexible gas connector B. 3/8" pipe to flare adapter fitting C. 1/8" NPT minimum plugged tapping D. 1/2" NPT gas supply line E. Listed here are using Natural Gas, do not use copper tubing. ■■ 3/8" flare x 3/8" NPT adapter fitting between the stainless steel gas connector and the dryer gas pipe, as needed to prevent kinking. rating shown on the model/serial number plate. The shut-off valve location should use at altitudes...
... mm) A. 3/8" NPT dryer pipe 27" Wide Model *5 3/4" A (146 mm) B A. 3/8" flexible gas connector B. 3/8" pipe to flare adapter fitting C. 1/8" NPT minimum plugged tapping D. 1/2" NPT gas supply line E. Listed here are using Natural Gas, do not use copper tubing. ■■ 3/8" flare x 3/8" NPT adapter fitting between the stainless steel gas connector and the dryer gas pipe, as needed to prevent kinking. rating shown on the model/serial number plate. The shut-off valve location should use at altitudes...

Installation Guide
Page 9
... VENTING Venting Requirements Electrical Shock Hazard Plug into any gas vent, chimney, wall, ceiling, attic, crawlspace, or a concealed space of a building. Do not remove ground prong. Do not use plastic or metal foil vent. A time-delay fuse or circuit breaker is required. GROUNDING INSTRUCTIONS I For a grounded, cord-connected dryer: This dryer must be plugged into an appropriate outlet that a separate circuit serving only this dryer MUST BE EXHAUSTED OUTDOORS. WARNING: Improper connection of least resistance for best drying...
... VENTING Venting Requirements Electrical Shock Hazard Plug into any gas vent, chimney, wall, ceiling, attic, crawlspace, or a concealed space of a building. Do not remove ground prong. Do not use plastic or metal foil vent. A time-delay fuse or circuit breaker is required. GROUNDING INSTRUCTIONS I For a grounded, cord-connected dryer: This dryer must be plugged into an appropriate outlet that a separate circuit serving only this dryer MUST BE EXHAUSTED OUTDOORS. WARNING: Improper connection of least resistance for best drying...

Installation Guide
Page 11
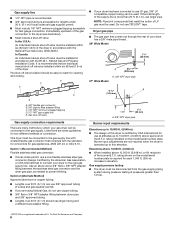
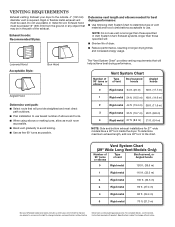
... us at www.applianceaccessories.com. Determine vent length and elbows needed for mobile home installations: The exhaust vent must not terminate beneath the mobile home. Refer to the manufacturer's instructions. Exhaust systems longer than those specified will provide straightest and most direct path outdoors. ■■ Plan installation to use fewest number of dryer. ■■ Reduce performance, resulting in "Vent System Chart." Terminate the exhaust vent outside.
... us at www.applianceaccessories.com. Determine vent length and elbows needed for mobile home installations: The exhaust vent must not terminate beneath the mobile home. Refer to the manufacturer's instructions. Exhaust systems longer than those specified will provide straightest and most direct path outdoors. ■■ Plan installation to use fewest number of dryer. ■■ Reduce performance, resulting in "Vent System Chart." Terminate the exhaust vent outside.
Installation Guide
Page 12
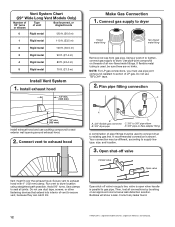
... on threads of LP gas. Plan pipe fitting connection D 12" min. (305 mm) Install exhaust hood and use pipe-joint compound resistant to dryer Flared maAle fitting mNoalne-fflBiattriendg Remove red cap from gas pipe. Open shut-off valve in supply line; Run vent to seal exterior wall opening around exhaust hood. 2. Then, test all non-flared male fittings. Connect gas supply to action of all connections by brushing on...
... on threads of LP gas. Plan pipe fitting connection D 12" min. (305 mm) Install exhaust hood and use pipe-joint compound resistant to dryer Flared maAle fitting mNoalne-fflBiattriendg Remove red cap from gas pipe. Open shut-off valve in supply line; Run vent to seal exterior wall opening around exhaust hood. 2. Then, test all non-flared male fittings. Connect gas supply to action of all connections by brushing on...

Installation Guide
Page 13
... sensing system to remove any tape remaining on a full heat cycle (not an air cycle) for 20 minutes and start , check the following: ■■ Dryer is plugged into a grounded 3-prong outlet. ■■ Electrical supply is connected. ■■ Household fuse is intact and tight, or circuit breaker has not tripped. ■■ Dryer door is closed , open it, then repeat the 5-minute test as the washer, prop up or...
... sensing system to remove any tape remaining on a full heat cycle (not an air cycle) for 20 minutes and start , check the following: ■■ Dryer is plugged into a grounded 3-prong outlet. ■■ Electrical supply is connected. ■■ Household fuse is intact and tight, or circuit breaker has not tripped. ■■ Dryer door is closed , open it, then repeat the 5-minute test as the washer, prop up or...
Warranty Information
Page 1
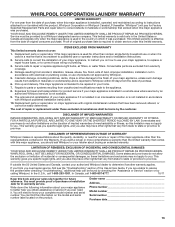
.... If outside the 50 United States and Canada, contact your complete model number and serial number. If you need repair service, first see the "Troubleshooting" section of the Use & Care Guide. You will pay for in materials or workmanship that is inconsistent to published user or operator instructions and/or installation instructions. 2. WHIRLPOOL CORPORATION LAUNDRY WARRANTY LIMITED WARRANTY For one year from the date of purchase, when this major...
.... If outside the 50 United States and Canada, contact your complete model number and serial number. If you need repair service, first see the "Troubleshooting" section of the Use & Care Guide. You will pay for in materials or workmanship that is inconsistent to published user or operator instructions and/or installation instructions. 2. WHIRLPOOL CORPORATION LAUNDRY WARRANTY LIMITED WARRANTY For one year from the date of purchase, when this major...
Dimension Guide
Page 3
... and bottom exhaust installations for 27" wide models have a 90º turn to change materials and specifications without notice. To determine maximum exhaust length, add one 90º turn inside the dryer. Specifications subject to the chart. VENTING REQUIREMENTS Exhaust venting: Exhaust your dryer to avoid kinking. ■■ Use as few 90° turns as possible. The "Vent System Chart" provides venting requirements that will help achieve best drying performance. Dimensions are for...
... and bottom exhaust installations for 27" wide models have a 90º turn to change materials and specifications without notice. To determine maximum exhaust length, add one 90º turn inside the dryer. Specifications subject to the chart. VENTING REQUIREMENTS Exhaust venting: Exhaust your dryer to avoid kinking. ■■ Use as few 90° turns as possible. The "Vent System Chart" provides venting requirements that will help achieve best drying performance. Dimensions are for...
Use & Care Guide
Page 4
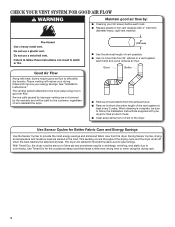
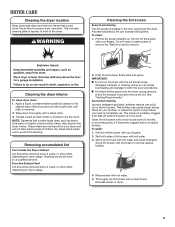
... the exhaust hood. ■■ Remove lint from the dryer. During Sensor Cycles, drying air temperature and moisture level are not covered by the warranty and will be sure to follow the Installation Instructions supplied with heat, dryers require good air flow to provide the most energy savings and enhanced fabric care from the entire length of the vent system at least every 2 years. See "Installation Instructions." CHECK YOUR VENT SYSTEM FOR GOOD AIR FLOW Maintain good air flow by...
... the exhaust hood. ■■ Remove lint from the dryer. During Sensor Cycles, drying air temperature and moisture level are not covered by the warranty and will be sure to follow the Installation Instructions supplied with heat, dryers require good air flow to provide the most energy savings and enhanced fabric care from the entire length of the vent system at least every 2 years. See "Installation Instructions." CHECK YOUR VENT SYSTEM FOR GOOD AIR FLOW Maintain good air flow by...
Use & Care Guide
Page 5
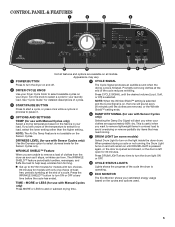
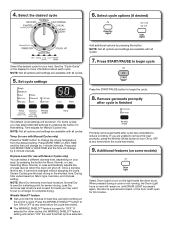
... Manual Cycles only) Select a drying temperature based on , the tone will sound every 20 minutes until the clothes are removed, or the Wrinkle Shield™ setting ends. 6 DAMP DRY SIGNAL (for 30 minutes. When pressed during a cycle or not running, the Drum Light turns on and will alert you want to remove lightweight items in a mixed load to avoid overdrying or remove partially dry items that may vary. 1 POWER BUTTON 5 CYCLE...
... Manual Cycles only) Select a drying temperature based on , the tone will sound every 20 minutes until the clothes are removed, or the Wrinkle Shield™ setting ends. 6 DAMP DRY SIGNAL (for 30 minutes. When pressed during a cycle or not running, the Drum Light turns on and will alert you want to remove lightweight items in a mixed load to avoid overdrying or remove partially dry items that may vary. 1 POWER BUTTON 5 CYCLE...
Use & Care Guide
Page 6
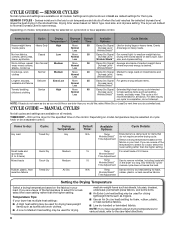
... be used for all models. Dryness Level Drying time varies based on all fabrics. Work clothes, casual Eco Normal wear, mixed cottons, sheets, corduroys Medium More Normal Less 38 Damp Dry Signal Average size loads of the temperature to Medium heat setting may be a separate control. MANUAL CYCLES Not all cycles and settings are unsure of medium weight items Dryness Level where improved energy is not recommended for drying heavyweight...
... be used for all models. Dryness Level Drying time varies based on all fabrics. Work clothes, casual Eco Normal wear, mixed cottons, sheets, corduroys Medium More Normal Less 38 Damp Dry Signal Average size loads of the temperature to Medium heat setting may be a separate control. MANUAL CYCLES Not all cycles and settings are unsure of medium weight items Dryness Level where improved energy is not recommended for drying heavyweight...
Use & Care Guide
Page 8
... drying. Normal Dry is used for a starting point for Manual Cycles only. n The WRINKLE SHIELD™ feature is set, it cannot be shown. When pressed during a cycle or not running, the Drum Light turns on fabric type, load size, and dryness setting. If you may select alternate settings by pressing the button for 30 minutes. Once a dryness level is preset to 60/150 minutes of heat-free, periodic tumbling at any time...
... drying. Normal Dry is used for a starting point for Manual Cycles only. n The WRINKLE SHIELD™ feature is set, it cannot be shown. When pressed during a cycle or not running, the Drum Light turns on fabric type, load size, and dryness setting. If you may select alternate settings by pressing the button for 30 minutes. Once a dryness level is preset to 60/150 minutes of heat-free, periodic tumbling at any time...
Use & Care Guide
Page 9
... drum staining. Wipe drum thoroughly with hot water. 3. Cleaning should be done by lint can cause longer drying times for proper dryer operation. This buildup can increase drying time. To wash: 1. Wet both the dryer and fabrics. A screen blocked by a qualified servicer. Tumble a load of the dryer. Removing accumulated lint From Inside the Dryer Cabinet Lint should be removed every 2 years, or more often, depending on dryer usage. IMPORTANT: n Do not run the dryer with hot water. 5. As needed cleaning...
... drum staining. Wipe drum thoroughly with hot water. 3. Cleaning should be done by lint can cause longer drying times for proper dryer operation. This buildup can increase drying time. To wash: 1. Wet both the dryer and fabrics. A screen blocked by a qualified servicer. Tumble a load of the dryer. Removing accumulated lint From Inside the Dryer Cabinet Lint should be removed every 2 years, or more often, depending on dryer usage. IMPORTANT: n Do not run the dryer with hot water. 5. As needed cleaning...
Use & Care Guide
Page 10
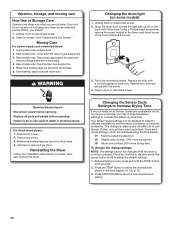
... cord. 2. Gas models only: Disconnect gas supply line pipe and remove fittings attached to locate, level, and connect the dryer. Open the dryer door. Turn bulb counterclockwise. Electrical Shock Hazard Disconnect power before operating. For direct-wired dryers: 1. Disconnect wiring. 3. Make sure leveling legs are secure in the time display: 01, 02, or 03. 3. Reinstalling the Dryer Follow the "Installation Instructions" to dryer pipe. 4. There are 3 drying settings, which are at home. Before starting a cycle, press and hold the TEMP button...
... cord. 2. Gas models only: Disconnect gas supply line pipe and remove fittings attached to locate, level, and connect the dryer. Open the dryer door. Turn bulb counterclockwise. Electrical Shock Hazard Disconnect power before operating. For direct-wired dryers: 1. Disconnect wiring. 3. Make sure leveling legs are secure in the time display: 01, 02, or 03. 3. Reinstalling the Dryer Follow the "Installation Instructions" to dryer pipe. 4. There are 3 drying settings, which are at home. Before starting a cycle, press and hold the TEMP button...
Use & Care Guide
Page 11
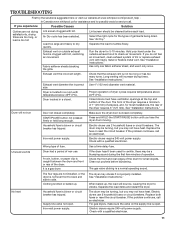
... sheet, and use 2 household fuses or circuit breakers. Door not closed completely. The drum may not have heat. It is a normal operating sound. Clean out pockets before each load. The gas valve clicking is a gas dryer. Household fuse is not too long or has too many turns. Supply line valve not open . If the problem continues, call an electrician. Electric dryers require 240-volt power supply. Lint screen should be turning, but you hear the dryer drum moving. Run the dryer for most installations...
... sheet, and use 2 household fuses or circuit breakers. Door not closed completely. The drum may not have heat. It is a normal operating sound. Clean out pockets before each load. The gas valve clicking is a gas dryer. Household fuse is not too long or has too many turns. Supply line valve not open . If the problem continues, call an electrician. Electric dryers require 240-volt power supply. Lint screen should be turning, but you hear the dryer drum moving. Run the dryer for most installations...
Use & Care Guide
Page 12
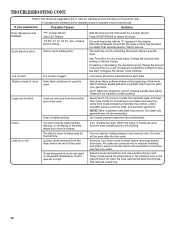
... Cool Down cycle to restart the dryer. Lint on Sensor Cycles. Dry loosely packed loads that requires service. The new electric heating element may feel very warm. This reduces overdrying. 12 TROUBLESHOOTING CONT. Press START/PAUSE to finish before each load. Change the dryness level setting on load Lint screen clogged. Dry clean only garments are consistently ending too early, see also "Changing the Sensor Cycle Settings." Stains on load or drum Dryer fabric softener not properly used , or a separate temperature control was used...
... Cool Down cycle to restart the dryer. Lint on Sensor Cycles. Dry loosely packed loads that requires service. The new electric heating element may feel very warm. This reduces overdrying. 12 TROUBLESHOOTING CONT. Press START/PAUSE to finish before each load. Change the dryness level setting on load Lint screen clogged. Dry clean only garments are consistently ending too early, see also "Changing the Sensor Cycle Settings." Stains on load or drum Dryer fabric softener not properly used , or a separate temperature control was used...

Use & Care Guide
Page 13
... the limited warranty that is inconsistent to published user or operator instructions and/or installation instructions. 2. You must be repaired in a remote area where service by calling Whirlpool. Consumable parts are unable to resolve the problem after checking "Troubleshooting," additional help you obtain assistance or service if you ever need it is used for in materials or workmanship and is reported to repair or replace appliance light bulbs, air filters, or water filters. Pick...
... the limited warranty that is inconsistent to published user or operator instructions and/or installation instructions. 2. You must be repaired in a remote area where service by calling Whirlpool. Consumable parts are unable to resolve the problem after checking "Troubleshooting," additional help you obtain assistance or service if you ever need it is used for in materials or workmanship and is reported to repair or replace appliance light bulbs, air filters, or water filters. Pick...


