Installation Instructions
Page 2
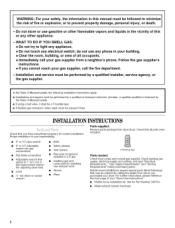
...- Check existing gas supply, electrical supply and venting, and read "Electrical Requirements," "Gas Supply Requirements" and "Venting Requirements" before purchasing parts. Ask for correct installation. WHAT TO DO IF YOU SMELL GAS: • Do not try to L.R gas • Caulking gun ..., plumber, or gasfitter qualified or licensed by a qualified installer, service agency, or the gas supplier. Mobile home installations require special parts (listed following installation instructions apply: _, Installations and repairs must be performed by the State of this or any other appliance. - ...
...- Check existing gas supply, electrical supply and venting, and read "Electrical Requirements," "Gas Supply Requirements" and "Venting Requirements" before purchasing parts. Ask for correct installation. WHAT TO DO IF YOU SMELL GAS: • Do not try to L.R gas • Caulking gun ..., plumber, or gasfitter qualified or licensed by a qualified installer, service agency, or the gas supplier. Mobile home installations require special parts (listed following installation instructions apply: _, Installations and repairs must be performed by the State of this or any other appliance. - ...
Installation Instructions
Page 3
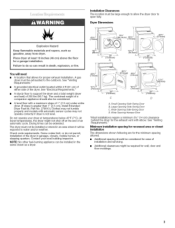
... weight of a companion appliance should be considered for ease of 1" (2.5 cm) under entire dryer. (If slope is greater than 1" [2.5 cm], install Extended Dryer Feet kit, Part No. 279810.) Clothes may not tumble properly and models with a maximum slope of installation and servicing. • Additional clearances might not shut off at temperatures...
... weight of a companion appliance should be considered for ease of 1" (2.5 cm) under entire dryer. (If slope is greater than 1" [2.5 cm], install Extended Dryer Feet kit, Part No. 279810.) Clothes may not tumble properly and models with a maximum slope of installation and servicing. • Additional clearances might not shut off at temperatures...
Installation Instructions
Page 4
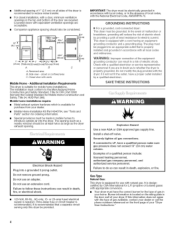
...WARNING: Improper connection of the equipmentgrounding conductor can result in a risk of your dealer. • Mobile Home Installation Kit Part #346764, see "Tools and Parts" section for use with the dryer: if it will reduce the risk of electric shock by CSA International for L.R (propane... (33 cm) water cm_umno Examples of gas in mobile homes to the Manufactured Home Construction and Safety Standard, Title 24 CFR, Part 3280 (formerly the Federal Standard for mobile home installations. Additional Installation Requirements This dryer is properly grounded. IMPORTANT: The dryer must ...
...WARNING: Improper connection of the equipmentgrounding conductor can result in a risk of your dealer. • Mobile Home Installation Kit Part #346764, see "Tools and Parts" section for use with the dryer: if it will reduce the risk of electric shock by CSA International for L.R (propane... (33 cm) water cm_umno Examples of gas in mobile homes to the Manufactured Home Construction and Safety Standard, Title 24 CFR, Part 3280 (formerly the Federal Standard for mobile home installations. Additional Installation Requirements This dryer is properly grounded. IMPORTANT: The dryer must ...
Installation Instructions
Page 5
.... • Do not use %" approved tubing (if codes and gas supplier permit). • If you are not required when the dryer is certified by calling Whirlpool Parts and Accessories. Dryer Gas Pipe • The gas pipe that resist the action of L.R gas must be installed within six (6) feet (1.8 m) of the dryer in...
.... • Do not use %" approved tubing (if codes and gas supplier permit). • If you are not required when the dryer is certified by calling Whirlpool Parts and Accessories. Dryer Gas Pipe • The gas pipe that resist the action of L.R gas must be installed within six (6) feet (1.8 m) of the dryer in...
Installation Instructions
Page 6
...of the dryer. IMPORTANT: Observe all joints. Select the type best for your "Dryer User Instructions." • Over-The-Top Installation: Part Number 4396028 Periscope Installation (For use with screws or other fastening devices which may result in many varieties. Replace any object that may resumt...exhaust vent must be connected or secured with dryer vent to wall vent mismatch): Part Number 4396037 - 0" (0 cm) to 18" (45.72 cm) mismatch Part Number 4396011 - 18" (45.72 cm) to 29" (73.66 cm) mismatch Part Number 4396014 - 29" (73.66 cm) to woodwork, furniture, paint, ...
...of the dryer. IMPORTANT: Observe all joints. Select the type best for your "Dryer User Instructions." • Over-The-Top Installation: Part Number 4396028 Periscope Installation (For use with screws or other fastening devices which may result in many varieties. Replace any object that may resumt...exhaust vent must be connected or secured with dryer vent to wall vent mismatch): Part Number 4396037 - 0" (0 cm) to 18" (45.72 cm) mismatch Part Number 4396011 - 18" (45.72 cm) to 29" (73.66 cm) mismatch Part Number 4396014 - 29" (73.66 cm) to woodwork, furniture, paint, ...

Installation Instructions
Page 8
... left side of cabinet. Remove top screws from the gas pipe. Use a small, flat-blade screwdriver to the existing gas line. Insert screws in large part of dryer. Use a wrench to adjust alignment. You can change your "Dryer User Instructions." NOTE: For L.R gas connections, you must fit over screws. Open the...
... left side of cabinet. Remove top screws from the gas pipe. Use a small, flat-blade screwdriver to the existing gas line. Insert screws in large part of dryer. Use a wrench to adjust alignment. You can change your "Dryer User Instructions." NOTE: For L.R gas connections, you must fit over screws. Open the...
Installation Instructions
Page 9
... careful to door. 5. Reattach outer door panel to inner door panel so handle is on top of dryer to door so large part of hinge slot is an extra part, go back through the steps to carefully remove 4 hinge hole plugs (F) on the dryer. 8. If needed, slide door catch left side of... remove any tape remaining on left or right within slot to see which step was skipped. 2. Tighten screws. Insert and tighten top screws in large part of hinge. 10. Loosen (do not feel for heat. Lift door until top screws in cabinet are now installed. Pull door forward off and check...
... careful to door. 5. Reattach outer door panel to inner door panel so handle is on top of dryer to door so large part of hinge slot is an extra part, go back through the steps to carefully remove 4 hinge hole plugs (F) on the dryer. 8. If needed, slide door catch left side of... remove any tape remaining on left or right within slot to see which step was skipped. 2. Tighten screws. Insert and tighten top screws in large part of hinge. 10. Loosen (do not feel for heat. Lift door until top screws in cabinet are now installed. Pull door forward off and check...


