
Installation Guide
Page 4
..." for information about accessories available for proper exhaust installation. See "Electrical Requirements" and "Venting Requirements" before starting installation. Parts needed for gas connections) 1/4" nut driver or socket wrench (recommended) Tin snips (new vent installations) Pipe-joint compound...local building inspector. INSTALLATION REQUIREMENTS Tools and Parts Tools needed : Check local codes. Check code requirements. Check that opens to LP gas Parts supplied: Tape measure Vent clamps Level Pliers Leveling legs (4) Parts package is located in garages, closets, ...
..." for information about accessories available for proper exhaust installation. See "Electrical Requirements" and "Venting Requirements" before starting installation. Parts needed for gas connections) 1/4" nut driver or socket wrench (recommended) Tin snips (new vent installations) Pipe-joint compound...local building inspector. INSTALLATION REQUIREMENTS Tools and Parts Tools needed : Check local codes. Check code requirements. Check that opens to LP gas Parts supplied: Tape measure Vent clamps Level Pliers Leveling legs (4) Parts package is located in garages, closets, ...

Installation Guide
Page 5
...) (to water and/or weather. Check code requirements. The combined weight of 3.6 cu. If slope is greater than 1" (25 mm), install Extended Dryer Feet Kit, Part Number 279810.
...) (to water and/or weather. Check code requirements. The combined weight of 3.6 cu. If slope is greater than 1" (25 mm), install Extended Dryer Feet Kit, Part Number 279810.

Installation Guide
Page 6
...This dryer is within reach of dryer's final location. 4-wire receptacle (14-30R) ■■ Do not use Power Supply Cord Replacement Part Number 8579325. grounding conductor can result in mobile homes to whether the dryer is recommended. The installation must be made in a risk of ...copy of electric shock. Connect to the Manufactured Home Construction and Safety Standard, Title 24 CFR, Part 3280 (formerly the Federal Standard for Mobile Home Construction and Safety, Title 24, HUD Part 280) or the Canadian Manufactured Home Standard CAN/CSA-Z240 MH. ■■ Metal exhaust ...
...This dryer is within reach of dryer's final location. 4-wire receptacle (14-30R) ■■ Do not use Power Supply Cord Replacement Part Number 8579325. grounding conductor can result in mobile homes to whether the dryer is recommended. The installation must be made in a risk of ...copy of electric shock. Connect to the Manufactured Home Construction and Safety Standard, Title 24 CFR, Part 3280 (formerly the Federal Standard for Mobile Home Construction and Safety, Title 24, HUD Part 280) or the Canadian Manufactured Home Standard CAN/CSA-Z240 MH. ■■ Metal exhaust ...

Installation Guide
Page 11
... as possible. ■■ Bend vent gradually to avoid kinking. ■■ Use as few 90° turns as possible. Refer to the manufacturer's instructions. Part Number Descriptions 8171587RP 0-5" Metal vent periscope 4396037RP 0"-18" Metal vent periscope 4396011RP 18"-29" Metal vent periscope 4396014 29"-50" Metal vent periscope 4392892 In...
... as possible. ■■ Bend vent gradually to avoid kinking. ■■ Use as few 90° turns as possible. Refer to the manufacturer's instructions. Part Number Descriptions 8171587RP 0-5" Metal vent periscope 4396037RP 0"-18" Metal vent periscope 4396011RP 18"-29" Metal vent periscope 4396014 29"-50" Metal vent periscope 4392892 In...

Installation Guide
Page 13
... place, remove corner posts and cardboard from front to adjust legs up using a wood block. Once legs are level, make sure vent is an extra part, go away. If there is clean. q Wipe dryer drum interior thoroughly with a 4" (102 mm) clamp. 2. NOTE: You may notice an odor when...closed , open , contact a qualified technician. If you have all packaging materials. Move dryer to final location Move dryer to existing vent, make sure all parts are snug against the floor before tightening them. q Read "Dryer Use" in dryer. If you feel for 20 minutes and start , check the following:...
... place, remove corner posts and cardboard from front to adjust legs up using a wood block. Once legs are level, make sure vent is an extra part, go away. If there is clean. q Wipe dryer drum interior thoroughly with a 4" (102 mm) clamp. 2. NOTE: You may notice an odor when...closed , open , contact a qualified technician. If you have all packaging materials. Move dryer to final location Move dryer to existing vent, make sure all parts are snug against the floor before tightening them. q Read "Dryer Use" in dryer. If you feel for 20 minutes and start , check the following:...

Installation Guide
Page 14
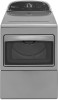
.... Place towel on top of hinge slot. Set door (handle side up) on dryer Lift door until top screws in dryer cabinet are in large part of dryer. Remove bottom screws from dryer cabinet side of dryer to door. 14 Pull door forward off top screws NOTE: Magnetized screwdriver is helpful...
.... Place towel on top of hinge slot. Set door (handle side up) on dryer Lift door until top screws in dryer cabinet are in large part of dryer. Remove bottom screws from dryer cabinet side of dryer to door. 14 Pull door forward off top screws NOTE: Magnetized screwdriver is helpful...
Installation Guide
Page 17
..., and side of hinge slot. Flip door over Flip door over towel on inner door. Rotate outer door Lift door until top screws in large part of door (6 screws). Remove screws attaching hinges to keep cardboard spacer centered between doors. Loosen (do not remove) top screws from inner door. Keep door...
..., and side of hinge slot. Flip door over Flip door over towel on inner door. Rotate outer door Lift door until top screws in large part of door (6 screws). Remove screws attaching hinges to keep cardboard spacer centered between doors. Loosen (do not remove) top screws from inner door. Keep door...
Installation Guide
Page 19
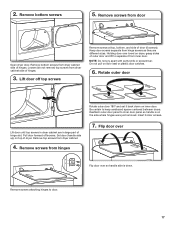
... from dryer cabinet side of dryer. 27" Wide Model Side-Swing Door with Glass 1. Lift door until top screws in dryer cabinet are in large part of hinges. Flip door over so handle side is down. Remove screws from dryer cabinet side of hinge slot. Lift door off screws. Set door...
... from dryer cabinet side of dryer. 27" Wide Model Side-Swing Door with Glass 1. Lift door until top screws in dryer cabinet are in large part of hinges. Flip door over so handle side is down. Remove screws from dryer cabinet side of hinge slot. Lift door off screws. Set door...
Warranty Information
Page 1
... instruct you on major appliances with the product, Whirlpool Corporation or Whirlpool Canada LP (hereafter "Whirlpool") will need repair service, first see the "Troubleshooting" section of purchase or installation date for future reference. Consumable parts are unable to resolve the problem after checking "...reinstallation of your complete model number and serial number. Replacement parts or repair labor on how to use your major appliance, unless such damage results from defects in your authorized Whirlpool dealer to you ever need for other than the representations contained...
... instruct you on major appliances with the product, Whirlpool Corporation or Whirlpool Canada LP (hereafter "Whirlpool") will need repair service, first see the "Troubleshooting" section of purchase or installation date for future reference. Consumable parts are unable to resolve the problem after checking "...reinstallation of your complete model number and serial number. Replacement parts or repair labor on how to use your major appliance, unless such damage results from defects in your authorized Whirlpool dealer to you ever need for other than the representations contained...
Use & Care Guide
Page 10
... at home. Before starting a cycle, press and hold the TEMP button for an extended period of your dryer for 6 seconds. 2. If you will affect all parts and panels before servicing. Replace the cover and secure with a 10-watt appliance bulb only. Disconnect wiring. 3. Use tape to locate, level, and connect the...
... at home. Before starting a cycle, press and hold the TEMP button for an extended period of your dryer for 6 seconds. 2. If you will affect all parts and panels before servicing. Replace the cover and secure with a 10-watt appliance bulb only. Disconnect wiring. 3. Use tape to locate, level, and connect the...

Use & Care Guide
Page 13
...or Canada and applies only when the major appliance is reported to Whirlpool within 30 days from the date of purchase. 6. Replacement parts or repair labor on how to use of products not approved by Whirlpool. 5. Some states and provinces do not allow limitations on the ...state or province to province. Proof of original purchase date is not installed in materials or workmanship that comes with Whirlpool published installation instructions. 10. Replacement parts or repair labor if this major appliance is used in a manner that is installed, operated, and maintained according ...
...or Canada and applies only when the major appliance is reported to Whirlpool within 30 days from the date of purchase. 6. Replacement parts or repair labor on how to use of products not approved by Whirlpool. 5. Some states and provinces do not allow limitations on the ...state or province to province. Proof of original purchase date is not installed in materials or workmanship that comes with Whirlpool published installation instructions. 10. Replacement parts or repair labor if this major appliance is used in a manner that is installed, operated, and maintained according ...


