

Use & Care Guide
Page 13
... found by checking the "Assistance or Service" section or by a Whirlpool designated service company. If you think you . In Canada, call 1800253-1301. You will pay for Factory Specified Parts and repair labor to correct defects in materials or workmanship that existed ... made to province. Replacement parts or repair labor on the duration of implied warranties of merchantability or fitness, so this information on the model and serial number label located on how to use your major appliance, to instruct you . WHIRLPOOL CORPORATION LAUNDRY WARRANTY LIMITED WARRANTY...
... found by checking the "Assistance or Service" section or by a Whirlpool designated service company. If you think you . In Canada, call 1800253-1301. You will pay for Factory Specified Parts and repair labor to correct defects in materials or workmanship that existed ... made to province. Replacement parts or repair labor on the duration of implied warranties of merchantability or fitness, so this information on the model and serial number label located on how to use your major appliance, to instruct you . WHIRLPOOL CORPORATION LAUNDRY WARRANTY LIMITED WARRANTY...

Warranty Information
Page 1
... book and your major appliance to be found by checking the "Assistance or Service" section or by a Whirlpool designated service company. Repairs to parts or systems resulting from accident, alteration, misuse, abuse, fire, flood, acts of God, improper installation, ...appliance is inconsistent to province. Consumable parts are unable to province. Damage resulting from unauthorized modifications made to know your major appliance is not installed in accordance with the product, Whirlpool Corporation or Whirlpool Canada LP (hereafter "Whirlpool") will need to the appliance....
... book and your major appliance to be found by checking the "Assistance or Service" section or by a Whirlpool designated service company. Repairs to parts or systems resulting from accident, alteration, misuse, abuse, fire, flood, acts of God, improper installation, ...appliance is inconsistent to province. Consumable parts are unable to province. Damage resulting from unauthorized modifications made to know your major appliance is not installed in accordance with the product, Whirlpool Corporation or Whirlpool Canada LP (hereafter "Whirlpool") will need to the appliance....

Installation Guide
Page 4
... clamps 8" or 10" pipe wrench 8" or 10" adjustable wrench (for gas connections) Level 4 Pliers Pipe-joint compound resistant to LP gas INSTALLATION REQUIREMENTS Tools and Parts Gather the required tools and...
... clamps 8" or 10" pipe wrench 8" or 10" adjustable wrench (for gas connections) Level 4 Pliers Pipe-joint compound resistant to LP gas INSTALLATION REQUIREMENTS Tools and Parts Gather the required tools and...

Installation Guide
Page 5
...times can be exposed to water and/or weather. Location Requirements You will be installed in garages, closets, mobile homes, or sleeping quarters. Parts needed: Check local codes. Some codes limit, or do not permit, installation of a companion appliance should also be installed or stored in ... "Use and Care Guide" for information about accessories available for gas dryers. 5 See "Electrical Requirements" and "Venting Requirements" before purchasing parts. Parts supplied: Leveling legs (4) Parts package is greater than 1" (25 mm), install Extended Dryer Feet Kit...
...times can be exposed to water and/or weather. Location Requirements You will be installed in garages, closets, mobile homes, or sleeping quarters. Parts needed: Check local codes. Some codes limit, or do not permit, installation of a companion appliance should also be installed or stored in ... "Use and Care Guide" for information about accessories available for gas dryers. 5 See "Electrical Requirements" and "Venting Requirements" before purchasing parts. Parts supplied: Leveling legs (4) Parts package is greater than 1" (25 mm), install Extended Dryer Feet Kit...

Installation Guide
Page 6
Installation clearances: The location must conform to the Manufactured Home Construction and Safety Standard, Title 24 CFR, Part 3280 (formerly the Federal Standard for Mobile Home Construction and Safety, Title 24, HUD Part 280) or the Canadian Manufactured Home Standard CAN/CSA-Z240 MH. ■■ Metal exhaust system hardware, available for wall...
Installation clearances: The location must conform to the Manufactured Home Construction and Safety Standard, Title 24 CFR, Part 3280 (formerly the Federal Standard for Mobile Home Construction and Safety, Title 24, HUD Part 280) or the Canadian Manufactured Home Standard CAN/CSA-Z240 MH. ■■ Metal exhaust system hardware, available for wall...
Installation Guide
Page 7
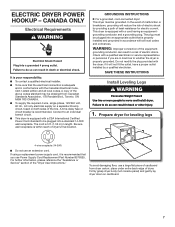
... dryer is 5 ft. (1.52 m) in a risk of least resistance for leveling legs 4-wire receptacle (14-30R) ■■ Do not use Power Supply Cord Replacement Part Number 8579325. Check with all local codes. Canada Only Electrical Requirements It is your responsibility: ■■ To contact a qualified electrical installer. ■■ To...
... dryer is 5 ft. (1.52 m) in a risk of least resistance for leveling legs 4-wire receptacle (14-30R) ■■ Do not use Power Supply Cord Replacement Part Number 8579325. Check with all local codes. Canada Only Electrical Requirements It is your responsibility: ■■ To contact a qualified electrical installer. ■■ To...

Installation Guide
Page 11
... the right side, left side, or through the bottom (4-way vent kit). In Canada, call 1-800-901-2042, or visit us at www.applianceaccessories.com. Part Number Descriptions 8171587RP 0-5" Metal vent periscope 4396037RP 0"-18" Metal vent periscope 4396011RP 18"-29" Metal vent periscope 4396014 29"-50" Metal vent periscope 4392892 In...
... the right side, left side, or through the bottom (4-way vent kit). In Canada, call 1-800-901-2042, or visit us at www.applianceaccessories.com. Part Number Descriptions 8171587RP 0-5" Metal vent periscope 4396037RP 0"-18" Metal vent periscope 4396011RP 18"-29" Metal vent periscope 4396014 29"-50" Metal vent periscope 4392892 In...

Installation Guide
Page 14
... open. ■■ If the gas supply line shut-off valve is closed . Tighten and adjust leveling legs If your tools. If you have all parts are snug against the floor before tightening them. q Check that you feel for the moisture sensing system to adjust legs up or down, and check.... q Read "Dryer Use" in your door is open the dryer door and feel heat, cancel cycle and close the door. If there is an extra part, go away. Use wrench to operate correctly. Level Dryer 1. If dryer is closed , open it, then repeat the 5-minute test as outlined above. ■■...
... open. ■■ If the gas supply line shut-off valve is closed . Tighten and adjust leveling legs If your tools. If you have all parts are snug against the floor before tightening them. q Check that you feel for the moisture sensing system to adjust legs up or down, and check.... q Read "Dryer Use" in your door is open the dryer door and feel heat, cancel cycle and close the door. If there is an extra part, go away. Use wrench to operate correctly. Level Dryer 1. If dryer is closed , open it, then repeat the 5-minute test as outlined above. ■■...
Installation Guide
Page 15
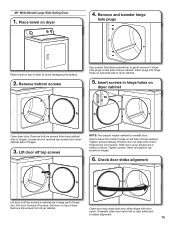
... tighten top screws in bottom of hinges. If needed to gently remove 4 hinge hole plugs on left side of hinge slot. Insert screws in large part of dryer cabinet. Slide door up so screws are in hinge holes on dryer 4. Tighten screws. Pull door forward off top screws NOTE: Two people...
... tighten top screws in bottom of hinges. If needed to gently remove 4 hinge hole plugs on left side of hinge slot. Insert screws in large part of dryer cabinet. Slide door up so screws are in hinge holes on dryer 4. Tighten screws. Pull door forward off top screws NOTE: Two people...

Installation Guide
Page 16
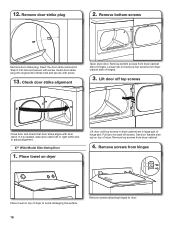
... over towel on the side where hinges were just removed. Do not pull on dryer 4. Rotate outer door Take outer door and rotate in large part of dryer. Remove screws from dryer cabinet. 16 Place towel on door seal or plastic door catches. 6.
... over towel on the side where hinges were just removed. Do not pull on dryer 4. Rotate outer door Take outer door and rotate in large part of dryer. Remove screws from dryer cabinet. 16 Place towel on door seal or plastic door catches. 6.
Installation Guide
Page 18
Insert the door strike removed in large part of hinge slot. Set door (handle side up) on dryer Lift door until top screws in dryer cabinet are in Step 9 into original door strike ...
Insert the door strike removed in large part of hinge slot. Set door (handle side up) on dryer Lift door until top screws in dryer cabinet are in Step 9 into original door strike ...
Installation Guide
Page 20
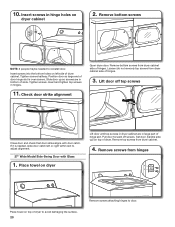
... off screws. 10. Remove bottom screws NOTE: 2 people maybe needed , slide door catch left side of hinge slot. Insert and tighten top screws in large part of dryer cabinet. Remove screws from dryer cabinet side of dryer to avoid damaging the surface. 20 Remove screws attaching hinges to adjust alignment. 27...
... off screws. 10. Remove bottom screws NOTE: 2 people maybe needed , slide door catch left side of hinge slot. Insert and tighten top screws in large part of dryer cabinet. Remove screws from dryer cabinet side of dryer to avoid damaging the surface. 20 Remove screws attaching hinges to adjust alignment. 27...


