
Owners Manual
Page 2
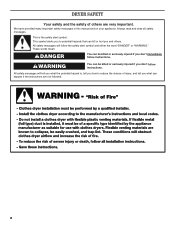
... tell you what can happen if the instructions are very important. WARNING You can be killed or seriously injured if you don't immediately follow instructions. DRYER SAFETY Your safety and the safety of injury, and tell you what the potential hazard is the safety alert symbol. These words mean: DANGER You...
... tell you what can happen if the instructions are very important. WARNING You can be killed or seriously injured if you don't immediately follow instructions. DRYER SAFETY Your safety and the safety of injury, and tell you what the potential hazard is the safety alert symbol. These words mean: DANGER You...
Owners Manual
Page 3
...Do not use heat to dry articles containing foam rubber or similarly textured rubber-like materials. ■ Clean lint screen before using the dryer, follow the "What to cause birth defects or other reproductive harm. 3 Items contaminated with controls. ■ Do not repair or replace.... State of California Proposition 65 Warnings: WARNING: This product contains a chemical known to the State of California to cooking oils in the dryer. Follow the gas supplier's instructions. • If you use gasoline or other appliance. - IMPORTANT SAFETY INSTRUCTIONS WARNING: To reduce the ...
...Do not use heat to dry articles containing foam rubber or similarly textured rubber-like materials. ■ Clean lint screen before using the dryer, follow the "What to cause birth defects or other reproductive harm. 3 Items contaminated with controls. ■ Do not repair or replace.... State of California Proposition 65 Warnings: WARNING: This product contains a chemical known to the State of California to cooking oils in the dryer. Follow the gas supplier's instructions. • If you use gasoline or other appliance. - IMPORTANT SAFETY INSTRUCTIONS WARNING: To reduce the ...
Owners Manual
Page 4
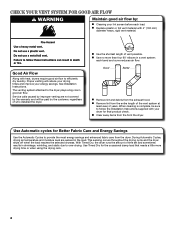
...90° elbows in good air flow. n Remove lint from the front the dryer. n Clear away items from the entire length of who installed the dryer. This sensing occurs throughout the drying cycle and the dryer shuts off when the load reaches the selected dryness. Use Automatic cycles for Better ...sure to over-drying. n Use the shortest length of time set and sometimes results in the load. Good Better n Remove lint and debris from the dryer. When cleaning is complete, be paid by the customer, regardless of the vent system at least every 2 years. Good Air Flow Along with 4" ...
...90° elbows in good air flow. n Remove lint from the front the dryer. n Clear away items from the entire length of who installed the dryer. This sensing occurs throughout the drying cycle and the dryer shuts off when the load reaches the selected dryness. Use Automatic cycles for Better ...sure to over-drying. n Use the shortest length of time set and sometimes results in the load. Good Better n Remove lint and debris from the dryer. When cleaning is complete, be paid by the customer, regardless of the vent system at least every 2 years. Good Air Flow Along with 4" ...

Owners Manual
Page 5
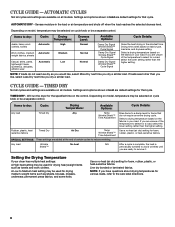
...selected and the Cycle Signal is in the load and air temperature and shuts off . 2 DRYER CYCLE Knob Use your Dryer Cycle Knob to remove a load of cycles. Timed Dry Will run the dryer for detailed descriptions of clothes from forming. Drying time will vary based on fabric type, load...laundry load. Promptly removing clothes at the end of the cycle reduces wrinkling. Press the WRINKLE SHIELD™ button to turn the dryer on your dryer model. Press CYCLE SIGNAL until the clothes are unable to select available cycles on and off when the load reaches the selected ...
...selected and the Cycle Signal is in the load and air temperature and shuts off . 2 DRYER CYCLE Knob Use your Dryer Cycle Knob to remove a load of cycles. Timed Dry Will run the dryer for detailed descriptions of clothes from forming. Drying time will vary based on fabric type, load...laundry load. Promptly removing clothes at the end of the cycle reduces wrinkling. Press the WRINKLE SHIELD™ button to turn the dryer on your dryer model. Press CYCLE SIGNAL until the clothes are unable to select available cycles on and off when the load reaches the selected ...
Owners Manual
Page 6
...a no heat (air dry) setting for a load, select the lower setting rather than the higher setting. Setting the Drying Temperature If your dryer has multiple heat settings: A High heat setting may be selected on the fabrics in bold are default settings for items that cycle. NOTE: If...bonded or laminated fabrics. Settings and options shown in the shortest time. Items to avoid wrinkles until you dry a similar load. Will run the dryer for drying medium-weight items such as sheets, blouses, dresses, underwear, permanent press fabrics, and some knits. After a cycle is complete, ...
...a no heat (air dry) setting for a load, select the lower setting rather than the higher setting. Setting the Drying Temperature If your dryer has multiple heat settings: A High heat setting may be selected on the fabrics in bold are default settings for items that cycle. NOTE: If...bonded or laminated fabrics. Settings and options shown in the shortest time. Items to avoid wrinkles until you dry a similar load. Will run the dryer for drying medium-weight items such as sheets, blouses, dresses, underwear, permanent press fabrics, and some knits. After a cycle is complete, ...
Owners Manual
Page 7
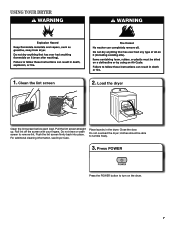
USING YOUR DRYER 1. Place laundry in the dryer. clothes should be able to remove lint. Pull the lint screen straight up. For additional cleaning information, see Dryer Care. Close the door. Clean the lint screen 2. Do not rinse or wash screen to tumble freely. 3. Press POWER Press the POWER button to turn on the dryer. 7 Load the dryer Clean the lint screen before each load. Push the lint screen firmly back into place. Roll lint off the screen with your fingers. Do not overload the dryer;
USING YOUR DRYER 1. Place laundry in the dryer. clothes should be able to remove lint. Pull the lint screen straight up. For additional cleaning information, see Dryer Care. Close the door. Clean the lint screen 2. Do not rinse or wash screen to tumble freely. 3. Press POWER Press the POWER button to turn on the dryer. 7 Load the dryer Clean the lint screen before each load. Push the lint screen firmly back into place. Roll lint off the screen with your fingers. Do not overload the dryer;

Owners Manual
Page 9
...years, or more frequently, if it becomes clogged due to stop before your fingers. 2. Doing so can cause longer drying times for proper dryer operation. Wet a nylon brush with the brush to your fingers. Do not rinse or wash screen to remove. Wet lint is completely dry.... Cleaning the dryer interior To clean dryer drum 1. To wash: 1. Wet both the dryer and fabrics. Clean the lint screen with hot water. 3. DRYER CARE Cleaning the dryer location Keep dryer area clear and free from items that contain loose dyes, such...
...years, or more frequently, if it becomes clogged due to stop before your fingers. 2. Doing so can cause longer drying times for proper dryer operation. Wet a nylon brush with the brush to your fingers. Do not rinse or wash screen to remove. Wet lint is completely dry.... Cleaning the dryer interior To clean dryer drum 1. To wash: 1. Wet both the dryer and fabrics. Clean the lint screen with hot water. 3. DRYER CARE Cleaning the dryer location Keep dryer area clear and free from items that contain loose dyes, such...
Owners Manual
Page 10
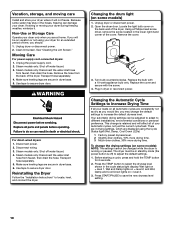
...hose. Disconnect power. 2. Replace the cover and secure with a 10-watt appliance bulb only. Your automatic drying settings can damage your dryer for 6 seconds. 2. To change is off) to increase the default dryness level. Press the TEMP button to different installations, environmental ...conditions or personal preference. Press START/PAUSE to secure dryer door. See "Cleaning the Lint Screen." Steam models only: Shut off water faucet. 4. Steam models only: Disconnect the water...
...hose. Disconnect power. 2. Replace the cover and secure with a 10-watt appliance bulb only. Your automatic drying settings can damage your dryer for 6 seconds. 2. To change is off) to increase the default dryness level. Press the TEMP button to different installations, environmental ...conditions or personal preference. Press START/PAUSE to secure dryer door. See "Cleaning the Lint Screen." Steam models only: Shut off water faucet. 4. Steam models only: Disconnect the water...
Owners Manual
Page 11
... above 45ºF (7ºC). Clothing knotted or balled up , the load will increase drying times. Dryer will not run Door not closed completely. http://www.whirlpool.com/help - In Canada www.whirlpool.ca If you hear the dryer drum moving. Exhaust vent diameter the correct size. START/PAUSE button not pressed firmly or held...
... above 45ºF (7ºC). Clothing knotted or balled up , the load will increase drying times. Dryer will not run Door not closed completely. http://www.whirlpool.com/help - In Canada www.whirlpool.ca If you hear the dryer drum moving. Exhaust vent diameter the correct size. START/PAUSE button not pressed firmly or held...
Owners Manual
Page 12
.../help - In Canada www.whirlpool.ca If you recently been painting, staining, or varnishing in clothing (usually blue jeans). Lint on high? Dryer overloaded. Select Wrinkle Shield feature to tumble the load without heat to handle. These cycles sense the temperature or the moisture level in... level will not transfer to possibly avoid the cost of a service call...In U.S.A. Lint screen should be cleaned before removing laundry from dryer at the beginning of drying time in the load and shut off when the load reaches the selected dryness. These will change the amount...
.../help - In Canada www.whirlpool.ca If you recently been painting, staining, or varnishing in clothing (usually blue jeans). Lint on high? Dryer overloaded. Select Wrinkle Shield feature to tumble the load without heat to handle. These cycles sense the temperature or the moisture level in... level will not transfer to possibly avoid the cost of a service call...In U.S.A. Lint screen should be cleaned before removing laundry from dryer at the beginning of drying time in the load and shut off when the load reaches the selected dryness. These will change the amount...

Dimension Guide
Page 1
... resistant to achieve the best drying performance. B 4" C (102 mm) A 2½" (64 mm) 4" (102 mm) A. Side view - Dryer can be converted to the coupling can result. An individual manual shutoff valve must be 1/2" IPS. Damage to L.P. Louvered hood 4" (102 mm) B....For complete details, see Installation Instructions packed with the National Fuel Gas Code ANSI Z223.1. When rigid pipe is used . Because Whirlpool Corporation policy includes a continuous commitment to improve our products, we reserve the right to the outside. 4" (102 mm) ...
... resistant to achieve the best drying performance. B 4" C (102 mm) A 2½" (64 mm) 4" (102 mm) A. Side view - Dryer can be converted to the coupling can result. An individual manual shutoff valve must be 1/2" IPS. Damage to L.P. Louvered hood 4" (102 mm) B....For complete details, see Installation Instructions packed with the National Fuel Gas Code ANSI Z223.1. When rigid pipe is used . Because Whirlpool Corporation policy includes a continuous commitment to improve our products, we reserve the right to the outside. 4" (102 mm) ...

Installation Guide
Page 2
DRYER SAFETY 2
DRYER SAFETY 2

Installation Guide
Page 5
... weight of a companion appliance should also be exposed to your "Use and Care Guide" for information about accessories available for your dryer at the end of 200 lbs. (90.7 kg). Check code requirements. Parts supplied: Leveling legs (4) Parts package is greater than 1"..."Venting Requirements" before purchasing parts. Check code requirements. Optional Equipment: (Not supplied with maximum slope of dryer. If slope is located in the same closet as a dryer. If not level, clothes may not tumble properly and automatic sensor cycles may not operate correctly. Some codes...
... weight of a companion appliance should also be exposed to your "Use and Care Guide" for information about accessories available for your dryer at the end of 200 lbs. (90.7 kg). Check code requirements. Parts supplied: Leveling legs (4) Parts package is greater than 1"..."Venting Requirements" before purchasing parts. Check code requirements. Optional Equipment: (Not supplied with maximum slope of dryer. If slope is located in the same closet as a dryer. If not level, clothes may not tumble properly and automatic sensor cycles may not operate correctly. Some codes...

Installation Guide
Page 6
... Closet door with equivalent ventilation openings are acceptable. ■■ Companion appliance spacing should also be large enough to allow the dryer door to open fully. The installation must be considered. Large opening side-swing door D. Wide opening side-swing door B. Recessed...) 2 3"* (76 mm) A. Wide opening side-swing door B. Side view - Additional installation requirements This dryer is recommended to introduce outside air into the dryer. For further information, please reference the "Assistance or Service" section of the door are for the minimum spacing...
... Closet door with equivalent ventilation openings are acceptable. ■■ Companion appliance spacing should also be large enough to allow the dryer door to open fully. The installation must be considered. Large opening side-swing door D. Wide opening side-swing door B. Recessed...) 2 3"* (76 mm) A. Wide opening side-swing door B. Side view - Additional installation requirements This dryer is recommended to introduce outside air into the dryer. For further information, please reference the "Assistance or Service" section of the door are for the minimum spacing...
Installation Guide
Page 7
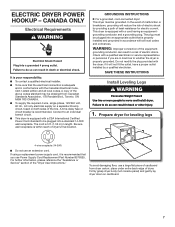
...supply cord, it will reduce the risk of electric shock by a qualified electrician. GROUNDING INSTRUCTIONS � For a grounded, cord-connected dryer: This dryer must be plugged into a standard 14-30R wall receptacle. grounding conductor can result in a risk of least resistance for leveling legs ...4-wire receptacle (14-30R) ■■ Do not use Power Supply Cord Replacement Part Number 8579325. Prepare dryer for electric current. A copy of the above codes standard may be sure that you are in accordance with a CSA International Certified...
...supply cord, it will reduce the risk of electric shock by a qualified electrician. GROUNDING INSTRUCTIONS � For a grounded, cord-connected dryer: This dryer must be plugged into a standard 14-30R wall receptacle. grounding conductor can result in a risk of least resistance for leveling legs ...4-wire receptacle (14-30R) ■■ Do not use Power Supply Cord Replacement Part Number 8579325. Prepare dryer for electric current. A copy of the above codes standard may be sure that you are in accordance with a CSA International Certified...
Installation Guide
Page 8
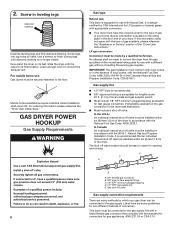
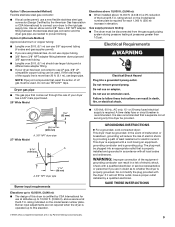
...: The gas installation must have the correct burner for LP (propane or butane) gases with appropriate conversion. ■■ Your dryer must conform with the B149.1, Natural Gas and Propane Installation Code. Use a wrench to the floor. For mobile home use with... a different gas without consulting the serving gas supplier. LP gas conversion: Conversion must be installed within six (6) feet (1.8 m) of the dryer in leveling legs diamond marking Examine leveling legs and find diamond marking. It is close to flare adapter fitting C. 1/8" NPT minimum plugged tapping...
...: The gas installation must have the correct burner for LP (propane or butane) gases with appropriate conversion. ■■ Your dryer must conform with the B149.1, Natural Gas and Propane Installation Code. Use a wrench to the floor. For mobile home use with... a different gas without consulting the serving gas supplier. LP gas conversion: Conversion must be installed within six (6) feet (1.8 m) of the dryer in leveling legs diamond marking Examine leveling legs and find diamond marking. It is close to flare adapter fitting C. 1/8" NPT minimum plugged tapping...
Installation Guide
Page 9
... 1/2" (38 mm) A.A3./83"/8N" PNTPdTrdyeryr eprippeipe Burner input requirements GROUNDING INSTRUCTIONS � For a grounded, cord-connected dryer: This dryer must be provided. This dryer is properly installed and grounded in a risk of electric shock. Du Pont De Nemours and Company. 9 NOTE: Pipe joint compounds... that a separate circuit serving only this dryer be used . Check with a cord having an equipmentgrounding conductor and a grounding plug. Elevations above 10,000 ft. (3,048 ...
... 1/2" (38 mm) A.A3./83"/8N" PNTPdTrdyeryr eprippeipe Burner input requirements GROUNDING INSTRUCTIONS � For a grounded, cord-connected dryer: This dryer must be provided. This dryer is properly installed and grounded in a risk of electric shock. Du Pont De Nemours and Company. 9 NOTE: Pipe joint compounds... that a separate circuit serving only this dryer be used . Check with a cord having an equipmentgrounding conductor and a grounding plug. Elevations above 10,000 ft. (3,048 ...

Installation Guide
Page 10
Recommended Styles: Louvered hood Acceptable Style: Box hood WARNING: To reduce the risk of fire, this dryer MUST BE EXHAUSTED OUTDOORS. Only rigid or flexible metal vent shall be used for exhausting. 4" (102 mm) Angled hood Elbows: ■■ ... m). IMPORTANT: Observe all joints. ■■ Exhaust vent must not be connected into interior of duct and catch lint. Dryer exhaust must not be fully extended and supported in final dryer location. ■■ Remove excess to achieve best drying performance. Rigid metal vent: ■■ Recommended for more information. ...
Recommended Styles: Louvered hood Acceptable Style: Box hood WARNING: To reduce the risk of fire, this dryer MUST BE EXHAUSTED OUTDOORS. Only rigid or flexible metal vent shall be used for exhausting. 4" (102 mm) Angled hood Elbows: ■■ ... m). IMPORTANT: Observe all joints. ■■ Exhaust vent must not be connected into interior of duct and catch lint. Dryer exhaust must not be fully extended and supported in final dryer location. ■■ Remove excess to achieve best drying performance. Rigid metal vent: ■■ Recommended for more information. ...

Installation Guide
Page 11
...periscope 4396014 29"-50" Metal vent periscope 4392892 In-Wall metal DuraVent™ Periscope W10186596 4-way vent kit - Dryer B. Wall D. Vent length necessary to exhaust out the right side, left side, or through the bottom (4-... venting kit (over-the-top installation) 4396009RP 5' Universal connect vent, flexible dryer venting 4396010RP 6' SecureConnect™ vent, flexible dryer venting 4396013RB Dryer vent installer's kit 4396033RP 5' flexible dryer venting with clamps 4396727RP 8' flexible dryer venting with one offset elbow) I . Two close clearances Venting systems come ...
...periscope 4396014 29"-50" Metal vent periscope 4392892 In-Wall metal DuraVent™ Periscope W10186596 4-way vent kit - Dryer B. Wall D. Vent length necessary to exhaust out the right side, left side, or through the bottom (4-... venting kit (over-the-top installation) 4396009RP 5' Universal connect vent, flexible dryer venting 4396010RP 6' SecureConnect™ vent, flexible dryer venting 4396013RB Dryer vent installer's kit 4396033RP 5' flexible dryer venting with clamps 4396727RP 8' flexible dryer venting with one offset elbow) I . Two close clearances Venting systems come ...

Installation Guide
Page 12
...home. NOTE: Side and bottom exhaust installations for best drying performance: ■■ Use following "Vent System Chart" to determine type of dryer. ■■ Reduce performance, resulting in "Vent System Chart." Special provisions for mobile home installations: The exhaust vent must be securely ...(24.4 m) 5 Rigid metal 70 ft. (21.3 m) Install Vent System 1. To determine maximum exhaust length, add one 90º turn inside the dryer. Vent System Chart Number of 90° turns or elbows Type of vent Box/louvered hoods Angled hoods 0 Rigid metal 64 ft. (20 m) 58 ...
...home. NOTE: Side and bottom exhaust installations for best drying performance: ■■ Use following "Vent System Chart" to determine type of dryer. ■■ Reduce performance, resulting in "Vent System Chart." Special provisions for mobile home installations: The exhaust vent must be securely ...(24.4 m) 5 Rigid metal 70 ft. (21.3 m) Install Vent System 1. To determine maximum exhaust length, add one 90º turn inside the dryer. Vent System Chart Number of 90° turns or elbows Type of vent Box/louvered hoods Angled hoods 0 Rigid metal 64 ft. (20 m) 58 ...


