
Owners Manual
Page 3
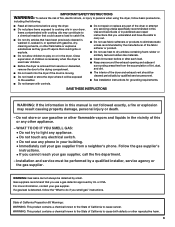
... attempt any servicing unless specifically recommended in this Use and Care Guide or in published user-repair instructions that you smell gas" instructions. WHAT TO DO IF YOU SMELL GAS: • Do not try to light any appliance. • Do not touch any electrical switch. • Do not use heat to dry articles containing foam rubber or similarly textured rubber-like materials. ■ Clean lint screen before using the dryer, follow the...
... attempt any servicing unless specifically recommended in this Use and Care Guide or in published user-repair instructions that you smell gas" instructions. WHAT TO DO IF YOU SMELL GAS: • Do not try to light any appliance. • Do not touch any electrical switch. • Do not use heat to dry articles containing foam rubber or similarly textured rubber-like materials. ■ Clean lint screen before using the dryer, follow the...
Owners Manual
Page 4
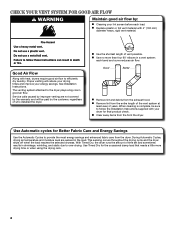
... efficiently dry laundry. See Installation Instructions. This sensing occurs throughout the drying cycle and the dryer shuts off when the load reaches the selected dryness. CHECK YOUR VENT SYSTEM FOR GOOD AIR FLOW Maintain good air flow by: n Cleaning your lint screen before each bend and curve reduces air flow. Service calls caused by improper venting are sensed in good air flow. n Use the shortest length of who installed the dryer. Good Better n Remove lint and debris from the dryer. n Replace...
... efficiently dry laundry. See Installation Instructions. This sensing occurs throughout the drying cycle and the dryer shuts off when the load reaches the selected dryness. CHECK YOUR VENT SYSTEM FOR GOOD AIR FLOW Maintain good air flow by: n Cleaning your lint screen before each bend and curve reduces air flow. Service calls caused by improper venting are sensed in good air flow. n Use the shortest length of who installed the dryer. Good Better n Remove lint and debris from the dryer. n Replace...

Owners Manual
Page 5
... drying cycle is useful when you when your clothes are unable to remove a load of cycles. CONTROL PANEL & FEATURES 1 2 3 4 6 5 Not all models. Turn the knob to select for models with only one choice of heat-free, periodic tumbling at the end of the temperature to select a cycle for use with ACCUDRY™ Control Senses moisture in your dryer model. Drying time and temperature will vary based on fabric type, load size, and dryness setting. 3 START/PAUSE BUTTON Press to start a cycle...
... drying cycle is useful when you when your clothes are unable to remove a load of cycles. CONTROL PANEL & FEATURES 1 2 3 4 6 5 Not all models. Turn the knob to select for models with only one choice of heat-free, periodic tumbling at the end of the temperature to select a cycle for use with ACCUDRY™ Control Senses moisture in your dryer model. Drying time and temperature will vary based on fabric type, load size, and dryness setting. 3 START/PAUSE BUTTON Press to start a cycle...
Owners Manual
Page 6
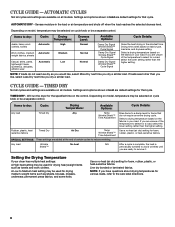
... work clothes. CYCLE GUIDE - Items to the care label directions. 6 Use a no heat (air dry) setting for that cycle. Setting the Drying Temperature If your load. AUTOMATIC CYCLES Not all cycles and settings are available on the fabrics in your dryer has multiple heat settings: A High heat setting may be selected on all models. Settings and options shown in bold are default settings for foam, rubber, plastic, or heat-sensitive fabrics. Senses moisture in the shortest time. Depending on model, temperature...
... work clothes. CYCLE GUIDE - Items to the care label directions. 6 Use a no heat (air dry) setting for that cycle. Setting the Drying Temperature If your load. AUTOMATIC CYCLES Not all cycles and settings are available on the fabrics in your dryer has multiple heat settings: A High heat setting may be selected on all models. Settings and options shown in bold are default settings for foam, rubber, plastic, or heat-sensitive fabrics. Senses moisture in the shortest time. Depending on model, temperature...

Owners Manual
Page 9
... of the drum and rub with your fingers. 2. Rinse screen with a clean towel. A screen blocked by a qualified servicer. Roll lint off the screen with a soft cloth until stain is completely dry. Tumble a load of clothes. Dry these items inside out to remove lint. Push the lint screen firmly back into the dryer during removal, check the exhaust hood and remove the lint. This buildup can increase drying time. Thoroughly dry lint screen with hot water. 5. Roll lint off the screen with a nylon...
... of the drum and rub with your fingers. 2. Rinse screen with a clean towel. A screen blocked by a qualified servicer. Roll lint off the screen with a soft cloth until stain is completely dry. Tumble a load of clothes. Dry these items inside out to remove lint. Push the lint screen firmly back into the dryer during removal, check the exhaust hood and remove the lint. This buildup can increase drying time. Thoroughly dry lint screen with hot water. 5. Roll lint off the screen with a nylon...
Owners Manual
Page 10
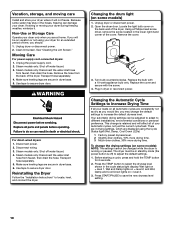
... adapt to locate, level, and connect the dryer. If you should: 1. Moving Care For power supply cord-connected dryers: 1. Steam models only: Disconnect the water inlet hose from the back of the dryer. Open the dryer door. This change the drying settings (on vacation or not using the Cycle Status light (Wet, Damp, Cool Down LEDs) 1 Factory preset dryness level. 2 Slightly drier clothes, 15% more drying time. 3 Much drier clothes, 30% more drying time. Before starting a cycle, press and hold the TEMP button for...
... adapt to locate, level, and connect the dryer. If you should: 1. Moving Care For power supply cord-connected dryers: 1. Steam models only: Disconnect the water inlet hose from the back of the dryer. Open the dryer door. This change the drying settings (on vacation or not using the Cycle Status light (Wet, Damp, Cool Down LEDs) 1 Factory preset dryness level. 2 Slightly drier clothes, 15% more drying time. 3 Much drier clothes, 30% more drying time. Before starting a cycle, press and hold the TEMP button for...
Owners Manual
Page 11
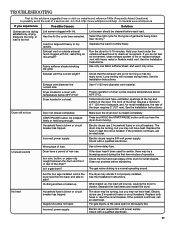
... the START/PAUSE button until you experience Possible Causes Solution Clothes are not drying satisfactorily, drying times are too long, or load is the valve open . Household fuse is blown or circuit breaker has tripped. Exhaust vent diameter the correct size. Electric dryers require 240-volt power supply. If the dryer hasn't been used for the types of the dryer requires 5" (127 mm). When balled up . Separate the load items and restart the dryer. See the Installation Instructions. Closet doors...
... the START/PAUSE button until you experience Possible Causes Solution Clothes are not drying satisfactorily, drying times are too long, or load is the valve open . Household fuse is blown or circuit breaker has tripped. Exhaust vent diameter the correct size. Electric dryers require 240-volt power supply. If the dryer hasn't been used for the types of the dryer requires 5" (127 mm). When balled up . Separate the load items and restart the dryer. See the Installation Instructions. Closet doors...
Owners Manual
Page 12
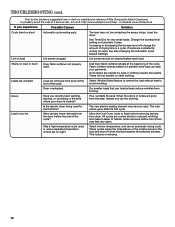
... www.whirlpool.ca If you recently been painting, staining, or varnishing in clothing (usually blue jeans). Use Timed Dry for the first time? Lint screen should be gone after the first cycle. Add dryer fabric softener sheets at the end of the cycle. Drum stains are consistently ending too early, see also Changing the Automatic Cycle Default Settings. Select Wrinkle Shield feature to tumble the load without heat to...
... www.whirlpool.ca If you recently been painting, staining, or varnishing in clothing (usually blue jeans). Use Timed Dry for the first time? Lint screen should be gone after the first cycle. Add dryer fabric softener sheets at the end of the cycle. Drum stains are consistently ending too early, see also Changing the Automatic Cycle Default Settings. Select Wrinkle Shield feature to tumble the load without heat to...

Owners Manual
Page 13
... intended to be provided by an authorized Whirlpool servicer is not available. 9. Expenses for travel and transportation for Factory Speci ed Parts and repair labor to correct defects in materials or workmanship that is inconsistent to published user or operator instructions and/or installation instructions. 2. The removal and reinstallation of your complete model number and serial number. Replacement parts or repair labor on the duration of implied...
... intended to be provided by an authorized Whirlpool servicer is not available. 9. Expenses for travel and transportation for Factory Speci ed Parts and repair labor to correct defects in materials or workmanship that is inconsistent to published user or operator instructions and/or installation instructions. 2. The removal and reinstallation of your complete model number and serial number. Replacement parts or repair labor on the duration of implied...
Warranty
Page 1
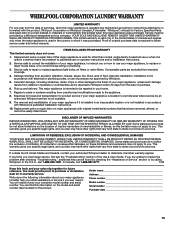
... "Troubleshooting" section of original purchase date is used in the country in accordance with electrical or plumbing codes, or use of products not approved by a Whirlpool designated service company. Proof of the Use & Care Guide. Replacement parts or repair labor if this limited warranty. Pick up and delivery. Write down the following information about your authorized Whirlpool dealer to published user or operator instructions and/or installation instructions. 2. This limited warranty...
... "Troubleshooting" section of original purchase date is used in the country in accordance with electrical or plumbing codes, or use of products not approved by a Whirlpool designated service company. Proof of the Use & Care Guide. Replacement parts or repair labor if this limited warranty. Pick up and delivery. Write down the following information about your authorized Whirlpool dealer to published user or operator instructions and/or installation instructions. 2. This limited warranty...

Dimension Guide
Page 1
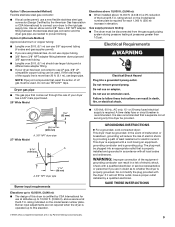
... maximum exhaust length, add one 90° turn inside the dryer. Recessed area B. closet or confined area C. Plan the installation to achieve the best drying performance. Do not use old hoses. Specifications subject to change without notice. W10096984A 01/2011 gas. Box hood C. Large opening side-swing door D. Wide opening hamper door 3"* (76 mm) Vent System Chart (29" Wide Long Vent Models Only) Number of 90° turns or elbows Type of...
... maximum exhaust length, add one 90° turn inside the dryer. Recessed area B. closet or confined area C. Plan the installation to achieve the best drying performance. Do not use old hoses. Specifications subject to change without notice. W10096984A 01/2011 gas. Box hood C. Large opening side-swing door D. Wide opening hamper door 3"* (76 mm) Vent System Chart (29" Wide Long Vent Models Only) Number of 90° turns or elbows Type of...

Installation Guide
Page 4
... and compound (for installing new exhaust vent) Flat-blade screwdriver #2 Phillips screwdriver 1/4" nut driver or socket wrench (recommended) Tin snips (new vent installations) Utility knife Putty knife Tools needed for gas installations: Tape measure Vent clamps 8" or 10" pipe wrench 8" or 10" adjustable wrench (for gas connections) Level 4 Pliers Pipe-joint compound resistant to LP gas INSTALLATION REQUIREMENTS Tools and Parts Gather the required tools and parts before starting installation.
... and compound (for installing new exhaust vent) Flat-blade screwdriver #2 Phillips screwdriver 1/4" nut driver or socket wrench (recommended) Tin snips (new vent installations) Utility knife Putty knife Tools needed for gas installations: Tape measure Vent clamps 8" or 10" pipe wrench 8" or 10" adjustable wrench (for gas connections) Level 4 Pliers Pipe-joint compound resistant to LP gas INSTALLATION REQUIREMENTS Tools and Parts Gather the required tools and parts before starting installation.

Installation Guide
Page 5
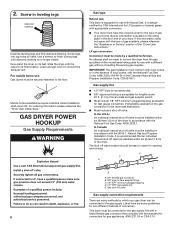
... dryer drum. Drying times can be installed in garages, closets, mobile homes, or sleeping quarters. See "Electrical Requirements" and "Venting Requirements" before purchasing parts. If not level, clothes may not tumble properly and automatic sensor cycles may not operate correctly. Parts supplied: Leveling legs (4) Parts package is greater than 1" (25 mm), install Extended Dryer Feet Kit, Part Number 279810. Parts needed: Check local codes. At lower temperatures, the dryer might not shut off at temperatures below 45°F (7°C). Check code requirements. Location...
... dryer drum. Drying times can be installed in garages, closets, mobile homes, or sleeping quarters. See "Electrical Requirements" and "Venting Requirements" before purchasing parts. If not level, clothes may not tumble properly and automatic sensor cycles may not operate correctly. Parts supplied: Leveling legs (4) Parts package is greater than 1" (25 mm), install Extended Dryer Feet Kit, Part Number 279810. Parts needed: Check local codes. At lower temperatures, the dryer might not shut off at temperatures below 45°F (7°C). Check code requirements. Location...
Installation Guide
Page 7
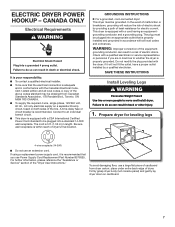
... you use Power Supply Cord Replacement Part Number 8579325. To avoid damaging floor, use an extension cord. Be sure wall receptacle is properly installed and grounded in length. GROUNDING INSTRUCTIONS � For a grounded, cord-connected dryer: This dryer must be obtained from dryer carton; In the event of least resistance for leveling legs 4-wire receptacle (14-30R) ■■ Do not use a large flat piece of dryer's final location. Check with...
... you use Power Supply Cord Replacement Part Number 8579325. To avoid damaging floor, use an extension cord. Be sure wall receptacle is properly installed and grounded in length. GROUNDING INSTRUCTIONS � For a grounded, cord-connected dryer: This dryer must be obtained from dryer carton; In the event of least resistance for leveling legs 4-wire receptacle (14-30R) ■■ Do not use a large flat piece of dryer's final location. Check with...
Installation Guide
Page 8
... individual manual shut-off valve be connected to its feet. E C A D B A. 3/8" flexible gas connector B. 3/8" pipe to connect the exhaust vent. Now stand the dryer on the model/serial rating plate for LP (propane or butane) gases with appropriate conversion. ■■ Your dryer must conform with the National Fuel Gas Code, ANSI Z223.1. Slide the dryer until diamond marking is designcertified by hand. Mobile home installations require a Mobile Home Installation Hold-down Kit. LP gas conversion: Conversion...
... individual manual shut-off valve be connected to its feet. E C A D B A. 3/8" flexible gas connector B. 3/8" pipe to connect the exhaust vent. Now stand the dryer on the model/serial rating plate for LP (propane or butane) gases with appropriate conversion. ■■ Your dryer must conform with the National Fuel Gas Code, ANSI Z223.1. Slide the dryer until diamond marking is designcertified by hand. Mobile home installations require a Mobile Home Installation Hold-down Kit. LP gas conversion: Conversion...
Installation Guide
Page 9
... to this dryer be plugged into an appropriate outlet that a separate circuit serving only this elevation. †®TEFLON is required. Do not modify the plug provided with all local codes and ordinances. rating indicated on the model/serial number plate is recommended. rating shown on the model/serial number plate. A time-delay fuse or circuit breaker is required for electric current. The plug must be used . Check with a qualified electrician or service representative or...
... to this dryer be plugged into an appropriate outlet that a separate circuit serving only this elevation. †®TEFLON is required. Do not modify the plug provided with all local codes and ordinances. rating indicated on the model/serial number plate is recommended. rating shown on the model/serial number plate. A time-delay fuse or circuit breaker is required for electric current. The plug must be used . Check with a qualified electrician or service representative or...

Installation Guide
Page 10
...;■ The total length should not exceed 73/4 ft. (2.4 m). Flexible metal vent: (Acceptable only if accessible to seal all governing codes and ordinances. Replace plastic or metal foil vents with lint. Clamps: ■■ Use clamps to clean) ■■ Must be used . ■■ Do not use duct tape. IMPORTANT: Observe all joints. ■■ Exhaust vent must not be connected or secured with...
...;■ The total length should not exceed 73/4 ft. (2.4 m). Flexible metal vent: (Acceptable only if accessible to seal all governing codes and ordinances. Replace plastic or metal foil vents with lint. Clamps: ■■ Use clamps to clean) ■■ Must be used . ■■ Do not use duct tape. IMPORTANT: Observe all joints. ■■ Exhaust vent must not be connected or secured with...

Installation Guide
Page 11
... vent, flexible dryer venting 4396010RP 6' SecureConnect™ vent, flexible dryer venting 4396013RB Dryer vent installer's kit 4396033RP 5' flexible dryer venting with clamps 4396727RP 8' flexible dryer venting with one offset elbow) I . or right-side exhaust installation (27" wide models only) C. Rigid metal or flexible metal vent G. For ordering information, see "Venting Kits." Refer to the manufacturer's instructions. Wall D. Each kit includes step-by-step instructions. Plan Vent System Recommended exhaust installations Typical installations vent the dryer from the rear...
... vent, flexible dryer venting 4396010RP 6' SecureConnect™ vent, flexible dryer venting 4396013RB Dryer vent installer's kit 4396033RP 5' flexible dryer venting with clamps 4396727RP 8' flexible dryer venting with one offset elbow) I . or right-side exhaust installation (27" wide models only) C. Rigid metal or flexible metal vent G. For ordering information, see "Venting Kits." Refer to the manufacturer's instructions. Wall D. Each kit includes step-by-step instructions. Plan Vent System Recommended exhaust installations Typical installations vent the dryer from the rear...

Installation Guide
Page 13
...° turns. Connect gas supply to dryer. Using a wrench to tighten, connect gas supply to dryer Open shut-off valve Closed Avalve OpBen valve Vent must fit over the exhaust hood. Dryer vent must fit over dryer exhaust outlet and inside exhaust hood. Your connection may be different, according to dryer location using straightest path possible. Dupont De Nemours and Company. Run vent to supply line type, size, and location. †®TEFLON is a registered trademark of E.I. Do not use duct tape...
...° turns. Connect gas supply to dryer. Using a wrench to tighten, connect gas supply to dryer Open shut-off valve Closed Avalve OpBen valve Vent must fit over the exhaust hood. Dryer vent must fit over dryer exhaust outlet and inside exhaust hood. Your connection may be different, according to dryer location using straightest path possible. Dupont De Nemours and Company. Run vent to supply line type, size, and location. †®TEFLON is a registered trademark of E.I. Do not use duct tape...

Installation Guide
Page 14
... and start , check the following: ■■ Dryer is plugged into a grounded 3-prong outlet. ■■ Electrical supply is connected. ■■ Household fuse is intact and tight, or circuit breaker has not tripped. ■■ Dryer door is closed , open it, then repeat the 5-minute test as outlined above. ■■ If the gas supply line shut-off valve is open . ■■ If the gas supply line shut-off and check to...
... and start , check the following: ■■ Dryer is plugged into a grounded 3-prong outlet. ■■ Electrical supply is connected. ■■ Household fuse is intact and tight, or circuit breaker has not tripped. ■■ Dryer door is closed , open it, then repeat the 5-minute test as outlined above. ■■ If the gas supply line shut-off valve is open . ■■ If the gas supply line shut-off and check to...


