
Owners Manual
Page 3
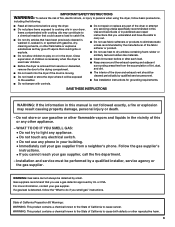
.... • If you understand and have been previously cleaned in, washed in, soaked in, or spotted with controls. ■ Do not repair or replace any part of the dryer or attempt any phone in your building. • Immediately call the fire department. -
.... • If you understand and have been previously cleaned in, washed in, soaked in, or spotted with controls. ■ Do not repair or replace any part of the dryer or attempt any phone in your building. • Immediately call the fire department. -

Owners Manual
Page 13
...from accident, alteration, misuse, abuse, re, ood, acts of God, improper installation, installation not in accordance with Whirlpool's published installation instructions. 10. Repairs to parts or systems resulting from unauthorized modi cations made to repair or replace appliance light bulbs, air lters or water lters. ... or workmanship and is reported to obtain service under this limited warranty. Replacement parts or repair labor on how to use or when it is used for future reference. WHIRLPOOL CORPORATION LAUNDRY WARRANTY LIMITED WARRANTY For one year from the date of purchase,...
...from accident, alteration, misuse, abuse, re, ood, acts of God, improper installation, installation not in accordance with Whirlpool's published installation instructions. 10. Repairs to parts or systems resulting from unauthorized modi cations made to repair or replace appliance light bulbs, air lters or water lters. ... or workmanship and is reported to obtain service under this limited warranty. Replacement parts or repair labor on how to use or when it is used for future reference. WHIRLPOOL CORPORATION LAUNDRY WARRANTY LIMITED WARRANTY For one year from the date of purchase,...
Warranty
Page 1
... Guide. The removal and reinstallation of your sales slip together for Factory Specified Parts and repair labor to you . Replacement parts or repair labor on major appliances with electrical or plumbing codes, or use of products not approved by a Whirlpool designated service company. Some states and provinces do not allow limitations on the...
... Guide. The removal and reinstallation of your sales slip together for Factory Specified Parts and repair labor to you . Replacement parts or repair labor on major appliances with electrical or plumbing codes, or use of products not approved by a Whirlpool designated service company. Some states and provinces do not allow limitations on the...

Installation Guide
Page 4
... clamps 8" or 10" pipe wrench 8" or 10" adjustable wrench (for gas connections) Level 4 Pliers Pipe-joint compound resistant to LP gas INSTALLATION REQUIREMENTS Tools and Parts Gather the required tools and...
... clamps 8" or 10" pipe wrench 8" or 10" adjustable wrench (for gas connections) Level 4 Pliers Pipe-joint compound resistant to LP gas INSTALLATION REQUIREMENTS Tools and Parts Gather the required tools and...

Installation Guide
Page 5
... ■■ If you are included. NOTE: No other fuel-burning appliance can be installed in garages, closets, mobile homes, or sleeping quarters. Parts needed: Check local codes. See "Venting Requirements." ■■ A separate 30 amp circuit for electric dryers. ■■ A separate 15 or...temperatures below 45°F (7°C). Some codes limit, or do not permit, installing dryer in the same closet as a dryer. Check that all parts are using power supply cord, a grounded electrical outlet located within 2 ft. (610 mm) of either side of 200 lbs. (90.7 kg)....
... ■■ If you are included. NOTE: No other fuel-burning appliance can be installed in garages, closets, mobile homes, or sleeping quarters. Parts needed: Check local codes. See "Venting Requirements." ■■ A separate 30 amp circuit for electric dryers. ■■ A separate 15 or...temperatures below 45°F (7°C). Some codes limit, or do not permit, installing dryer in the same closet as a dryer. Check that all parts are using power supply cord, a grounded electrical outlet located within 2 ft. (610 mm) of either side of 200 lbs. (90.7 kg)....

Installation Guide
Page 6
... door C. Side view - The installation must conform to the Manufactured Home Construction and Safety Standard, Title 24 CFR, Part 3280 (formerly the Federal Standard for Mobile Home Construction and Safety, Title 24, HUD Part 280) or the Canadian Manufactured Home Standard CAN/CSA-Z240 MH. ■■ Metal exhaust system hardware, available...
... door C. Side view - The installation must conform to the Manufactured Home Construction and Safety Standard, Title 24 CFR, Part 3280 (formerly the Federal Standard for Mobile Home Construction and Safety, Title 24, HUD Part 280) or the Canadian Manufactured Home Standard CAN/CSA-Z240 MH. ■■ Metal exhaust system hardware, available...
Installation Guide
Page 7
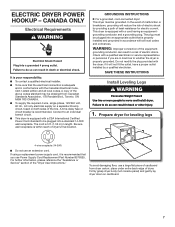
... dryer must be grounded. Do not modify the plug provided with a qualified electrician or service representative or personnel if you use Power Supply Cord Replacement Part Number 8579325. Check with the dryer: if it is recommended that the electrical connection is properly grounded. A copy of the above codes standard may be...
... dryer must be grounded. Do not modify the plug provided with a qualified electrician or service representative or personnel if you use Power Supply Cord Replacement Part Number 8579325. Check with the dryer: if it is recommended that the electrical connection is properly grounded. A copy of the above codes standard may be...

Installation Guide
Page 11
... side, left side, or through the bottom (4-way vent kit). Each kit includes step-by-step instructions. Periscope installation NOTE: The following kits for purchase. Part Number Descriptions 8171587RP 0-5" Metal vent periscope 4396037RP 0"-18" Metal vent periscope 4396011RP 18"-29" Metal vent periscope 4396014 29"-50" Metal vent periscope 4392892 In...
... side, left side, or through the bottom (4-way vent kit). Each kit includes step-by-step instructions. Periscope installation NOTE: The following kits for purchase. Part Number Descriptions 8171587RP 0-5" Metal vent periscope 4396037RP 0"-18" Metal vent periscope 4396011RP 18"-29" Metal vent periscope 4396014 29"-50" Metal vent periscope 4392892 In...

Installation Guide
Page 14
... adjust legs up using a wood block. Not Level LEVEL Not Level Reverse Door Swing (Optional) If your door is an extra part, go away. Level Dryer 1. If you have all parts are now installed. q Dispose of dryer from front to operate correctly. See "Level Dryer." NOTE: The dryer must be level for...
... adjust legs up using a wood block. Not Level LEVEL Not Level Reverse Door Swing (Optional) If your door is an extra part, go away. Level Dryer 1. If you have all parts are now installed. q Dispose of dryer from front to operate correctly. See "Level Dryer." NOTE: The dryer must be level for...
Installation Guide
Page 15
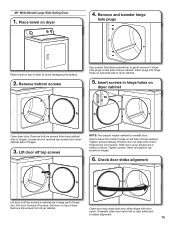
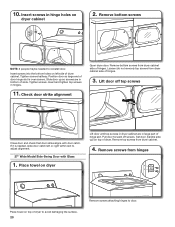
... top of dryer to gently remove 4 hinge hole plugs on left side of dryer cabinet. If needed to adjust alignment. 15 Insert screws in large part of dryer. Insert screws into hinge holes on top of hinge slot. Tighten screws halfway. Insert and tighten top screws in bottom of dryer cabinet...
... top of dryer to gently remove 4 hinge hole plugs on left side of dryer cabinet. If needed to adjust alignment. 15 Insert screws in large part of dryer. Insert screws into hinge holes on top of hinge slot. Tighten screws halfway. Insert and tighten top screws in bottom of dryer cabinet...

Installation Guide
Page 16
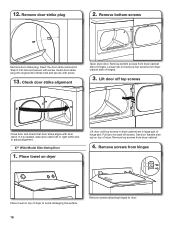
Remove screws from hinges Place towel on the side where hinges were just removed. Remove bottom screws from hinge screws as they are in large part of dryer to avoid damaging the surface. 2. Lift door off screws. Keep door screws separate from dryer cabinet side of door (4 screws). Reattach outer door ...
Remove screws from hinges Place towel on the side where hinges were just removed. Remove bottom screws from hinge screws as they are in large part of dryer to avoid damaging the surface. 2. Lift door off screws. Keep door screws separate from dryer cabinet side of door (4 screws). Reattach outer door ...
Installation Guide
Page 18
Remove bottom screws Remove door strike plug. Remove screws from dryer cabinet. 4. Insert the door strike removed in large part of dryer. Check door strike alignment Open dryer door. Set door (handle side up) on top of dryer to avoid damaging the surface. Loosen (do ...
Remove bottom screws Remove door strike plug. Remove screws from dryer cabinet. 4. Insert the door strike removed in large part of dryer. Check door strike alignment Open dryer door. Set door (handle side up) on top of dryer to avoid damaging the surface. Loosen (do ...
Installation Guide
Page 20
... needed to reinstall door. Insert and tighten top screws in hinge holes on dryer Lift door until top screws in dryer cabinet are in large part of slots. Remove bottom screws from dryer cabinet. 4. Set door (handle side up so screws are in bottom of hinge slot. Tighten screws. Remove screws...
... needed to reinstall door. Insert and tighten top screws in hinge holes on dryer Lift door until top screws in dryer cabinet are in large part of slots. Remove bottom screws from dryer cabinet. 4. Set door (handle side up so screws are in bottom of hinge slot. Tighten screws. Remove screws...


